

How to solve the problem of Router cross-module jump
After starting a modular development project, a very important issue is the page jump problem. This article mainly introduces the example of Router solving the page jump under cross-module. Now I will share it with you and give you an example. refer to.
1. Foreword
After starting a modular development project, a very important issue is the page jump problem.
For details on modular development, please see my other article Android Modular Development Exploration.
It is precisely because the project is divided into modules that there is no dependency between the modules and they are invisible to each other. So what should we do if we jump from interface a of module A to interface b of module B?
2. Cross-module jump methods
Here we will first introduce these common jump methods:
Show jump
Implicit jump
Scheme protocol jump
- ##Router Routing table solution
2.1 Display jump
Display jump is our most commonly used jump method: using Intent, passing in the current Activity context, and the class object of the target Activity are enough, as follows:Intent intent = new Intent(); intent.setClass(mContext, GuideActivity.class); startActivity(intent);
2.2 Hidden jump
The hidden jump we are talking about here is that the intent does not set a class, but sets an Action or Category. For example: In the manifest file<!--网页展示界面-->
<activity
android:name="com.whaty.base.BaseWebViewActivity"
android:hardwareAccelerated="true">
<intent-filter>
<category android:name="android.intent.category.DEFAULT" />
<action android:name="com.whaty.base.BaseWebViewActivity" />
</intent-filter>
</activity>//创建一个隐式的 Intent 对象:Action 动作
Intent intent = new Intent();
//设置 Intent 的动作为清单中指定的action
intent.setAction("com.whaty.base.BaseWebViewActivity");
startActivity(intent);2.3 scheme jump
If we define a URI for B page - wsc://home/bbb, and then serialize the shared messageModel into a Json string, then A only needs to assemble a jump protocol that conforms to the B page scheme. wsc://home/bbb?message={ “name”:”John”, “age”:31, “city”:”New York” }In the manifest file, configure the data attribute and set Its host, path, scheme, etc.<activity android:name=".ui.BbbActivity"
<intent-filter>
<category android:name="android.intent.category.DEFAULT" />
<action android:name="android.intent.action.VIEW" />
<data
android:host="bbb"
android:path="/home"
android:scheme="wsc" />
</intent-filter>
</activity>final Uri uri = new Uri.Builder().authority("wsc").path("home/bbb").appendQueryParameter("message", new Gson().toJson(messageModel)).build();
final Intent intent = new Intent(Intent.ACTION_VIEW);
intent.setData(uri);
startActivity(intent);3. Why use Router
Google provides two native routing solutions: explicit and implicit. However, in modular development, explicit Intent has the problem of direct dependence on classes, causing severe coupling between modules. Implicit Intent requires a large number of paths to be configured in the Manifest, making it difficult to expand (such as jump interception). In order to solve the above problems, we need to adopt a more flexible Router solution.4. Implementation Ideas
The idea is as follows:Use annotations to label aliases for each target Activity. When the application starts, all classes are scanned and the annotated activities are stored in the routing table. When jumping, obtain the class object of the target Activity through the alias in the routing table, and use Intent to implement the jump.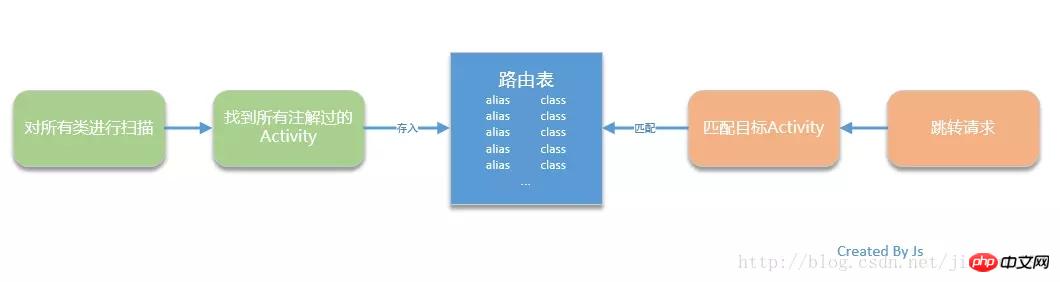
5. Code implementation
5.1 Custom annotations/**
* Description: 路由跳转界面 注解
* Created by jia on 2018/1/10.
* 人之所以能,是相信能
*/
@Target(ElementType.TYPE) //注解作用于类型(类,接口,注解,枚举)
@Retention(RetentionPolicy.RUNTIME) //运行时保留,运行中可以处理
@Documented // 生成javadoc文件
public @interface Action {
String DEFAULT = "js";
String value() default DEFAULT;
}@Action("MainActivity")
public class MainActivity extends BaseActivity implements TabLayout.OnTabSelectedListener {
...
}private void getAllActivities(Context ctx){
try {
//通过资源路径获得DexFile
DexFile e = new DexFile(ctx.getPackageResourcePath());
Enumeration entries = e.entries();
//遍历所有元素
while(entries.hasMoreElements()) {
String entryName = (String)entries.nextElement();
//匹配Activity包名与类名
if(entryName.contains("activity") && entryName.contains("Activity")) {
//通过反射获得Activity类
Class entryClass = Class.forName(entryName);
if(entryClass.isAnnotationPresent(Action.class)) {
Action action = (Action)entryClass.getAnnotation(Action.class);
this.map.put(action.value(), entryClass);
}
}
}
} catch (Exception e) {
e.printStackTrace();
}
}/**
* 页面跳转
* @param activity
* @param alias
*/
public void jumpActivity(Activity activity, String alias) throws ClassNotFoundException{
if(map.containsKey(alias)) {
Intent intent = new Intent(activity, map.get(alias));
activity.startActivity(intent);
} else {
throw new ClassNotFoundException();
}
}Summary
In this way, the module dependency problem caused by jumping Activity is solved. Compared with the native solution, it is more scalable. However, this plan is only phased and there are still some problems. First of all, frequent use of reflection during the loading process will cause performance problems. Secondly, the alias of each Activity needs to be maintained uniformly, which increases the cost of collaboration. Still needs to be optimized. Of course, there are many popular Router solutions on the market (such as Alibaba’s ARouter). Here is just an idea. If you have good suggestions, welcome to exchange and make progress together. The above is what I compiled for everyone. I hope it will be helpful to everyone in the future. Related articles:About the use of Material in Angular2 (detailed tutorial)
How to use the Lodash method in Angular Do?
vue-router project actual combat (detailed tutorial)
How to control file drag and get the drag content function in js
The above is the detailed content of How to solve the problem of Router cross-module jump. For more information, please follow other related articles on the PHP Chinese website!

Hot AI Tools

Undresser.AI Undress
AI-powered app for creating realistic nude photos

AI Clothes Remover
Online AI tool for removing clothes from photos.

Undress AI Tool
Undress images for free

Clothoff.io
AI clothes remover

AI Hentai Generator
Generate AI Hentai for free.

Hot Article
Hot Tools

Notepad++7.3.1
Easy-to-use and free code editor

SublimeText3 Chinese version
Chinese version, very easy to use

Zend Studio 13.0.1
Powerful PHP integrated development environment

Dreamweaver CS6
Visual web development tools

SublimeText3 Mac version
God-level code editing software (SublimeText3)
Hot Topics
 1377
1377
 52
52

 React Router User Guide: How to implement front-end routing control
Sep 29, 2023 pm 05:45 PM
React Router User Guide: How to implement front-end routing control
Sep 29, 2023 pm 05:45 PM
ReactRouter User Guide: How to Implement Front-End Routing Control With the popularity of single-page applications, front-end routing has become an important part that cannot be ignored. As the most popular routing library in the React ecosystem, ReactRouter provides rich functions and easy-to-use APIs, making the implementation of front-end routing very simple and flexible. This article will introduce how to use ReactRouter and provide some specific code examples. To install ReactRouter first, we need
 How to call functions in different modules in C++?
Apr 12, 2024 pm 03:54 PM
How to call functions in different modules in C++?
Apr 12, 2024 pm 03:54 PM
Calling functions across modules in C++: Declare the function: Declare the function to be called in the header file of the target module. Implement function: Implement the function in the source file. Linking modules: Use a linker to link together modules containing function declarations and implementations. Call the function: Include the header file of the target module in the module that needs to be called, and then call the function.
 The unique advantages of Vue Router Lazy-Loading routing, how to optimize page performance?
Sep 15, 2023 am 10:36 AM
The unique advantages of Vue Router Lazy-Loading routing, how to optimize page performance?
Sep 15, 2023 am 10:36 AM
VueRouter is a routing management plug-in officially provided by Vue.js. It can help us implement page navigation and route switching in Vue applications. The Lazy-Loading feature is a unique advantage of VueRouter, which can greatly optimize page performance. In this article, we will introduce VueRouter’s Lazy-Loading routing feature and provide some practical code examples for optimizing page performance. Lazy-Loading means when needed
 What should I do if react router does not display?
Dec 30, 2022 am 09:30 AM
What should I do if react router does not display?
Dec 30, 2022 am 09:30 AM
Solution to react router not displaying: 1. Add browserRouter to the parent routing component to wrap the router; 2. Use "this.props.history.go()" to refresh the component; 3. Add "forcerefresh" to the browserrouter parameter ={true}"; 4. Write a hook function in "<Route>" and call it when leaving or entering this route.
 Vue Router Lazy-Loading routing: a trend to help improve page performance
Sep 15, 2023 am 08:03 AM
Vue Router Lazy-Loading routing: a trend to help improve page performance
Sep 15, 2023 am 08:03 AM
VueRouter is the official route manager in the Vue.js framework. It allows developers to switch page content through route mapping, making single-page applications more controllable and easier to maintain. However, as applications become more complex, the loading and parsing of routes can become a performance bottleneck. In order to solve this problem, VueRouter provides a function of lazy loading of routes, which defers the loading of routes until actually needed. Lazy-loading is a loading technology that
 How to use router routing to implement jump parameters in vue3
May 16, 2023 am 10:49 AM
How to use router routing to implement jump parameters in vue3
May 16, 2023 am 10:49 AM
1. Route jump 1. First introduce the API—useRouterimport{useRouter}from'vue-router'2. Define the router variable on the jump page // First define constrouter=useRouter() in the setup 3. Use router.push to jump to the page //String router.push('home')//Object router.push({path:'home'})//
 How to use Router to implement redirection function in Vue project
Sep 15, 2023 am 08:36 AM
How to use Router to implement redirection function in Vue project
Sep 15, 2023 am 08:36 AM
How to use Router to implement redirection function in Vue project In a Vue project, we often need to implement jump and redirection functions between pages. And VueRouter provides a simple yet powerful solution. This article will introduce how to use Router to implement the redirection function in the Vue project and give specific code examples. Install VueRouter First, we need to install VueRouter in the Vue project. Can
 How is lazy loading of routes implemented in Vue Router?
Jul 21, 2023 am 10:40 AM
How is lazy loading of routes implemented in Vue Router?
Jul 21, 2023 am 10:40 AM
How is lazy loading of routes implemented in VueRouter? In Vue development, we usually use VueRouter to implement jumps and routing control between pages. When the project becomes large, we may have many routing pages to load, which will cause the entire project to load slowly. In order to improve the performance of the project, VueRouter provides a mechanism for lazy loading of routes. Lazy loading of routes means that the routing page will be loaded only when it is accessed, instead of loading all routes when the application is initialized.
