qprint is a small plug-in for page printing based on jquery, but I have to admit that this plug-in is really powerful. The following article mainly introduces you to the implementation method of how to use the jqprint plug-in to print page content. What is needed Friends can refer to it, and follow me to learn together.
Business Scenario
The customer needs to have a print button on the page. After clicking it, the content of the Echarts chart and the text prompt information can be printed. Through Google Search found that there are about three implementation methods, the other two are not familiar, and the printing method used is a print plug-in developed based on jQuery, so you can use jQuery to find elements, so I decided to use this way.
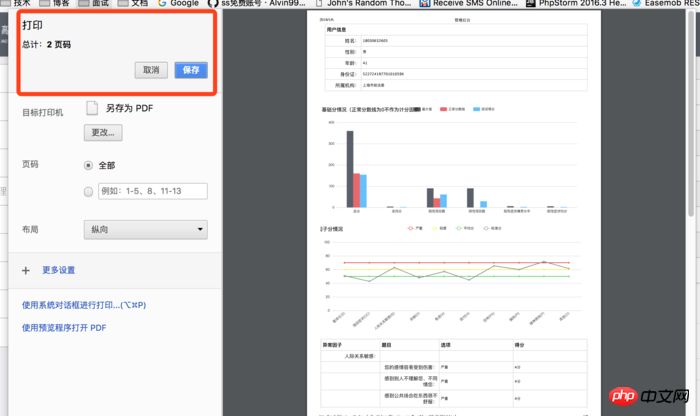
Let’s take a look at the implementation renderings, as follows:

Implementation renderings
Introducing js files
<script type="text/javascript" src="__JS__/jquery-migrate-1.2.1.min.js"></script>
<script type="text/javascript" src="__JS__/jqprint-0.3.js"></script>
Note: Here is the jQuery file introduced first. If the jQuery file is not introduced first, If there is a js file, there will be compatibility issues, resulting in an error when printing using jqprint.
html page
There are many html tags in it
<p class="wrap-content container" id="container">
 <table border="0" cellpadding="0" cellspacing="0" class="store-joinin baseinfo">
  <thead>
   <tr>
    <th colspan="40">用户信息</th>
   </tr>
  </thead>
  <tbody>
   <tr style="background: rgb(255, 255, 255);">
    <th>姓名:</th>
    <td colspan="40">18030632605</td>
   </tr>
   <tr style="background: rgb(255, 255, 255);">
    <th>性别:</th>
    <td colspan="40">男</td>
   </tr>
   <tr style="background: rgb(255, 255, 255);">
    <th>年龄:</th>
    <td colspan="40">41</td>
   </tr>
   <tr style="background: rgb(255, 255, 255);">
    <th>身份证:</th>
    <td colspan="40">52272419770101059X</td>
   </tr>
   <tr style="background: rgb(255, 255, 255);">
    <th>所属机构:</th>
    <td colspan="40">上海市政法委</td>
   </tr>
  </tbody>
  </table>
 ......
<button class="btn btn-danger printBtn1" onclick="btnPrintClick()" type="button">打 印</button>Of course, there are many html tags below. It is not shown here.
Function executed after the print button is clicked
function btnPrintClick(){
var imgBox = $('#img_box');
var chartBox = $('#main');
if (imgBox.length <= 0) {
chartBox.after('<p id="img_box"></p>');
imgBox = $('#img_box');
}
// 将echart生成图片并放入img-box,并显示图片img-box
imgBox.html('< img src="' + myChart.getDataURL() + '"/>').css('display','block');
// 隐藏echart图chart-box
chartBox.css('display','none');
// 调整img大小
var img = imgBox.find('img');
var imgWidth = img.width();
var showWidth = 1000; // 显示宽度,即图片缩小到的宽度
if (imgWidth > showWidth) { // 只有当图片大了才缩小
var imgNewHeight = img.height() / (imgWidth / showWidth);
img.css({'width': showWidth + 'px', 'height': imgNewHeight + 'px'});
}
var imgBox2 = $('#img_box2');
var chartBox2 = $('#main2');
if (imgBox2.length <= 0) {
chartBox2.after('<p id="img_box2"></p>');
imgBox2 = $('#img_box2');
}
// 将echart生成图片并放入img-box,并显示图片img-box
imgBox2.html('< img src="' + myChart2.getDataURL() + '"/>').css('display','block');
// 隐藏echart图chart-box
chartBox2.css('display','none');
// 调整img大小
var img2 = imgBox2.find('img');
var img2Width = img2.width();
var show2Width = 1000; // 显示宽度,即图片缩小到的宽度
if (img2Width > show2Width) { // 只有当图片大了才缩小
var img2NewHeight = img2.height() / (img2Width / show2Width);
img2.css({'width': show2Width + 'px', 'height': img2NewHeight + 'px'});
}
// 打印
$("#TestQuestions").jqprint();
// 执行打印后再切换回来
// 显示echart图chart-box
chartBox.css('display','block');
chartBox2.css('display','block');
// 隐藏图片img-box
imgBox.css('display','none');
imgBox2.css('display','none');
}Notes:
The image scaling method is used here. For example, if the Echarts chart needs to display a lot of content, generally the scroll bar is used on the Just restore it again.
Any labels that do not need to be printed can be hidden first. For label content that does not need to appear on the printed page, we use jQuery to find the corresponding element before printing, hide the element, and then display the hidden element after printing.
Attribute
debug: false, //If true, the iframe viewing effect can be displayed (iframe defaults to high The width and width are very small and can be increased in the source code), the default is false
importCSS: true, //true means importing the css of the original page, the default is true. (If it is true, it will first look for $("link[media=print]"), if not, it will look for the css file in $("link"))
printContainer: true, //Indicates if the originally selected object must be included in printing (note: setting it to false may break your CSS rules).
operaSupport: false //Indicates that if the plug-in must also support the opera browser, in this case, it provides the creation of a temporary printing tab. The default is true
The above is what I compiled for everyone. I hope it will be helpful to everyone in the future.
Related articles:
How does requireJS implement a module loader?
Implementing the MVVM framework in js (detailed tutorial)
Explanation of scope scope in angularjs
How to achieve high-performance loading order in javascript
The above is the detailed content of How to print page content using jqprint. For more information, please follow other related articles on the PHP Chinese website!
 Why is my phone not turned off but when someone calls me it prompts me to turn it off?
 How to set up hibernation in Win7 system
 What does Jingdong plus mean?
 The difference between cellpadding and cellspacing
 Sublime input Chinese method
 How to solve garbled characters in PHP
 What currency is USDT?
 rtmp server
 What is digital currency


