

css+transition to make visible and invisible animation
This time I will introduce to you what are the precautions for making visible and invisible animations with css transition. The following is a practical case. Let’s take a look.
Let’s take a look at the renderings first
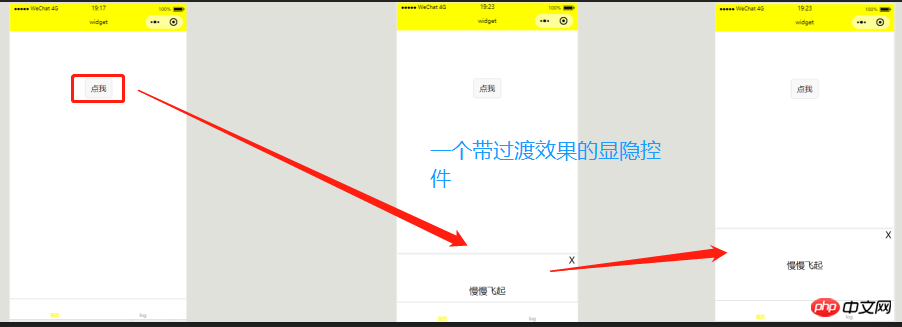
The probability of a widget with a transition effect like this being used in our actual development is relatively high. However, in the process of developing WeChat mini programs, some friends may find that the transition attribute is not easy to use (explained below), so at this time we will consider using the wx.createAnimation API officially provided by WeChat to create animations.
Next, I will show you how to make the transition attribute easy to use in this need. The following code is
page({
    data: {
        show:false//用于显示或隐藏控件
    },
    chanMask:function(){
        var isShow = this.data.show ? false : true;//如果显示就隐藏,隐藏就显示
        this.setData({
            show:isShow
        })
    }
})/*index.wxss*/
/*显示前*/
.mask-con{
transition: 1s;
position: fixed;
width: 100%;
height: 300rpx;
left: 0;
bottom: -300rpx;
text-align: center;
line-height: 300rpx;
box-shadow: 0 1px 10px #aaa;
}
/*显示后*/
.mask-con-show{
bottom: 0;
}
<!--index.wxml-->
<view class="container">
<button bindtap="chanMask">点我</button>
<view class="mask-con {{show ? 'mask-con-show' : ''}}">
<view class="close" bindtap="chanMask">X</view>
慢慢飞起
</view>
</view>In the above code, we first define a show variable in data. Used for the display state of the mask-con control, this variable is alternately changed in the chanMask function, and then the chanMask function is bound to the click events of the button and close controls. Finally, we decide whether to give the mask-con (our Animation control) Add a class: mask-con-show So here we have implemented a visible and hidden widget with transition, but for some needs this is still too reluctant, such as the situation below:
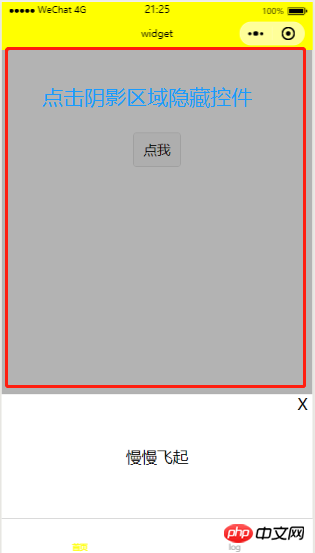
Many apps or small programs now use this method to close the pop-up window control. The X user clicked it is not enough. After seeing this, smart friends may think of adding another one. A shadow control is under the mask-con and is bound to our chanMask function. In this case, the shadow control and our mask-con may not be in a whole, which is not intuitive enough. For example, the leader wants the shadow to have An effect in which the display color gradually deepens and the hidden color gradually fades. In order to deal with this situation, we adjust the code as follows:
page({
data: {
show:false//用于显示或隐藏mask控件
},
chanMask:function(){
var isShow = this.data.show ? false : true;//如果显示就隐藏,隐藏就显示
this.setData({
show:isShow
})
}
})
/*index.wxss*/
.mask-shadow{
width: 100%;
height: 100%;
opacity: 0;
transition: 1s;
}
.mask-shadow-on{
opacity: 0.3;
}
.mask-con{
position: absolute;
width: 100%;
height: 300rpx;
left: 0;
bottom: -300rpx;
transition: 1s;
text-align: center;
line-height: 300rpx;
box-shadow: 0 1px 10px #aaa;
}
.mask-con-show{
bottom: 0;
}
<!--index.wxml-->
<view class="container">
<button bindtap="chanMask">点我</button>
<view class="mask {{show ? 'show' : 'hide'}}">
<view class="mask-shadow {{show ? 'mask-shadow-on' : ''}}"></view>
<view class="mask-con {{show ? 'mask-con-show' : ''}}">
<view class="close" bindtap="chanMask">X</view>
慢慢飞起
</view>
</view>
</view>Here we set two style class names mask-shadow-on and mask-con-show to define the shadow and the effect of the main control mask-con animation (the specific code is determined according to your own needs), it seems that everything is OK, there are no problems, then run a wave first, Emma, Shenma situation ? The shadow and our mask-con are directly displayed without any transition effect. So why does this affect the effect of our program? After some consideration, the blogger found that our transition attribute may be invalid when display is none. , then some friends here may ask, "Blogger, that's wrong. We have clearly set the mask's display to block, why do we still have this problem?"
This is how our mask It takes a while for the control to be fully displayed. However, after our variable show is set to true, our shadow control and main control will immediately add the post-animation style class name. This time is longer than the mask display. The time needs to be faster, so our machine thinks that mask is still in the situation where the display is none
For example: mask is the boss of this whole area. This boss has not finished his performance yet. What do you guys do? The younger brother has already come out to steal the limelight. Where do you want to put the face of being the boss? If not, I have to kill all of you who steal my limelight and see how you behave. This boss doesn't speak much. If you steal his limelight, he won't be happy if you don't perform (user experience), and he won't tell you after the performance. So what should you do if this boss is so difficult to take care of? Some friends are already feeling confused, so what are you waiting for? Pick up the phone in your hand and call the help hotline. . . . . Ah, that’s too far off topic
In fact, the solution is very simple. Yes, the answer is the setTimeout() function. Come on, let’s change the code again:
page({
data: {
show:false,//用于显示或隐藏mask控件
runAM:false//用于动画执行的根据
},
chanMask:function(){
var isShow = this.data.show ? false : true;//如果显示就隐藏,隐藏就显示
var delay = isShow ? 30 : 1000;//第一个时间是博主测出来控件显示所需的时间,第二个是动画所需的时间
if(isShow){
this.setData({
show:isShow
});
}else{
this.setData({
runAM:isShow
})
}
setTimeout(function(){
if(isShow){
this.setData({
runAM:isShow
});
}else{
this.setData({
show:isShow
});
}
}, delay);
}
})
<!--index.wxml-->
<view class="container">
<button bindtap="chanMask">点我</button>
<view class="mask {{show ? 'show' : 'hide'}}" bindtap="chanMask">
<view class="mask-shadow {{runAM ? 'mask-shadow-on' : ''}}"></view>
<view class="mask-con {{runAM ? 'mask-con-show' : ''}}">
<view class="close" bindtap="chanMask">X</view>
慢慢飞起
</view>
</view>
</view>In the above code, We added a new variable runAM to data to use as a certificate for when the animation starts to be executed, and then defined a variable delay for setting the delay in the chanMask function. The code may be a bit convoluted. The blogger will explain it roughly here
The entire process of the program is based on the isShow variable.
When isShow is true, it means that we have to open the mask control, so we first display the mask control, and then delay After 30 milliseconds, add a style class name to the control to be animated
When isShow is false, we first remove the class name of the animation control (after removal, the animation will return to its original form), and then Let the mask hide after a delay of 1000 milliseconds (the time required for animation)
The setting of the first value of delay was measured by the blogger himself. If you are still worried that the control is not displayed, you can It doesn’t matter if you set it to 50 milliseconds or 100 milliseconds. This 0.1 second time difference has little impact on the user experience. If you set it for 1 second and there is no response, I can only say to change your phone
In the end, you will find that during the entire process, the blogger only calls one function to display or hide, and does not create a new function for closing. This writing method is full of style.
This method is also applicable Yu H5
I believe that you have mastered the method after reading the case in this article. For more exciting information, please pay attention to other related articles on the php Chinese website!
Recommended reading:
How to customize the login form code with Vue.js
Use JS in the front-end and back-end Send Json
The above is the detailed content of css+transition to make visible and invisible animation. For more information, please follow other related articles on the PHP Chinese website!

Hot AI Tools

Undresser.AI Undress
AI-powered app for creating realistic nude photos

AI Clothes Remover
Online AI tool for removing clothes from photos.

Undress AI Tool
Undress images for free

Clothoff.io
AI clothes remover

AI Hentai Generator
Generate AI Hentai for free.

Hot Article
Hot Tools

Notepad++7.3.1
Easy-to-use and free code editor

SublimeText3 Chinese version
Chinese version, very easy to use

Zend Studio 13.0.1
Powerful PHP integrated development environment

Dreamweaver CS6
Visual web development tools

SublimeText3 Mac version
God-level code editing software (SublimeText3)
Hot Topics
 1378
1378
 52
52

 How to write split lines on bootstrap
Apr 07, 2025 pm 03:12 PM
How to write split lines on bootstrap
Apr 07, 2025 pm 03:12 PM
There are two ways to create a Bootstrap split line: using the tag, which creates a horizontal split line. Use the CSS border property to create custom style split lines.
 How to insert pictures on bootstrap
Apr 07, 2025 pm 03:30 PM
How to insert pictures on bootstrap
Apr 07, 2025 pm 03:30 PM
There are several ways to insert images in Bootstrap: insert images directly, using the HTML img tag. With the Bootstrap image component, you can provide responsive images and more styles. Set the image size, use the img-fluid class to make the image adaptable. Set the border, using the img-bordered class. Set the rounded corners and use the img-rounded class. Set the shadow, use the shadow class. Resize and position the image, using CSS style. Using the background image, use the background-image CSS property.
 How to resize bootstrap
Apr 07, 2025 pm 03:18 PM
How to resize bootstrap
Apr 07, 2025 pm 03:18 PM
To adjust the size of elements in Bootstrap, you can use the dimension class, which includes: adjusting width: .col-, .w-, .mw-adjust height: .h-, .min-h-, .max-h-
 The Roles of HTML, CSS, and JavaScript: Core Responsibilities
Apr 08, 2025 pm 07:05 PM
The Roles of HTML, CSS, and JavaScript: Core Responsibilities
Apr 08, 2025 pm 07:05 PM
HTML defines the web structure, CSS is responsible for style and layout, and JavaScript gives dynamic interaction. The three perform their duties in web development and jointly build a colorful website.
 How to set up the framework for bootstrap
Apr 07, 2025 pm 03:27 PM
How to set up the framework for bootstrap
Apr 07, 2025 pm 03:27 PM
To set up the Bootstrap framework, you need to follow these steps: 1. Reference the Bootstrap file via CDN; 2. Download and host the file on your own server; 3. Include the Bootstrap file in HTML; 4. Compile Sass/Less as needed; 5. Import a custom file (optional). Once setup is complete, you can use Bootstrap's grid systems, components, and styles to create responsive websites and applications.
 How to use bootstrap in vue
Apr 07, 2025 pm 11:33 PM
How to use bootstrap in vue
Apr 07, 2025 pm 11:33 PM
Using Bootstrap in Vue.js is divided into five steps: Install Bootstrap. Import Bootstrap in main.js. Use the Bootstrap component directly in the template. Optional: Custom style. Optional: Use plug-ins.
 How to use bootstrap button
Apr 07, 2025 pm 03:09 PM
How to use bootstrap button
Apr 07, 2025 pm 03:09 PM
How to use the Bootstrap button? Introduce Bootstrap CSS to create button elements and add Bootstrap button class to add button text
 How to view the date of bootstrap
Apr 07, 2025 pm 03:03 PM
How to view the date of bootstrap
Apr 07, 2025 pm 03:03 PM
Answer: You can use the date picker component of Bootstrap to view dates in the page. Steps: Introduce the Bootstrap framework. Create a date selector input box in HTML. Bootstrap will automatically add styles to the selector. Use JavaScript to get the selected date.
