This article mainly introduces you to the relevant information about DOM attribute binding in the Angular4 learning tutorial. The article introduces it in detail through sample code, which has certain reference learning value for everyone's study or work
Preface
Some events triggered by DOM elements are propagated through the DOM hierarchy. The events first start with the innermost element, and then propagate to the outer elements until they To the root element, this propagation process is called event bubbling. This article mainly introduces the relevant content about Angular4 DOM attribute binding, and shares it for everyone's reference and study. I won't say much below, let's take a look at the detailed introduction.
Introduction
Use interpolation expressions to display the value of an expression on the template
<img src="{{imgUrl}}" alt="">
<h1>{{productTitle}}</h1>Use square brackets to An attribute value of an HTML tag is bound to an expression
<img [src]="imgUrl" alt="">
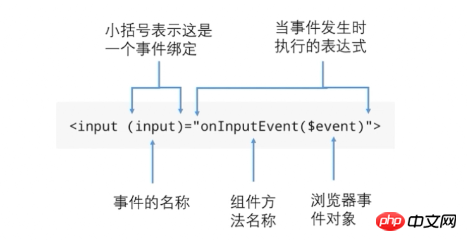
Use parentheses to bind a method of the component controller to an event handler on the template
<button (click)="onClickButton($event)">按钮绑定事件</button>
Note
Before starting the following example, please make sure you have created a new project. If not, please check out: Angular2 Study Notes - Angular CLI Installation and Usage Tutorial
Event Binding

Preparation
Understand the purpose: Add a button to the template interface, and then bind an event through parentheses.
Create a new bind component, use the command: ng g c bind
Modify bind.component.html
<button (click)="onClickButton($event)">按钮绑定事件</button>
Modify bind.component.ts
//在 BindComponent 类方法中增加方法体
onClickButton(event: any){
 console.log(event);
}Modify app.component.html
<!-- 增加 app-bind 组件 -->
<app-bind></app-bind>
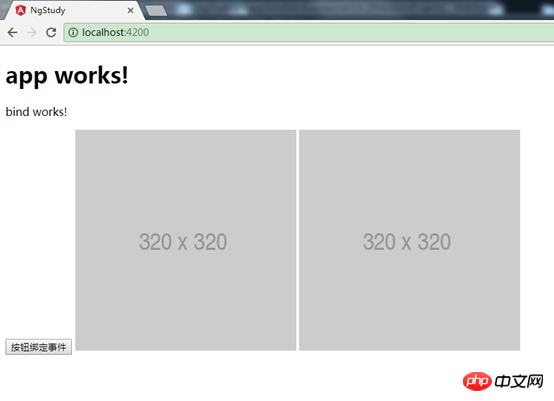
Illustration:

##Dom attribute binding
Example 1
The relationship between interpolation expressions and attribute bindingBoth methods can be implemented. The logic of angular implementation is: In the program When loading a component, the "interpolation expression" will first be translated into "property binding"Modify bind.component.html<img [src]="imgUrl" alt="">
//增加变量
imgUrl: string = http://placehold.it/320x280;

Example 2
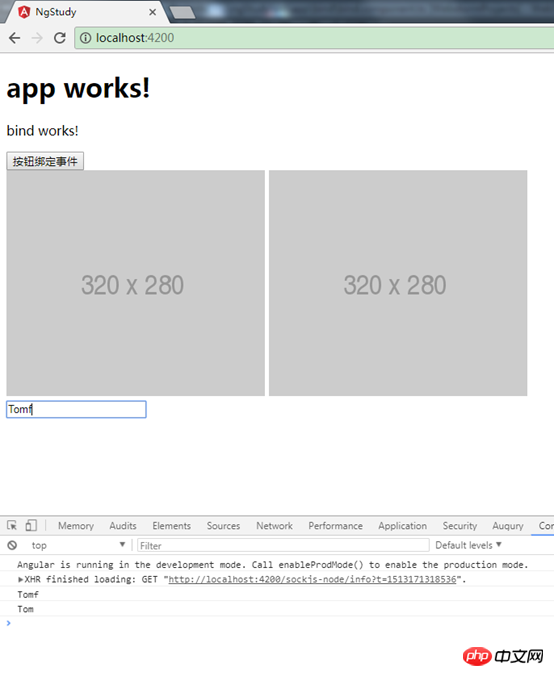
The difference between dom attribute and html attributeHTML element There are some differences between DOM attributes and HTML attributes, and this difference needs to be clarified. Modify bind.component.html<!-- 增加代码 --> <p> <input type="text" value="Tom" (input)="onInputEvent($event)"> </p>
//增加 event事件
onInputEvent(event: any){
 //获取的是 dom 属性,即输入属性
 console.log(event.target.value);
 //获取的是 html 属性,也就是初始化的属性
 console.log(event.target.getAttribute("value"));
}
Summary:
1. There is a 1:1 mapping relationship between a small number of HTML attributes and DOM attributes, such as: id 2. Some have HTML attributes, There is no DOM attribute, such as: colspan 3. Some have DOM attributes and no HTML attributes, such as: textContent 4. Even if the names are the same, the content obtained by the DOM attribute and the HTML attribute may be different 5. Template binding is bound through DOM attributes, not through HTML attributes 6. HTML attributes specify the initial value, and DOM attributes represent the current value; the value of the DOM attribute can Change, the value of HTML cannot be changedComplete code of example part
bind.component.htmlbind works!
<button (click)="onClickButton($event)">按钮绑定事件</button><img [src]="imgUrl" alt="">

import { Component, OnInit } from '@angular/core';
@Component({
 selector: 'app-bind',
 templateUrl: './bind.component.html',
 styleUrls: ['./bind.component.css']
})
export class BindComponent implements OnInit {
 imgUrl: string = "http://placehold.it/320x280";
 constructor() { }
 ngOnInit() {
 }
 onClickButton(event: any){
 console.log(event);
 }
 onInputEvent(event: any){
 //获取的是 dom 属性,即输入属性
 console.log(event.target.value);

 //获取的是 html 属性,也就是初始化的属性
 console.log(event.target.getAttribute("value"));
 }
}Using fullpage.js to implement scrolling
The problem of failure to install Electron using npm
How to develop component libraries using React
How to obtain and display passwords in real time in AngularJS
In How to get the first value in the select drop-down box in JavaScript
The above is the detailed content of Implement DOM attribute binding in Angular4. For more information, please follow other related articles on the PHP Chinese website!


