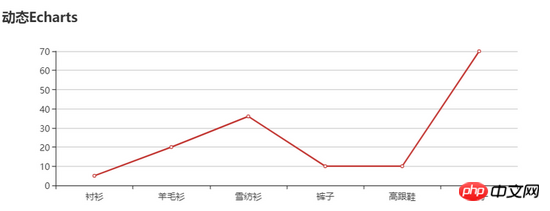
This time I will show you how to use the Vue Echarts component and what are the precautions for using the Vue Echarts component. The following is a practical case, let's take a look.
Preparation work
Project structure construction
Due to production needs (actually laziness), Therefore, this tutorial uses ==vue-cli== to build the infrastructure of the project.
npm install -g vue-cli
vue init webpack vue-charts
cd vue-charts
npm run dev
Install Echarts
Use npm to install directly.
npm install Echarts --save
Introducing Echarts
//在main.js加入下面两行代码
import echarts from 'echarts'
Vue.prototype.$echarts = echarts //将echarts注册成Vue的全局属性
At this point, the preparation work has been completed.
Static Component Development
Because I was too deeply poisoned by the article "React Programming Thoughts", the author is also accustomed to gradually iterating from basic to advanced when developing components.
The purpose of the static component is very simple, which is to render the Echarts chart onto the page.
Create a new Chart.vue file
<template>
 <p :id="id" :style="style"></p>
</template>
<script>
export default {
 name: "Chart",
 data() {
  return {
   //echarts实例
   chart: ""
  };
 },
 props: {
  //父组件需要传递的参数:id,width,height,option
  id: {
   type: String
  },
  width: {
   type: String,
   default: "100%"
  },
  height: {
   type: String,
   default: "300px"
  },
  option: {
   type: Object,
   //Object类型的prop值一定要用函数return出来,不然会报错。原理和data是一样的,
   //使用闭包保证一个vue实例拥有自己的一份props
   default() {
    return {
     title: {
      text: "vue-Echarts"
     },
     legend: {
      data: ["销量"]
     },
     xAxis: {
      data: ["衬衫", "羊毛衫", "雪纺衫", "裤子", "高跟鞋", "袜子","tuoxie"]
     },
     series: [
      {
       name: "销量",
       type: "line",
       data: [5, 20, 36, 10, 10, 70]
      }
     ]
    };
   }
  }
 },
 computed: {
  style() {
   return {
    height: this.height,
    width: this.width
   };
  }
 },
 mounted() {
  this.init();
 },
 methods: {
  init() {
   this.chart = this.$echarts.init(document.getElementById(this.id));
   this.chart.setOption(this.option);
  }
 }
};
</script>The above file implements a component that renders a simple line chart to the page. Isn't it very simple? The simplest method to use is as follows:
App.vue
<template>
 <p id="app">
  <Chart id="test"/>
 </p>
</template>
<script>
import Chart from "./components/Chart";
export default {
 name: "App",
 data() {},
 components: {
  Chart
 }
}
</script>At this point, you should be able to see the following effect when running the program:

First iteration
Now that we have a basic version, let’s take a look at what’s left unsatisfactory:
The chart cannot be automatically scaled according to the window size. Although the width is set to 100%, the chart will not be re-rendered until the page is refreshed, which will make the user experience very poor.
Charts are currently unable to automatically refresh data
Let’s realize these two points:
Auto scaling
Echarts itself does not support automatic scaling, but Echarts provides us with the resize method.
//在init方法中加入下面这行代码
window.addEventListener("resize", this.chart.resize);With just this sentence, we have realized the need for the chart to adapt to the window size.
Support automatic data refresh
Because Echarts is data-driven, which means that as long as we reset the data, the chart will follow Re-rendering is the basis for realizing this requirement. Let's imagine again that if you want to support automatic refresh of data, you must have a listener that can monitor data changes in real time and then tell Echarts to reset the data. Fortunately, Vue provides us with the ==watcher== function, through which we can easily implement the above functions:
//在Chart.vue中加入watch
 watch: {
  //观察option的变化
  option: {
   handler(newVal, oldVal) {
    if (this.chart) {
     if (newVal) {
      this.chart.setOption(newVal);
     } else {
      this.chart.setOption(oldVal);
     }
    } else {
      this.init();
    }
   },
   deep: true //对象内部属性的监听,关键。
  }
}The above code implements our monitoring of property changes in the option object. Once the If the data changes, the chart will be re-rendered.
Achieve dynamic refresh
The next step, I think everyone knows, is to regularly pull data from the background, and then update the option of the parent component Just fine. There are two questions that need to be considered here:
If the chart requires adding one data per second, how should the data request be performed to achieve a balance between performance and user experience?
Should the code for dynamically updating data be placed in the parent component or the child component?
Regarding the first question, obtaining the server data in real time every second is definitely the most accurate. There are two solutions:
Request to the background once per second
Maintain a long connection, and the background pushes data to the front end once per second
The first solution is undoubtedly good for performance and a huge waste of resources; unless the real-time requirements are particularly high (stock system), this method is not recommended;
The second solution requires the use of web Socket, but additional work is required on the server side Development work.
Based on the actual needs of the project (the real-time requirements are not high, and the data generated in the background also has a certain delay), the author adopted the following solution:
The front-end every other Request data from the background once a minute, and it is the data of the previous minute of the current time;
前端将上述数据每隔一秒向图表set一次数据
关于第二个问题:笔者更倾向于将Chart组件设计成纯组件,即只接收父组件传递的数据进行变化,不在内部进行复杂操作;这也符合目前前端MVVM框架的最佳实践;而且若将数据传递到Chart组件内部再进行处理,一是遇到不需要动态渲染的需求还需要对组件进行额外处理,二是要在Chart内部做ajax操作,这样就导致Chart完全没有了可复用性。
接下来我们修改App.vue
<template>
 <p id="app">
  <Chart id="test" :option="option"/>
 </p>
</template>
<script>
import vueEcharts from "./components/vueEcharts";
export default {
 name: "App",
 data() {
  return {
   //笔者使用了mock数据代表从服务器获取的数据
   chartData: {
    xData: ["衬衫", "羊毛衫", "雪纺衫", "裤子", "高跟鞋", "袜子"],
    sData: [5, 20, 36, 10, 10, 70]
   }
  };
 },
 components: {
  Chart
 },
 mounted() {
  this.refreshData();
 },
 methods: {
  //添加refreshData方法进行自动设置数据
  refreshData() {
   //横轴数据
   let xData = this.chartData.xData,
    //系列值
     sData = this.chartData.sData;
   for (let i = 0; i < xData.length; i++) {
    //此处使用let是关键,也可以使用闭包。原理不再赘述
      setTimeout(() => {
     this.option.xAxis.data.push(xData[i]);
     this.option.series[0].data.push(sData[i]);
    }, 1000*i)//此处要理解为什么是1000*i
   }
  }
 }
};
</script>至此我们就实现了图表动态数据加载,效果如下图:

总结
这篇教程通过一个动态图表的开发,传递了以下信息:
Echarts如何与Vue结合使用
Vue组件开发、纯组件与“脏”组件的区别
Vue watch的用法
let的特性
JavaScript EventLoop特性
...
大家可以根据这个列表查漏补缺。
后续优化
这个组件还有需要需要优化的点,比如:
间隔时间应该可配置
每分钟从后台获取数据,那么图表展示的数据将会越来越多,越来越密集,浏览器负担越来越大,直到崩溃
没有设置暂停图表刷新的按钮
相信看了本文案例你已经掌握了方法,更多精彩请关注php中文网其它相关文章!
推荐阅读:
The above is the detailed content of How to use Vue+Echarts component. For more information, please follow other related articles on the PHP Chinese website!


