I made an Android project some time ago, which required the use of a database. I have written a little about web pages before stuff, so I plan to use the golden partner of MYSQL PHP, although it is a bit overkill.
I am a real novice and don’t know much about Android. This project is purely to rush the ducks to the shelves. The reason why I write this blog is to share the experience I encountered in the project. I share the solutions to various problems with you, hoping it will be helpful to you.
Next, I will introduce how the Android client interacts with the MYSQL database through PHP from three aspects.
简单的说,安卓客户端通过Http向本地服务器发出请求,访问指定的php代码,服务器端通过php代码执行数据库的操作,
返回相应的JSON数据。服务器可以理解为运行着某些服务器容器的电脑,比如你的电脑安装了Apache并保持运行,那么电脑就变成了一台服务器,只是这台服务器没有入网,只能本地访问。安卓客户端通过HttpURLConnection向服务器中指定的php文件提交POST或GET请求,服务器端相应php代码接受来自客户端的参数(如果是带参传递)进行数据库的操作,返回JSON数据给客户端。
下面我以安卓客户端通过用户名密码登陆为例进行说明。具体为:客户端通过POST方法向服务器提交2个参数:用户名(username)和密码(password)到指定login.php文件(这个文件写登陆验证的php代码),该文件中通过查询数据库中是否存在该用户以及密码是否正确来返回客户端相应的JSON数据。
既然选择了PHP+MYSQL,那么使用wamp server套件是比较方便的一种选择,用过它的朋友都应该轻车熟路了。
安卓客户端所做的工作有:通过HttpURLConnection向服务器中指定的login.php文件提交POST或GET请求,服务器端接受来自客户端的参数执行login.php文件进行数据库的操作,返回JSON数据给客户端。
这里只贴出代码部分,至于界面只需要2个文本编辑框edittext用于输入用户名密码,一个button登陆按钮,其id自行设置即可。
登陆按钮响应函数如下
        loginbtn.setOnClickListener(new View.OnClickListener() {
            @Override
            public void onClick(View v) {//登陆按钮监听事件
/*                ((App)getApplicationContext()).setTextData(et.getText().toString());
                location_x.setText(((App)getApplicationContext()).getTextData());*/
                new Thread(new Runnable() {
                    @Override
                    public void run() {
                        try {
                            int result = login();
                            //login()为向php服务器提交请求的函数,返回数据类型为int
                            if (result == 1) {
                                Log.e("log_tag", "登陆成功!");
                                //Toast toast=null;
                                Looper.prepare();
                                Toast.makeText(PhpActivity.this, "登陆成功!", Toast.LENGTH_SHORT).show();
                                Looper.loop();
                            } else if (result == -2) {
                                Log.e("log_tag", "密码错误!");
                                //Toast toast=null;
                                Looper.prepare();
                                Toast.makeText(PhpActivity.this, "密码错误!", Toast.LENGTH_SHORT).show();
                                Looper.loop();
                            } else if (result == -1) {
                                Log.e("log_tag", "不存在该用户!");
                                //Toast toast=null;
                                Looper.prepare();
                                Toast.makeText(PhpActivity.this, "不存在该用户!", Toast.LENGTH_SHORT).show();
                                Looper.loop();
                            }
                        } catch (IOException e) {
                            System.out.println(e.getMessage());
                        }
                    }
                }).start();
            }
});登陆按钮响应函数中有个login()函数,这个函数就是完成向服务器提交申请并获取服务器返回json数据的功能。
/*
*用户登录提交post请求
* 向服务器提交数据1.user_id用户名,2.input_pwd密码
* 返回JSON数据{"status":"1","info":"login success","sex":"0","nicename":""}
*/
private int login() throws IOException {
int returnResult=0;
/*获取用户名和密码*/
String user_id=et.getText().toString();
String input_pwd=pwd.getText().toString();
if(user_id==null||user_id.length()<=0){
Looper.prepare();
Toast.makeText(PhpActivity.this,"请输入账号", Toast.LENGTH_LONG).show();
Looper.loop();
return 0;
}
if(input_pwd==null||input_pwd.length()<=0){
Looper.prepare();
Toast.makeText(PhpActivity.this,"请输入密码", Toast.LENGTH_LONG).show();
Looper.loop();
return 0;
}
String urlstr="http://192.168.191.1/LBS/login.php";
//建立网络连接
URL url = new URL(urlstr);
HttpURLConnection http= (HttpURLConnection) url.openConnection();
//往网页写入POST数据,和网页POST方法类似,参数间用‘&’连接
String params="uid="+user_id+'&'+"pwd="+input_pwd;
http.setDoOutput(true);
http.setRequestMethod("POST");
OutputStream out=http.getOutputStream();
out.write(params.getBytes());//post提交参数
out.flush();
out.close();
//读取网页返回的数据
BufferedReader bufferedReader=new BufferedReader(new InputStreamReader(http.getInputStream()));//获得输入流
String line="";
StringBuilder sb=new StringBuilder();//建立输入缓冲区
while (null!=(line=bufferedReader.readLine())){//结束会读入一个null值
sb.append(line);//写缓冲区
}
String result= sb.toString();//返回结果
try {
/*获取服务器返回的JSON数据*/
JSONObject jsonObject= new JSONObject(result);
returnResult=jsonObject.getInt("status");//获取JSON数据中status字段值
} catch (Exception e) {
// TODO: handle exception
Log.e("log_tag", "the Error parsing data "+e.toString());
}
return returnResult;
}对于这个login()函数有几点说明:
1) urlstr="http://192.168.191.1/LBS/login.php"。其中192.168.191.1即本地电脑运行的Apache服务器的地址,这个地址会映射到Wamp安装目录下的WWW目录,LBS即为WWW目录下的文件夹。
一开始我使用android studio自带模拟器进行测试,网上说是浏览器访问10.0.2.0什么的就能访问电脑上的本地Apache服务器,但是没能成功访问wamp自带的apache服务器。
最后找到一个极好方法,就是使用真机测试,作为服务器的电脑需要安装一个wifi共享软件(如猎豹wifi),用要测试的真机连接该wifi后,手机浏览器访问http://192.168.191.1,如果显示
如下图则说明手机访问电脑apache服务器成功,至此服务器环境已经搭建成功。login.php是放在电脑的apache服务器下的,比如我的是在D:\wamp\www\LBS文件夹下。
2) HttpURLConnection。本人曾在网上找到过一些安卓网络请求的方法,但是大多都已弃用,使用HttpURLConnection是当前还未弃用的一种方法,当然对于高手来说,这就不值一提了。
3) JSONObject。
由于在后面的php代码中所返回的数据为json数据类型,所以需要在客户端进行解析,这并不困难,不清楚的可以搜索一下。
4)之前已经说过,本人对安卓一窍不通,所以在测试时犯了一个大忌,就是网络访问不能放在主线程中,否则会阻塞主线程,造成UI假死等错误,所以需要单开一个线程,即
登陆按钮响应函数中的run方法。
login.php在服务器容器中,时刻响应着外部的访问请求,主要工作是:
1)获取手机端通过Post请求发送的用户名密码。
where conn.php is the database connection file, the code is as follows
2)连接数据库,从数据库中查找是否有与该用户名密码一致的记录,根据查找结果返回不同的Json数据。
As for the database, you can create it yourself. According to the above PHP code, there is a user in the database Table, there are 4 fields in the table, namely userid, password, nicename, and sex. You can create it by yourself (nicename and sex are not used in this example). The screenshot is as follows

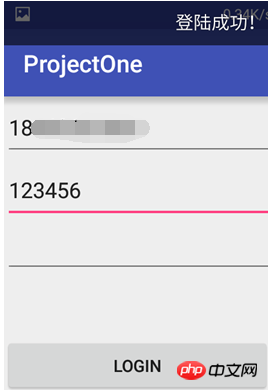
##After the above work is completed, deploy the client to the real machine for testing
Enter the username and password, click the login button, the result is as follows:

Key source code
PS: When will CSDN release My own text editing tools are a bit easier to use.
This article explains a simple example of Android PHP MYSQL development. For more related content, please pay attention to the php Chinese website.Related recommendations:
Detailed explanation of the usage of $this in PHPThe relationship between Java and PHPSummary of practical experience with PHP
The above is the detailed content of Explanation of simple examples of Android+PHP+MYSQL development. For more information, please follow other related articles on the PHP Chinese website!


