

React performs rendering transformation on the server side
This time I will bring you React's rendering transformation of the server. What are the precautions for React's rendering transformation of the server? The following is a practical case, let's take a look.
Due to the need for web page SEO, I wanted to transform the previous React project into server-side rendering. After some investigation and research, I consulted a lot of Internet information. Successfully stepped on the trap.
Selection idea: To implement server-side rendering, you want to use the latest version of React, and do not make major changes to the existing writing method. If you plan to render on the server-side from the beginning, it is recommended to write directly using the NEXT framework
Project address: https://github.com/wlx200510/react_koa_ssr
Scaffolding selection: webpack3.11.0 react Router4 Redux koa2 React16 Node8.x
Main experience: React Become more familiar with relevant knowledge, successfully expand your own technical field, and accumulate server-side technology in actual projects
Note: Before using the framework, be sure to confirm that the current webpack version is 3.x and the node is 8.x For the above, it is recommended that readers have used React for more than 3 months and have actual experience in React projects
Project directory introduction
1 2 3 4 5 6 7 8 9 10 11 12 13 14 15 16 17 18 19 20 21 22 23 24 25 26 27 28 29 30 31 32 33 34 35 36 37 38 39 40 41 42 43 44 45 46 47 48 49 50 51 52 53 54 55 56 57 58 59 |
|
Project construction ideas
Local development uses webpack-dev-server to implement hot updates. The basic process is similar to the previous react development. It is still browser-side rendering, so one thing should be taken into consideration when writing code. Set of logic, the problem of two rendering environments.
After the rendering of the front-end page is completed, its Router jump will not make a request to the server, thereby reducing the pressure on the server. Therefore, there are two ways to enter the page, which must also be considered. The problem of routing isomorphism in two rendering environments.
The production environment needs to use koa as the back-end server to implement on-demand loading, obtain data on the server side, and render the entire HTML, using the latest capabilities of React16 to merge the entire status tree. Implement server-side rendering.
Introduction to local development
The main file involved in checking local development is the index.js file in the src directory to determine the current operating environment. The module.hot API will only be used in the development environment to implement page rendering update notifications when the reducer changes. Pay attention to the hydrate method. This is a new API method specifically for server-side rendering in the v16 version. It Based on the render method, the maximum possible reuse of server-side rendering content is achieved, and the process from static DOM to dynamic NODES is realized. The essence is to replace the process of judging the checksum mark under the v15 version, making the reuse process more efficient and elegant.
1 2 3 4 5 6 7 8 9 10 11 12 13 14 15 16 17 18 19 20 21 22 23 24 |
|
Pay attention to the definition of the window.main function. Combined with index.ejs, you can know that this function is triggered after all scripts are loaded. The react-loadable writing method is used for lazy loading of the page. The writing method of packaging pages separately should be explained in combination with routing settings. Here is a general impression. It should be noted that the three methods exposed under the app file are common on the browser side and the server side. The following is mainly about this part of the idea.
Route processing
Next, look at the following files in the src/app directory. index.js exposes three methods. The three methods involved are in the service It will be used in client-side and browser-side development. This part mainly talks about the code ideas in the router file and the processing of routing by the createApp.js file. This is the key point to achieve mutual communication between the routes at both ends.
routes.js under the router folder is a routing configuration file. It imports the routing configurations under each page and synthesizes a configuration array. You can use this configuration to flexibly control the online and offline pages. The index.js in the same directory is the standard way of writing RouterV4. The routing configuration is passed in by traversing the configuration array. ConnectRouter is a component used to merge Routers. Note that history needs to be passed in as a parameter and needs to be in the createApp.js file. Do separate processing. Let’s take a brief look at several configuration items in the Route component. What’s worth noting is the thunk attribute. This is a key step in achieving rendering after the backend obtains data. It is this attribute that enables components similar to Next to obtain data in advance. Life cycle hooks and other attributes can be found in the relevant React-router documentation and will not be described here.
1 2 3 4 5 6 7 8 9 10 11 12 13 |
|
查看app目录下的createApp.js里面的代码可以发现,本框架是针对不同的工作环境做了不同的处理,只有在生产环境下才利用Loadable.Capture方法实现了懒加载,动态引入不同页面对应的打包之后的js文件。到这里还要看一下组件里面的路由配置文件的写法,以home页面下的index.js为例。注意/* webpackChunkName: 'Home' */这串字符,实质是指定了打包后此页面对应的js文件名,所以针对不同的页面,这个注释也需要修改,避免打包到一起。loading这个配置项只会在开发环境生效,当页面加载未完成前显示,这个实际项目开发如果不需要可以删除此组件。
1 2 3 4 5 6 7 8 9 10 11 12 |
|
这里多说一句,有时我们要改造的项目的页面文件里有从window.location里面获取参数的代码,改造成服务端渲染时要全部去掉,或者是要在render之后的生命周期中使用。并且页面级别组件都已经注入了相关路由信息,可以通过this.props.location来获取URL里面的参数。本项目用的是BrowserRouter,如果用HashRouter则包含参数可能略有不同,根据实际情况取用。
根据React16的服务端渲染的API介绍:
浏览器端使用的注入ConnectedRouter中的history为:import createHistory from 'history/createBrowserHistory'
服务器端使用的history为import createHistory from 'history/createMemoryHistory'
服务端渲染
这里就不会涉及到koa2的一些基础知识,如果对koa2框架不熟悉可以参考我的另外一篇博文。这里是看server文件夹下都是服务端的代码。首先是简洁的app.js用于保证每次连接都返回的是一个新的服务器端实例,这对于单线程的js语言是很关键的思路。需要重点介绍的就是clientRouter.js这个文件,结合/src/app/configureStore.js这个文件共同理解服务端渲染的数据获取流程和React的渲染机制。
1 2 3 4 5 6 7 8 9 10 11 |
|
window.__REDUX_DEVTOOLS_EXTENSION_COMPOSE__这个变量是浏览器里面的Redux的开发者工具,开发React-redux应用时建议安装,否则会有报错提示。这里面大部分都是redux-thunk的示例代码,关于这部分如果看不懂建议看一下redux-thunk的官方文档,这里要注意的是configureStore这个方法要传入的initialState参数,这个渲染的具体思路是:在服务端判断路由的thunk方法,如果存在则需要执行这个获取数据逻辑,这是个阻塞过程,可以当作同步,获取后放到全局State中,在前端输出的HTML中注入window.__INITIAL_STATE__这个全局变量,当html载入完毕后,这个变量赋值已有数据的全局State作为initState提供给react应用,然后浏览器端的js加载完毕后会通过复用页面上已有的dom和初始的initState作为开始,合并到render后的生命周期中,从而在componentDidMount中已经可以从this.props中获取渲染所需数据。
但还要考虑到页面切换也有可能在前端执行跳转,此时作为React的应用不会触发对后端的请求,因此在componentDidMount这个生命周期里并没有获取数据,为了解决这个问题,我建议在这个生命周期中都调用props中传来的action触发函数,但在action内部进行一层逻辑判断,避免重复的请求,实际项目中请求数据往往会有个标识性ID,就可以将这个ID存入store中,然后就可以进行一次对比校验来提前返回,避免重复发送ajax请求,具体可看store/actions/home.js`中的逻辑处理。
1 2 3 4 5 6 7 8 9 10 11 12 13 14 15 16 |
|
注意这里的async/await写法,这里涉及到服务端koa2使用这个来做数据请求,因此需要统一返回async函数,这块不熟的同学建议看下ES7的知识,主要是async如何配合Promise实现异步流程改造,并且如果涉及koa2的服务端工作,对async函数用的更多,这也是本项目要求Node版本为8.x以上的原因,从8开始就可以直接用这两个关键字。
不过到具体项目中,往往会涉及到一些服务端参数的注入问题,但这块根据不同项目需求差异很大,并且不属于这个React服务端改造的一部分,没法统一分享,如果真是公司项目要用到对这块有需求咨询可以打赏后加我微信讨论。
以Home页面为例的渲染流程
为了方便大家理解,我以一个页面为例整理了一下数据流的整体过程,看一下思路:
The server receives the request and finds the corresponding routing configuration through /home.
It is judged that the route has a thunk method, and then executes store/actions/thunk. The exposed functions in js
The data obtained asynchronously will be injected into the global state, and the dispatch distribution at this time does not actually take effect
The HTML code to be output will put the global state after obtaining the data into the global variable window.__INITIAL_STATE__, as initState
window.__INITIAL_STATE__ will be in the react life cycle Merge into the global state before taking effect. At this time, react finds that the dom has been generated, render will not be triggered again, and the data status is synchronized
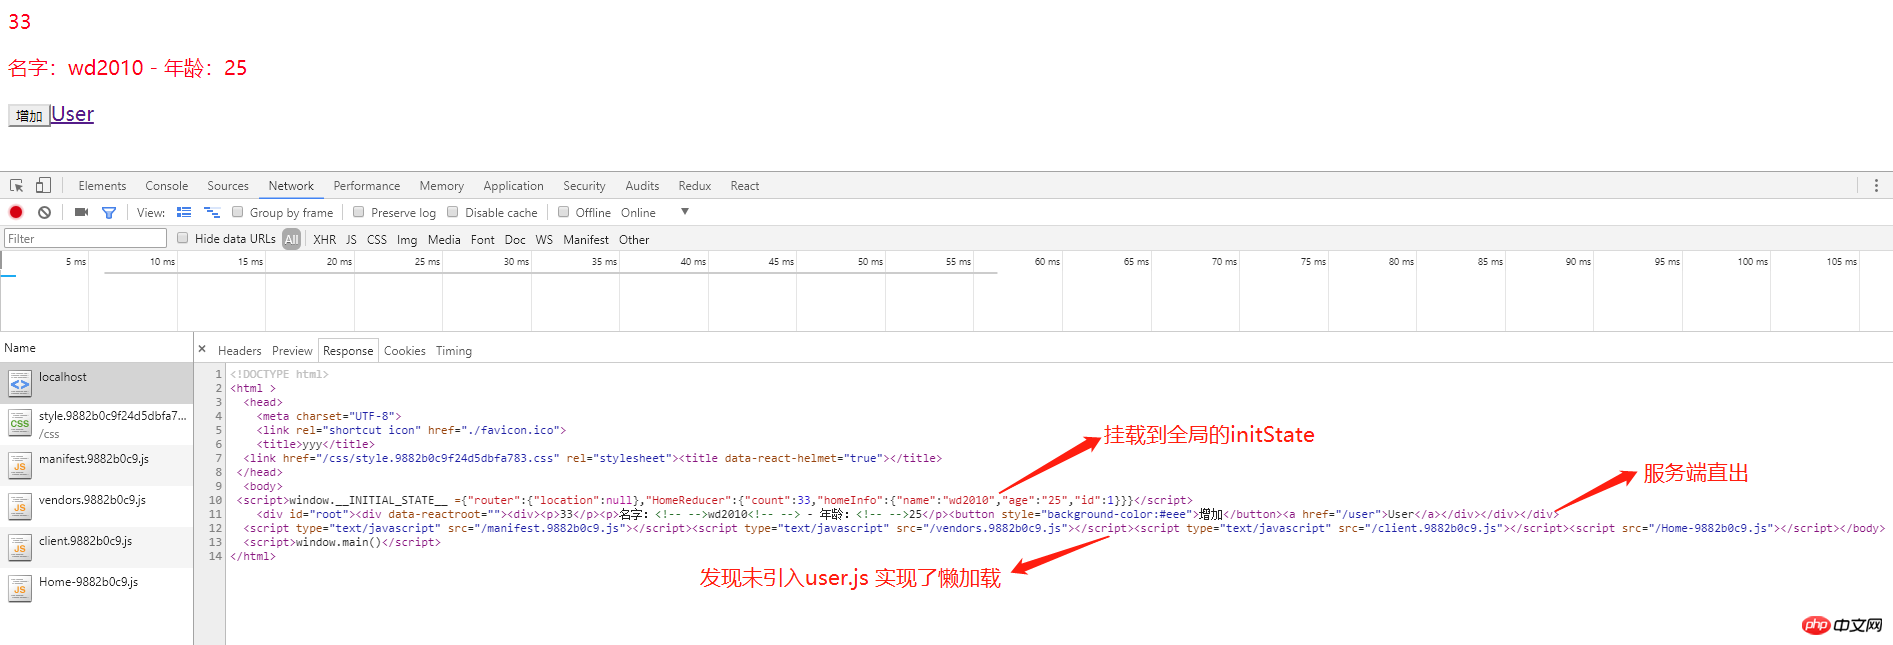
server Straight out of HTML
The basic process has been introduced. As for the functional writing methods of some Reducers and the positions of actions, they are organized with reference to some analyzes on the Internet. Different people have different opinions. As long as it conforms to your own understanding, And it’s good for team development. If you meet the reader background I set at the beginning of the article, I believe that the description in this article is enough for you to illuminate your own server-side rendering technology. It doesn’t matter if you don’t know much about React. You can refer here to supplement some basic knowledge of React
I believe you have mastered the method after reading the case in this article. For more exciting information, please pay attention to other related articles on the php Chinese website!
Recommended reading:
How to use webpack vue environment LAN
Vue underlying principles and component communication
The above is the detailed content of React performs rendering transformation on the server side. For more information, please follow other related articles on the PHP Chinese website!

Hot AI Tools

Undresser.AI Undress
AI-powered app for creating realistic nude photos

AI Clothes Remover
Online AI tool for removing clothes from photos.

Undress AI Tool
Undress images for free

Clothoff.io
AI clothes remover

AI Hentai Generator
Generate AI Hentai for free.
Hot Article
Hot Tools

Notepad++7.3.1
Easy-to-use and free code editor

SublimeText3 Chinese version
Chinese version, very easy to use

Zend Studio 13.0.1
Powerful PHP integrated development environment

Dreamweaver CS6
Visual web development tools

SublimeText3 Mac version
God-level code editing software (SublimeText3)
Hot Topics
 1376
1376
 52
52

 How to build a real-time chat app with React and WebSocket
Sep 26, 2023 pm 07:46 PM
How to build a real-time chat app with React and WebSocket
Sep 26, 2023 pm 07:46 PM
How to build a real-time chat application using React and WebSocket Introduction: With the rapid development of the Internet, real-time communication has attracted more and more attention. Live chat apps have become an integral part of modern social and work life. This article will introduce how to build a simple real-time chat application using React and WebSocket, and provide specific code examples. 1. Technical preparation Before starting to build a real-time chat application, we need to prepare the following technologies and tools: React: one for building
 Guide to React front-end and back-end separation: How to achieve decoupling and independent deployment of front-end and back-end
Sep 28, 2023 am 10:48 AM
Guide to React front-end and back-end separation: How to achieve decoupling and independent deployment of front-end and back-end
Sep 28, 2023 am 10:48 AM
React front-end and back-end separation guide: How to achieve front-end and back-end decoupling and independent deployment, specific code examples are required In today's web development environment, front-end and back-end separation has become a trend. By separating front-end and back-end code, development work can be made more flexible, efficient, and facilitate team collaboration. This article will introduce how to use React to achieve front-end and back-end separation, thereby achieving the goals of decoupling and independent deployment. First, we need to understand what front-end and back-end separation is. In the traditional web development model, the front-end and back-end are coupled
 How to build simple and easy-to-use web applications with React and Flask
Sep 27, 2023 am 11:09 AM
How to build simple and easy-to-use web applications with React and Flask
Sep 27, 2023 am 11:09 AM
How to use React and Flask to build simple and easy-to-use web applications Introduction: With the development of the Internet, the needs of web applications are becoming more and more diverse and complex. In order to meet user requirements for ease of use and performance, it is becoming increasingly important to use modern technology stacks to build network applications. React and Flask are two very popular frameworks for front-end and back-end development, and they work well together to build simple and easy-to-use web applications. This article will detail how to leverage React and Flask
 How to build a reliable messaging app with React and RabbitMQ
Sep 28, 2023 pm 08:24 PM
How to build a reliable messaging app with React and RabbitMQ
Sep 28, 2023 pm 08:24 PM
How to build a reliable messaging application with React and RabbitMQ Introduction: Modern applications need to support reliable messaging to achieve features such as real-time updates and data synchronization. React is a popular JavaScript library for building user interfaces, while RabbitMQ is a reliable messaging middleware. This article will introduce how to combine React and RabbitMQ to build a reliable messaging application, and provide specific code examples. RabbitMQ overview:
 React responsive design guide: How to achieve adaptive front-end layout effects
Sep 26, 2023 am 11:34 AM
React responsive design guide: How to achieve adaptive front-end layout effects
Sep 26, 2023 am 11:34 AM
React Responsive Design Guide: How to Achieve Adaptive Front-end Layout Effects With the popularity of mobile devices and the increasing user demand for multi-screen experiences, responsive design has become one of the important considerations in modern front-end development. React, as one of the most popular front-end frameworks at present, provides a wealth of tools and components to help developers achieve adaptive layout effects. This article will share some guidelines and tips on implementing responsive design using React, and provide specific code examples for reference. Fle using React
 React code debugging guide: How to quickly locate and solve front-end bugs
Sep 26, 2023 pm 02:25 PM
React code debugging guide: How to quickly locate and solve front-end bugs
Sep 26, 2023 pm 02:25 PM
React code debugging guide: How to quickly locate and resolve front-end bugs Introduction: When developing React applications, you often encounter a variety of bugs that may crash the application or cause incorrect behavior. Therefore, mastering debugging skills is an essential ability for every React developer. This article will introduce some practical techniques for locating and solving front-end bugs, and provide specific code examples to help readers quickly locate and solve bugs in React applications. 1. Selection of debugging tools: In Re
 React Router User Guide: How to implement front-end routing control
Sep 29, 2023 pm 05:45 PM
React Router User Guide: How to implement front-end routing control
Sep 29, 2023 pm 05:45 PM
ReactRouter User Guide: How to Implement Front-End Routing Control With the popularity of single-page applications, front-end routing has become an important part that cannot be ignored. As the most popular routing library in the React ecosystem, ReactRouter provides rich functions and easy-to-use APIs, making the implementation of front-end routing very simple and flexible. This article will introduce how to use ReactRouter and provide some specific code examples. To install ReactRouter first, we need
 How to build a fast data analysis application using React and Google BigQuery
Sep 26, 2023 pm 06:12 PM
How to build a fast data analysis application using React and Google BigQuery
Sep 26, 2023 pm 06:12 PM
How to use React and Google BigQuery to build fast data analysis applications Introduction: In today's era of information explosion, data analysis has become an indispensable link in various industries. Among them, building fast and efficient data analysis applications has become the goal pursued by many companies and individuals. This article will introduce how to use React and Google BigQuery to build a fast data analysis application, and provide detailed code examples. 1. Overview React is a tool for building
