
目前正在做浏览器端采用JS方式实现打印这么一个功能,JS打印实现的方法很多,但是兼容各个浏览器实现打印预览的功能有些棘手,现将实现的内容及遇到的问题记录下来,希望有大牛看到所提的问题后可以给予解答,在此感谢啦。
window.print();会弹出打印对话框,打印的是window.document.body.innerHTML中的内容,下面是从网上摘到的一个局部打印的例子,该例子的不足是打印会修改页面的内容。
<!DOCTYPE html>
<html>
<head>
<meta http-equiv="Content-Type" content="text/html; charset=utf-8" />
<title>局部打印案例</title>
<script type="text/javascript">
    function doPrint() {
        bdhtml=window.document.body.innerHTML;
        sprnstr="<!--startprint-->";
        eprnstr="<!--endprint-->";
        prnhtml=bdhtml.substr(bdhtml.indexOf(sprnstr)+17);
        prnhtml=prnhtml.substring(0,prnhtml.indexOf(eprnstr));
        window.document.body.innerHTML=prnhtml;
        window.print();
}
</script>
</head>
<body>
<p>1不需要打印的地方</p>
<p>2这里不要打印啊</p>
<!--startprint--><!--注意要加上html里star和end的这两个标记-->
<h1>打印标题</h1>
<p>打印内容~~</p>
<!--endprint-->
<button type="button" onclick="doPrint()">打印</button>
<p>不打印的地方啊哈哈哈哈</p>
<p>2</p>
</body>
</html>这种方式是其只兼容IE,其他浏览器不可使用,同时IE10以下的浏览器才可以使用,调用方式如下:
<body>
	<object id="WebBrowser" classid=CLSID:8856F961-340A-11D0-A96B-00C04FD705A2 height="0" width="0"> </object>
</body>
<script>
	WebBrowser.ExecWB(1,1)  //打开
	WebBrowser.ExecWB(2,1)  //关闭现在所有的IE窗口,并打开一个新窗口
	WebBrowser.ExecWB(4,1)  //保存网页
	//--------------- 常用 ---------------
	WebBrowser.ExecWB(6,1)  //打印
	WebBrowser.ExecWB(7,1)  //打印预览
	WebBrowser.ExecWB(8,1)  //打印页面设置
	//-------------------------------------
	WebBrowser.ExecWB(10,1) //查看页面属性
	WebBrowser.ExecWB(15,1) //撤销
	WebBrowser.ExecWB(17,1) //全选
	WebBrowser.ExecWB(22,1) //刷新
	WebBrowser.ExecWB(45,1) //关闭窗体无提示
</script>
这种方式优势是在IE下可以弹出打印预览,这是打印很人性化的功能,但是遗憾的是高版本的IE浏览器不支持WebBrowser了
该方式也兼容各个版本的浏览器,同window.print()一样,其启动的是打印对话框,chrome的打印对话框自带预览功能,但是IE、火狐仅仅只弹出打印设置对话框,没有预览功能。
使用JQuery浏览插件可以很方便的进行局部打印,常用的插件有:
1)jquery.print.js 下载地址:https://github.com/DoersGuild/jQuery.print
2)jquery.print-preview.js 下载地址:https://github.com/etimbo/jquery-print-preview-plugin
这两种方式使用都很简单,1)通过$("#id").print(/*options*/);调用;2)通过$('#id').printArea(/*options*/); 其中的option可选项可以在下载地址下载下来后看示例代码,一般options不用传即可,示例代码如下:
<html>
<head>
<meta http-equiv=Content-Type content="text/html; charset=utf-8">
<title>JQuery打印</title>
<script type="text/javascript" src="./js/jquery-3.1.1.min.js"></script>
<script language="javascript" src="./js/jquery.print.js"></script>
</head>
<body style='margin:0 auto;text-align:center;'>
<button id='button_print' name='button_print' onclick="javascript:printit()>打印</button>
<p id='ganburenmianbaio' class=WordSection1 style='width:750px;margin:0 auto;text-align:center;vertical-align: middle;'>
</p>
</body>
<script language="javascript">
function printit(){
$("#ganburenmianbaio").print({iframe:true,prepend:'<br/>'});
}
</script>
</html>该方式需要用户浏览器安装相关的第三方插件,用户体验不好,故在此不细述了。
chrome浏览器、win10自带的IE浏览器 调用打印弹出的打印设置界面中包含打印预览部分,故其通过上面的打印函数的调用即可实现。
IE9以后的版本、火狐不支持webbrowser控件了,JS调用不了浏览器的打印预览的功能,我们只能用iframe模拟打印预览的对话框,将需要打印的内容显示在该对话框中,然后在调用打印的功能实现打印。
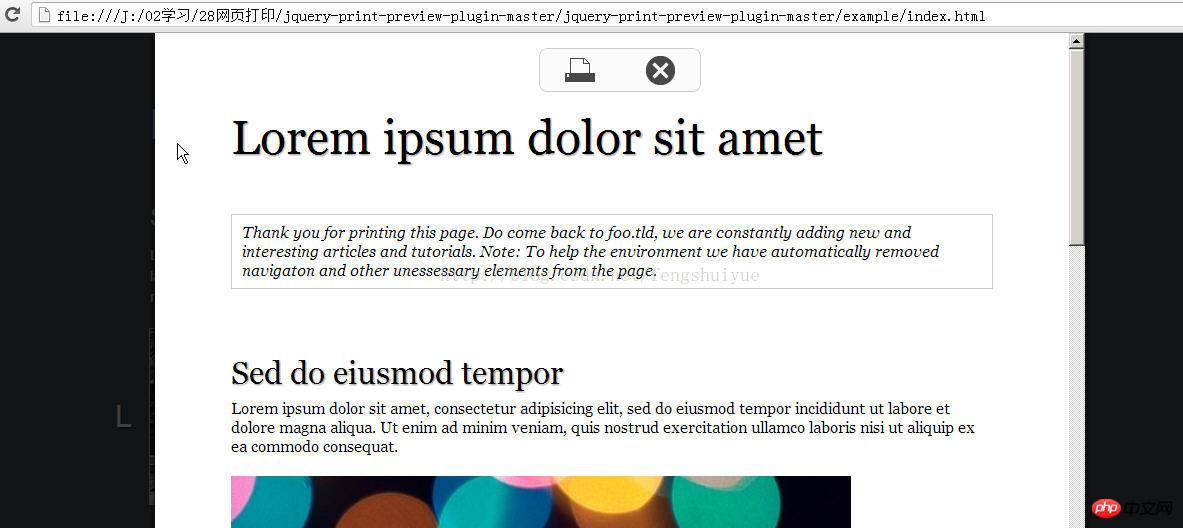
jquery.print-preview.js 下载地址:https://github.com/etimbo/jquery-print-preview-plugin
其实现的效果如下图(其自动的示例代码)
IE8及以下版本可以调用WebBrowser.ExecWB(7,1) 函数弹出浏览器的打印预览对话框,采用该函数的好处是 用户可以在打印预览对话框中 调整页边距、页眉、页脚;
下面贴出的是设置页边距、页眉、页脚的JS代码
//取得页面打印设置的原参数数据
function PageSetup_temp(){
    try
	{
	   var Wsh=new ActiveXObject("WScript.Shell");
	   HKEY_Key="header";
		//取得页眉默认值
	   head = Wsh.RegRead(HKEY_Root+HKEY_Path+HKEY_Key);
	   HKEY_Key="footer";
		//取得页脚默认值
	   foot = Wsh.RegRead(HKEY_Root+HKEY_Path+HKEY_Key);
	   HKEY_Key="margin_bottom";
		//取得下页边距
	   bottom = Wsh.RegRead(HKEY_Root+HKEY_Path+HKEY_Key);
	   HKEY_Key="margin_left";
		//取得左页边距
	   left = Wsh.RegRead(HKEY_Root+HKEY_Path+HKEY_Key);
	   HKEY_Key="margin_right";
		//取得右页边距
	   right = Wsh.RegRead(HKEY_Root+HKEY_Path+HKEY_Key);
	   HKEY_Key="margin_top";
		//取得上页边距
	   top = Wsh.RegRead(HKEY_Root+HKEY_Path+HKEY_Key);
	}
	catch(e){
		 //alert("不允许ActiveX控件");
	}
}

//设置网页打印的页眉页脚和页边距,注册表里的单位是英寸,打印设置中是毫米,1英寸=25.4毫米
function PageSetup_Null(){
	try
	{
	   var Wsh=new ActiveXObject("WScript.Shell");
	   HKEY_Key="header";
		//设置页眉(为空)
	   Wsh.RegWrite(HKEY_Root+HKEY_Path+HKEY_Key,"");
	   HKEY_Key="footer";
		//设置页脚(为空)
	   Wsh.RegWrite(HKEY_Root+HKEY_Path+HKEY_Key,"");
	   HKEY_Key="margin_bottom";
		//设置下页边距(0)
	   Wsh.RegWrite(HKEY_Root+HKEY_Path+HKEY_Key,"0.6");
	   HKEY_Key="margin_left";
		//设置左页边距(0)
	   Wsh.RegWrite(HKEY_Root+HKEY_Path+HKEY_Key,"0.3");
	   HKEY_Key="margin_right";
		//设置右页边距(0)
	   Wsh.RegWrite(HKEY_Root+HKEY_Path+HKEY_Key,"0.3");
	   HKEY_Key="margin_top";
		//设置上页边距(8)
	   Wsh.RegWrite(HKEY_Root+HKEY_Path+HKEY_Key,"0.6");
	}
	catch(e){
		 //alert("不允许ActiveX控件");
	}
}

//设置网页打印的页眉页脚和页边距为默认值
function PageSetup_Default(){
	try
	{
	   var Wsh=new ActiveXObject("WScript.Shell");
	   HKEY_Key="header";
	   HKEY_Key="header";
		//还原页眉
	   Wsh.RegWrite(HKEY_Root+HKEY_Path+HKEY_Key,head);
	   HKEY_Key="footer";
		//还原页脚
	   Wsh.RegWrite(HKEY_Root+HKEY_Path+HKEY_Key,foot);
	   HKEY_Key="margin_bottom";
		//还原下页边距
	   Wsh.RegWrite(HKEY_Root+HKEY_Path+HKEY_Key,bottom);
	   HKEY_Key="margin_left";
		//还原左页边距
	   Wsh.RegWrite(HKEY_Root+HKEY_Path+HKEY_Key,left);
	   HKEY_Key="margin_right";
		//还原右页边距
	   Wsh.RegWrite(HKEY_Root+HKEY_Path+HKEY_Key,right);
	   HKEY_Key="margin_top";
		//还原上页边距
	   Wsh.RegWrite(HKEY_Root+HKEY_Path+HKEY_Key,top);
	}
	catch(e){
		 //alert("不允许ActiveX控件");
	}
}使用该函数,会弹出
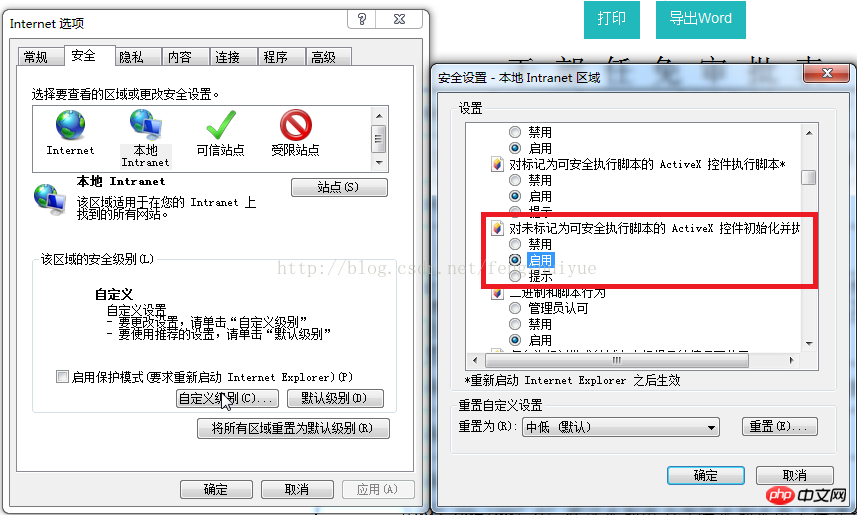
通过网页修改activex安全设置,添加信任站点,禁用该弹出窗口提示,代码如下:
function activeXControl(){
		try{
		var WshShell=new ActiveXObject("WScript.Shell");

		//添加信任站点(http://127.0.0.1)
		WshShell.RegWrite("HKEY_CURRENT_USER\\Software\\Microsoft\\Windows\\CurrentVersion\\Internet Settings\\ZoneMap\\Ranges\\Range100\\","");
		WshShell.RegWrite("HKEY_CURRENT_USER\\Software\\Microsoft\\Windows\\CurrentVersion\\Internet Settings\\ZoneMap\\Ranges\\Range100\\:Range","127.0.0.1");
		WshShell.RegWrite("HKEY_CURRENT_USER\\Software\\Microsoft\\Windows\\CurrentVersion\\Internet Settings\\ZoneMap\\Ranges\\Range100\\http","2","REG_DWORD");

		//修改IE ActiveX安全设置: 1本地Intranet区域
		WshShell.RegWrite("HKEY_CURRENT_USER\\Software\\Microsoft\\Windows\\CurrentVersion\\Internet Settings\\Zones\\1\\1001","0","REG_DWORD");
		WshShell.RegWrite("HKEY_CURRENT_USER\\Software\\Microsoft\\Windows\\CurrentVersion\\Internet Settings\\Zones\\1\\1004","0","REG_DWORD");
		WshShell.RegWrite("HKEY_CURRENT_USER\\Software\\Microsoft\\Windows\\CurrentVersion\\Internet Settings\\Zones\\1\\1200","0","REG_DWORD");
		WshShell.RegWrite("HKEY_CURRENT_USER\\Software\\Microsoft\\Windows\\CurrentVersion\\Internet Settings\\Zones\\1\\1201","0","REG_DWORD");
		WshShell.RegWrite("HKEY_CURRENT_USER\\Software\\Microsoft\\Windows\\CurrentVersion\\Internet Settings\\Zones\\1\\1405","0","REG_DWORD");
		WshShell.RegWrite("HKEY_CURRENT_USER\\Software\\Microsoft\\Windows\\CurrentVersion\\Internet Settings\\Zones\\1\\2201","0","REG_DWORD");

		//修改IE ActiveX安全设置:2受信任的站点区域
		WshShell.RegWrite("HKEY_CURRENT_USER\\Software\\Microsoft\\Windows\\CurrentVersion\\Internet Settings\\Zones\\2\\1001","0","REG_DWORD");
		WshShell.RegWrite("HKEY_CURRENT_USER\\Software\\Microsoft\\Windows\\CurrentVersion\\Internet Settings\\Zones\\2\\1004","0","REG_DWORD");
		WshShell.RegWrite("HKEY_CURRENT_USER\\Software\\Microsoft\\Windows\\CurrentVersion\\Internet Settings\\Zones\\2\\1200","0","REG_DWORD");
		WshShell.RegWrite("HKEY_CURRENT_USER\\Software\\Microsoft\\Windows\\CurrentVersion\\Internet Settings\\Zones\\2\\1201","0","REG_DWORD");
		WshShell.RegWrite("HKEY_CURRENT_USER\\Software\\Microsoft\\Windows\\CurrentVersion\\Internet Settings\\Zones\\2\\1405","0","REG_DWORD");
		WshShell.RegWrite("HKEY_CURRENT_USER\\Software\\Microsoft\\Windows\\CurrentVersion\\Internet Settings\\Zones\\2\\2201","0","REG_DWORD");

		//修改IE ActiveX安全设置:3Internet区域
		WshShell.RegWrite("HKEY_CURRENT_USER\\Software\\Microsoft\\Windows\\CurrentVersion\\Internet Settings\\Zones\\3\\1001","0","REG_DWORD");
		WshShell.RegWrite("HKEY_CURRENT_USER\\Software\\Microsoft\\Windows\\CurrentVersion\\Internet Settings\\Zones\\3\\1004","0","REG_DWORD");
		WshShell.RegWrite("HKEY_CURRENT_USER\\Software\\Microsoft\\Windows\\CurrentVersion\\Internet Settings\\Zones\\3\\1200","0","REG_DWORD");
		WshShell.RegWrite("HKEY_CURRENT_USER\\Software\\Microsoft\\Windows\\CurrentVersion\\Internet Settings\\Zones\\3\\1201","0","REG_DWORD");
		WshShell.RegWrite("HKEY_CURRENT_USER\\Software\\Microsoft\\Windows\\CurrentVersion\\Internet Settings\\Zones\\3\\1405","0","REG_DWORD");
		WshShell.RegWrite("HKEY_CURRENT_USER\\Software\\Microsoft\\Windows\\CurrentVersion\\Internet Settings\\Zones\\3\\2201","0","REG_DWORD");

		//禁用Winxp弹出窗口阻止程序
		WshShell.RegWrite("HKEY_CURRENT_USER\\Software\\Microsoft\\Internet Explorer\\New Windows\\PopupMgr","no");
	}catch(e){
		 //alert("不允许ActiveX控件");
	}
}1)网页修改activex安全设置该段代码也是必须在启用ActiveX的条件下调用成功,是需要用户在Internet的配置项中设置的(如下图),如何才能自动启用该插件?
2) chrome、火狐如何通过JS设置页边距、页眉、页脚?
3) IE高版本浏览器、火狐如何通过JS弹出浏览器自己的打印预览?
本文讲解了JS实现浏览器打印、打印预览 ,更多相关内容请关注php中文网。
相关推荐:
Create the simplest ThinkPhp project
Some summary about adding, deleting, modifying and checking of ThinkPHP
The above is the detailed content of JS implements browser printing and print preview. For more information, please follow other related articles on the PHP Chinese website!


![[Web front-end] Node.js quick start](https://img.php.cn/upload/course/000/000/067/662b5d34ba7c0227.png)


