

How to implement a collapsible tree menu in Vue.js
Through this article, I will show you how to use recursive components effectively. I will proceed step by step by building an expandable/collapse tree menu. Through this article, I will share with you how to use Vue.js recursive components to implement a collapsible tree menu. Friends who need it can refer to it

Call a recursive component in Vue.js is itself, such as:
Vue.component('recursive-component', {
  template: `<!--Invoking myself!-->
       <recursive-component></recursive-component>`
});Recursive components are often used to display comments on blogs, nested menus, or are basically the same type of parent and child, although the specific content is different. For example:

Now I will show you how to use recursive components effectively. I will proceed step by step by building an expandable/collapse tree menu.
Data Structure
The recursive component of a tree UI will be the visual representation of some recursive data structure. In this tutorial, we will use a tree structure, where each node is an object:
a label property.
If it has child nodes, a nodes attribute, then it is an array attribute of one or more nodes.
Like all tree structures, it must have a root node, but can be infinitely deep.
let tree = {
  label: 'root',
  nodes: [
   {
    label: 'item1',
    nodes: [
     {
      label: 'item1.1'
     },
     {
      label: 'item1.2',
      nodes: [
       {
        label: 'item1.2.1'
       }
      ]
     }
    ]
   },
   {
    label: 'item2'
   }
  ]
}Recursive Component
Let’s make a recursive component to display our data structure called TreeMenu. It only displays the current node's label, and calls itself to display any child nodes. File name: TreeMenu.vue, the content is as follows:
<template>
<p class="tree-menu">
<p>{{ label }}</p>
<tree-menu
v-for="node in nodes"
:nodes="node.nodes"
:label="node.label"
>
</tree-menu>
</p>
</template>
<script>
export default {
props: [ 'label', 'nodes' ],
name: 'tree-menu'
}
</script>If you use a component recursively, you must first make a global definition for Vue.component, or give it a name attribute. Otherwise, any child component will not be able to call it further and you will get an undefined "undefined component error" error message.
Basic Event
As with any recursive function, you need a basic event to end the recursion, otherwise rendering will continue indefinitely, This will eventually lead to stack overflow.
In the tree menu, we want to stop the recursion when we reach a node that has no children. You can do this via v-if , but our choice to use v-for will implicitly implement it for us; if the nodes array doesn't have any further definitions the tree-menu component will be called. The template.vue file is as follows:
<template>
  <p class="tree-menu">
   ...
   <!--If `nodes` is undefined this will not render-->
   <tree-menu v-for="node in nodes"></tree-menu>
 </template>
Usage
How do we use this component now? First, we declare a Vue instance with a data structure including a data attribute and a defined treemenu component. The app.js file looks like this:
import TreeMenu from './TreeMenu.vue'
 let tree = {
  ...
 }
 new Vue({
  el: '#app',
  data: {
   tree
  },
  components: {
   TreeMenu
  }
})Remember, our data structure has a root node. We start recursively calling the TreeMenu component in the main template, using the root nodes attribute to props:
<p id="app">
  <tree-menu :label="tree.label" :nodes="tree.nodes"></tree-menu>
 </p>
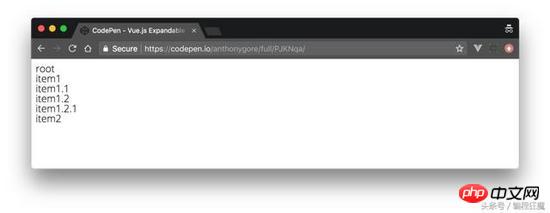
Here is what it currently looks like:
Correct Posture
It’s good to visually identify the “depth” of subcomponents so that users can get a feel for the data structure from the UI. Let's achieve this by indenting the child nodes at each level.
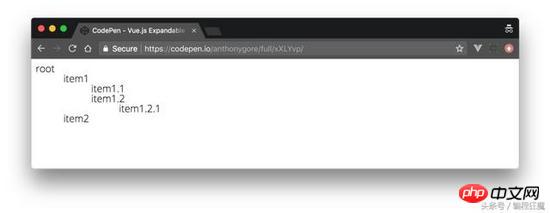
This is achieved by adding a depth prop definition through TreeMenu. We will use this value to dynamically bind inline styles with transforms: the CSS rule for transform: translate will be used for each node's label, thus creating an indent. template.vue is modified as follows**: **
<template>
<p class="tree-menu">
<p :style="indent">{{ label }}</p>
<tree-menu
v-for="node in nodes"
:nodes="node.nodes"
:label="node.label"
:depth="depth + 1"
>
</tree-menu>
</p>
</template>
<script>
export default {
props: [ 'label', 'nodes', 'depth' ],
name: 'tree-menu',
computed: {
indent() {
return { transform: `translate(${this.depth * 50}px)` }
}
}
}
</script>The depth attribute starts from zero in the main template. In the component template above, you can see that this value is incremented every time it is passed to any child node.
<p id="app">
  <tree-menu
   :label="tree.label"
   :nodes="tree.nodes"
   :depth="0"
  ></tree-menu>
 </p>
Note: Remember to v-bind the depth value to make sure it is a JavaScript number type and not a string.
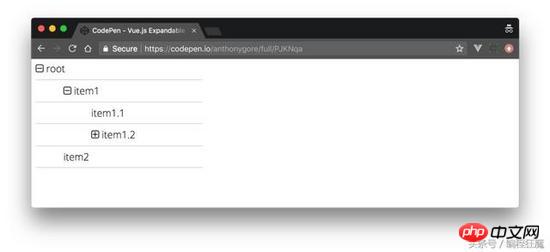
Expand/Collapse
Since recursive data structures can be large, it is a good idea to display them The UI trick is to hide all nodes except the root node so that the user can expand or collapse the nodes as needed.
To do this, we will add a local attribute showChildren. If its value is False, the child node will not be rendered. This value should be toggled by clicking on the node, so we need to use a click event listener method toggleChildren to manage it. The template.vue file is modified as follows**: **
<template>
<p class="tree-menu">
<p :style="indent" @click="toggleChildren">{{ label }}</p>
<tree-menu
v-if="showChildren"
v-for="node in nodes"
:nodes="node.nodes"
:label="node.label"
:depth="depth + 1"
>
</tree-menu>
</p>
</template>
<script>
export default {
props: [ 'label', 'nodes', 'depth' ],
data() {
return { showChildren: false }
},
name: 'tree-menu',
computed: {
indent() {
return { transform: `translate(${this.depth * 50}px)` }
}
},
methods: {
toggleChildren() {
this.showChildren = !this.showChildren;
}
}
}
</script>Summary
In this way, we have a working tree menu. As a finishing touch, you can add a plus/minus icon to make the UI more visible. I also added great font and computing capabilities to the original showChildren.
Go to CodePen (https://codepen.io/anthonygore/pen/PJKNqa) to see how I implemented it.
The above is what I compiled for everyone. I hope it will be helpful to everyone in the future.
Related articles:
Implementing multiple routing implementations in Vue-Router2.X
Detailed interpretation of react controlled components and non- Controlled components
Using routing and hook functions in Vue2.X
Vuejs single-file component (detailed tutorial)
Use the image lazy loading plug-in in vue-lazyload
The above is the detailed content of How to implement a collapsible tree menu in Vue.js. For more information, please follow other related articles on the PHP Chinese website!

Hot AI Tools

Undresser.AI Undress
AI-powered app for creating realistic nude photos

AI Clothes Remover
Online AI tool for removing clothes from photos.

Undress AI Tool
Undress images for free

Clothoff.io
AI clothes remover

AI Hentai Generator
Generate AI Hentai for free.

Hot Article
Hot Tools

Notepad++7.3.1
Easy-to-use and free code editor

SublimeText3 Chinese version
Chinese version, very easy to use

Zend Studio 13.0.1
Powerful PHP integrated development environment

Dreamweaver CS6
Visual web development tools

SublimeText3 Mac version
God-level code editing software (SublimeText3)
Hot Topics
 1377
1377
 52
52

 In-depth discussion of how vite parses .env files
Jan 24, 2023 am 05:30 AM
In-depth discussion of how vite parses .env files
Jan 24, 2023 am 05:30 AM
When using the Vue framework to develop front-end projects, we will deploy multiple environments when deploying. Often the interface domain names called by development, testing and online environments are different. How can we make the distinction? That is using environment variables and patterns.
 What is the difference between componentization and modularization in vue
Dec 15, 2022 pm 12:54 PM
What is the difference between componentization and modularization in vue
Dec 15, 2022 pm 12:54 PM
The difference between componentization and modularization: Modularization is divided from the perspective of code logic; it facilitates code layered development and ensures that the functions of each functional module are consistent. Componentization is planning from the perspective of UI interface; componentization of the front end facilitates the reuse of UI components.
 Detailed graphic explanation of how to integrate the Ace code editor in a Vue project
Apr 24, 2023 am 10:52 AM
Detailed graphic explanation of how to integrate the Ace code editor in a Vue project
Apr 24, 2023 am 10:52 AM
Ace is an embeddable code editor written in JavaScript. It matches the functionality and performance of native editors like Sublime, Vim, and TextMate. It can be easily embedded into any web page and JavaScript application. Ace is maintained as the main editor for the Cloud9 IDE and is the successor to the Mozilla Skywriter (Bespin) project.
 Let's talk in depth about reactive() in vue3
Jan 06, 2023 pm 09:21 PM
Let's talk in depth about reactive() in vue3
Jan 06, 2023 pm 09:21 PM
Foreword: In the development of vue3, reactive provides a method to implement responsive data. This is a frequently used API in daily development. In this article, the author will explore its internal operating mechanism.
 Explore how to write unit tests in Vue3
Apr 25, 2023 pm 07:41 PM
Explore how to write unit tests in Vue3
Apr 25, 2023 pm 07:41 PM
Vue.js has become a very popular framework in front-end development today. As Vue.js continues to evolve, unit testing is becoming more and more important. Today we’ll explore how to write unit tests in Vue.js 3 and provide some best practices and common problems and solutions.
 A simple comparison of JSX syntax and template syntax in Vue (analysis of advantages and disadvantages)
Mar 23, 2023 pm 07:53 PM
A simple comparison of JSX syntax and template syntax in Vue (analysis of advantages and disadvantages)
Mar 23, 2023 pm 07:53 PM
In Vue.js, developers can use two different syntaxes to create user interfaces: JSX syntax and template syntax. Both syntaxes have their own advantages and disadvantages. Let’s discuss their differences, advantages and disadvantages.
 A brief analysis of how vue implements file slicing upload
Mar 24, 2023 pm 07:40 PM
A brief analysis of how vue implements file slicing upload
Mar 24, 2023 pm 07:40 PM
In the actual development project process, sometimes it is necessary to upload relatively large files, and then the upload will be relatively slow, so the background may require the front-end to upload file slices. It is very simple. For example, 1 A gigabyte file stream is cut into several small file streams, and then the interface is requested to deliver the small file streams respectively.
 A brief analysis of how to handle exceptions in Vue3 dynamic components
Dec 02, 2022 pm 09:11 PM
A brief analysis of how to handle exceptions in Vue3 dynamic components
Dec 02, 2022 pm 09:11 PM
How to handle exceptions in Vue3 dynamic components? The following article will talk about Vue3 dynamic component exception handling methods. I hope it will be helpful to everyone!
