

How to implement table filtering using Angular
This article mainly introduces Angular's implementation of more complex table filtering and deletion functions. It analyzes AngularJS's related operation skills such as table sorting, query matching, and dynamic modification of page element attributes in the form of examples. Friends in need can refer to the following
The example in this article describes Angular's implementation of more complex table filtering and deletion functions. Share it with everyone for your reference, the details are as follows:
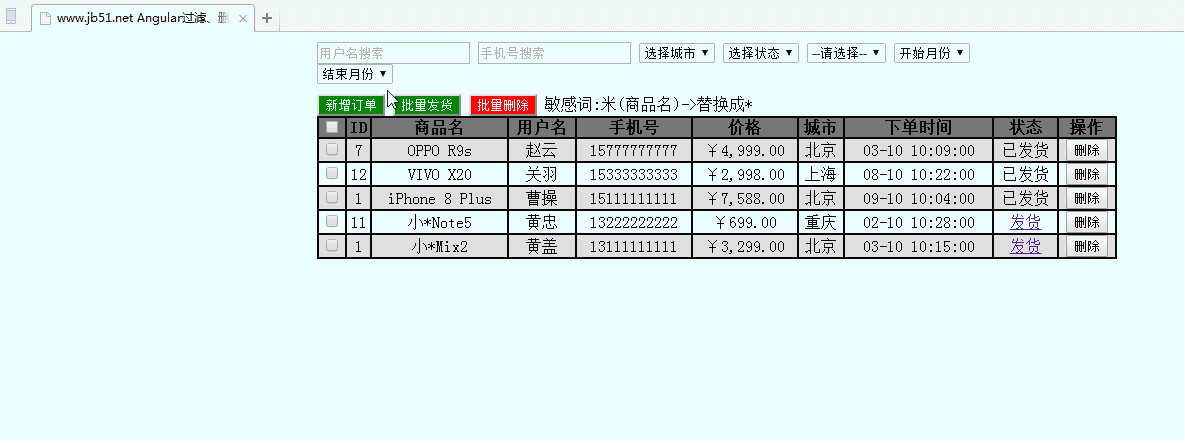
Let’s take a look at the running effect first:
The specific code is as follows:
<!DOCTYPE html>
<html>
<head>
<meta charset="utf-8" />
<title>www.jb51.net Angular过滤、删除</title>
<style>
table{
border: 1px solid black;
width: 800px;
}
td , th{
border: 1px solid black;
text-align: center;
}
th{
background: #767674;
}
.d1{
width: 50%;
margin: 0 auto;
}
.d2{
margin-top: 10px;
}
.btn{
background: green;
color: white;
}
.btn1{
background: red;
color: white;
}
tr:nth-child(2n){
background-color: gainsboro;
}
</style>
<script src="angular.min.js"></script>
<script type="text/javascript" src="jquery-1.9.1.min.js" ></script>
<script>
angular.module("MyApp",[])
.controller("democ",function($scope,$filter){
$scope.isc = false;
$scope.arrs = [{
checked:false,
id:7,
name:"OPPO R9s",
user:"赵云",
tel:15777777777,
price:4999,
city:"北京",
time:new Date('03-09 10:00'),
sta:"已发货"
},
{
checked:false,
id:12,
name:"VIVO X20",
user:"关羽",
tel:15333333333,
price:2998,
city:"上海",
time:new Date('08-22 10:00'),
sta:"已发货"
},
{
checked:false,
id:1,
name:"iPhone 8 Plus",
user:"曹操",
tel:15111111111,
price:7588,
city:"北京",
time:new Date('09-04 10:00'),
sta:"已发货"
},
{
checked:false,
id:11,
name:"小*Note5",
user:"黄忠",
tel:13222222222,
price:699,
city:"重庆",
time:new Date('02-28 10:00'),
sta:"发货"
},
{
checked:false,
id:1,
name:"小*Mix2",
user:"黄盖",
tel:13111111111,
price:3299,
city:"北京",
time:new Date('03-015 10:00'),
sta:"发货"
}];
$scope.arr = $scope.arrs;
$scope.seluser = function(){
$scope.arr = [];
var val = $scope.reg_user;
var f = $filter("filter");
$scope.arr = f($scope.arrs,{"user":val});
}
$scope.seltel = function(){
$scope.arr = [];
var val = $scope.reg_tel;
var f = $filter("filter");
$scope.arr = f($scope.arrs,{"tel":val});
}
$scope.selsta = function(){
$scope.arr = [];
var val = $scope.reg_sta;
var f = $filter("filter");
$scope.arr = f($scope.arrs,{"sta":val});
}
$scope.ckAll = function(){
var ck = $scope.sta_ck;
for(var i=0; i<$scope.arrs.length; i++){
$scope.arrs[i].checked = ck;
}
}
$scope.del = function(th){
$scope.arrs.splice(th,1);
}
$scope.delAll = function(){
for(var i=0; i<$scope.arrs.length; i++){
if($scope.arrs[i].checked==true){
$scope.arrs.splice(i,1);
i--;
}
}
}
$scope.add = function(){
var d=new Date();
$scope.arrs.push({
checked:false,
id:$scope.a_id,
name:$scope.a_name,
user:$scope.a_user,
tel:$scope.a_tel,
price:$scope.a_price,
city:$scope.a_city,
time:d,
sta:"发货"
});
$scope.arr = $scope.arrs;
$scope.isc = false;
}
});
</script>
</head>
<body ng-app="MyApp" ng-controller="democ">
<p class="d1">
<p>
<input type="text" placeholder="用户名搜索" ng-change="seluser()" ng-model="reg_user"/>
<input type="text" placeholder="手机号搜索" ng-change="seltel()" ng-model="reg_tel"/>
<select>
<option>选择城市</option>
<option>北京</option>
<option>上海</option>
<option>广州</option>
</select>
<select ng-change="selsta()" ng-model="reg_sta">
<option value="">选择状态</option>
<option value="发货">发货</option>
<option value="已发货">已发货</option>
</select>
<select ng-model="selid">
<option value="">--请选择--</option>
<option value="id">ID正序</option>
<option value="-id">ID倒叙</option>
</select>
<select ng-model="selmonth">
<option value="">开始月份</option>
<option value="1">1</option>
<option value="2">2</option>
<option value="3">3</option>
<option value="4">4</option>
<option value="5">5</option>
<option value="6">6</option>
<option value="7">7</option>
<option value="8">8</option>
<option value="9">9</option>
<option value="10">10</option>
<option value="11">11</option>
<option value="12">12</option>
</select>
<select ng-model="lastmonth">
<option value="">结束月份</option>
<option value="1">1</option>
<option value="2">2</option>
<option value="3">3</option>
<option value="4">4</option>
<option value="5">5</option>
<option value="6">6</option>
<option value="7">7</option>
<option value="8">8</option>
<option value="9">9</option>
<option value="10">10</option>
<option value="11">11</option>
<option value="12">12</option>
</select>
</p>
<p class="d2">
<input type="button" value="新增订单" class="btn" ng-click="isc=true"/>
<input type="button" value="批量发货" class="btn"/>
<input type="button" value="批量删除" class="btn1" ng-click="delAll()"/>
敏感词:米(商品名)->替换成*
</p>
<p>
<table cellpadding="0" cellspacing="0">
<tr>
<th><input type="checkbox" ng-change="ckAll()" ng-model="sta_ck"/></th>
<th>ID</th>
<th>商品名</th>
<th>用户名</th>
<th>手机号</th>
<th>价格</th>
<th>城市</th>
<th>下单时间</th>
<th>状态</th>
<th>操作</th>
</tr>
<tr ng-repeat="a in arr|orderBy : selid | filter:{time:selmonth} | filter:{time:lastmonth}">
<td><input type="checkbox" ng-model="a.checked"/></td>
<td>{{a.id}}</td>
<td>{{a.name}}</td>
<td>{{a.user}}</td>
<td>{{a.tel}}</td>
<td>{{a.price|currency : '¥'}}</td>
<td>{{a.city}}</td>
<td>{{a.time|date : 'MM-HH hh:dd:ss'}}</td>
<td>
<span ng-show="a.sta=='已发货'">{{a.sta}}</span>
<span ng-show="a.sta=='发货'"><a href="#" rel="external nofollow" ng-click="a.sta='已发货'">{{a.sta}}</a></span>
</td>
<td><input type="button" value="删除" ng-click="del(this)"/></td>
</tr>
</table>
</p>
<p ng-show="isc">
I D:<input type="text" ng-model="a_id"/><br />
商品名:<input type="text" ng-model="a_name"/><br />
用户名:<input type="text" ng-model="a_user"/><br />
手机号:<input type="text" ng-model="a_tel"/><br />
价 值:<input type="text" ng-model="a_price"/><br />
城 市:<input type="text" ng-model="a_city"/><br />
<input type="button" value="保存" ng-click="add()"/>
</p>
</p>
</body>
</html>and above This is the text I compiled, I hope it will be helpful to everyone
Related articles:
How to use navigation guard usage in VueRouter
How to implement a collapsible tree menu in Vue.js
The above is the detailed content of How to implement table filtering using Angular. For more information, please follow other related articles on the PHP Chinese website!

Hot AI Tools

Undresser.AI Undress
AI-powered app for creating realistic nude photos

AI Clothes Remover
Online AI tool for removing clothes from photos.

Undress AI Tool
Undress images for free

Clothoff.io
AI clothes remover

AI Hentai Generator
Generate AI Hentai for free.

Hot Article
Hot Tools

Notepad++7.3.1
Easy-to-use and free code editor

SublimeText3 Chinese version
Chinese version, very easy to use

Zend Studio 13.0.1
Powerful PHP integrated development environment

Dreamweaver CS6
Visual web development tools

SublimeText3 Mac version
God-level code editing software (SublimeText3)
Hot Topics
 1378
1378
 52
52

 Steps to adjust the format of pictures inserted in PPT tables
Mar 26, 2024 pm 04:16 PM
Steps to adjust the format of pictures inserted in PPT tables
Mar 26, 2024 pm 04:16 PM
1. Create a new PPT file and name it [PPT Tips] as an example. 2. Double-click [PPT Tips] to open the PPT file. 3. Insert a table with two rows and two columns as an example. 4. Double-click on the border of the table, and the [Design] option will appear on the upper toolbar. 5. Click the [Shading] option and click [Picture]. 6. Click [Picture] to pop up the fill options dialog box with the picture as the background. 7. Find the tray you want to insert in the directory and click OK to insert the picture. 8. Right-click on the table box to bring up the settings dialog box. 9. Click [Format Cells] and check [Tile images as shading]. 10. Set [Center], [Mirror] and other functions you need, and click OK. Note: The default is for pictures to be filled in the table
 How to delete Xiaohongshu notes
Mar 21, 2024 pm 08:12 PM
How to delete Xiaohongshu notes
Mar 21, 2024 pm 08:12 PM
How to delete Xiaohongshu notes? Notes can be edited in the Xiaohongshu APP. Most users don’t know how to delete Xiaohongshu notes. Next, the editor brings users pictures and texts on how to delete Xiaohongshu notes. Tutorial, interested users come and take a look! Xiaohongshu usage tutorial How to delete Xiaohongshu notes 1. First open the Xiaohongshu APP and enter the main page, select [Me] in the lower right corner to enter the special area; 2. Then in the My area, click on the note page shown in the picture below , select the note you want to delete; 3. Enter the note page, click [three dots] in the upper right corner; 4. Finally, the function bar will expand at the bottom, click [Delete] to complete.
 Is it true that you can be blocked and deleted on WeChat and permanently unable to be added?
Apr 08, 2024 am 11:41 AM
Is it true that you can be blocked and deleted on WeChat and permanently unable to be added?
Apr 08, 2024 am 11:41 AM
1. First of all, it is false to block and delete someone permanently and not add them permanently. If you want to add the other party after you have blocked them and deleted them, you only need the other party's consent. 2. If a user blocks someone, the other party will not be able to send messages to the user, view the user's circle of friends, or make calls with the user. 3. Blocking does not mean deleting the other party from the user's WeChat contact list. 4. If the user deletes the other party from the user's WeChat contact list after blocking them, there is no way to recover after deletion. 5. If the user wants to add the other party as a friend again, the other party needs to agree and add the user again.
 How to make a table for sales forecast
Mar 20, 2024 pm 03:06 PM
How to make a table for sales forecast
Mar 20, 2024 pm 03:06 PM
Being able to skillfully make forms is not only a necessary skill for accounting, human resources, and finance. For many sales staff, learning to make forms is also very important. Because the data related to sales is very large and complex, and it cannot be simply recorded in a document to explain the problem. In order to enable more sales staff to be proficient in using Excel to make tables, the editor will introduce the table making issues about sales forecasting. Friends in need should not miss it! 1. Open [Sales Forecast and Target Setting], xlsm, to analyze the data stored in each table. 2. Create a new [Blank Worksheet], select [Cell], and enter [Label Information]. [Drag] downward and [Fill] the month. Enter [Other] data and click [
 How to delete Xiaohongshu releases? How to recover after deletion?
Mar 21, 2024 pm 05:10 PM
How to delete Xiaohongshu releases? How to recover after deletion?
Mar 21, 2024 pm 05:10 PM
As a popular social e-commerce platform, Xiaohongshu has attracted a large number of users to share their daily life and shopping experiences. Sometimes we may inadvertently publish some inappropriate content, which needs to be deleted in time to better maintain our personal image or comply with platform regulations. 1. How to delete Xiaohongshu releases? 1. Log in to your Xiaohongshu account and enter your personal homepage. 2. At the bottom of the personal homepage, find the "My Creations" option and click to enter. 3. On the "My Creations" page, you can see all published content, including notes, videos, etc. 4. Find the content that needs to be deleted and click the "..." button on the right. 5. In the pop-up menu, select the "Delete" option. 6. After confirming the deletion, the content will disappear from your personal homepage and public page.
 How to set WPS value to automatically change color according to conditions_Steps to set WPS table value to automatically change color according to condition
Mar 27, 2024 pm 07:30 PM
How to set WPS value to automatically change color according to conditions_Steps to set WPS table value to automatically change color according to condition
Mar 27, 2024 pm 07:30 PM
1. Open the worksheet and find the [Start]-[Conditional Formatting] button. 2. Click Column Selection and select the column to which conditional formatting will be added. 3. Click the [Conditional Formatting] button to bring up the option menu. 4. Select [Highlight conditional rules]-[Between]. 5. Fill in the rules: 20, 24, dark green text with dark fill color. 6. After confirmation, the data in the selected column will be colored with corresponding numbers, text, and cell boxes according to the settings. 7. Conditional rules without conflicts can be added repeatedly, but for conflicting rules WPS will replace the previously established conditional rules with the last added rule. 8. Repeatedly add the cell columns after [Between] rules 20-24 and [Less than] 20. 9. If you need to change the rules, you can just clear the rules and then reset the rules.
 How to completely delete WeChat File Transfer Assistant_Introduction to how to close WeChat File Transfer Assistant
Mar 20, 2024 pm 08:31 PM
How to completely delete WeChat File Transfer Assistant_Introduction to how to close WeChat File Transfer Assistant
Mar 20, 2024 pm 08:31 PM
WeChat's file transfer assistant is available to every user. Some users use it as a memo to record some things. So how to completely delete WeChat File Transfer Assistant? Let me introduce it to you in detail below. How to completely delete WeChat File Transfer Assistant? Answer: [WeChat]-[Long press File Transfer Assistant]-[Delete this chat]. Specific steps: 1. First open the WeChat software. After entering the home page, we find [File Transfer Assistant] and press and hold; 2. Then a pop-up will be marked as unread, pin the chat to the top, do not display the chat, and delete the chat. Here We can click [Delete this chat];
 How to completely delete TikTok chat history
May 07, 2024 am 11:14 AM
How to completely delete TikTok chat history
May 07, 2024 am 11:14 AM
1. Open the Douyin app, click [Message] at the bottom of the interface, and click the chat conversation entry that needs to be deleted. 2. Long press any chat record, click [Multiple Select], and check the chat records you want to delete. 3. Click the [Delete] button in the lower right corner and select [Confirm deletion] in the pop-up window to permanently delete these records.
