

How to create a complete project process using gulp
This article mainly introduces a brief discussion of the complete project process of creating gulp. Now I will share it with you and give you a reference.
gulp is a tool for automatically building projects during front-end development. The same function is grunt. The build tool relies on plug-ins to automatically monitor file changes and complete functions such as syntax checking, merging, renaming, compression, formatting, automatic browser refresh, and deployment of files such as js/sass/less/html/image/css/coffee.
All environments are executed based on node installation. node -v Check the installation status of node. npm -v Check the installation status of npm.
Common parameters for gulp automated construction
1. src reads files or folders
2. dest generates files, that is, writes files
3. watch detection file
4. tesk specified task
5.pipe process gulp in a streaming way.
gulp creates a complete project The directory structure is as follows
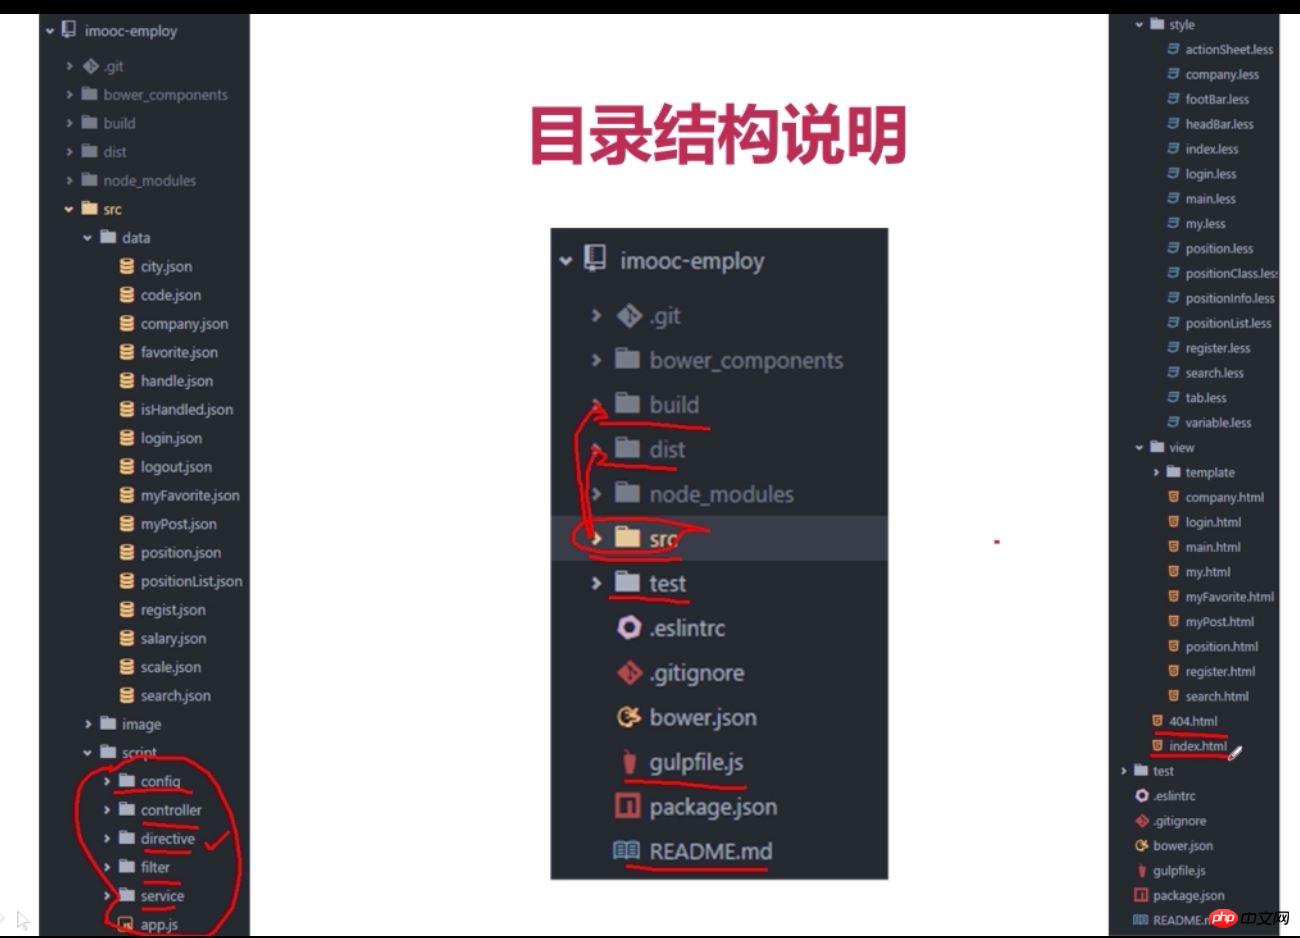
Explanation:
bower_components This file contains third-party js installed through bower.
build: Project integration directory, usually all code is integrated here without compression.
dist: Project release directory, also after compressing all files.
src: Project source file directory, all source files are placed here.
test: This is for writing automated tests
1. Enter the project root directory in the terminal and install bower.
bower init
Initialize Bower, generate the bower.json file, and then install it Required plug-ins and third-party files such as angular execute
bower install - - save angular
to see how to use bower.
2. Install and view gulp in the project root directory.
Install gulp globally
npm install --global gulp
Then create the configuration file
npm init Initialize and create the package.json file
npm install --save-dev gulp will Node's configuration environment is loaded into the configuration file.
Then install the required plug-ins
npm install xxx —save-dev will automatically write the file into the configuration file.
These are commonly used to create the entire site. If there are multiple plug-ins, you can separate the plug-ins in the form of spaces
npm install gulp-clean gulp-concat gulp-connect gulp-cssmin gulp-imagemin gulp-less gulp-load-plugins gulp-uglify open -—save-dev
Then there is the writing of the gulpfile.js configuration file. Specifically, the following
//引入gulp
var gulp = require('gulp');
//这样的话 其他的模块可以直接使用 $ 符号来引入
var $ = require('gulp-load-plugins')();
var open = require('open');

//定义目录路径
var app = {
 //源代码,文件目录
 srcPath: 'src/',
 //文件整合之后的目录
 devPath: 'build/',
 //项目,发布目录上产部署
 prdPath: 'dist/'
};

//通过bower安装的插件,需要拷贝到 devPath prdPath中
gulp.task('lib',function(){
 // /**/* 读取这个文件夹下边的所有的文件或者文件夹
 gulp.src('bower_components/**/*')
 //读取完整后进行操作 西安拷贝到整合目录 并重命名,在拷贝到生产目录并重命名
 .pipe(gulp.dest(app.devPath + 'vendor'))
 .pipe(gulp.dest(app.prdPath + 'vendor'))
 .pipe($.connect.reload()); //文件更改后自动变异 并执行启动服务重新打开浏览器
});
//将 html 拷贝到 devPath prdPath中
gulp.task('html',function(){
 gulp.src(app.srcPath + '**/*.html')
 .pipe(gulp.dest(app.devPath))
 .pipe(gulp.dest(app.prdPath))
 .pipe($.connect.reload());
});
//将 模拟的json 文件 拷贝到 devPath prdPath中
gulp.task('json',function(){
 gulp.src(app.srcPath + 'data/**/*.json')
 .pipe(gulp.dest(app.devPath + 'data'))
 .pipe(gulp.dest(app.prdPath + 'data'))
 .pipe($.connect.reload());
});

//将 index.less 文件 拷贝到 devPath prdPath中,index.less引入了所有的其他的less
gulp.task('less',function(){
 gulp.src(app.srcPath + 'style/index.less')
 .pipe($.less())
 .pipe(gulp.dest(app.devPath + 'css'))
 .pipe($.cssmin())
 .pipe(gulp.dest(app.prdPath + 'css'))
 .pipe($.connect.reload());
});
// 拷贝 js 文件 将所有的源文件中的js 文件整合成index.js 然后拷贝过去
gulp.task('script',function(){
 gulp.src(app.srcPath + 'script/**/*.js')
 .pipe($.concat('index.js'))
 .pipe(gulp.dest(app.devPath + 'js'))
 .pipe($.uglify())
 .pipe(gulp.dest(app.prdPath + 'js'))
 .pipe($.connect.reload());
});

//拷贝 压缩 图片 最后放到发布目录下
gulp.task('image',function(){
 gulp.src(app.srcPath + 'image/**/*')
 //江源图片放到整合目录下,在压缩放到生产目录下
 .pipe(gulp.dest(app.devPath + 'image'))
 .pipe($.imagemin())
 .pipe(gulp.dest(app.prdPath + 'image'))
 .pipe($.connect.reload());
});

//总的方法
gulp.task('build',['image', 'script', 'less', 'json', 'html', 'lib']);

//清除旧文件,每次更新的时候
gulp.task('clean',function(){
 gulp.src([app.devPath,app.prdPath])
 .pipe($.clean());
})

//编写服务
gulp.task('serve',['build'], function() {
 $.connect.server({
  //服务起来的入口
  root: [app.devPath],
  //文件更改后自动刷新页面
  livereload: true,
  //端口号
  port: 1234
 });
 // 在 命令工具中执行 gulp serve 就相当于是启动了服务
 //自动打开浏览器
 open('http://localhost:1234');
 //我们希望更改了文件,就自动编译,并且打包等然后打开浏览器
 gulp.watch('bower_components/**/*' , ['lib']);
 //监听 script 下边的 js 文件,并执行 script 方法
 gulp.watch(app.srcPath + 'script/**/*.js', ['script']);
 gulp.watch(app.srcPath + '**/*.html', ['html']);
 gulp.watch(app.srcPath + 'data/**/*.json', ['json']);
 gulp.watch(app.srcPath + 'style/**/*.less', ['less']);
 gulp.watch(app.srcPath + 'image/**/*', ['image']);
 //这样文件变更了就会自动构建
});
//默认执行的任务,直接 执行 gulp 变行了。都编写完成后再终端 执行 gulp 便可以了。
gulp.task('default', ['serve']);Using gulp to create a complete project process is completed
The above is what I compiled for everyone. I hope it will be helpful to everyone in the future.
Related articles:
Solution to the Bootstrap modal box submission BUG
Detailed interpretation of the entry function run in webpack
How to implement entry/leave animation in Vue
Detailed introduction to routing and middleware in node.js
The above is the detailed content of How to create a complete project process using gulp. For more information, please follow other related articles on the PHP Chinese website!

Hot AI Tools

Undresser.AI Undress
AI-powered app for creating realistic nude photos

AI Clothes Remover
Online AI tool for removing clothes from photos.

Undress AI Tool
Undress images for free

Clothoff.io
AI clothes remover

AI Hentai Generator
Generate AI Hentai for free.

Hot Article
Hot Tools

Notepad++7.3.1
Easy-to-use and free code editor

SublimeText3 Chinese version
Chinese version, very easy to use

Zend Studio 13.0.1
Powerful PHP integrated development environment

Dreamweaver CS6
Visual web development tools

SublimeText3 Mac version
God-level code editing software (SublimeText3)
Hot Topics
 1378
1378
 52
52

 How do I create and publish my own JavaScript libraries?
Mar 18, 2025 pm 03:12 PM
How do I create and publish my own JavaScript libraries?
Mar 18, 2025 pm 03:12 PM
Article discusses creating, publishing, and maintaining JavaScript libraries, focusing on planning, development, testing, documentation, and promotion strategies.
 How do I optimize JavaScript code for performance in the browser?
Mar 18, 2025 pm 03:14 PM
How do I optimize JavaScript code for performance in the browser?
Mar 18, 2025 pm 03:14 PM
The article discusses strategies for optimizing JavaScript performance in browsers, focusing on reducing execution time and minimizing impact on page load speed.
 What should I do if I encounter garbled code printing for front-end thermal paper receipts?
Apr 04, 2025 pm 02:42 PM
What should I do if I encounter garbled code printing for front-end thermal paper receipts?
Apr 04, 2025 pm 02:42 PM
Frequently Asked Questions and Solutions for Front-end Thermal Paper Ticket Printing In Front-end Development, Ticket Printing is a common requirement. However, many developers are implementing...
 How do I debug JavaScript code effectively using browser developer tools?
Mar 18, 2025 pm 03:16 PM
How do I debug JavaScript code effectively using browser developer tools?
Mar 18, 2025 pm 03:16 PM
The article discusses effective JavaScript debugging using browser developer tools, focusing on setting breakpoints, using the console, and analyzing performance.
 Who gets paid more Python or JavaScript?
Apr 04, 2025 am 12:09 AM
Who gets paid more Python or JavaScript?
Apr 04, 2025 am 12:09 AM
There is no absolute salary for Python and JavaScript developers, depending on skills and industry needs. 1. Python may be paid more in data science and machine learning. 2. JavaScript has great demand in front-end and full-stack development, and its salary is also considerable. 3. Influencing factors include experience, geographical location, company size and specific skills.
 How do I use source maps to debug minified JavaScript code?
Mar 18, 2025 pm 03:17 PM
How do I use source maps to debug minified JavaScript code?
Mar 18, 2025 pm 03:17 PM
The article explains how to use source maps to debug minified JavaScript by mapping it back to the original code. It discusses enabling source maps, setting breakpoints, and using tools like Chrome DevTools and Webpack.
 The difference in console.log output result: Why are the two calls different?
Apr 04, 2025 pm 05:12 PM
The difference in console.log output result: Why are the two calls different?
Apr 04, 2025 pm 05:12 PM
In-depth discussion of the root causes of the difference in console.log output. This article will analyze the differences in the output results of console.log function in a piece of code and explain the reasons behind it. �...
 TypeScript for Beginners, Part 2: Basic Data Types
Mar 19, 2025 am 09:10 AM
TypeScript for Beginners, Part 2: Basic Data Types
Mar 19, 2025 am 09:10 AM
Once you have mastered the entry-level TypeScript tutorial, you should be able to write your own code in an IDE that supports TypeScript and compile it into JavaScript. This tutorial will dive into various data types in TypeScript. JavaScript has seven data types: Null, Undefined, Boolean, Number, String, Symbol (introduced by ES6) and Object. TypeScript defines more types on this basis, and this tutorial will cover all of them in detail. Null data type Like JavaScript, null in TypeScript
