

How to implement picker effect in vue
This article mainly introduces the Vue implementation of ios native picker effect and the analysis of implementation ideas. This article introduces you in very detail and has reference value. Friends in need can refer to it.
was the first to implement one before There is a similar time selection plug-in, but its scope of application is too narrow. I simply want to release this implementation recently and rewrite a highly reusable vue component.
Support Android 4.0 or above, Safari 7 or above
Effect preview
gitHub
The main wheel part dom structure
<template data-filtered="filtered">
<p class="pd-select-item">
<p class="pd-select-line"></p>
<ul class="pd-select-list">
<li class="pd-select-list-item">1</li>
</ul>
<ul class="pd-select-wheel">
<li class="pd-select-wheel-item">1</li>
</ul>
</p>
</template>
props
props: {
data: {
type: Array,
required: true
},
type: {
type: String,
default: 'cycle'
},
value: {}
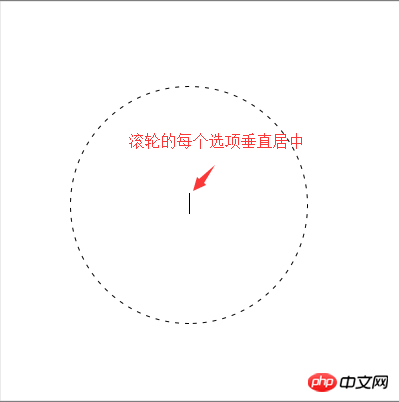
}Set the css style to center it vertically
.pd-select-line, .pd-select-list, .pd-select-wheel {
  position: absolute;
  left: 0;
  right: 0;
  top: 50%;
  transform: translateY(-50%);
}
.pd-select-list {
  overflow: hidden;
}Scroller 3d style setting
/* 滚轮盒子 */
.pd-select-wheel {
  transform-style: preserve-3d;
  height: 30px;
}
/* 滚轮单项 */
.pd-select-wheel-item {
  white-space: nowrap;
  text-overflow: ellipsis;
  backface-visibility: hidden;
  position: absolute;
  top: 0px;
  width: 100%;
  overflow: hidden;
}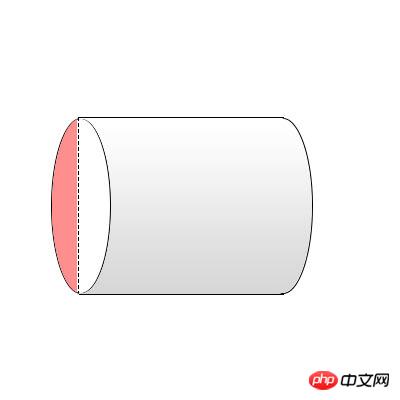
Mainly pay attention to the two attributes transform-style: preserve-3d; backface-visibility: hidden;
The first one is the 3D layout, which makes the interface 3D, and the second one is the The wheel is automatically hidden behind it (the red part in the picture above, the dom node on the back will be automatically hidden)
How to implement the 3D wheel
The main sentence of the box is this css transform: rotate3d(1 , 0, 0, x deg);
item mainly uses this css transform: rotate3d(1, 0, 0, xdeg) translate3d(0px, 0px, [x]px);
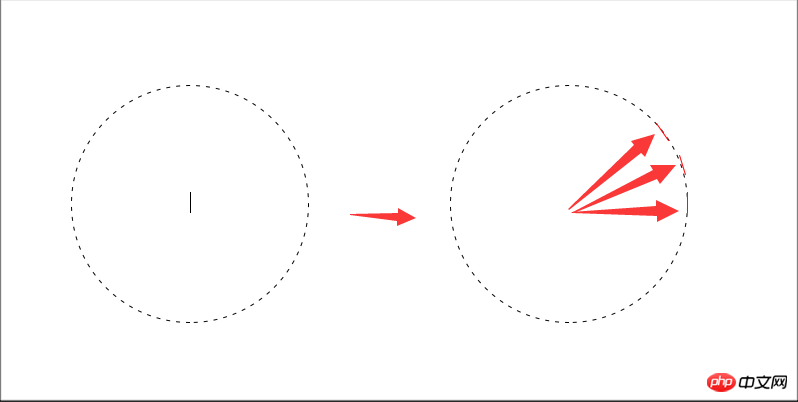

The above two pictures show the effect of translate3d(0px, 0px, [x]px); [x ] is the radius of the circle
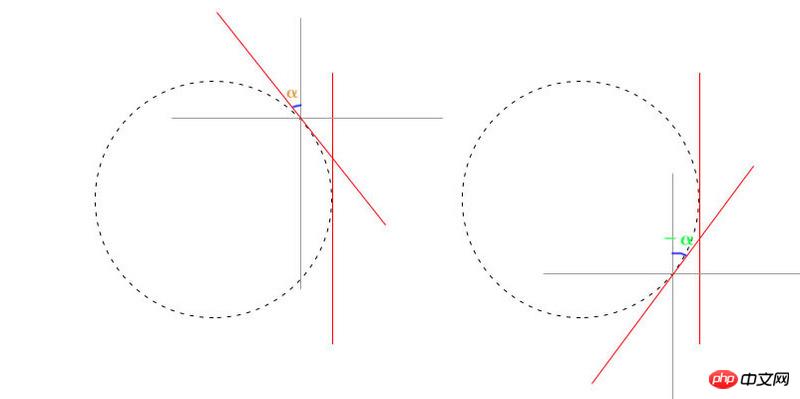
#As you can see from the above picture, we only need to rotate each dom itself, and then use translate3d(0px, 0px, [x]px); Expand each dom
to form a ring. α is the angle of rotation of each dom. Because only 0 to 180° is used here, a box is used to contain these dom
Line height and angle calculation
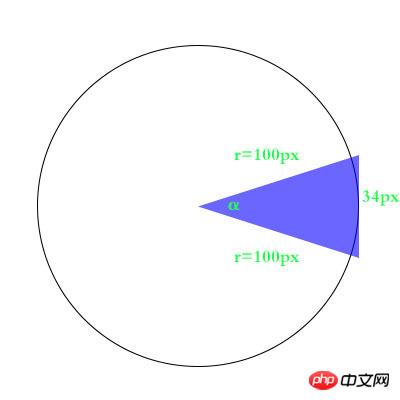
#Calculate the length of the third side if the two sides and the angle are known~=34px
http ://tool.520101.com/calculator/sanjiaoxingjiaodu/
Infinite scroll wheel implementation
/* 滚轮展示大小限定 */
spin: {start: 0, end: 9, branch: 9}

/* 获取spin 数据 */
 getSpinData (index) {
  index = index % this.listData.length
  return this.listData[index >= 0 ? index : index + this.listData.length]
 }
/* 模运算 获取数组有的索引 这样就构成 圆环了 */touchend does special processing
Set the setCSS type in touchend to round the scrolling data, so that when it stops, it will
accurately rotate one grid at a time
// other code ....
/* 计算touchEnd移动的整数距离 */
    let endMove = margin
    let endDeg = Math.round(updateDeg / deg) * deg
    if (type === 'end') {
     this.setListTransform(endMove, margin)
     this.setWheelDeg(endDeg)
    } else {
     this.setListTransform(updateMove, margin)
     this.setWheelDeg(updateDeg)
    }
 // other code ....
惯性缓动
// other code ....
setWheelDeg (updateDeg, type, time = 1000) {
    if (type === 'end') {
     this.$refs.wheel.style.webkitTransition = `transform ${time}ms cubic-bezier(0.19, 1, 0.22, 1)`
     this.$refs.wheel.style.webkitTransform = `rotate3d(1, 0, 0, ${updateDeg}deg)`
    } else {
     this.$refs.wheel.style.webkitTransition = ''
     this.$refs.wheel.style.webkitTransform = `rotate3d(1, 0, 0, ${updateDeg}deg)`
    }
   }
setListTransform (translateY = 0, marginTop = 0, type, time = 1000) {
    if (type === 'end') {
     this.$refs.list.style.webkitTransition = `transform ${time}ms cubic-bezier(0.19, 1, 0.22, 1)`
     this.$refs.list.style.webkitTransform = `translateY(${translateY - this.spin.branch * 34}px)`
     this.$refs.list.style.marginTop = `${-marginTop}px`
     this.$refs.list.setAttribute('scroll', translateY)
     console.log('end')
    } else {
     this.$refs.list.style.webkitTransition = ''
     this.$refs.list.style.webkitTransform = `translateY(${translateY - this.spin.branch * 34}px)`
     this.$refs.list.style.marginTop = `${-marginTop}px`
     this.$refs.list.setAttribute('scroll', translateY)
    }
}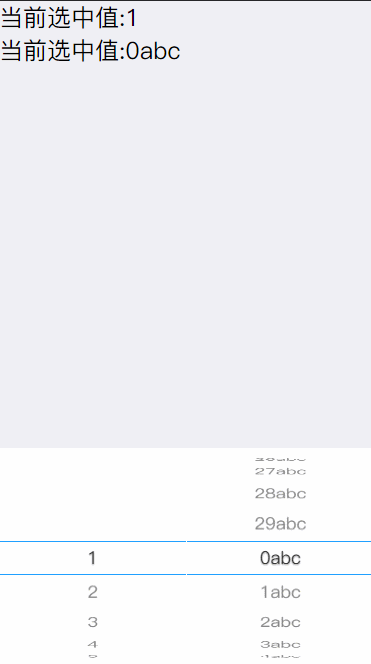
// other code ....Get the current Selected value
/* 在设置完css后获取值 */
setStyle (move, type, time) {
  // ...other code
  /* 设置$emit 延迟 */
  setTimeout(() => this.getPickValue(endMove), 1000)
 // ...other code
}
/* 获取选中值 */
   getPickValue (move) {
    let index = Math.abs(move / 34)
    let pickValue = this.getSpinData(index)
    this.$emit('input', pickValue)
}Initialization settings
mounted () {
   /* 事件绑定 */
   this.$el.addEventListener('touchstart', this.itemTouchStart)
   this.$el.addEventListener('touchmove', this.itemTouchMove)
   this.$el.addEventListener('touchend', this.itemTouchEnd)
   /* 初始化状态 */
   let index = this.listData.indexOf(this.value)
   if (index === -1) {
    console.warn('当前初始值不存在,请检查后listData范围!!')
    this.setListTransform()
    this.getPickValue(0)
   } else {
    let move = index * 34
    /* 因为往上滑动所以是负 */
    this.setStyle(-move)
    this.setListTransform(-move, -move)
}When displayed as a non-infinite scroll wheel
Here we are very A good judgment is that the scrolling distance cannot exceed the array length of the original number * 34, and cannot be less than 0 (direction involved in the actual code)
/* 根据滚轮类型 line or cycle 判断 updateMove最大距离 */
if (this.type === 'line') {
if (updateMove > 0) {
updateMove = 0
}
if (updateMove < -(this.listData.length - 1) * singleHeight) {
updateMove = -(this.listData.length - 1) * singleHeight
}
}
/* 根据type 控制滚轮显示效果 */
setHidden (index) {
if (this.type === 'line') {
return index < 0 || index > this.listData.length - 1
} else {
return false
}
},dom structure also adds a corresponding response
<p class="pd-select-item">
<p class="pd-select-line"></p>
<p class="pd-select-list">
<ul class="pd-select-ul" ref="list">
<li class="pd-select-list-item" v-for="el,index in renderData " :class="{'hidden':setHidden(el.index)}" :key="index">{{el.value}}</li>
</ul>
</p>
<ul class="pd-select-wheel" ref="wheel">
<li class="pd-select-wheel-item" :class="{'hidden':setHidden(el.index)}" :style="setWheelItemDeg(el.index)" :index="el.index" v-for="el,index in renderData " :key="index">{{el.value}}</li>
</ul>
</p>The above is what I compiled for everyone. I hope it will be helpful to everyone in the future.
Related articles:
JavaScript module optimization
How to extract third-party libraries using webpack
How to determine the client type using JS
The above is the detailed content of How to implement picker effect in vue. For more information, please follow other related articles on the PHP Chinese website!

Hot AI Tools

Undresser.AI Undress
AI-powered app for creating realistic nude photos

AI Clothes Remover
Online AI tool for removing clothes from photos.

Undress AI Tool
Undress images for free

Clothoff.io
AI clothes remover

Video Face Swap
Swap faces in any video effortlessly with our completely free AI face swap tool!

Hot Article
Hot Tools

Notepad++7.3.1
Easy-to-use and free code editor

SublimeText3 Chinese version
Chinese version, very easy to use

Zend Studio 13.0.1
Powerful PHP integrated development environment

Dreamweaver CS6
Visual web development tools

SublimeText3 Mac version
God-level code editing software (SublimeText3)
Hot Topics
 1386
1386
 52
52

 How to use bootstrap in vue
Apr 07, 2025 pm 11:33 PM
How to use bootstrap in vue
Apr 07, 2025 pm 11:33 PM
Using Bootstrap in Vue.js is divided into five steps: Install Bootstrap. Import Bootstrap in main.js. Use the Bootstrap component directly in the template. Optional: Custom style. Optional: Use plug-ins.
 How to add functions to buttons for vue
Apr 08, 2025 am 08:51 AM
How to add functions to buttons for vue
Apr 08, 2025 am 08:51 AM
You can add a function to the Vue button by binding the button in the HTML template to a method. Define the method and write function logic in the Vue instance.
 How to reference js file with vue.js
Apr 07, 2025 pm 11:27 PM
How to reference js file with vue.js
Apr 07, 2025 pm 11:27 PM
There are three ways to refer to JS files in Vue.js: directly specify the path using the <script> tag;; dynamic import using the mounted() lifecycle hook; and importing through the Vuex state management library.
 How to use watch in vue
Apr 07, 2025 pm 11:36 PM
How to use watch in vue
Apr 07, 2025 pm 11:36 PM
The watch option in Vue.js allows developers to listen for changes in specific data. When the data changes, watch triggers a callback function to perform update views or other tasks. Its configuration options include immediate, which specifies whether to execute a callback immediately, and deep, which specifies whether to recursively listen to changes to objects or arrays.
 What does vue multi-page development mean?
Apr 07, 2025 pm 11:57 PM
What does vue multi-page development mean?
Apr 07, 2025 pm 11:57 PM
Vue multi-page development is a way to build applications using the Vue.js framework, where the application is divided into separate pages: Code Maintenance: Splitting the application into multiple pages can make the code easier to manage and maintain. Modularity: Each page can be used as a separate module for easy reuse and replacement. Simple routing: Navigation between pages can be managed through simple routing configuration. SEO Optimization: Each page has its own URL, which helps SEO.
 How to return to previous page by vue
Apr 07, 2025 pm 11:30 PM
How to return to previous page by vue
Apr 07, 2025 pm 11:30 PM
Vue.js has four methods to return to the previous page: $router.go(-1)$router.back() uses <router-link to="/" component window.history.back(), and the method selection depends on the scene.
 How to query the version of vue
Apr 07, 2025 pm 11:24 PM
How to query the version of vue
Apr 07, 2025 pm 11:24 PM
You can query the Vue version by using Vue Devtools to view the Vue tab in the browser's console. Use npm to run the "npm list -g vue" command. Find the Vue item in the "dependencies" object of the package.json file. For Vue CLI projects, run the "vue --version" command. Check the version information in the <script> tag in the HTML file that refers to the Vue file.
 How to use function intercept vue
Apr 08, 2025 am 06:51 AM
How to use function intercept vue
Apr 08, 2025 am 06:51 AM
Function interception in Vue is a technique used to limit the number of times a function is called within a specified time period and prevent performance problems. The implementation method is: import the lodash library: import { debounce } from 'lodash'; Use the debounce function to create an intercept function: const debouncedFunction = debounce(() => { / Logical / }, 500); Call the intercept function, and the control function is called at most once in 500 milliseconds.
