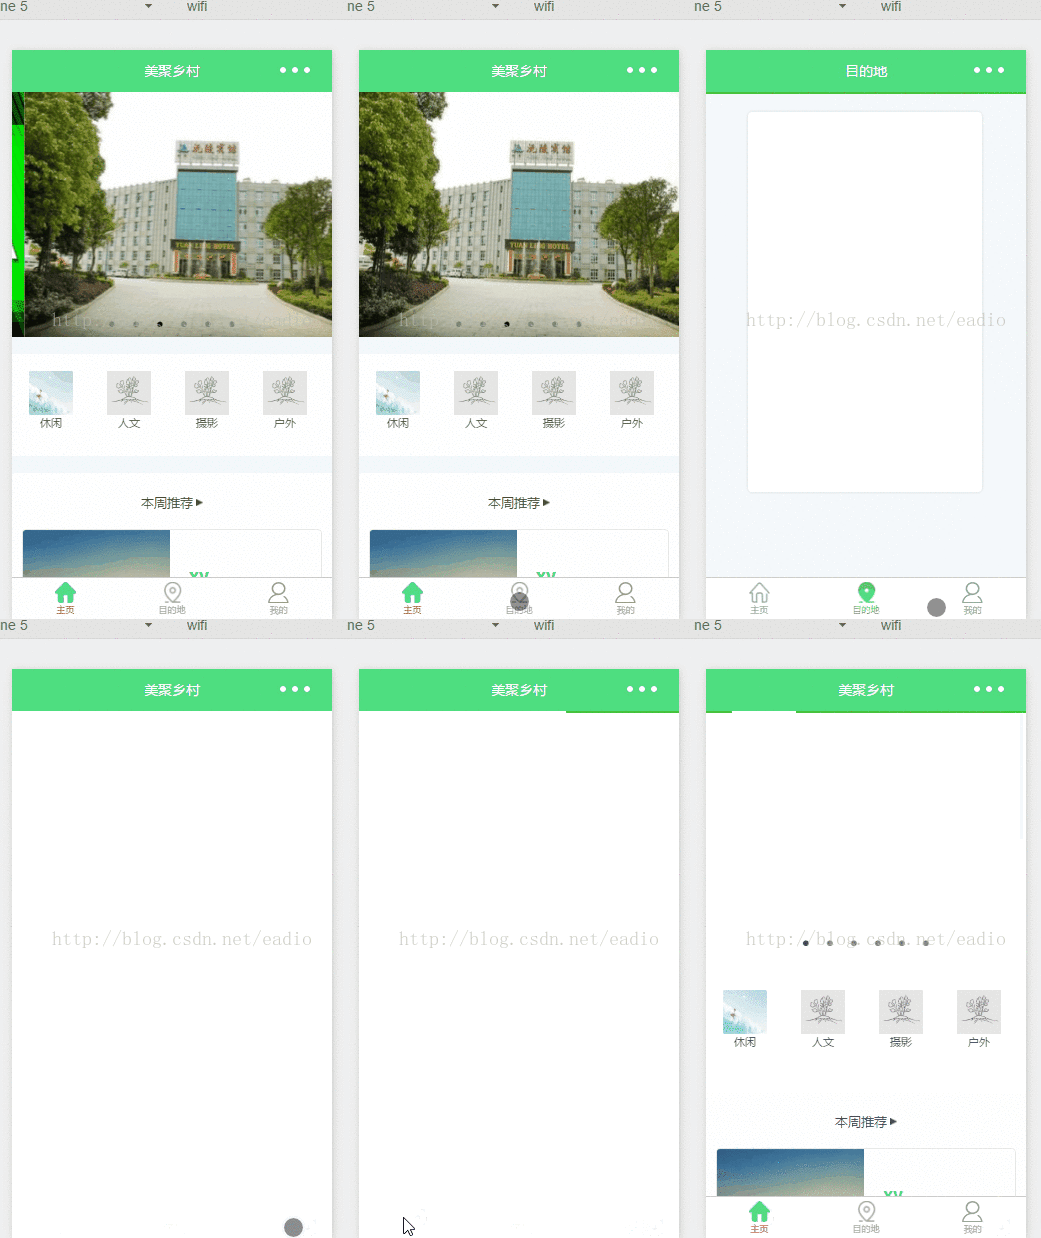
This article mainly introduces the usage of the WeChat mini program tabBar template, and analyzes the definition, configuration, reference and other related operation skills of the tabBar template in the form of specific examples. Friends in need can refer to the following
Examples of this article Learn how to use the WeChat mini program tabBar template. Share it with everyone for your reference, the details are as follows:
As we all know, the tabBar of WeChat mini program opens a new page, and the WeChat document shows that only up to 5 pages can be opened. This can easily cause problems. What if I have 5 tabBars? The following is the original words of WeChat:
An application can only open 5 pages at the same time. After 5 pages have been opened, wx.navigateTo cannot open a new page normally. Please avoid multi-level interactions, or use wx.redirectTo
So these days I have been thinking about customizing the template based on the WeChat tabBar array for page calls. However, I added a selectedColor and active attributes to each object in the list to facilitate styling the current page of each tabBar. If not passed, the set selectedColor will be used directly. Therefore, this string of data can only be set under each page, and cannot be set under the public app.js configuration file. It is a bit redundant in the code. Next time, I will study how to configure it directly into app.js.
Just create a new tarBar.wxml template page, and then pass in the data from the page that references the template. The code is as follows:
<template name="tabBar">
<view class="flex-h flex-hsb tab-bar" style="color: {{tabBar.color}}; background: {{tarBar.backgroundColor}}; {{tabBar.position=='top'? 'top: 0' : 'bottom: 0'}}; {{tabBar.borderStyle? (tabBar.position=='top'? 'border-bottom: solid 1px '+tabBar.borderStyle + ';' : 'border-top: solid 1px '+tabBar.borderStyle + ';') : ''}}">
<block wx:for="{{tabBar.list}}" wx:key="pagePath">
<navigator url="{{item.pagePath}}" open-type="redirect" class="menu-item" style="{{item.active? 'color: '+(item.selectedColor? item.selectedColor : tabBar.selectedColor) : ''}}">
<image src="{{item.selectedIconPath}}" wx:if="{{item.active}}"></image>
<image src="{{item.iconPath}}" wx:if="{{!item.active}}"></image>
<text>{{item.text}}</text>
</navigator>
</block>
</view>
</template>Next, test, first the configuration object of index.js:
//配置tabBar
  tabBar: {
   "color": "#9E9E9E",
   "selectedColor": "#f00",
   "backgroundColor": "#fff",
   "borderStyle": "#ccc",
   "list": [
    {
     "pagePath": "/pages/index/index",
     "text": "主页",
     "iconPath": "../../img/tabBar_home.png",
     "selectedIconPath": "../../img/tabBar_home_cur.png",
     //"selectedColor": "#4EDF80",
     active: true
    },
    {
     "pagePath": "/pages/village/city/city",
     "text": "目的地",
     "iconPath": "../../img/tabBar_village.png",
     "selectedIconPath": "../../img/tabBar_village_cur.png",
     "selectedColor": "#4EDF80",
     active: false
    },
    {
     "pagePath": "/pages/mine/mine",
     "text": "我的",
     "iconPath": "../../img/tabBar_mine.png",
     "selectedIconPath": "../../img/tabBar_mine_cur.png",
     "selectedColor": "#4EDF80",
     active: false
    }
   ],
   "position": "bottom"
}index.wxml introduces the template:
<import src="../../template/tabBar.wxml" />
<template is="tabBar" data="{{tabBar: tabBar}}" />Next is the mine.js file to introduce the configuration object:
//配置tabBar
  tabBar: {
   "color": "#9E9E9E",
   "selectedColor": "#f00",
   "backgroundColor": "#fff",
   "borderStyle": "#ccc",
   "list": [
    {
     "pagePath": "/pages/index/index",
     "text": "主页",
     "iconPath": "../../img/tabBar_home.png",
     "selectedIconPath": "../../img/tabBar_home_cur.png",
     //"selectedColor": "#4EDF80",
     active: false
    },
    {
     "pagePath": "/pages/village/city/city",
     "text": "目的地",
     "iconPath": "../../../img/tabBar_village.png",
     "selectedIconPath": "../../../img/tabBar_village_cur.png",
     "selectedColor": "#4EDF80",
     active: false
    },
    {
     "pagePath": "/pages/mine/mine",
     "text": "我的",
     "iconPath": "../../img/tabBar_mine.png",
     "selectedIconPath": "../../img/tabBar_mine_cur.png",
     "selectedColor": "#4EDF80",
     active: true
    }
   ],
   "position": "bottom"
}mine.wxml introduces the template:
<import src="../../template/tabBar.wxml" />
<template is="tabBar" data="{{tabBar: tabBar}}" />The final demonstration is as follows:

Option 2, I put the configuration data in the app.js file, and then add the data to the current page instance by clicking to jump to the page. , the specific methods are as follows:
1. App.js file configuration:
//app.js
var net = require('common/net');
var a_l, a_d = {}, a_cbSucc, a_cbSuccFail, a_cbFail, a_cbCom, a_h, a_m;
App({
onLaunch: function () {
var that = this;
},
//修改tabBar的active值
editTabBar: function () {
var _curPageArr = getCurrentPages();
var _curPage = _curPageArr[_curPageArr.length - 1];<span style="font-family: Arial, Helvetica, sans-serif;">//相当于Page({})里面的this对象</span>
var _pagePath=_curPage.__route__;
if(_pagePath.indexOf('/') != 0){
_pagePath='/'+_pagePath;
}
var tabBar=this.globalData.tabBar;
for(var i=0; i<tabBar.list.length; i++){
tabBar.list[i].active=false;
if(tabBar.list[i].pagePath==_pagePath){
tabBar.list[i].active=true;//根据页面地址设置当前页面状态
}
}
_curPage.setData({
tabBar: tabBar
});
},
globalData: {
userInfo: null,
//配置tabBar
tabBar: {
"color": "#9E9E9E",
"selectedColor": "#f00",
"backgroundColor": "#fff",
"borderStyle": "#ccc",
"list": [
{
"pagePath": "/pages/index/index",
"text": "主页",
"iconPath": "/pages/templateImg/tabBar_home.png",
"selectedIconPath": "/pages/templateImg/tabBar_home_cur.png",
"selectedColor": "#4EDF80",
active: false
},
{
"pagePath": "/pages/village/city/city",
"text": "目的地",
"iconPath": "/pages/templateImg/tabBar_village.png",
"selectedIconPath": "/pages/templateImg/tabBar_village_cur.png",
"selectedColor": "#4EDF80",
active: false
},
{
"pagePath": "/pages/mine/mine",
"text": "我的",
"iconPath": "/pages/templateImg/tabBar_mine.png",
"selectedIconPath": "/pages/templateImg/tabBar_mine_cur.png",
"selectedColor": "#4EDF80",
active: false
}
],
"position": "bottom"
}
}
})2. Index.js mine.js city.js page usage:
var App=getApp();
Page({
 data:{
  detail: {},
 },
 onLoad:function(options){
  App.editTabBar();//添加tabBar数据
  var that=this;
 }
})The above is me I compiled it for everyone, I hope it will be helpful to everyone in the future.
Related articles:
How to convert timestamp format in js
How to get dom elements in vue
How to implement reading the full text in vue
How to build a vue project on webpack
The above is the detailed content of About tabBar template usage in WeChat mini program (detailed tutorial). For more information, please follow other related articles on the PHP Chinese website!


