
This article introduces you to the mobile terminal image cropping component function based on Vue. Because the mobile terminal uses vue, it is written as a vue component. Here are some of my implementation ideas. Friends who need it can refer to it. Next
I am working on a recent project to build a license plate recognition function. I originally thought it was very simple, just throw the image to the background, but after testing, the recognition rate was only 20-40%. Therefore, the product recommends that after taking a picture, you can drag and zoom the picture, then crop the license plate part and upload it to the background to improve the recognition rate. At the beginning, I checked Baidu to see if there were any ready-made components, but I couldn't find a suitable one. Fortunately, I wasn't very anxious about this function, so I studied it at home on the weekend.
Demo address: https://vivialex.github.io/demo/imageClipper/index.html
Download address: https://github.com/vivialex/vue-imageClipper
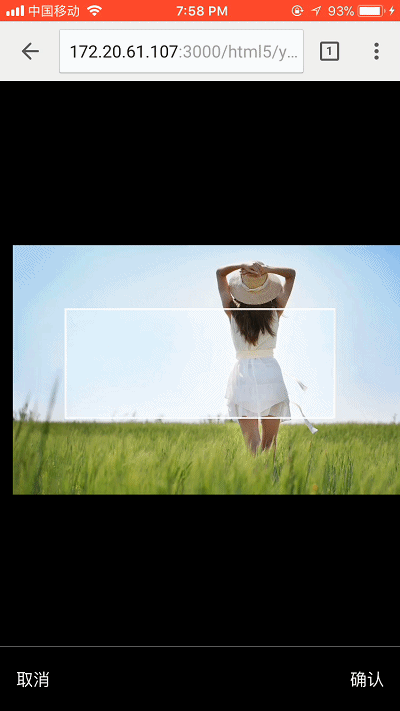
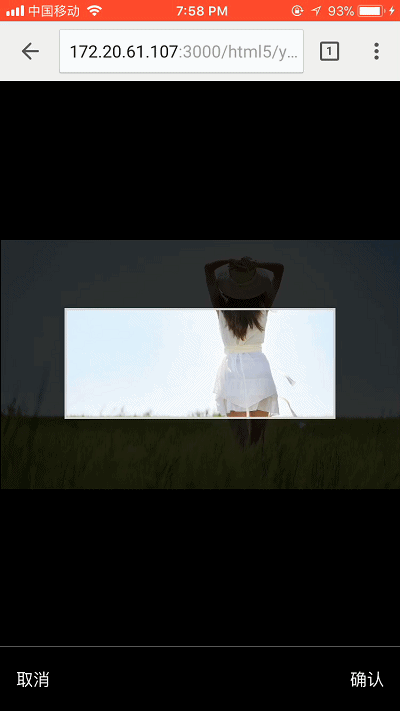
Since the mobile terminal uses Vue, I wrote it as a Vue component. Let’s talk about some of my implementation ideas (I have limited skills, please understand. In addition, the code shown is not necessarily complete for a certain function. Code), let’s take a look at the effect first:
1. Initialization parameters of the component
1. Image img (url or base64 data-url)
2. Screenshot width clipperImgWidth
3. Screenshot height clipperImgHeight
1 2 3 4 5 6 7 8 9 10 11 |
|
2 , Layout
Viewed in the Z-axis direction, it is mainly composed of 4 layers. The first layer is a canvas (called cCanvas) that occupies the entire container; the second layer is a transparent mask layer; the third layer is the cropped area (the white box in the example picture), which contains a Canvas with equal area sizes (called pCanvas); the fourth layer is a transparent layer gesture-mask, used to bind touchstart, touchmove, touchend events. Both canvases will load the same picture, but the starting coordinates are different. Why do we need two canvases? Because I want to create the effect that when the finger leaves the screen, part of the surface outside the cropping area will have a mask layer effect, which can highlight the content of the cropping area.
1 2 3 4 5 6 7 8 9 10 11 12 13 14 15 16 17 18 |
|
3. Initialize canvas
Pictures drawn by canvas will appear blurry on the hdpi display. The specific reasons will not be analyzed here. You can refer to Get off here. What I do here is to make the width and height of the canvas times the devicePixelRatio of its css width/height, and the parameters passed in when calling the canvas api must be multiplied by window.devicePixelRatio. Finally, record the x, y difference between the two canvas coordinate origins (originXDiff and originYDiff). As follows
1 2 3 4 5 6 7 8 9 10 11 12 13 14 15 16 17 18 19 20 21 22 23 24 25 26 27 28 29 30 31 32 33 34 35 36 37 38 39 40 41 42 |
|
IV. Loading images
Loading images is relatively simple. First, create an Image object and listen to the onload event (because the loaded The image may be cross-domain, so set its crossOrigin attribute to Anonymous, and then set the Access-Control-Allow-Origin response header on the server). If the width and height of the loaded image are greater than the width and height of the container, they must be reduced. Finally, vertically and horizontally centered display () (note here is to save the width and height value before the picture is drawn, because the future scaling of the picture will be based on this value and then multiplied by the zoom factor, here take imgStartWidth, imgStartHeight) as follows
1 2 3 4 5 6 7 8 9 10 11 12 13 14 15 16 17 18 19 20 21 22 23 24 25 26 27 28 29 30 31 32 33 34 35 36 37 38 39 40 41 42 43 44 45 46 47 48 49 50 51 52 53 54 55 56 57 58 59 60 61 62 63 64 65 66 67 68 69 |
|
5. Draw the picture
The following _drawImage has four parameters, which are the x, y coordinates of the picture corresponding to cCanvas and the current width and height w of the picture. ,h. The function will first clear the contents of the two canvases by resetting the width and height of the canvas. Then update the corresponding value in the component instance, and finally call the drawImage of the two canvases to draw the picture. For pCanvas, the coordinate values of the picture drawn are x and y minus the corresponding originXDiff and originYDiff (actually it is equivalent to switching the coordinate system display, so you only need to subtract the x and y difference between the origins of the two coordinate systems) ). Take a look at the code
1 2 3 4 5 6 7 8 9 10 11 12 13 14 15 16 17 18 19 |
|
6. Moving pictures
The implementation of moving pictures is very simple. First, bind touchstart, touchmove, touchend to gesture-mask. Events, the contents of these three events are introduced below
First define four variables scx, scy (the starting coordinates of the finger), iX, iY (the current coordinates of the picture, relative to cCanvas).
1. touchstart
The method is very simple, just get the pageX and pageY of touches[0] to update scx and scy and update iX and iY
2. touchmove
Get the page
Let’s take a look at the code
1 2 3 4 5 6 7 8 9 10 11 12 13 14 15 16 17 18 19 20 21 22 23 24 25 26 |
|
七、缩放图片(这里不作特别说明的坐标都是相对于cCanvas坐标系)
绘制缩放后的图片无非需要4个参数,缩放后图片左上角的坐标以及宽高。求宽高相对好办,宽高等于imgStartWidth * 缩放比率与imgstartHeight * 缩放倍率(imgStartWidth ,imgstartHeight 上文第四节有提到)。接下来就是求缩放倍率的问题了,首先在touchstart事件上求取两手指间的距离d1;然后在touchmove事件上继续求取两手指间的距离d2,当前缩放倍率= 初始缩放倍率 + (d2-d1) / 步长(例如每60px算0.1),touchend事件上让初始缩放倍率=当前缩放倍率。
至于如何求取缩放后图片左上角的坐标值,在草稿纸上画来画去,画了很久......终于有点眉目。首先要找到一个缩放中心(这里做法是取双指的中点坐标,但是这个坐标必须要位于图片上,如果不在图片上,则取图片上离该中点坐标最近的点),然后存在下面这个等式
(缩放中心x坐标 - 缩放后图片左上角x坐标)/ 缩放后图片的宽度 = (缩放中心x坐标 - 缩放前图片左上角x坐标)/ 缩放前图片的宽度;(y坐标同理)
接下来看看下面这个例子(在visio找了很久都没有画坐标系的功能,所以只能手工画了)
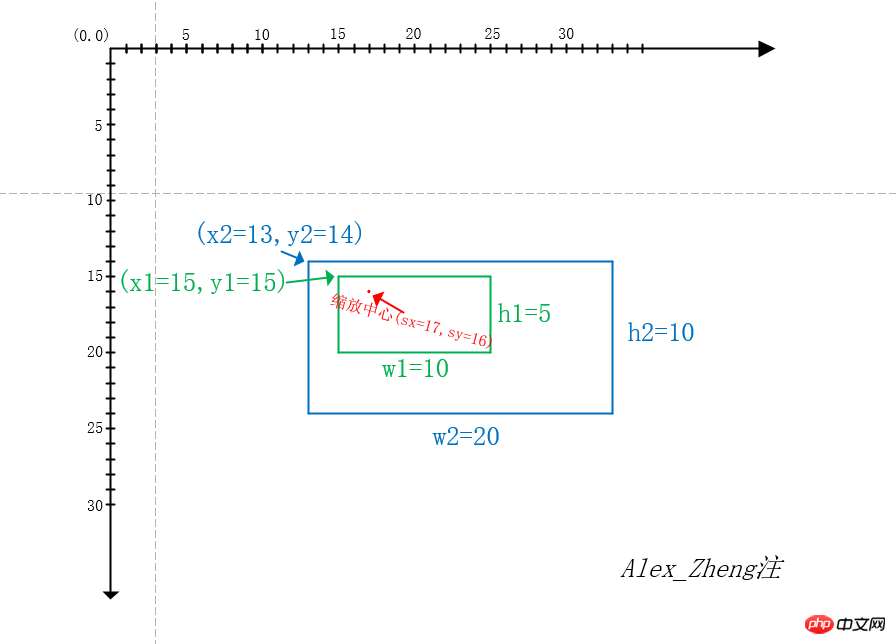
绿色框是一张10*5的图片,蓝色框是宽高放大两倍后的图片20*10,根据上面的公式推算的x2 = sx - w2(sx - x1) / w1,y2 = sy - h2(sy - y1) / h1。
坚持...继续看看代码吧
1 2 3 4 5 6 7 8 9 10 11 12 13 14 15 16 17 18 19 20 21 22 23 24 25 26 27 28 29 30 31 32 33 34 35 36 37 38 39 40 41 42 43 44 45 46 47 48 49 50 51 52 53 54 55 56 57 58 59 60 61 62 63 64 65 66 67 68 69 70 71 72 73 74 75 76 77 78 79 80 81 82 83 84 85 86 87 88 89 90 91 92 93 94 95 96 97 98 99 100 101 102 103 104 105 106 107 108 109 110 111 112 113 114 115 116 117 118 119 120 121 122 123 124 125 126 127 128 129 130 131 132 133 134 135 136 137 138 139 140 141 |
|
说明一下fingers是干嘛的,是用来记录当前有多少只手指在屏幕上触摸。可能会出现这种情况,双指缩放后,其中一只手指移出显示屏,而另外一个手指在显示屏上移动。针对这种情况,要在touchend事件上根据e.changedTouches来移除fingers里已经离开显示屏的finger,如果此时fingers里只剩下一个finger,则更新scx,scy,iX,iY为移动图片做初始化准备。
八、裁剪图片
这里很简单,就调用pCanvas的toDataURL方法就可以了
1 2 3 4 5 6 7 8 9 |
|
上面是我整理给大家的,希望今后会对大家有帮助。
相关文章:
在Bootstrap框架里使用treeview如何实现动态加载数据
The above is the detailed content of How to implement image cropping component using Vue mobile terminal. For more information, please follow other related articles on the PHP Chinese website!


![[Web front-end] Node.js quick start](https://img.php.cn/upload/course/000/000/067/662b5d34ba7c0227.png)


