Analysis on the use of vue routing
This article mainly introduces the usage analysis of vue routing, which has certain reference value. Now I share it with everyone. Friends in need can refer to it
vue-router is the official routing of Vue.js Plug-in, which is deeply integrated with vue.js and suitable for building single-page applications.
vue-router is the official routing plug-in of Vue.js. It is deeply integrated with vue.js and is suitable for building single-page applications. Vue's single-page application is based on routing and components. Routing is used to set access paths and map paths and components. Traditional page applications use some hyperlinks to achieve page switching and jumps. In the vue-router single-page application, it is switching between paths, that is, switching of components.
This article will introduce various features of vue-router in the form of examples. It contains 6 examples in total. Each example has a beggar version, and the first 5 examples have an emperor version.
The beggar version is an HTML page with all the code mixed together, and the emperor version is built based on the vue-webpack-simple template.
The first single-page application (01)
Now we start the vue-router journey with a simple single-page application. This single-page application has two Paths: /home and /about. Corresponding to these two paths are the two components Home and About.
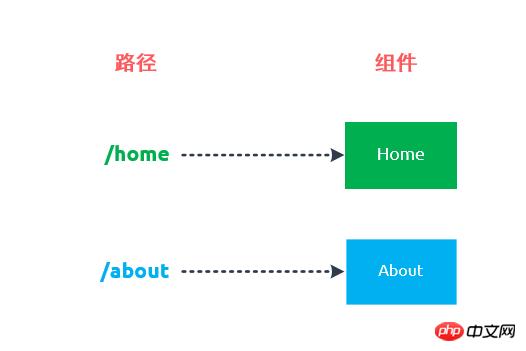
#1. Create components
First introduce vue.js and vue-router.js:
<script src="js/vue.js"></script>
<script src="js/vue-router.js"></script>
然后创建两个组件构造器Home和About:
var Home = Vue.extend({
template: '<p><h1>Home</h1><p>{{msg}}</p></p>',
data: function() {
return {
msg: 'Hello, vue router!'
}
}
})
var About = Vue.extend({
template: '<p><h1>About</h1><p>This is the tutorial about vue-router.</p></p>'
})2. Create Router
var router = new VueRouter()
Call the constructor VueRouter to create a router instance router.
3. Mapping routes
router.map({
 '/home': { component: Home },
 '/about': { component: About }
})Call the map method of router to map routes. Each route exists in the form of key-value, where key is the path and value is the component.
For example: '/home' is the key of a route, which represents the path; {component: Home} represents the component mapped by the route.
4. Use the v-link instruction
<p class="list-group">
<a class="list-group-item" v-link="{ path: '/home'}">Home</a>
<a class="list-group-item" v-link="{ path: '/about'}">About</a>
</p>Use the v-link instruction on the a element to jump to the specified path.
5. Use the
<router-view></router-view>
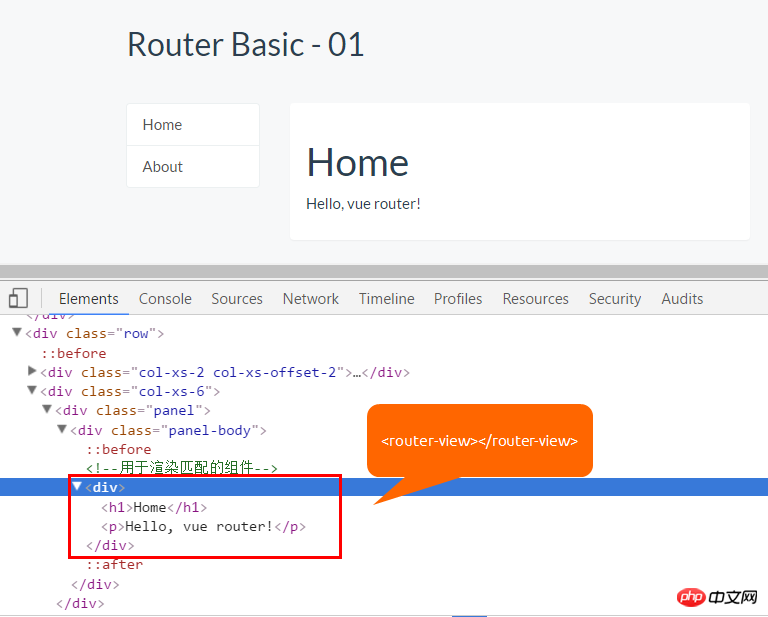
Use the <router-view></router-view> tag on the page, which uses for rendering matching components.
6. Start routing
var App = Vue.extend({})
router.start(App, '#app')The operation of the router requires a root component. router.start(App, '#app') means that the router will create an App instance. And mounted to the #app element.
Note: Applications using vue-router do not need to explicitly create a Vue instance. Instead, call the start method to mount the root component to an element.
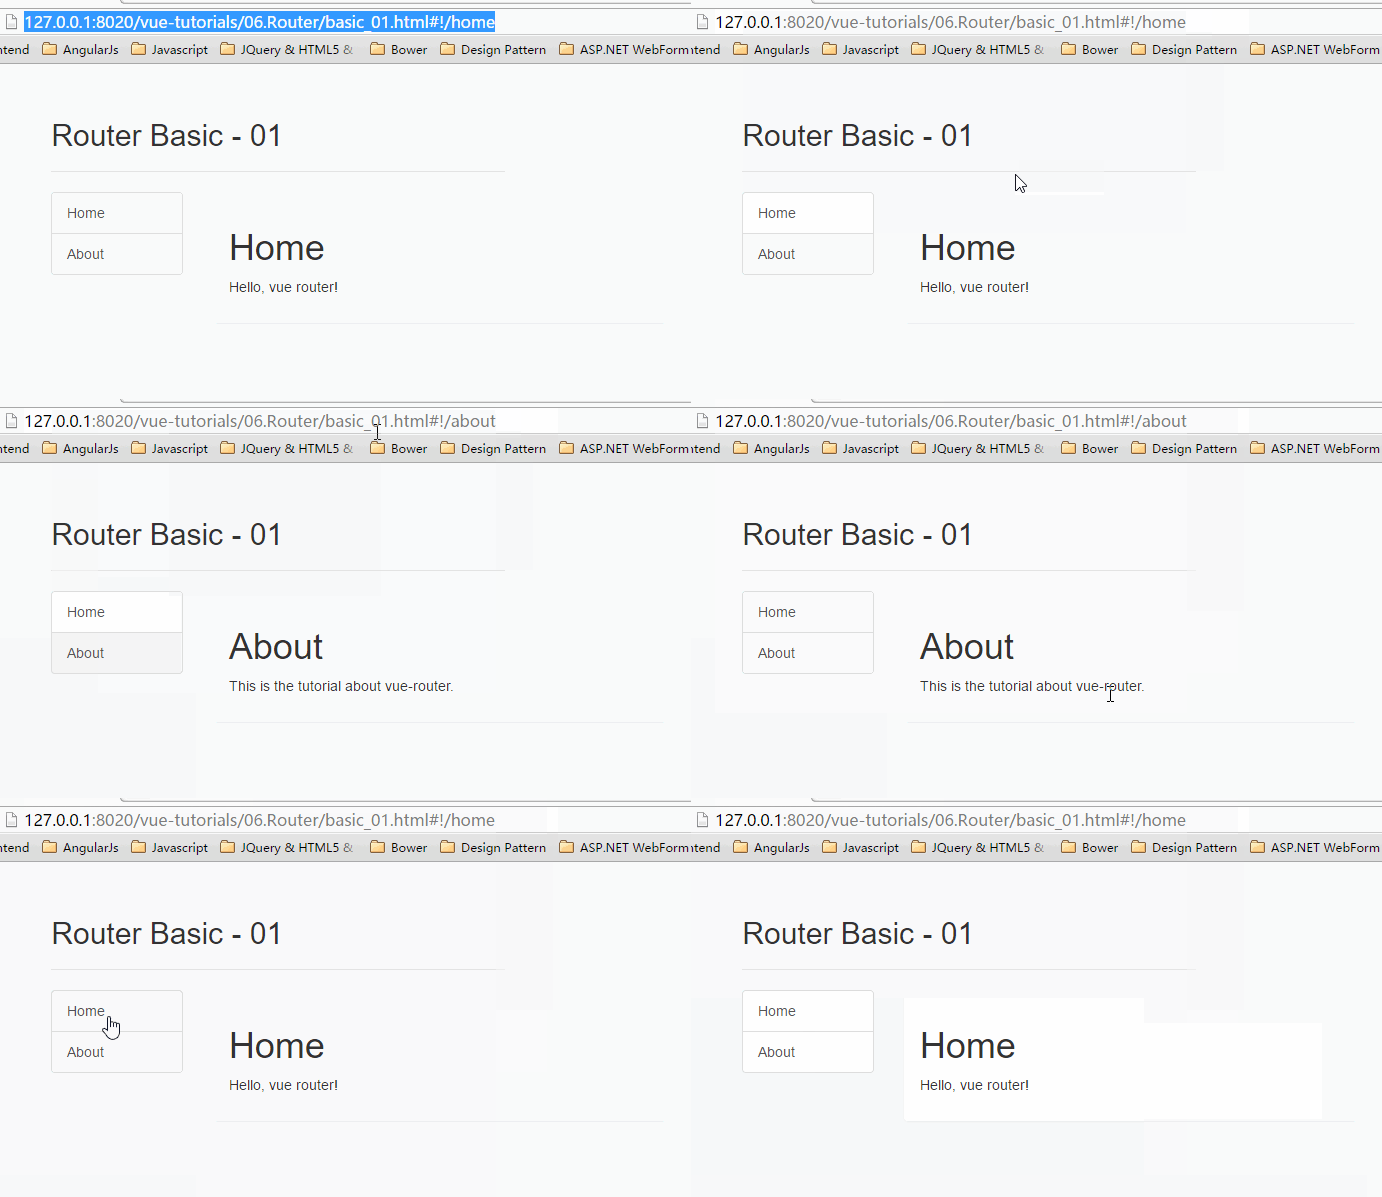
After you obtain the latest source code from GitHub, if you want to run the Emperor Edition, take demo01 as an example and execute the following command under Git Bash:
npm run demo01-dev
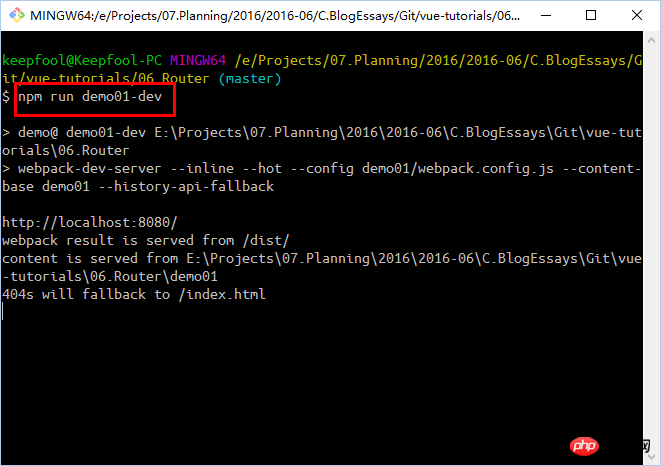
Then visit the address http://127.0.0.1:8080
in the browser. If you want to compile and publish, please execute the following command under Git Bash:
npm run demo01-build
Steps to write a single page
The above 6 steps can be said to be the basic steps for creating a single page application:
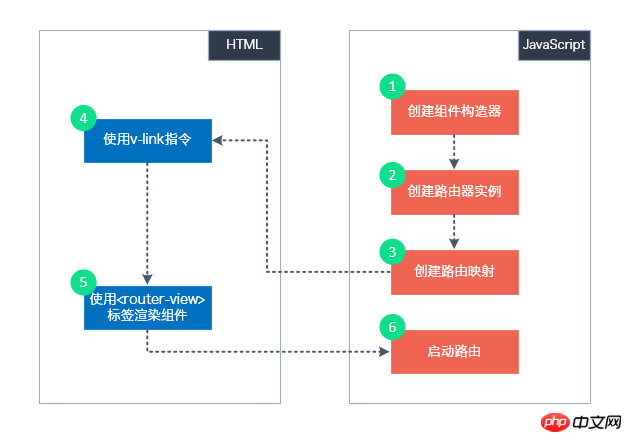
JavaScript
1. Create components: Create components that need to be rendered by single-page applications
2. Create routes: Create a VueRouter instance
3. Map routing: call the map method of the VueRouter instance
4. Start routing: call the start method of the VueRouter instance
HTML
router.redirect
When the application is run for the first time, the right side is blank. The application usually has a home page, such as the Home page.router.redirect({
'/': '/home'
})Execution process
When the user clicks on the v-link instruction element, we can roughly guess what happened:- vue-router will first look for the routing mapping of the v-link directive
- and then find the matching component based on the routing mapping
- Finally, render the component to the
tag
Nested routing is a common requirement. Assume that users can access some content through the paths /home/news and /home/message. One path maps a component, and accessing these two paths will also render two components respectively.
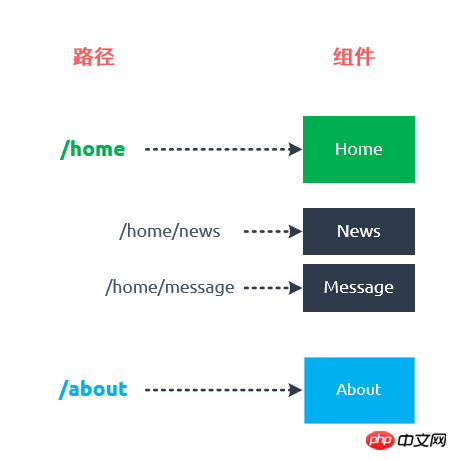 There are two key points to implement nested routing:
- Use the
在路由器对象中给组件定义子路由
现在我们就动手实现这个需求。
组件模板:
Home
{{msg}}
<router-view></router-view>
- News 01
- News 02
- News 03
- Message 01
- Message 02
- Message 03
组件构造器:
var Home = Vue.extend({
 template: '#home',
 data: function() {
 return {
  msg: 'Hello, vue router!'
 }
 }
})

var News = Vue.extend({
 template: '#news'
})

var Message = Vue.extend({
 template: '#message'
})路由映射:
router.map({
 '/home': {
 component: Home,
 // 定义子路由
 subRoutes: {
  '/news': {
  component: News
  },
  '/message': {
  component: Message
  }
 }
 },
 '/about': {
 component: About
 }
})在/home路由下定义了一个subRoutes选项,/news和/message是两条子路由,它们分别表示路径/home/news和/home/message,这两条路由分别映射组件News和Message。
该示例运行如下:
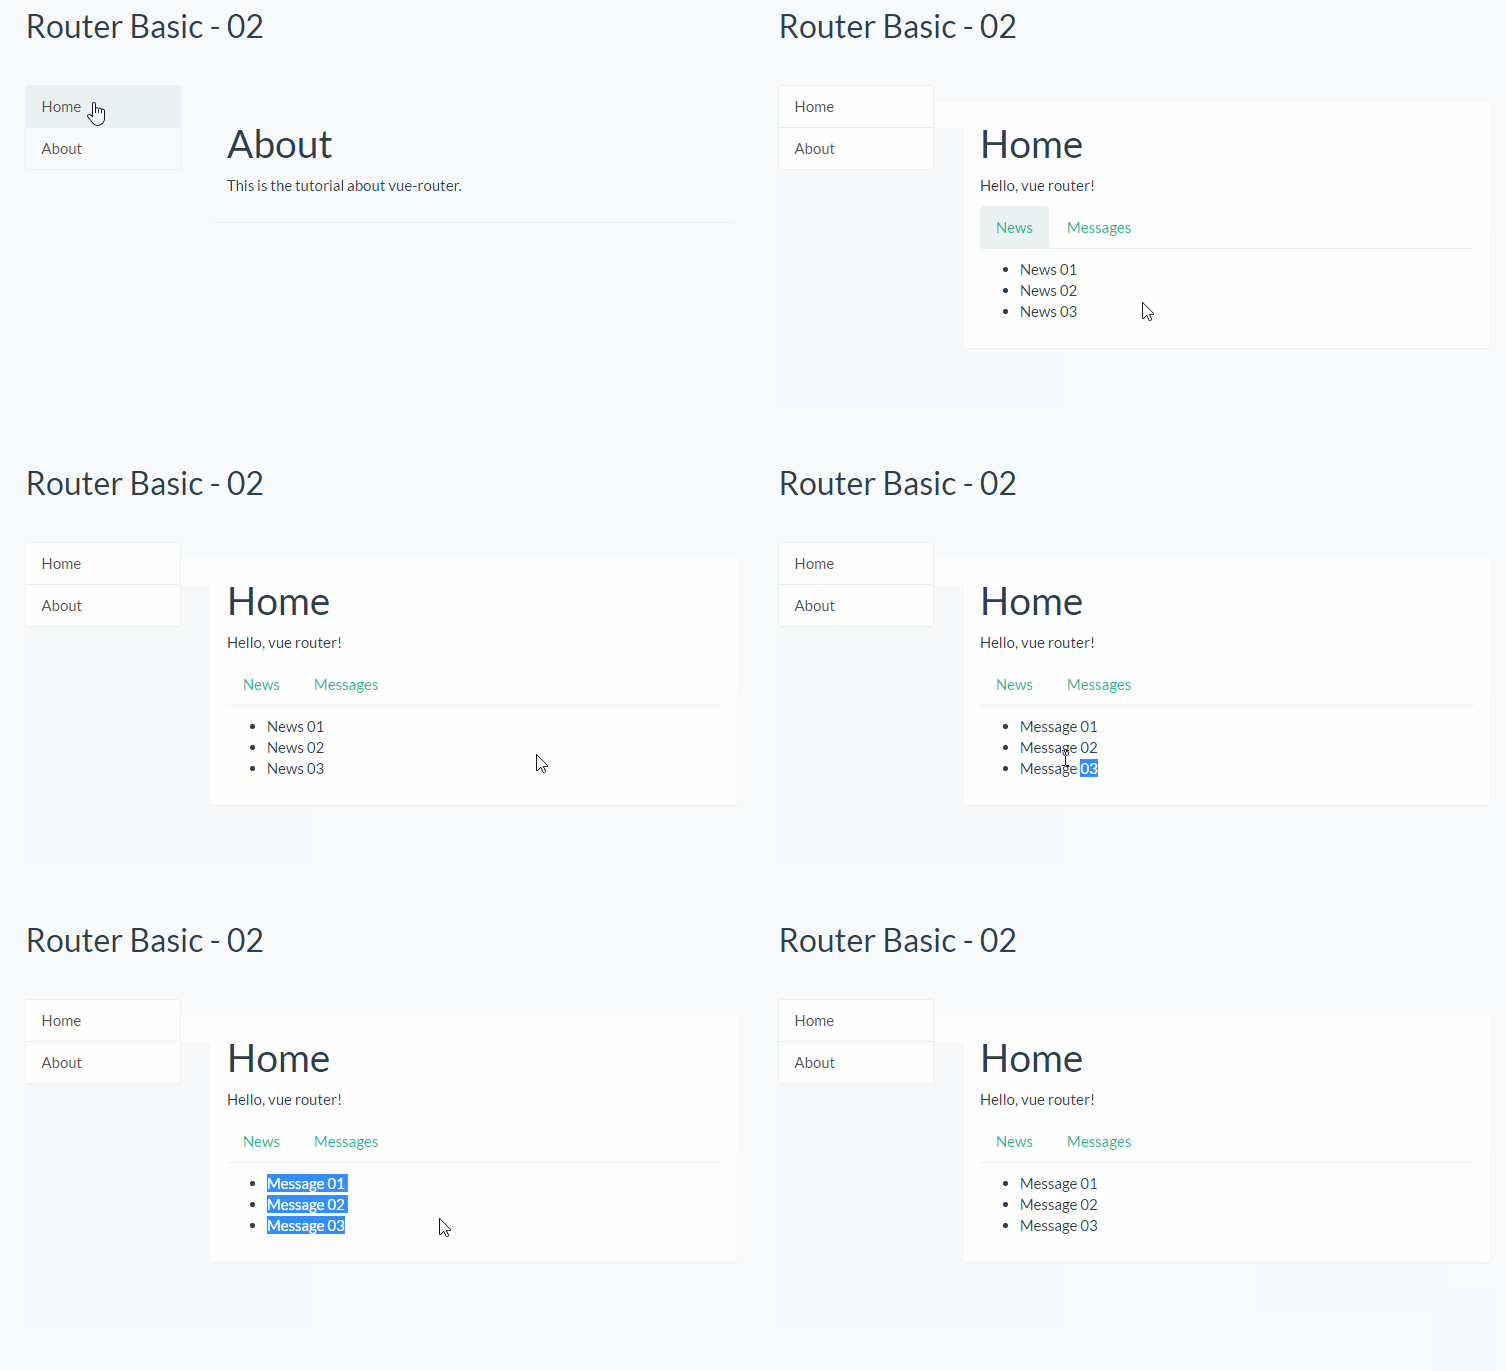
注意:这里有一个概念要区分一下,/home/news和/home/message是/home路由的子路由,与之对应的News和Message组件并不是Home的子组件。
具名路径(03)
在有些情况下,给一条路径加上一个名字能够让我们更方便地进行路径的跳转,尤其是在路径较长的时候。
我们再追加一个组件NewsDetail,该组件在访问/home/news/detail路径时被渲染,组件模板:
<template id="newsDetail">
 <p>
 News Detail - {{$route.params.id}} ......
 </p>
</template>组件构造器:
var NewsDetail = Vue.extend({
 template: '#newsDetail'
})具名路由映射
router.map({
 '/home': {
 component: Home,
 subRoutes: {
  '/news': {
  name: 'news',
  component: News,
  subRoutes: {
   'detail/:id': {
   name: 'detail',
   component: NewsDetail
   }
  }
  },
  '/message': {
  component: Message
  }
 }
 },
 '/about': {
 component: About
 }
})注意:我们在定义/homes/news/和home/news/detail/:id路由时,给该路由指定了name属性。
/:id是路由参数,例如:如果要查看id = '01'的News详情,那么访问路径是/home/news/detail/01。
Home组件和News组件模板:
Home
{{msg}}
<router-view></router-view>
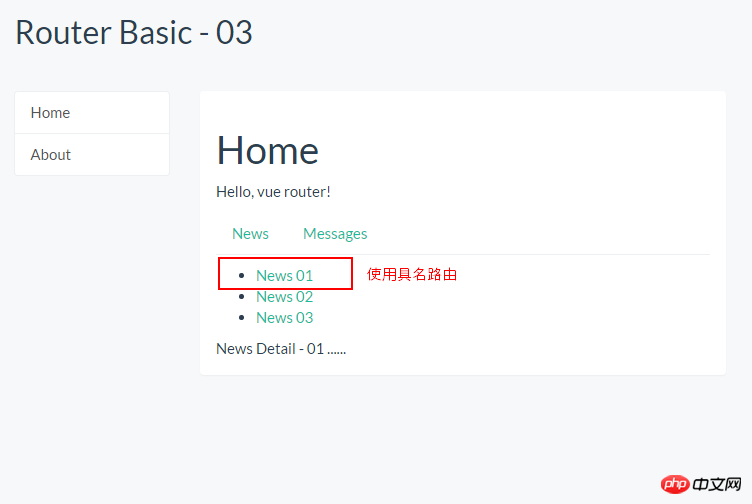
News和News 01这两行HTML代码,使用了用了具名路径。
该示例运行如下:
v-link指令
用了这么久的v-link指令,是该介绍一下它了。
v-link 是一个用来让用户在 vue-router 应用的不同路径间跳转的指令。该指令接受一个 JavaScript 表达式,并会在用户点击元素时用该表达式的值去调用 router.Go。
具体来讲,v-link有三种用法:
<!-- 字面量路径 -->
<a v-link="'home'">Home</a>
<!-- 效果同上 -->
<a v-link="{ path: 'home' }">Home</a>
<!-- 具名路径 -->
<a v-link="{ name: 'detail', params: {id: '01'} }">Home</a>v-link 会自动设置 的 href 属性,你无需使用href来处理浏览器的调整,原因如下:
它在 HTML5 history 模式和 hash 模式下的工作方式相同,所以如果你决定改变模式,或者 IE9 浏览器退化为 hash 模式时,都不需要做任何改变。
在 HTML5 history 模式下,v-link 会监听点击事件,防止浏览器尝试重新加载页面。
在 HTML5 history 模式下使用 root 选项时,不需要在 v-link 的 URL 中包含 root 路径。
路由对象(04)
在使用了 vue-router 的应用中,路由对象会被注入每个组件中,赋值为 this.$route ,并且当路由切换时,路由对象会被更新。
路由对象暴露了以下属性:
$route.path
字符串,等于当前路由对象的路径,会被解析为绝对路径,如 "/home/news" 。
$route.params
对象,包含路由中的动态片段和全匹配片段的键值对
$route.query
对象,包含路由中查询参数的键值对。例如,对于 /home/news/detail/01?favorite=yes ,会得到$route.query.favorite == 'yes' 。
$route.router
路由规则所属的路由器(以及其所属的组件)。
$route.matched
数组,包含当前匹配的路径中所包含的所有片段所对应的配置参数对象。
$route.name
当前路径的名字,如果没有使用具名路径,则名字为空。
在页面上添加以下代码,可以显示这些路由对象的属性:
<p>
 <p>当前路径:{{$route.path}}</p>
 <p>当前参数:{{$route.params | json}}</p>
 <p>路由名称:{{$route.name}}</p>
 <p>路由查询参数:{{$route.query | json}}</p>
 <p>路由匹配项:{{$route.matched | json}}</p>
</p>$route.path, $route.params, $route.name, $route.query这几个属性很容易理解,看示例就能知道它们代表的含义。
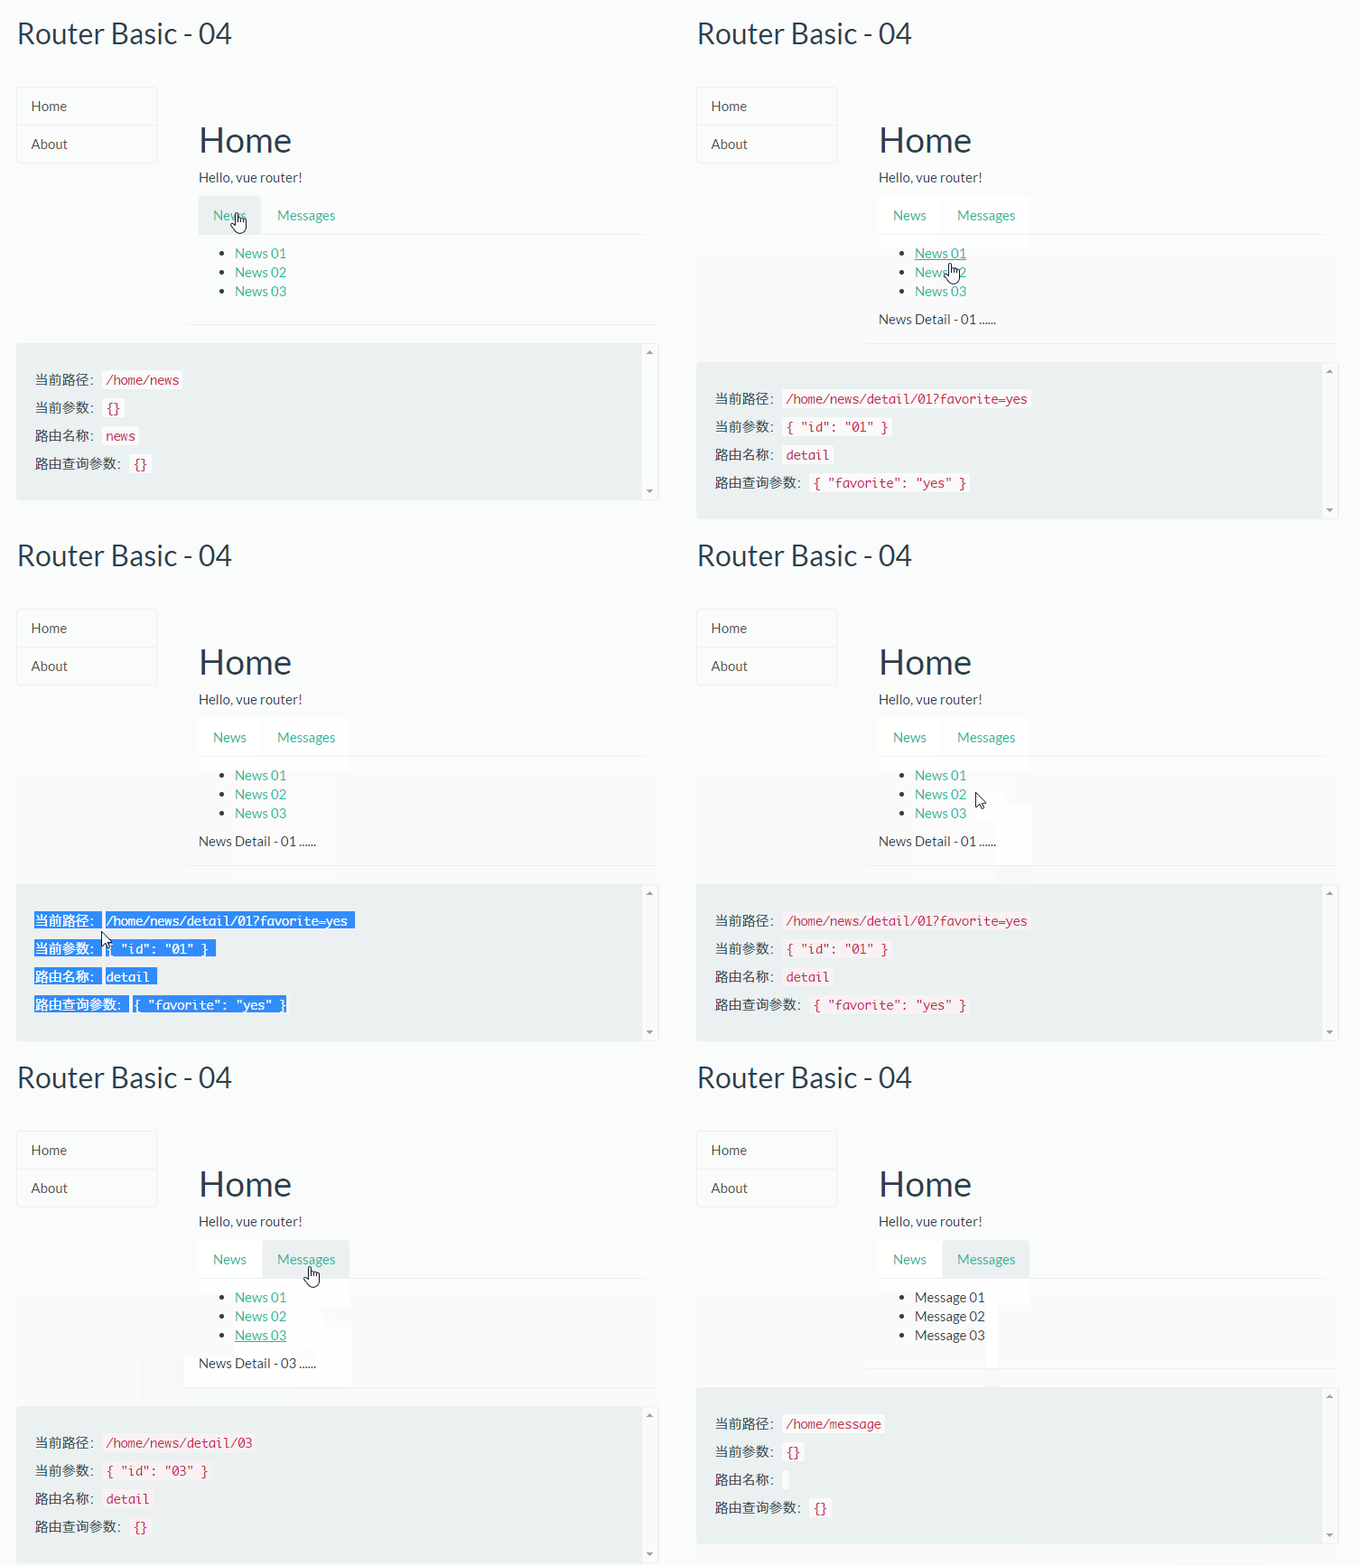
(由于$route.matched内容较长,所以没有将其显示在画面上)
这里我要稍微说一下$router.matched属性,它是一个包含性的匹配,它会将嵌套它的父路由都匹配出来。
例如,/home/news/detail/:id这条路径,它包含3条匹配的路由:
1./home/news/detail/:id
2./home/news
3./home
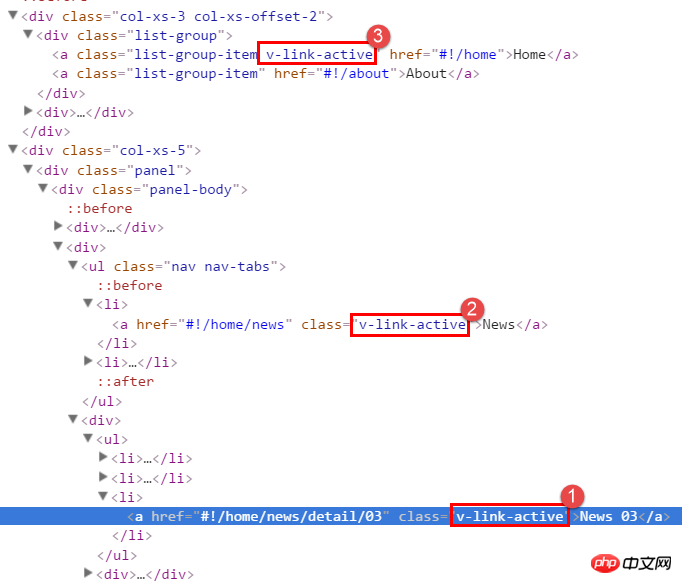
另外,带有 v-link 指令的元素,如果 v-link 对应的 URL 匹配当前的路径,该元素会被添加特定的class,该class的默认名称为v-link-active。例如,当我们访问/home/news/detail/03这个URL时,根据匹配规则,会有3个链接被添加v-link-active。
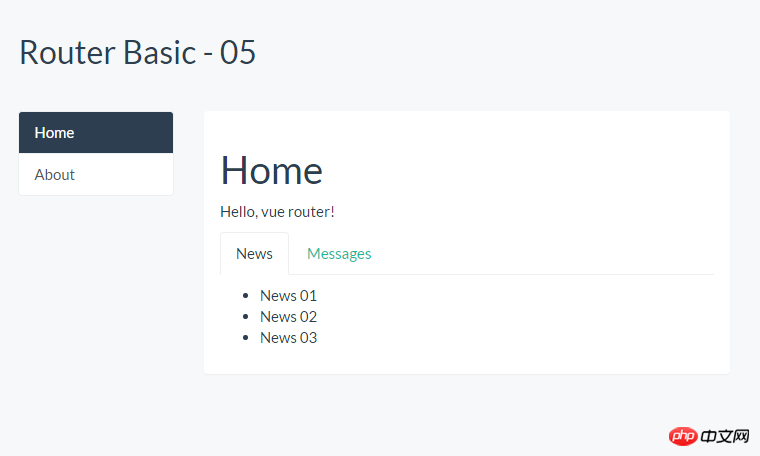
让链接处于活跃状态(05)
以上画面存在两个问题:
1.当用户点击Home链接或About链接后,链接没有显示为选中
2.当用户点击News或Message链接后,链接没有显示为选中
设置activeClass
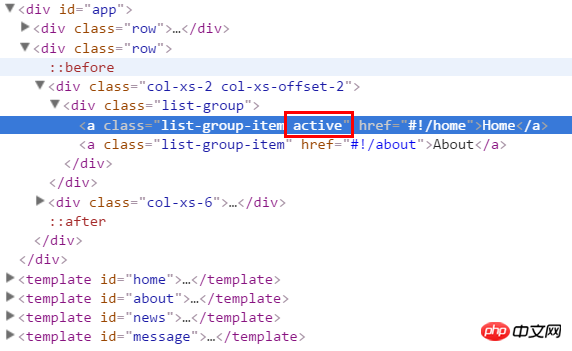
第1个问题,可以通过设定v-link指令的activeClass解决。
<a class="list-group-item" v-link="{ path: '/home', activeClass: 'active'}">Home</a>
<a class="list-group-item" v-link="{ path: '/about', activeClass: 'active'}">About</a>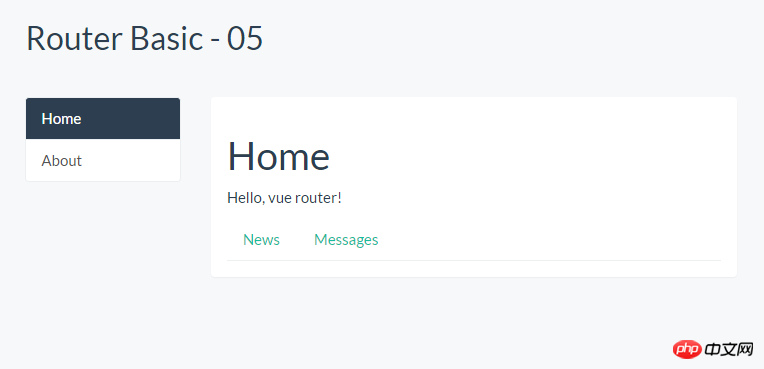
设定了v-link指令的activeClass属性后,默认的v-link-active被新的class取代。
第2个问题,为v-link指令设定activeClass是不起作用的,因为我们使用的是bootstrap的样式,需要设置a标签的父元素
<ul class="nav nav-tabs">
<li class="active">
<a v-link="{ path: '/home/news'}">News</a>
</li>
<li>
<a v-link="{ path: '/home/message'}">Messages</a>
</li>
</ul>如何实现这个效果呢?你可能会想到,为Home组件的data选项追加一个currentPath属性,然后使用以下方式绑定class。
<ul class="nav nav-tabs">
<li :class="currentPath == '/home/news' ? 'active': ''">
<a v-link="{ path: '/home/news'}">News</a>
</li>
<li :class="currentPath == '/home/message' ? 'active': ''">
<a v-link="{ path: '/home/message'}">Messages</a>
</li>
</ul>现在又出现了另一个问题,在什么情况下给currentPath赋值呢?
用户点击v-link的元素时,是路由的切换。
每个组件都有一个route选项,route选项有一系列钩子函数,在切换路由时会执行这些钩子函数。
其中一个钩子函数是data钩子函数,它用于加载和设置组件的数据。
var Home = Vue.extend({
 template: '#home',
 data: function() {
 return {
  msg: 'Hello, vue router!',
  currentPath: ''
 }
 },
 route: {
 data: function(transition){
  transition.next({
  currentPath: transition.to.path
  })
 }
 }
})该示例运行效果如下:
钩子函数(06)
路由的切换过程,本质上是执行一系列路由钩子函数,钩子函数总体上分为两大类:
全局的钩子函数
组件的钩子函数
全局的钩子函数定义在全局的路由对象中,组件的钩子函数则定义在组件的route选项中。
全局钩子函数
全局钩子函数有2个:
beforeEach:在路由切换开始时调用
afterEach:在每次路由切换成功进入激活阶段时被调用
组件的钩子函数
组件的钩子函数一共6个:
data:可以设置组件的data
activate:激活组件
deactivate:禁用组件
canActivate:组件是否可以被激活
canDeactivate:组件是否可以被禁用
canReuse:组件是否可以被重用
切换对象
每个切换钩子函数都会接受一个 transition 对象作为参数。这个切换对象包含以下函数和方法:
transition.to
表示将要切换到的路径的路由对象。
transition.from
代表当前路径的路由对象。
transition.next()
调用此函数处理切换过程的下一步。
transition.abort([reason])
调用此函数来终止或者拒绝此次切换。
transition.redirect(path)
取消当前切换并重定向到另一个路由。
钩子函数的执行顺序
全局钩子函数和组件钩子函数加起来一共8个,为了熟练vue router的使用,有必要了解这些钩子函数的执行顺序。
为了直观地了解这些钩子函数的执行顺序,在画面上追加一个Vue实例:
var well = new Vue({
el: '.well',
data: {
msg: '',
color: '#ff0000'
},
methods: {
setColor: function(){
this.color = '#' + parseInt(Math.random()*256).toString(16)
+ parseInt(Math.random()*256).toString(16)
+ parseInt(Math.random()*256).toString(16)
},
setColoredMessage: function(msg){
this.msg += '<p style="color: ' + this.color + '">' + msg + '</p>'
},
setTitle: function(title){
this.msg = '<h2 style="color: #333">' + title + '</h2>'
}
}
})well实例的HTML:
<p class="well">
 {{{ msg }}}
</p>然后,添加一个RouteHelper函数,用于记录各个钩子函数的执行日志:
function RouteHelper(name) {
 var route = {
 canReuse: function(transition) {
  well.setColoredMessage('执行组件' + name + '的钩子函数:canReuse')
  return true
 },
 canActivate: function(transition) {
  well.setColoredMessage('执行组件' + name + '的钩子函数:canActivate')
  transition.next()
 },
 activate: function(transition) {
  well.setColoredMessage('执行组件' + name + '的钩子函数:activate')
  transition.next()
 },
 canDeactivate: function(transition) {
  well.setColoredMessage('执行组件' + name + '的钩子函数:canDeactivate')
  transition.next()
 },
 deactivate: function(transition) {
  well.setColoredMessage('执行组件' + name + '的钩子函数:deactivate')
  transition.next()
 },
 data: function(transition) {
  well.setColoredMessage('执行组件' + name + '的钩子函数:data')
  transition.next()
 }
 }
 return route;
}最后,将这些钩子函数应用于各个组件:
var Home = Vue.extend({
 template: '#home',
 data: function() {
 return {
  msg: 'Hello, vue router!',
  path: ''
 }
 },
 route: RouteHelper('Home')
})

var News = Vue.extend({
 template: '#news',
 route: RouteHelper('News')
})

var Message = Vue.extend({
 template: '#message',
 route: RouteHelper('Message')
})

var About = Vue.extend({
 template: '#about',
 route: RouteHelper('About')
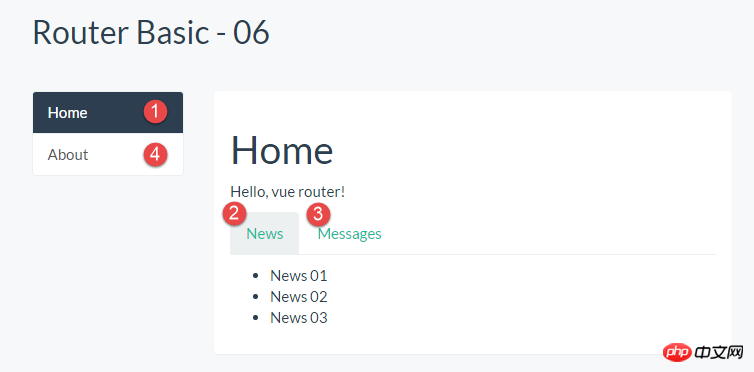
})我们按照以下步骤做个小实验:
1.运行应用(访问/home路径)
2.访问/home/news路径
3.访问/home/message路径
4.访问/about路径
切换控制流水线
当用户点击了/home/news链接,然后再点击/home/message链接后,vue-router做了什么事情呢?它执行了一个切换管道
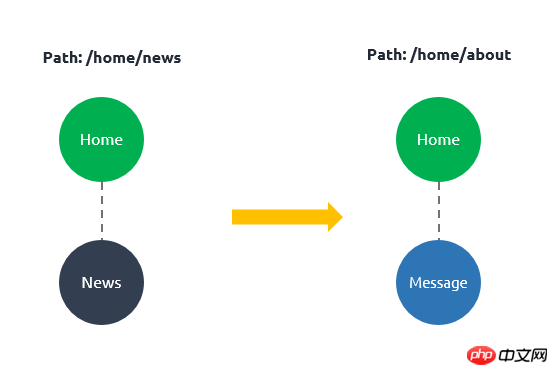
如何做到这些呢?这个过程包含一些我们必须要做的工作:
1.可以重用组件Home,因为重新渲染后,组件Home依然保持不变。
2.需要停用并移除组件News。
3.启用并激活组件Message。
4. Before performing steps 2 and 3, you need to ensure that the switching effect is valid - that is, to ensure that all components involved in the switching can be deactivated/activated as expected.
Various stages of switching
We can divide routing switching into three stages: reusable stage, verification stage and activation stage.
We take switching from home/news to home/message as an example to describe each stage. (Refer to the following text description: http://router.vuejs.org/zh-cn/pipeline/index.html)
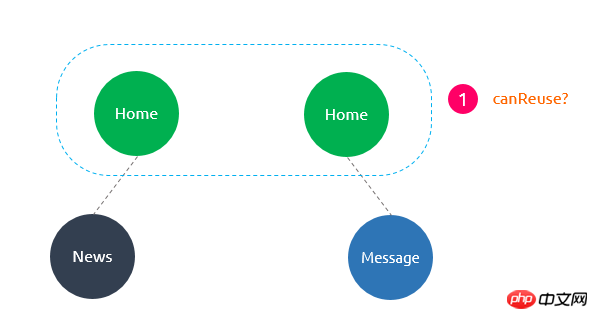
1. Reusable phase
Check Whether there are reusable components in the current view structure. This is done by comparing the two new component trees, identifying shared components, and then checking their reusability (via the canReuse option). By default, all components are reusable unless customized.
2. Verification phase
Check whether the current component can be deactivated and whether the new component can be activated. This is judged by calling the canDeactivate and canActivate hook functions in the routing configuration phase.
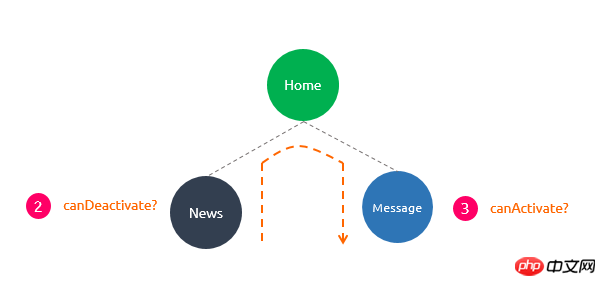
3. Activation phase
Once all verification hook functions are called and the switch is not terminated, the switch can be considered to be legal. The router then begins disabling current components and enabling new components.
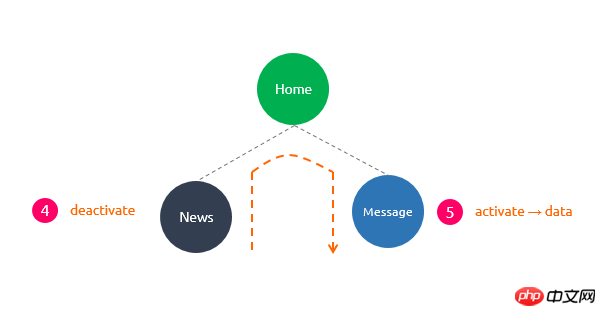
The calling sequence of the corresponding hook function in this phase is the same as that in the verification phase. Its purpose is to provide an opportunity for cleaning and preparation before component switching is actually executed. The interface is updated until the deactivate and activate hook functions of all affected components are executed.
data This hook function will be called after activate, or when the current component component can be reused.
The above is the entire content of this article. I hope it will be helpful to everyone's study. For more related content, please pay attention to the PHP Chinese website!
Related recommendations:
vue.extend implements alert modal box pop-up component
About how vue introduces sass global Analysis of variables
The above is the detailed content of Analysis on the use of vue routing. For more information, please follow other related articles on the PHP Chinese website!

Hot AI Tools

Undresser.AI Undress
AI-powered app for creating realistic nude photos

AI Clothes Remover
Online AI tool for removing clothes from photos.

Undress AI Tool
Undress images for free

Clothoff.io
AI clothes remover

AI Hentai Generator
Generate AI Hentai for free.

Hot Article

Hot Tools

Notepad++7.3.1
Easy-to-use and free code editor

SublimeText3 Chinese version
Chinese version, very easy to use

Zend Studio 13.0.1
Powerful PHP integrated development environment

Dreamweaver CS6
Visual web development tools

SublimeText3 Mac version
God-level code editing software (SublimeText3)

Hot Topics
 Why is there no page request information on the console network after vue-router jump?
Apr 04, 2025 pm 05:27 PM
Why is there no page request information on the console network after vue-router jump? When using vue-router for page redirection, you may notice a...
 How to implement the photo upload function of high-photographers of different brands on the front end?
Apr 04, 2025 pm 05:42 PM
How to implement the photo upload function of different brands of high-photographers on the front end When developing front-end projects, you often encounter the need to integrate hardware equipment. for...
 How to use Vue to implement electronic quotation forms with single header and multi-body?
Apr 04, 2025 pm 11:39 PM
How to implement electronic quotation forms with single header and multi-body in Vue. In modern enterprise management, the electronic processing of quotation forms is to improve efficiency and...
 How to use el-table to implement table grouping, drag and drop sorting in Vue2?
Apr 04, 2025 pm 07:54 PM
Implementing el-table table group drag and drop sorting in Vue2. Using el-table tables to implement group drag and drop sorting in Vue2 is a common requirement. Suppose we have a...
 Vue Material Year Calendar plug-in: What should I do if the calendar does not update the selected status after activeDates.push?
Apr 04, 2025 pm 05:00 PM
About VueMaterialYear...
 How to achieve segmentation effect with 45 degree curve border?
Apr 04, 2025 pm 11:48 PM
Tips for Implementing Segmenter Effects In user interface design, segmenter is a common navigation element, especially in mobile applications and responsive web pages. ...
 Does JavaScript naming specification raise compatibility issues in Android WebView?
Apr 04, 2025 pm 07:15 PM
JavaScript Naming Specification and Android...
 How to make sure the bottom of a 3D object is fixed on the map using Mapbox and Three.js in Vue?
Apr 04, 2025 pm 06:42 PM
How to use Mapbox and Three.js in Vue to adapt three-dimensional objects to map viewing angles. When using Vue to combine Mapbox and Three.js, the created three-dimensional objects need to...


