
 Web Front-end
JS Tutorial
Implement a pixel comparison service based on casperjs and resemble.js
Web Front-end
JS Tutorial
Implement a pixel comparison service based on casperjs and resemble.js
Implement a pixel comparison service based on casperjs and resemble.js

This article mainly introduces you to the relevant information about implementing a pixel comparison service based on casperjs and resemble.js. The article introduces it in detail through the example code. It has certain reference learning value for everyone's study or work. It needs Friends, come and study together.
Preface
This time I share a node service that provides pixel comparison between the design draft and the front-end page, aiming to provide testing or The front-end personnel complete an auxiliary test themselves. Believe me, under the comparison at the pixel level, the degree of restoration of the design draft on the web page will immediately become apparent. Not much to say below, let’s take a look at the detailed introduction.
Effect preview
## Pre-knowledge
- casperjs: written based on PhantomJS. It provides an interfaceless browser internally. Simply put, you can use it to complete the operation of simulating a human to operate the browser in the form of code, which involves various mouse events and many other functions. This time it is mainly used. It comes with a screenshot function.
- resemble.js: Image pixel comparison tool. The simple understanding of the calling method is that two images are passed in and a composite image is returned with comparison parameters such as difference and so on. The basic implementation idea can be understood as converting the image to canvas, obtaining its image pixels, and then comparing each pixel.
the whole idea
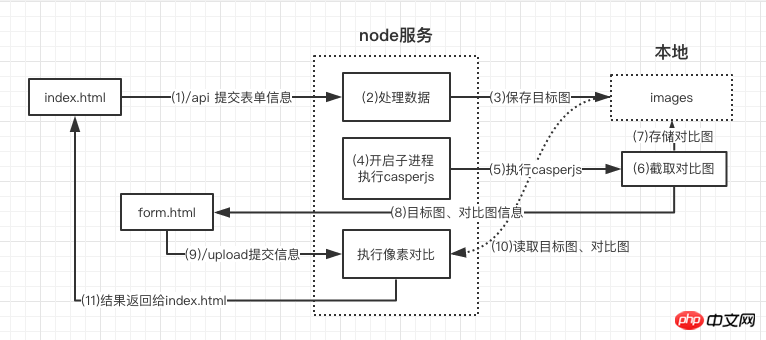
From the picture above, we should be able to sort out a rough process:
- Receive the design draft image and the website address and node information that need to be intercepted from the front-end page
- Save the design draft to the images folder
- Open the sub-process, start casperjs, and complete the interception of the target website
- After intercepting, request form.html to fill in the image address information and re-transmit it back to the server
- The server obtains the image information and compares the intercepted image with the design draft through resemblejs
- The results are returned to the front-end page
Implementation details
const MIME_TYPE = {
 "css": "text/css",
 "gif": "image/gif",
 "html": "text/html",
 "ico": "image/x-icon",
 "jpeg": "image/jpeg",
 "jpg": "image/jpg",
 "js": "text/javascript",
 "json": "application/json",
 "pdf": "application/pdf",
 "png": "image/png",
 "svg": "image/svg+xml",
 "swf": "application/x-shockwave-flash",
 "tiff": "image/tiff",
 "txt": "text/plain",
 "wav": "audio/x-wav",
 "wma": "audio/x-ms-wma",
 "wmv": "video/x-ms-wmv",
 "xml": "text/xml"
}
function sendFile(filePath, res) {
 fs.open(filePath, 'r+', function(err){ //根据路径打开文件
  if(err){
   send404(res)
  }else{
   let ext = path.extname(filePath)
   ext = ext ? ext.slice(1) : 'unknown'
   let contentType = MIME_TYPE[ext] || "text/plain" //匹配文件类型
   fs.readFile(filePath,function(err,data){
    if(err){
     send500(res)
    }else{
     res.writeHead(200,{'content-type':contentType})
     res.end(data)
    }
   })
  }
 })
}const multiparty = require('multiparty') //解析表单
let form = new multiparty.Form()
form.parse(req, function (err, fields, files) {
let filename = files['file'][0].originalFilename,
targetPath = __dirname + '/images/' + filename,
if(filename){
fs.createReadStream(files['file'][0].path).pipe(fs.createWriteStream(targetPath))
...
}
})Run casperjs
const { spawn } = require('child_process')
spawn('casperjs', ['casper.js', filename, captureUrl, selector, id])
casperjs.stdout.on('data', (data) => {
 ...
}) Take a screenshot and submit the data to form.html
const system = require('system')
const host = 'http://10.2.45.110:3033'
const casper = require('casper').create({
 // 浏览器窗口大小
 viewportSize: {
  width: 1920,
  height: 4080
 }
})
const fileName = decodeURIComponent(system.args[4])
const url = decodeURIComponent(system.args[5])
const selector = decodeURIComponent(system.args[6])
const id = decodeURIComponent(system.args[7])
const time = new Date().getTime()
casper.start(url)
casper.then(function() {
  console.log('正在截图请稍后')
  this.captureSelector('./images/casper'+ id + time +'.png', selector)
})
casper.then(function() {
 casper.start(host + '/form.html', function() {
  this.fill('form#contact-form', {
   'diff': './images/casper'+ id + time +'.png',
   'point': './images/' + fileName,
   'id': id
  }, true)
 })
})
casper.run()Perform pixel comparison and return data through resemble.js
function complete(data) {
  let imgName = 'diff'+ new Date().getTime() +'.png',
   imgUrl,
   analysisTime = data.analysisTime,
   misMatchPercentage = data.misMatchPercentage,
   resultUrl = './images/' + imgName
  fs.writeFileSync(resultUrl, data.getBuffer())
  imgObj = {
   ...
  }
  let resEnd = resObj[id] // 找回最开始的res返回给页面数据
  resEnd.writeHead(200, {'Content-type':'application/json'})
  resEnd.end(JSON.stringify(imgObj))
 }
let result = resemble(diff).compareTo(point).ignoreColors().onComplete(complete)这其中涉及到了一个点,即我现在所得到的结果要返回给最初的请求里,而从一开始的请求到现在我已经中转了多次,导致我现在找不到我最初的返回体res了。想了很久只能暂时采用了设定全局对象,在接收最初的请求后将请求者的ip和时间戳设定为唯一id存为该对象的key,value为当前的res。同时整个中转流程中时刻传递id,最后通过调用resObj[id]来得到一开始的返回体,返回数据。这个方法我不认为是最优解,但是鉴于我现在想不出来好方法为了跑通整个服务不得已。。如果有新的思路请务必告知!!
部署
安装PhantomJS(osx)
官网下载: phantomjs-2.1.1-macosx.zip
解压路径:/User/xxx/phantomjs-2.1.1-macosx
添加环境变量:~/.bash_profile 文件中添加
export PATH="$PATH:/Users/xxx/phantomjs-2.1.1-macosx/bin"
terminal输入:phantomjs --version
能看到版本号即安装成功
安装casperjs
brew update && brew install casperjs
安装resemble.js
cnpm i resemblejs //已写进packjson可不用安装
brew install pkg-config cairo libpng jpeg giflib
cnpm i canvas //node内运行canvas
node服务
git clone https://github.com/Aaaaaaaty/gui-auto-test.git
cd gui-auto-test
cnpm i
cd pxdiff
nodemon server.js
打开http://localhost:3033/index.html
以上就是本文的全部内容,希望对大家的学习有所帮助,更多相关内容请关注PHP中文网!
相关推荐:
The above is the detailed content of Implement a pixel comparison service based on casperjs and resemble.js. For more information, please follow other related articles on the PHP Chinese website!

Hot AI Tools

Undresser.AI Undress
AI-powered app for creating realistic nude photos

AI Clothes Remover
Online AI tool for removing clothes from photos.

Undress AI Tool
Undress images for free

Clothoff.io
AI clothes remover

AI Hentai Generator
Generate AI Hentai for free.

Hot Article
Hot Tools

Notepad++7.3.1
Easy-to-use and free code editor

SublimeText3 Chinese version
Chinese version, very easy to use

Zend Studio 13.0.1
Powerful PHP integrated development environment

Dreamweaver CS6
Visual web development tools

SublimeText3 Mac version
God-level code editing software (SublimeText3)
Hot Topics
 1359
1359
 52
52

 The difference between nodejs and tomcat
Apr 21, 2024 am 04:16 AM
The difference between nodejs and tomcat
Apr 21, 2024 am 04:16 AM
The main differences between Node.js and Tomcat are: Runtime: Node.js is based on JavaScript runtime, while Tomcat is a Java Servlet container. I/O model: Node.js uses an asynchronous non-blocking model, while Tomcat is synchronous blocking. Concurrency handling: Node.js handles concurrency through an event loop, while Tomcat uses a thread pool. Application scenarios: Node.js is suitable for real-time, data-intensive and high-concurrency applications, and Tomcat is suitable for traditional Java web applications.
 The difference between nodejs and vuejs
Apr 21, 2024 am 04:17 AM
The difference between nodejs and vuejs
Apr 21, 2024 am 04:17 AM
Node.js is a server-side JavaScript runtime, while Vue.js is a client-side JavaScript framework for creating interactive user interfaces. Node.js is used for server-side development, such as back-end service API development and data processing, while Vue.js is used for client-side development, such as single-page applications and responsive user interfaces.
 Is nodejs a backend framework?
Apr 21, 2024 am 05:09 AM
Is nodejs a backend framework?
Apr 21, 2024 am 05:09 AM
Node.js can be used as a backend framework as it offers features such as high performance, scalability, cross-platform support, rich ecosystem, and ease of development.
 How to connect nodejs to mysql database
Apr 21, 2024 am 06:13 AM
How to connect nodejs to mysql database
Apr 21, 2024 am 06:13 AM
To connect to a MySQL database, you need to follow these steps: Install the mysql2 driver. Use mysql2.createConnection() to create a connection object that contains the host address, port, username, password, and database name. Use connection.query() to perform queries. Finally use connection.end() to end the connection.
 What is the difference between npm and npm.cmd files in the nodejs installation directory?
Apr 21, 2024 am 05:18 AM
What is the difference between npm and npm.cmd files in the nodejs installation directory?
Apr 21, 2024 am 05:18 AM
There are two npm-related files in the Node.js installation directory: npm and npm.cmd. The differences are as follows: different extensions: npm is an executable file, and npm.cmd is a command window shortcut. Windows users: npm.cmd can be used from the command prompt, npm can only be run from the command line. Compatibility: npm.cmd is specific to Windows systems, npm is available cross-platform. Usage recommendations: Windows users use npm.cmd, other operating systems use npm.
 What are the global variables in nodejs
Apr 21, 2024 am 04:54 AM
What are the global variables in nodejs
Apr 21, 2024 am 04:54 AM
The following global variables exist in Node.js: Global object: global Core module: process, console, require Runtime environment variables: __dirname, __filename, __line, __column Constants: undefined, null, NaN, Infinity, -Infinity
 Is nodejs a back-end development language?
Apr 21, 2024 am 05:09 AM
Is nodejs a back-end development language?
Apr 21, 2024 am 05:09 AM
Yes, Node.js is a backend development language. It is used for back-end development, including handling server-side business logic, managing database connections, and providing APIs.
 Is there a big difference between nodejs and java?
Apr 21, 2024 am 06:12 AM
Is there a big difference between nodejs and java?
Apr 21, 2024 am 06:12 AM
The main differences between Node.js and Java are design and features: Event-driven vs. thread-driven: Node.js is event-driven and Java is thread-driven. Single-threaded vs. multi-threaded: Node.js uses a single-threaded event loop, and Java uses a multi-threaded architecture. Runtime environment: Node.js runs on the V8 JavaScript engine, while Java runs on the JVM. Syntax: Node.js uses JavaScript syntax, while Java uses Java syntax. Purpose: Node.js is suitable for I/O-intensive tasks, while Java is suitable for large enterprise applications.
