
 Web Front-end
JS Tutorial
SpringBoot and Vue.js implement the file upload function that separates the front and back ends
Web Front-end
JS Tutorial
SpringBoot and Vue.js implement the file upload function that separates the front and back ends
SpringBoot and Vue.js implement the file upload function that separates the front and back ends

This article mainly introduces the file upload function of SpringBoot Vue.js to achieve front-end and back-end separation. Friends who need it can refer to it.
This article requires certain knowledge of Vue and SpringBoot and is divided into two projects. , one is the front-end Vue project, and the other is the back-end SpringBoot project.
Back-end project construction
I am using SpringBoot1.5.10 JDK8 IDEA Use IDEA to create a new SpringBoot project, just click next
After the project is successfully created, the maven pom configuration is as follows
<dependencies>
  <dependency>
   <groupId>org.springframework.boot</groupId>
   <artifactId>spring-boot-starter</artifactId>
  </dependency>
  <!--加入web模块-->
  <dependency>
   <groupId>org.springframework.boot</groupId>
   <artifactId>spring-boot-starter-web</artifactId>
  </dependency>
  <dependency>
   <groupId>org.springframework.boot</groupId>
   <artifactId>spring-boot-starter-test</artifactId>
   <scope>test</scope>
  </dependency>
  <dependency>
   <groupId>com.alibaba</groupId>
   <artifactId>fastjson</artifactId>
   <version>1.2.39</version>
  </dependency>
 </dependencies>
Next write the upload API interface
@RestController
@RequestMapping("/upload")
@CrossOrigin
public class UploadController {
 @Value("${prop.upload-folder}")
 private String UPLOAD_FOLDER;
 private Logger logger = LoggerFactory.getLogger(UploadController.class);
 @PostMapping("/singlefile")
 public Object singleFileUpload(MultipartFile file) {
  logger.debug("传入的文件参数:{}", JSON.toJSONString(file, true));
  if (Objects.isNull(file) || file.isEmpty()) {
   logger.error("文件为空");
   return "文件为空,请重新上传";
  }
  try {
   byte[] bytes = file.getBytes();
   Path path = Paths.get(UPLOAD_FOLDER + file.getOriginalFilename());
   //如果没有files文件夹,则创建
   if (!Files.isWritable(path)) {
    Files.createDirectories(Paths.get(UPLOAD_FOLDER));
   }
   //文件写入指定路径
   Files.write(path, bytes);
   logger.debug("文件写入成功...");
   return "文件上传成功";
  } catch (IOException e) {
   e.printStackTrace();
   return "后端异常...";
  }
 }
}CrossOrigin annotation: Solve cross-domain problems. Because the front and back ends are completely separated, cross-domain problems are inevitable. Adding this annotation will make the Controller support cross-domain. If this annotation is removed, the front-end Ajax request will Not to the back end. This is just a cross-domain solution, there are other solutions that this article will not cover.
MultipartFile: SpringMVC's multipartFile object, used to receive the FormData passed in by the front-end request.
PostMapping is a new annotation introduced after Spring 4.3 to simplify the mapping of HTTP methods. It is equivalent to our commonly used @RequestMapping(value = "/xx", method = RequestMethod.POST).
The backend has been completed so far, it is very simple.
Front-end project construction
I am using Node8 Webpack3 Vue2
You need to install the node environment locally, and install Vue- cli, use Vue-cli to generate a Vue project.
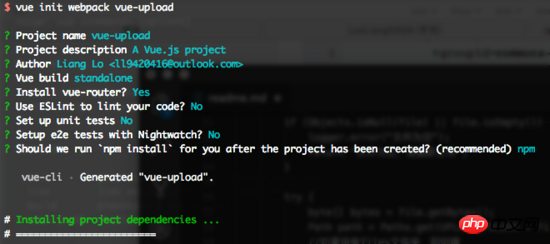
After the project is successfully created, open it with WebStorm and you can write a simple upload example. The main code is as follows:
<template>
<p class="hello">
<h1>{{ msg }}</h1>
<form>
<input type="file" @change="getFile($event)">
<button class="button button-primary button-pill button-small" @click="submit($event)">提交</button>
</form>
</p>
</template>
<script>
import axios from 'axios';
export default {
name: 'HelloWorld',
data() {
return {
msg: 'Welcome to Your Vue.js App',
file: ''
}
},
methods: {
getFile: function (event) {
this.file = event.target.files[0];
console.log(this.file);
},
submit: function (event) {
//阻止元素发生默认的行为
event.preventDefault();
let formData = new FormData();
formData.append("file", this.file);
axios.post('http://localhost:8082/upload/singlefile', formData)
.then(function (response) {
alert(response.data);
console.log(response);
window.location.reload();
})
.catch(function (error) {
alert("上传失败");
console.log(error);
window.location.reload();
});
}
}
}
</script>Use Axios to send Ajax requests to the backend, and use H5's FormData object to encapsulate image data
Test
Start On the server side, directly run the main method of the BootApplication class, port 8082

Start the front end, the port defaults to 8080, cd to the front-end directory, and execute respectively:
npm install
npm run dev
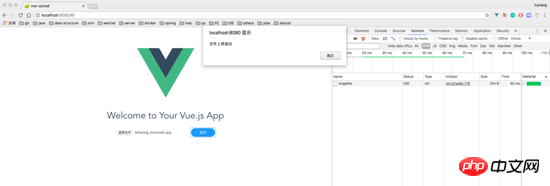
After successful startup, visit localhost:8080
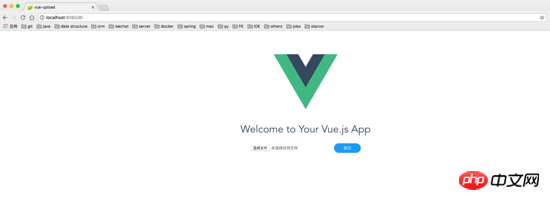
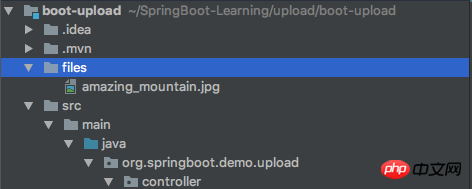
Select a picture to upload. You can see that after the upload is successful, There are also image files in the directory specified by the terminal
Summary
Here, one before and after The end-to-end upload demo is finished. This article is a simple demo that can only handle the upload of small files. Later I will write an article on SpringBoot Vue to implement large file upload in chunks, so stay tuned.
The above is the entire content of this article. I hope it will be helpful to everyone's study. For more related content, please pay attention to the PHP Chinese website!
Related recommendations:
Introduction to how projects built based on Vue-cli interact with the backend
About vue.js Front-end and back-end data interaction operation of submitting data
The above is the detailed content of SpringBoot and Vue.js implement the file upload function that separates the front and back ends. For more information, please follow other related articles on the PHP Chinese website!

Hot AI Tools

Undresser.AI Undress
AI-powered app for creating realistic nude photos

AI Clothes Remover
Online AI tool for removing clothes from photos.

Undress AI Tool
Undress images for free

Clothoff.io
AI clothes remover

Video Face Swap
Swap faces in any video effortlessly with our completely free AI face swap tool!

Hot Article
Hot Tools

Notepad++7.3.1
Easy-to-use and free code editor

SublimeText3 Chinese version
Chinese version, very easy to use

Zend Studio 13.0.1
Powerful PHP integrated development environment

Dreamweaver CS6
Visual web development tools

SublimeText3 Mac version
God-level code editing software (SublimeText3)
Hot Topics


![Windows ISO file too large BootCamp error [Fixed]](https://img.php.cn/upload/article/000/887/227/170831702395455.jpg?x-oss-process=image/resize,m_fill,h_207,w_330) Windows ISO file too large BootCamp error [Fixed]
Feb 19, 2024 pm 12:30 PM
Windows ISO file too large BootCamp error [Fixed]
Feb 19, 2024 pm 12:30 PM
If you get the error message "The Windows ISO file is too large" when using BootCampAssistant on a Mac computer, this may be because the ISO file size exceeds the limit supported by BootCampAssistant. The solution to this problem is to use other tools to compress the ISO file size to ensure that it can be processed in BootCamp Assistant. BootCampAssistant is a convenient tool provided by Apple for installing and running Windows operating system on Mac computers. It helps users set up a dual-boot system, allowing them to easily choose to use MacOS or Wind at startup
 A new programming paradigm, when Spring Boot meets OpenAI
Feb 01, 2024 pm 09:18 PM
A new programming paradigm, when Spring Boot meets OpenAI
Feb 01, 2024 pm 09:18 PM
In 2023, AI technology has become a hot topic and has a huge impact on various industries, especially in the programming field. People are increasingly aware of the importance of AI technology, and the Spring community is no exception. With the continuous advancement of GenAI (General Artificial Intelligence) technology, it has become crucial and urgent to simplify the creation of applications with AI functions. Against this background, "SpringAI" emerged, aiming to simplify the process of developing AI functional applications, making it simple and intuitive and avoiding unnecessary complexity. Through "SpringAI", developers can more easily build applications with AI functions, making them easier to use and operate.
 Use Spring Boot and Spring AI to build generative artificial intelligence applications
Apr 28, 2024 am 11:46 AM
Use Spring Boot and Spring AI to build generative artificial intelligence applications
Apr 28, 2024 am 11:46 AM
As an industry leader, Spring+AI provides leading solutions for various industries through its powerful, flexible API and advanced functions. In this topic, we will delve into the application examples of Spring+AI in various fields. Each case will show how Spring+AI meets specific needs, achieves goals, and extends these LESSONSLEARNED to a wider range of applications. I hope this topic can inspire you to understand and utilize the infinite possibilities of Spring+AI more deeply. The Spring framework has a history of more than 20 years in the field of software development, and it has been 10 years since the Spring Boot 1.0 version was released. Now, no one can dispute that Spring
 What are the implementation methods of spring programmatic transactions?
Jan 08, 2024 am 10:23 AM
What are the implementation methods of spring programmatic transactions?
Jan 08, 2024 am 10:23 AM
How to implement spring programmatic transactions: 1. Use TransactionTemplate; 2. Use TransactionCallback and TransactionCallbackWithoutResult; 3. Use Transactional annotations; 4. Use TransactionTemplate in combination with @Transactional; 5. Customize the transaction manager.
 How to use gRPC to implement file upload in Golang?
Jun 03, 2024 pm 04:54 PM
How to use gRPC to implement file upload in Golang?
Jun 03, 2024 pm 04:54 PM
How to implement file upload using gRPC? Create supporting service definitions, including request and response messages. On the client, the file to be uploaded is opened and split into chunks, then streamed to the server via a gRPC stream. On the server side, file chunks are received and stored into a file. The server sends a response after the file upload is completed to indicate whether the upload was successful.
 Simplify file upload processing with Golang functions
May 02, 2024 pm 06:45 PM
Simplify file upload processing with Golang functions
May 02, 2024 pm 06:45 PM
Answer: Yes, Golang provides functions that simplify file upload processing. Details: The MultipartFile type provides access to file metadata and content. The FormFile function gets a specific file from the form request. The ParseForm and ParseMultipartForm functions are used to parse form data and multipart form data. Using these functions simplifies the file processing process and allows developers to focus on business logic.
 How to set transaction isolation level in Spring
Jan 26, 2024 pm 05:38 PM
How to set transaction isolation level in Spring
Jan 26, 2024 pm 05:38 PM
How to set the transaction isolation level in Spring: 1. Use the @Transactional annotation; 2. Set it in the Spring configuration file; 3. Use PlatformTransactionManager; 4. Set it in the Java configuration class. Detailed introduction: 1. Use the @Transactional annotation, add the @Transactional annotation to the class or method that requires transaction management, and set the isolation level in the attribute; 2. In the Spring configuration file, etc.
 How to implement drag and drop file upload in Golang?
Jun 05, 2024 pm 12:48 PM
How to implement drag and drop file upload in Golang?
Jun 05, 2024 pm 12:48 PM
How to implement drag and drop file upload in Golang? Enable middleware; handle file upload requests; create HTML code for the drag and drop area; add JavaScript code for handling drag and drop events.
