This article mainly introduces the method of using Vue to customize the numeric keyboard component. It has a certain reference value. Now I share it with you. Friends in need can refer to it.
I have been doing Vue development recently because There are many pages involving amount input. The product always feels that the experience of using native input for amount input is not good, so I wrote a custom numeric keyboard component using Vue. For the specific implementation code, please refer to this article
In order to satisfy the user experience, the editor wrote a custom numeric keyboard component using vue, and the user experience is not bad.
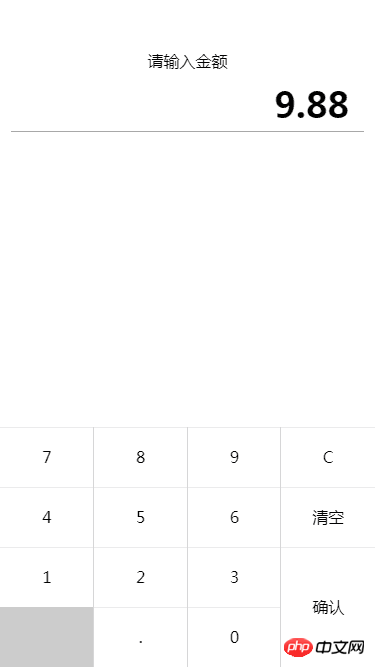
Without further ado, let’s show you the renderings~
Renderings

##Specific implementation
##Layout and typesetting<p class='key-container'>
<p class='key-title'>请输入金额</p>
<p class='input-box'>{{ money }}</p>
<p class='keyboard' @click.stop='_handleKeyPress'>
<p class='key-row'>
<p class='key-cell' data-num='7'>7</p>
<p class='key-cell' data-num='8'>8</p>
<p class='key-cell' data-num='9'>9</p>
<p class='key-cell' data-num='D'>C</p>
</p>
<p class='key-row'>
<p class='key-cell' data-num='4'>4</p>
<p class='key-cell' data-num='5'>5</p>
<p class='key-cell' data-num='6'>6</p>
<p class='key-cell' data-num='C'>清空</p>
</p>
<p class='key-row'>
<p class='key-cell' data-num='1'>1</p>
<p class='key-cell' data-num='2'>2</p>
<p class='key-cell' data-num='3'>3</p>
<p class='key-cell' data-num='-1'></p>
</p>
<p class='key-row'>
<p class='key-cell disabled' data-num='-1'></p>
<p class='key-cell' data-num='.'>.</p>
<p class='key-cell' data-num='0'>0</p>
<p class='key-cell' data-num='-1'></p>
</p>
<p class='key-confirm' data-num='S'>确认</p>
</p>
</p>
In terms of keyboard keys, each button is set with its custom attribute value num, the purpose is to distinguish the keys Different effects will be produced after
The event is bound to the parent, and the specific clicked element is determined by capturing
I will not post the style code here, I will host the specific one on github ~
Input judgmentFor the keyboard, the most important thing is input judgment. The entire keyboard input first passes through _handleKeyPress It can be seen from the
//处理按键
_handleKeyPress(e) {
 let num = e.target.dataset.num;
 //不同按键处理逻辑
 // -1 代表无效按键,直接返回
 if (num == -1) return false;
 switch (String(num)) {
 //小数点
 case '.':
  this._handleDecimalPoint();
  break;
 //删除键
 case 'D':
  this._handleDeleteKey();
  break;
 //清空键
 case 'C':
  this._handleClearKey();
  break;
 //确认键
 case 'S':
  this._handleConfirmKey();
  break;
 default:
  this._handleNumberKey(num);
  break;
 }
}that I have divided the key types into five major categories, namely decimal point, delete (backspace) key, clear key, confirm key and numeric keys, and use different processing for each. Function, let’s analyze the decimal points one by one. Since only one decimal point can be entered at most, it needs to be judged. If there is a decimal point, it will be returned directly; if not, it will also be determined whether the decimal point is the first one. If the entered character is yes, change it to 0. If not, append the decimal point to the end of the current character;
//处理小数点函数
 _handleDecimalPoint() {
  //如果包含小数点,直接返回
  if (this.money.indexOf('.') > -1) return false;
  //如果小数点是第一位,补0
  if (!this.money.length)
  this.money = '0.';
  //如果不是,添加一个小数点
  else
  this.money = this.money + '.';
}Delete (backspace) key is more convenient to process. First determine whether the currently entered character is Is empty, if there are no characters, return directly, otherwise delete the last character of the string;
//处理删除键
 _handleDeleteKey() {
  let S = this.money;
  //如果没有输入,直接返回
  if (!S.length) return false;
  //否则删除最后一个
  this.money = S.substring(0, S.length - 1);
}Clear key, the logic is the simplest, just clear the current character;
//处理清空键
 _handleClearKey() {
  this.money = '';
}Confirm key , to determine whether the current character is empty. If it is empty, it will prompt a message and return. If it is not empty, we must also judge. If the input is 8. This format, we need to align and format it into the form 8.00, otherwise we will directly keep the two characters. decimal place, finally trigger the callback and pass the result as a parameter;
_handleConfirmKey() {
  let S = this.money;
  //未输入
  if (!S.length){
  alert( '您目前未输入!' )
  return false;
  }
  //将 8. 这种转换成 8.00
  if (S.indexOf('.') > -1 && S.indexOf('.') == (S.length - 1))
  S = Number(S.substring(0, S.length - 1)).toFixed(2);
  //保留两位
  S = Number(S).toFixed(2);
  this.$emit('confirmEvent',S)
}The logic of the numeric keys is not very complicated. The main thing is to check whether there is a decimal point. If there is a decimal point, then enter up to two digits. , if there is no decimal point, you have to judge whether the first input is 0. If it is 0, then you can only enter the decimal point, and you must also avoid invalid inputs such as 0000, so I added an extra judgment, otherwise Just append it directly after the current character;
//处理数字
_handleNumberKey(num) {
let S = this.money;
//如果有小数点且小数点位数不小于2
if ( S.indexOf('.') > -1 && S.substring(S.indexOf('.') + 1).length < 2)
this.money = S + num;
//没有小数点
if (!(S.indexOf('.') > -1)) {
//如果第一位是0,只能输入小数点
if (num == 0 && S.length == 0)
this.money = '0.';
else {
if (S.length && Number(S.charAt(0)) === 0) return;
this.money = S + num;
}
}
}component introduction
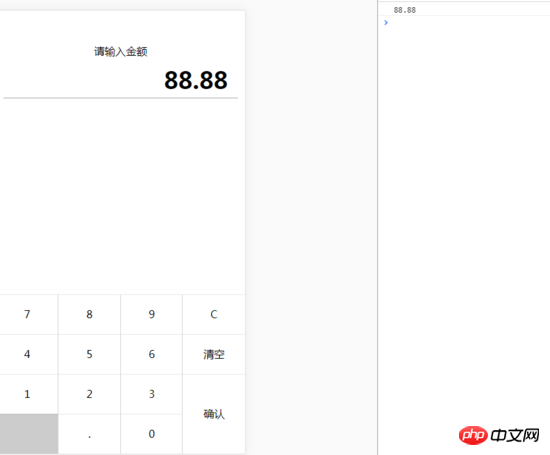
The component is ready, just fill in the path and enter the corresponding After registering in the components, you can put it directly on the page and use it, similar to the following <calculation @confirmEvent="_confirmEvent"></calculation>
_confirmEvent(res){
 console.log(res)
}The effect is similar to the following,
The above is the entire content of this article. I hope it will be helpful to everyone's learning. For more related content, please pay attention to PHP Chinese website! Related recommendations:
Introduction to Vue component communication practices
The above is the detailed content of How to customize the numeric keyboard component using Vue. For more information, please follow other related articles on the PHP Chinese website!


