
 Web Front-end
JS Tutorial
Ajax bootstrap beautifies web pages and implements code for page loading, deletion and viewing details
Web Front-end
JS Tutorial
Ajax bootstrap beautifies web pages and implements code for page loading, deletion and viewing details
Ajax bootstrap beautifies web pages and implements code for page loading, deletion and viewing details

This article mainly introduces the Ajax bootstrap beautification of web pages and the realization of page loading, deletion and viewing details. It has a certain reference value. Now I share it with you. Friends in need can refer to it.
Bootstrap is An open source toolkit launched by Twitter for front-end development, Bootstrap provides elegant HTML and CSS specifications, which is written in the dynamic CSS language Less. Through this article, I will introduce Ajax bootstrap to beautify the web page and realize the loading, deletion and viewing of the page details. Friends in need can refer to
Bookstrap: Beautify the page:
Bootstrap It is an open source toolkit for front-end development launched by Twitter.
It was developed by Twitter designers Mark Otto and Jacob Thornton and is a CSS/HTML framework.
Bootstrap provides elegant HTML and CSS specifications, which are written in the dynamic CSS language Less.
Bootstrap has been very popular since its launch and has been a popular open source project on GitHub, including NASA's MSNBC (Microsoft National Broadcasting Company) Breaking News.
You only need to reference some defined classes, that is, class names, to create web pages with very beautiful styles. It also supports self-adaptation and is a very good framework.
Calling file:
<link href="dist/css/bootstrap.min.css" rel="external nofollow" rel="external nofollow" rel="stylesheet" type="text/css" />
 <script src="jquery-1.11.2.min.js"></script>
 <script src="dist/js/bootstrap.min.js"></script>
If you want to reference one of the multiple JS files containing jquery, then the jquery file must be placed first
Next It is the beautification of the table
Striped table:
<table class="table table-striped">
 <thead>
 <tr>
  <td>代号</td>
  <td>名称</td>
  <td>操作</td>
 </tr>
 </thead>
 <tbody id="td">
 </tbody>
</table>
Add the details button and change the two button styles to beautify;
$.ajax({
url: "jiazai.php",
// 显示所有的数据不用写data
dataType: "TEXT",
success: function (data) {
var str = "";
var hang = data.split("|");
//split拆分字符串
for (var i = 0; i < hang.length; i++) {
//通过循环取到每一行;拆分出列;
var lie = hang[i].split("-");
str = str +
"<tr><td>"
+ lie[0] +
"</td><td>"
+ lie[1] +
"</td><td>" +
"<button type='button' class='btn btn-info sc' ids='"+lie[0]+"'>点击删除
</button><button type='button' class='btn btn-primary xq' ids='"+lie[0]+"'>查看详情</button>" +
//ids里面存上主键值
"</td></tr>";
}
$("#td").html(str);
//找到td把html代码扔进去
addshanchu();
addxiangqing();
}
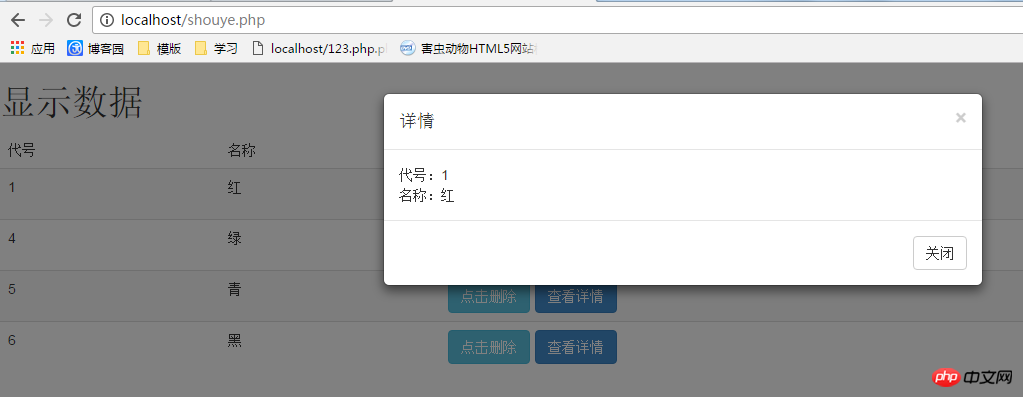
});View the click event of the details:
 //给查看详情加事件
 function addxiangqing()
 {
  $(".xq").click(function(){
   $('#myModal').modal('show')
   //打开模态框
   var ids = $(this).attr("ids");
   $.ajax({
    url:"xiangqing.php",
    data:{ids:ids},
    dataType:"TEXT",
    type:"POST",
     success:function(data){
     //拆分
      var lie = data.split("^");
      var str = "<p>代号:"+lie[0]+"</p><p>名称:"+lie[1]"</p>";
      //造字符串
      var str = "<p>代号:"+lie[0]+"</p><p>名称:"+lie[1]+"</p>";
      $("#nr").html(str);
   }
   });
   //在模态框里面要显示的内容
  })
}Next is the detailed processing page:
<?php
$ids = $_POST["ids"];
include ("db.class.php");
$db = new db();
$sql = "select * from min where ids = '{$ids}'";
echo $db->strQuery($sql);Here the splicing string and the call are written into the encapsulation class file, so just quote strQuery directly
Picture:
Total page code:
Table page:
无标题文档 <link href="dist/css/bootstrap.min.css" rel="external nofollow" rel="external nofollow" rel="stylesheet" type="text/css" /> <script src="jquery-1.11.2.min.js"></script> <script src="dist/js/bootstrap.min.js"></script>显示数据
<table class="table table-striped"> <thead> <tr> <td>代号</td> <td>名称</td> <td>操作</td> </tr> </thead> <tbody id="td"> </tbody> </table>
详情
<script> //调用load方法 load(); //把加载数据封装成一个方法 function load() { $.ajax({ url: "jiazai.php", // 显示所有的数据不用写data dataType: "TEXT", success: function (data) { var str = ""; var hang = data.split("|"); //split拆分字符串 for (var i = 0; i < hang.length; i++) { //通过循环取到每一行;拆分出列; var lie = hang[i].split("-"); str = str + "<tr><td>" + lie[0] + "</td><td>" + lie[1] + "</td><td>" + "<button type='button' class='btn btn-info sc' ids='"+lie[0]+"'>点击删除</button><button type='button' class='btn btn-primary xq' ids='"+lie[0]+"'>查看详情</button>" + //ids里面存上主键值 "</td></tr>"; } $("#td").html(str); //找到td把html代码扔进去 addshanchu(); addxiangqing(); } }); } //给查看详情加事件 function addxiangqing() { $(".xq").click(function(){ $('#myModal').modal('show') //打开模态框 var ids = $(this).attr("ids"); $.ajax({ url:"xiangqing.php", data:{ids:ids}, dataType:"TEXT", type:"POST", success:function(data){ //拆分 var lie = data.split("^"); // var str = "<p>代号:"+lie[0]+"</p><p>名称:"+lie[1]"</p>"; //造字符串 var str = "<p>代号:"+lie[0]+"</p><p>名称:"+lie[1]+"</p>"; $("#nr").html(str); } }); //在模态框里面要显示的内容 }) } //把删除事件封装成方法: function addshanchu() { //给删除按钮加上事件 $(".sc").click(function () { var ids = $(this).attr("ids"); $.ajax({ url: "shanchu.php", data: {ids: ids}, dataType: "TEXT", type: "POST", success: function (d) { if (d.trim() == "ok") { alert("删除成功"); //调用加载数据的方法 load(); } else { alert("删除失败"); } } }); }) } </script>
Loading:
<?php
include ("db.class.php");
$db = new db();
$sql = "select * from min";
$arr = $db->Query($sql);
//遍历
$str="";
foreach ($arr as $v)
{
 $str = $str.implode("-",$v)."|";
 //用-把$v拼起来,拼出来是1-红2-蓝,用|分割,拼出来是1-红|2-蓝|
}
$str = substr($str,0,strlen($str)-1);
//截取字符串:从第0个开始,截取它的长度-1
//strlen获取字符串长度
echo $str;Delete processing page
##
<?php
include ("db.class.php");
$db = new db();
$ids = $_POST["ids"];
$sql = "delete from min WHERE ids='{$ids}'";
if($db ->Query($sql,0))
{
echo "ok";
}
else{
echo "no";
}<?php
$ids = $_POST["ids"];
include ("db.class.php");
$db = new db();
$sql = "select * from min where ids = '{$ids}'";
echo $db->strQuery($sql);Introduction to the implementation of $.fn and image scrolling effects in jquery
Based on JSON format data Introduction to the simple jQuery slide plug-in (jquery-slider)
The above is the detailed content of Ajax bootstrap beautifies web pages and implements code for page loading, deletion and viewing details. For more information, please follow other related articles on the PHP Chinese website!

Hot AI Tools

Undresser.AI Undress
AI-powered app for creating realistic nude photos

AI Clothes Remover
Online AI tool for removing clothes from photos.

Undress AI Tool
Undress images for free

Clothoff.io
AI clothes remover

AI Hentai Generator
Generate AI Hentai for free.

Hot Article
Hot Tools

Notepad++7.3.1
Easy-to-use and free code editor

SublimeText3 Chinese version
Chinese version, very easy to use

Zend Studio 13.0.1
Powerful PHP integrated development environment

Dreamweaver CS6
Visual web development tools

SublimeText3 Mac version
God-level code editing software (SublimeText3)
Hot Topics
 1375
1375
 52
52

 How to do vertical centering of bootstrap
Apr 07, 2025 pm 03:21 PM
How to do vertical centering of bootstrap
Apr 07, 2025 pm 03:21 PM
Use Bootstrap to implement vertical centering: flexbox method: Use the d-flex, justify-content-center, and align-items-center classes to place elements in the flexbox container. align-items-center class method: For browsers that do not support flexbox, use the align-items-center class, provided that the parent element has a defined height.
 How to use bootstrap button
Apr 07, 2025 pm 03:09 PM
How to use bootstrap button
Apr 07, 2025 pm 03:09 PM
How to use the Bootstrap button? Introduce Bootstrap CSS to create button elements and add Bootstrap button class to add button text
 How to insert pictures on bootstrap
Apr 07, 2025 pm 03:30 PM
How to insert pictures on bootstrap
Apr 07, 2025 pm 03:30 PM
There are several ways to insert images in Bootstrap: insert images directly, using the HTML img tag. With the Bootstrap image component, you can provide responsive images and more styles. Set the image size, use the img-fluid class to make the image adaptable. Set the border, using the img-bordered class. Set the rounded corners and use the img-rounded class. Set the shadow, use the shadow class. Resize and position the image, using CSS style. Using the background image, use the background-image CSS property.
 How to get the bootstrap search bar
Apr 07, 2025 pm 03:33 PM
How to get the bootstrap search bar
Apr 07, 2025 pm 03:33 PM
How to use Bootstrap to get the value of the search bar: Determines the ID or name of the search bar. Use JavaScript to get DOM elements. Gets the value of the element. Perform the required actions.
 How to resize bootstrap
Apr 07, 2025 pm 03:18 PM
How to resize bootstrap
Apr 07, 2025 pm 03:18 PM
To adjust the size of elements in Bootstrap, you can use the dimension class, which includes: adjusting width: .col-, .w-, .mw-adjust height: .h-, .min-h-, .max-h-
 How to set up the framework for bootstrap
Apr 07, 2025 pm 03:27 PM
How to set up the framework for bootstrap
Apr 07, 2025 pm 03:27 PM
To set up the Bootstrap framework, you need to follow these steps: 1. Reference the Bootstrap file via CDN; 2. Download and host the file on your own server; 3. Include the Bootstrap file in HTML; 4. Compile Sass/Less as needed; 5. Import a custom file (optional). Once setup is complete, you can use Bootstrap's grid systems, components, and styles to create responsive websites and applications.
 How to set the bootstrap navigation bar
Apr 07, 2025 pm 01:51 PM
How to set the bootstrap navigation bar
Apr 07, 2025 pm 01:51 PM
Bootstrap provides a simple guide to setting up navigation bars: Introducing the Bootstrap library to create navigation bar containers Add brand identity Create navigation links Add other elements (optional) Adjust styles (optional)
 How to verify bootstrap date
Apr 07, 2025 pm 03:06 PM
How to verify bootstrap date
Apr 07, 2025 pm 03:06 PM
To verify dates in Bootstrap, follow these steps: Introduce the required scripts and styles; initialize the date selector component; set the data-bv-date attribute to enable verification; configure verification rules (such as date formats, error messages, etc.); integrate the Bootstrap verification framework and automatically verify date input when form is submitted.
