This article mainly introduces the use of JavaScript to implement the function of ID floating display comments in WordPress, which is to display the main content of the comment in a building-in-a-building style comment. Friends who need it can refer to it
For example : A left a message, and B replied to A with @, so B’s reply may be like this:
@A
How much money do you have?
That is, when the mouse is hovering When you stop on @A, A's comment content will be displayed in a floating area.

Implementation steps
Here we will take the iNove theme as an example to explain.
1. Save the following code as commenttips.js:
jQuery(document).ready(
 function(){
 var id=/^#comment-/;
 var at=/^@/;
 jQuery('#thecomments li p a').each(
  function() {
  if(jQuery(this).attr('href').match(id)&& jQuery(this).text().match(at)) {
   jQuery(this).addClass('atreply');
  }
  }
 );
 jQuery('.atreply').hover(
  function() {
  jQuery(jQuery(this).attr('href')).clone().hide().insertAfter(jQuery(this).parents('li')).attr('id','').addClass('tip').fadeIn(200);
  },
  function() {
  jQuery('.tip').fadeOut(400, function(){jQuery(this).remove();});
  }
 );
 jQuery('.atreply').mousemove(
  function(e) {
  jQuery('.tip').css({left:(e.clientX+18),top:(e.pageY+18)})
  }
 );
 }
)2. Place the commenttips.js file into the inove/js directory.
3. Append the style code to style.css As follows:
#thecomments .tip {
 background:#FFF;
 border:1px solid #CCC;
 width:605px;
 padding:10px !important;
 padding:10px 10px 0;
 margin-top:0;
 position:absolute;
 z-index:3;
}
#thecomments .tip .act {
 display:none;
}
*+html #thecomments .tip {
 padding:10px 10px 0 !important;
}4. Add code to call JavaScript in the theme. Open templates/end.php, and add the following code in the line before
<script type="text/javascript" src="http://ajax.googleapis.com/ajax/libs/jquery/1.3.1/jquery.min.js"></script> <script type="text/javascript" src="<?php bloginfo('template_url'); ?>/js/commenttips.js"></script>
5. Okay, refresh the page with the @ reply, wait until the page is loaded, hover the mouse over the @ reply, You will see the effect.
Why can’t it be displayed across pages?
Because the working principle is that when the mouse moves to @{username}, it will be found on this page The corresponding comment is inserted into the comment list and displayed in absolute position. If the comment is not on this page, the object cannot be found, and of course there will be no subsequent processing.
How to cross pages Get comment information?
If the corresponding comment cannot be found on this page, you can use AJAX to return the comment information queried in the background to the page through the comment ID. When the mouse moves over the @ comment, hover to the user The 'Loading...' prompt box is displayed. If the operation is successful, the found comment will be inserted at the end of the comment list, and the content of the comment will be replaced in the 'Loading...' box.
In other words, the comment that has been loaded The comments will always remain on this page, and there is no need to reload when the mouse moves over the @ comment again.
Let’s take a look at how to handle cross-page comments:
On the current page How to find the corresponding comment through @{username}?
1. Each comment will have an ID, the structure is like: comment-{commentId}, this is to facilitate finding the comment through the anchor point, and at the same time It has also become a necessary condition to complete the @ comment prompt.
2. Each @{username} is actually the anchor point pointing to the comment, and naturally the comment ID can be obtained.
So it is actually very simple, if the comment ID is _commentId, then the corresponding comment can be found in JS through the following code.
document.getElementById(_commentId);
If the target comment can be found, a hidden temporary comment is created, and the target comment is used as its content, in the @{username} attachment Display it; if the target comment is not found, use the ID to find the corresponding comment in the background and perform cross-page processing.
How to load comments across pages?
The essence of cross-page is to dynamically load comments and append the obtained comments to the end of the comment list so that the comments can be found on this page. The difference is that these comments will not be displayed through CSS processing.
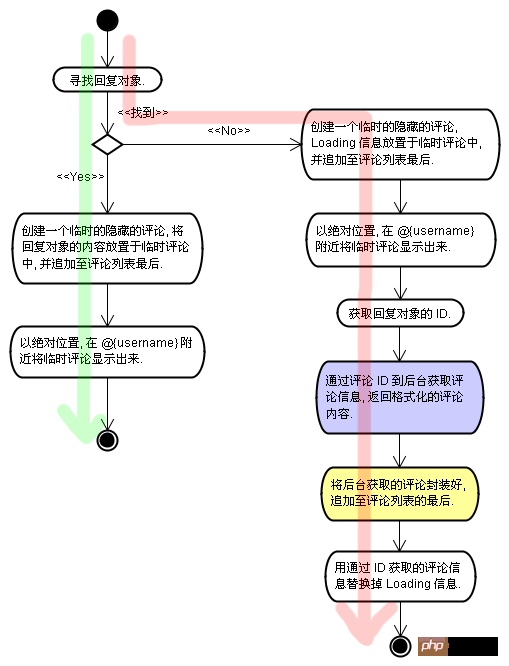
You can refer to Figure below. If the comment is not on this page, it will take the red path. After the comment is added to the current page, there will be an action to replace the Loading information in the prompt box with the comment content. When the user hovers the mouse here @{ username}, the comment is already on the current page, so there is no need to load it again. Instead, take the green path and directly bring up the comment prompt box.

$comment = get_comment($_GET['id']);
custom_comments($comment, null,null);
var id=/^#comment-/;
var at=/^@/;
jQuery('#thecomments li p a').each(function() {
if(jQuery(this).attr('href').match(id)&& jQuery(this).text().match(at)) {
jQuery(this).addClass('atreply');
}
});
jQuery('.atreply').hover(function() {
var target = this;
var _commentId = jQuery(this).attr('href');
if(jQuery(_commentId).is('.comment')) {
jQuery('<li class="comment tip"></li>').hide().html(jQuery(_commentId).html()).appendTo(jQuery('#thecomments'));
jQuery('#thecomments .tip').css({
left:jQuery().cumulativeOffset(this)[0] + jQuery(this).width() + 10,
top:jQuery().cumulativeOffset(this)[1] - 22
}).fadeIn();
} else {
var id = _commentId.slice(9);
jQuery.ajax({
type: 'GET'
,url: '?action=load_comment&id=' + id
,cache: false
,dataType: 'html'
,contentType: 'application/json; charset=utf-8'
,beforeSend: function(){
jQuery('<li class="comment tip"></li>').hide().html('<p class="ajax-loader msg">Loading...</p>').appendTo(jQuery('#thecomments'));
jQuery('#thecomments .tip').css({
left:jQuery().cumulativeOffset(target)[0] + jQuery(target).width() + 10,
top:jQuery().cumulativeOffset(target)[1] - 22
}).fadeIn();
}
,success: function(data){
var addedComment = jQuery(data + '</li>');
addedComment.hide().appendTo(jQuery('#thecomments'));
jQuery('#thecomments .tip').html(addedComment.html());
}
,error: function(){
jQuery('#thecomments .tip').html('<p class="msg">Oops, failed to load data.</p>');
}
});
}
}, function() {
jQuery('#thecomments .tip').fadeOut(400, function(){
jQuery(this).remove();
});
});function load_comment(){
if($_GET['action'] =='load_comment' && $_GET['id'] != ''){
$comment = get_comment($_GET['id']);
if(!$comment) {
fail(printf('Whoops! Can\'t find the comment with id %1$s', $_GET['id']));
}
custom_comments($comment, null,null);
die();
}
}
add_action('init', 'load_comment');Ajax bootstrap beautifies the web page and implements the code of page loading, deletion and viewing details
jquery in$ Introduction to the implementation of .fn and image scrolling effects
The above is the detailed content of Use jQuery to implement @ ID floating display in WordPress. For more information, please follow other related articles on the PHP Chinese website!


