Node crawls Lagou.com data and exports it to an excel file
This article mainly introduces the node crawling Lagou.com data and exporting it as an excel file. It has a certain reference value. Now I share it with everyone. Friends in need can refer to it
Preface
I have been learning node.js intermittently before. Today I will practice using Lagou.com and learn about the recent recruitment market through data! I am relatively new to node, and I hope I can learn and make progress together with everyone.
1. Summary
We first need to clarify the specific needs:
can be crawled through
node index city positionRelated informationYou can also enter node index start to directly crawl our predefined city and position arrays, and loop to crawl different job information in different cities
Store the final crawling results in the local
./datadirectory-
Generate the corresponding excel file and store it locally
2. Related modules used by crawlers
fs: used to read and write system files and directories
async: process control
superagent: client request proxy module
node-xlsx: Export files in a certain format as excel
3. The main steps of the crawler:
Initialize the project
New project directory
Create the project in the appropriate disk directory Directory node-crwl-lagou
Initialization project
Enter the node-crwl-lagou folder
Execute npm init and initialize the package.json file
Install dependent packages
npm install async
npm install superagent
npm install node-xlsx
Processing of command line input
For the content entered on the command line, you can use process.argv to obtain it. It will return an array, and each item in the array is the content entered by the user.
Distinguish between node index regional position and node index start two inputs, the simplest is to determine the length of process.argv, if the length is four, directly call the crawler main program To crawl the data, if the length is three, we need to piece together the URL through the predefined city and position arrays, and then use async.mapSeries to call the main program in a loop. The homepage code for command analysis is as follows:
if (process.argv.length === 4) {
  let args = process.argv
  console.log('准备开始请求' + args[2] + '的' + args[3] + '职位数据');
  requsetCrwl.controlRequest(args[2], args[3])
} else if (process.argv.length === 3 && process.argv[2] === 'start') {
  let arr = []
  for (let i = 0; i <p>The predefined city and position arrays are as follows: </p><pre class="brush:php;toolbar:false">{
    "city": ["北京","上海","广州","深圳","杭州","南京","成都","西安","武汉","重庆"],
    "position": ["前端","java","php","ios","android","c++","python",".NET"]
}The next step is the analysis of the main program part of the crawler.
Analyze the page and find the request address
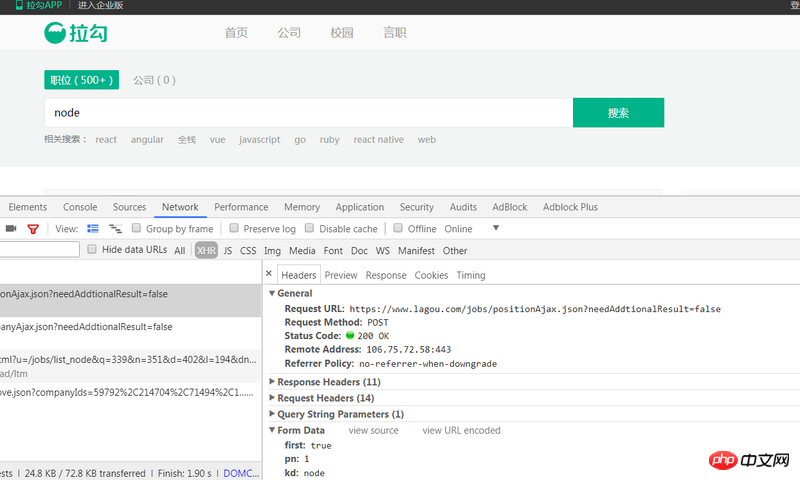
First we open the homepage of Lagou.com, enter the query information (such as node), and then check the console to find the relevant request, as shown in the figure:

This post requesthttps://www.lagou.com/jobs/positionAjax.json?needAddtionalResult=false is what we need, through three requests Parameters to obtain different data, a simple analysis can tell: the parameter first is to mark whether the current page is the first page, true is yes, false is no; the parameter pn is the current The page number; the parameter kd is the query input content.
Requesting data through superagent
First of all, it needs to be clear that the entire program is asynchronous, and we need to use async.series to call it in sequence.
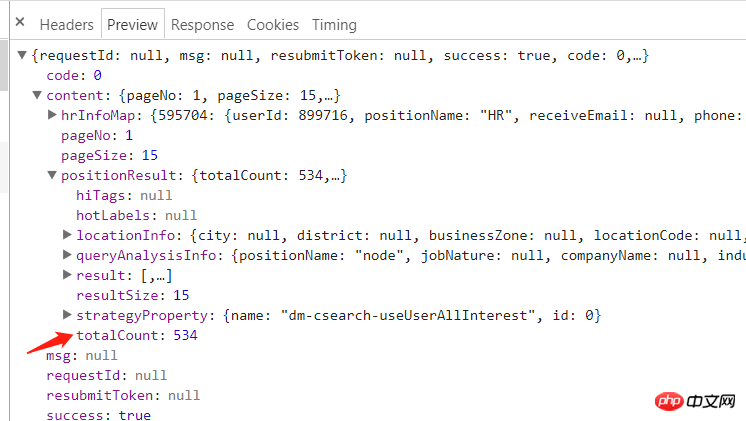
View the response returned by the analysis:

You can see that content.positionResult.totalCount is the total number of pages we need
We use superagent to directly call the post request , the console will prompt the following information:
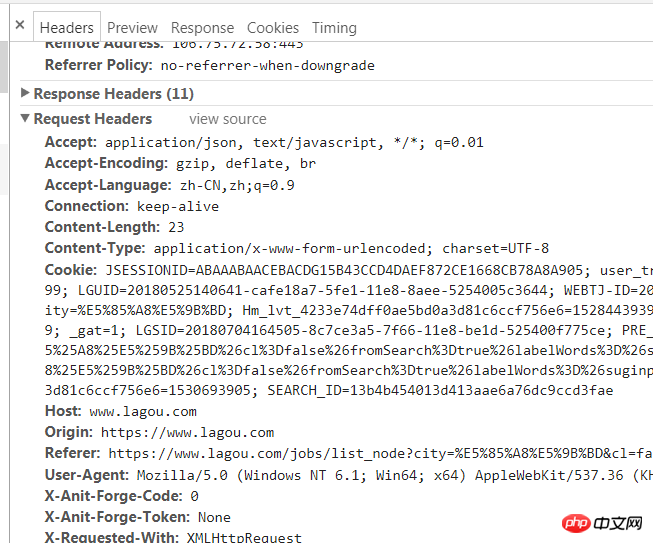
{'success': False, 'msg': '您操作太频繁,请稍后再访问', 'clientIp': '122.xxx.xxx.xxx'}This is actually one of the anti-crawler strategies. We only need to add a request header to it. The method of obtaining the request header is very simple, as follows:

Then use superagent to call the post request. The main code is as follows:
// 先获取总页数
    (cb) => {
      superagent
        .post(`https://www.lagou.com/jobs/positionAjax.json?needAddtionalResult=false&city=${city}&kd=${position}&pn=1`)
        .send({
          'pn': 1,
          'kd': position,
          'first': true
        })
        .set(options.options)
        .end((err, res) => {
          if (err) throw err
          // console.log(res.text)
          let resObj = JSON.parse(res.text)
          if (resObj.success === true) {
            totalPage = resObj.content.positionResult.totalCount;
            cb(null, totalPage);
          } else {
            console.log(`获取数据失败:${res.text}}`)
          }
        })
},After getting the total number of pages, we can passTotal number of pages/15Get the pn parameter, loop to generate all URLs and store them in urls:
(cb) => {
      for (let i=0;Math.ceil(i<totalpage><p>With all the URLs, it is not difficult to crawl to all the data. Continue to use the superagent's post method to loop requests For all URLs, every time the data is obtained, a json file is created in the data directory and the returned data is written. This seems simple, but there are two points to note: </p>
<ol class=" list-paddingleft-2">
<li><p>In order to prevent too many concurrent requests from causing the IP to be blocked: when looping URLs, you need to use the async.mapLimit method to control the concurrency to 3. After each request, it will take two seconds before sending the next request</p></li>
<li><p>在async.mapLimit的第四个参数中,需要通过判断调用主函数的第三个参数是否存在来区分一下是那种命令输入,因为对于<code>node index start</code>这个命令,我们使用得是async.mapSeries,每次调用主函数都传递了<code>(city, position, callback)</code>,所以如果是<code>node index start</code>的话,需要在每次获取数据完后将null传递回去,否则无法进行下一次循环</p></li>
</ol>
<p>主要代码如下:</p>
<pre class="brush:php;toolbar:false">// 控制并发为3
    (cb) => {
      async.mapLimit(urls, 3, (url, callback) => {
        num++;
        let page = url.split('&')[3].split('=')[1];
        superagent
          .post(url)
          .send({
            'pn': totalPage,
            'kd': position,
            'first': false
          })
          .set(options.options)
          .end((err, res) => {
            if (err) throw err
            let resObj = JSON.parse(res.text)
            if (resObj.success === true) {
              console.log(`正在抓取第${page}页,当前并发数量:${num}`);
              if (!fs.existsSync('./data')) {
                fs.mkdirSync('./data');
              }
              // 将数据以.json格式储存在data文件夹下
              fs.writeFile(`./data/${city}_${position}_${page}.json`, res.text, (err) => {
                if (err) throw err;
                // 写入数据完成后,两秒后再发送下一次请求
                setTimeout(() => {
                  num--;
                  console.log(`第${page}页写入成功`);
                  callback(null, 'success');
                }, 2000);
              });
            }
          })
      }, (err, result) => {
        if (err) throw err;
        // 这个arguments是调用controlRequest函数的参数,可以区分是那种爬取(循环还是单个)
        if (arguments[2]) {
          ok = 1;
        }
        cb(null, ok)
      })
    },
    () => {
      if (ok) {
        setTimeout(function () {
          console.log(`${city}的${position}数据请求完成`);
          indexCallback(null);
        }, 5000);
      } else {
        console.log(`${city}的${position}数据请求完成`);
      }
      // exportExcel.exportExcel() // 导出为excel
}导出的json文件如下:
json文件导出为excel
将json文件导出为excel有多种方式,我使用的是node-xlsx这个node包,这个包需要将数据按照固定的格式传入,然后导出即可,所以我们首先做的就是先拼出其所需的数据格式:
function exportExcel() {
  let list = fs.readdirSync('./data')
  let dataArr = []
  list.forEach((item, index) => {
    let path = `./data/${item}`
    let obj = fs.readFileSync(path, 'utf-8')
    let content = JSON.parse(obj).content.positionResult.result
    let arr = [['companyFullName', 'createTime', 'workYear', 'education', 'city', 'positionName', 'positionAdvantage', 'companyLabelList', 'salary']]
    content.forEach((contentItem) => {
      arr.push([contentItem.companyFullName, contentItem.phone, contentItem.workYear, contentItem.education, contentItem.city, contentItem.positionName, contentItem.positionAdvantage, contentItem.companyLabelList.join(','), contentItem.salary])
    })
    dataArr[index] = {
      data: arr,
      name: path.split('./data/')[1] // 名字不能包含 \ / ? * [ ]
    }
  })

// 数据格式
// var data = [
//   {
//     name : 'sheet1',
//     data : [
//       [
//         'ID',
//         'Name',
//         'Score'
//       ],
//       [
//         '1',
//         'Michael',
//         '99'
//
//       ],
//       [
//         '2',
//         'Jordan',
//         '98'
//       ]
//     ]
//   },
//   {
//     name : 'sheet2',
//     data : [
//       [
//         'AA',
//         'BB'
//       ],
//       [
//         '23',
//         '24'
//       ]
//     ]
//   }
// ]

// 写xlsx
  var buffer = xlsx.build(dataArr)
  fs.writeFile('./result.xlsx', buffer, function (err)
    {
      if (err)
        throw err;
      console.log('Write to xls has finished');

// 读xlsx
//     var obj = xlsx.parse("./" + "resut.xls");
//     console.log(JSON.stringify(obj));
    }
  );
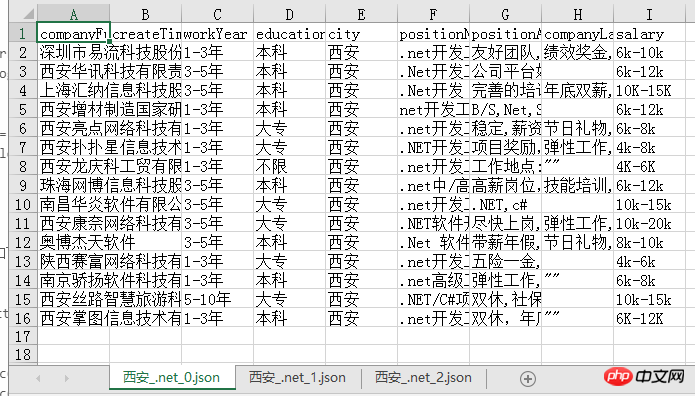
}导出的excel文件如下,每一页的数据都是一个sheet,比较清晰明了:
我们可以很清楚的从中看出目前西安.net的招聘情况,之后也可以考虑用更形象的图表方式展示爬到的数据,应该会更加直观!
总结
其实整个爬虫过程并不复杂,注意就是注意的小点很多,比如async的各个方法的使用以及导出设置header等,总之,也是收获满满哒!
源码
gitbug地址: https://github.com/fighting12...
以上就是本文的全部内容,希望对大家的学习有所帮助,更多相关内容请关注PHP中文网!
相关推荐:
The above is the detailed content of Node crawls Lagou.com data and exports it to an excel file. For more information, please follow other related articles on the PHP Chinese website!

Hot AI Tools

Undresser.AI Undress
AI-powered app for creating realistic nude photos

AI Clothes Remover
Online AI tool for removing clothes from photos.

Undress AI Tool
Undress images for free

Clothoff.io
AI clothes remover

AI Hentai Generator
Generate AI Hentai for free.

Hot Article

Hot Tools

Notepad++7.3.1
Easy-to-use and free code editor

SublimeText3 Chinese version
Chinese version, very easy to use

Zend Studio 13.0.1
Powerful PHP integrated development environment

Dreamweaver CS6
Visual web development tools

SublimeText3 Mac version
God-level code editing software (SublimeText3)

Hot Topics
 1378
1378
 52
52
 How to implement an online speech recognition system using WebSocket and JavaScript
Dec 17, 2023 pm 02:54 PM
How to use WebSocket and JavaScript to implement an online speech recognition system Introduction: With the continuous development of technology, speech recognition technology has become an important part of the field of artificial intelligence. The online speech recognition system based on WebSocket and JavaScript has the characteristics of low latency, real-time and cross-platform, and has become a widely used solution. This article will introduce how to use WebSocket and JavaScript to implement an online speech recognition system.
 WebSocket and JavaScript: key technologies for implementing real-time monitoring systems
Dec 17, 2023 pm 05:30 PM
WebSocket and JavaScript: Key technologies for realizing real-time monitoring systems Introduction: With the rapid development of Internet technology, real-time monitoring systems have been widely used in various fields. One of the key technologies to achieve real-time monitoring is the combination of WebSocket and JavaScript. This article will introduce the application of WebSocket and JavaScript in real-time monitoring systems, give code examples, and explain their implementation principles in detail. 1. WebSocket technology
 How to use JavaScript and WebSocket to implement a real-time online ordering system
Dec 17, 2023 pm 12:09 PM
Introduction to how to use JavaScript and WebSocket to implement a real-time online ordering system: With the popularity of the Internet and the advancement of technology, more and more restaurants have begun to provide online ordering services. In order to implement a real-time online ordering system, we can use JavaScript and WebSocket technology. WebSocket is a full-duplex communication protocol based on the TCP protocol, which can realize real-time two-way communication between the client and the server. In the real-time online ordering system, when the user selects dishes and places an order
 How to implement an online reservation system using WebSocket and JavaScript
Dec 17, 2023 am 09:39 AM
How to use WebSocket and JavaScript to implement an online reservation system. In today's digital era, more and more businesses and services need to provide online reservation functions. It is crucial to implement an efficient and real-time online reservation system. This article will introduce how to use WebSocket and JavaScript to implement an online reservation system, and provide specific code examples. 1. What is WebSocket? WebSocket is a full-duplex method on a single TCP connection.
 JavaScript and WebSocket: Building an efficient real-time weather forecasting system
Dec 17, 2023 pm 05:13 PM
JavaScript and WebSocket: Building an efficient real-time weather forecast system Introduction: Today, the accuracy of weather forecasts is of great significance to daily life and decision-making. As technology develops, we can provide more accurate and reliable weather forecasts by obtaining weather data in real time. In this article, we will learn how to use JavaScript and WebSocket technology to build an efficient real-time weather forecast system. This article will demonstrate the implementation process through specific code examples. We
 How to use insertBefore in javascript
Nov 24, 2023 am 11:56 AM
Usage: In JavaScript, the insertBefore() method is used to insert a new node in the DOM tree. This method requires two parameters: the new node to be inserted and the reference node (that is, the node where the new node will be inserted).
 Simple JavaScript Tutorial: How to Get HTTP Status Code
Jan 05, 2024 pm 06:08 PM
JavaScript tutorial: How to get HTTP status code, specific code examples are required. Preface: In web development, data interaction with the server is often involved. When communicating with the server, we often need to obtain the returned HTTP status code to determine whether the operation is successful, and perform corresponding processing based on different status codes. This article will teach you how to use JavaScript to obtain HTTP status codes and provide some practical code examples. Using XMLHttpRequest
 JavaScript and WebSocket: Building an efficient real-time image processing system
Dec 17, 2023 am 08:41 AM
JavaScript is a programming language widely used in web development, while WebSocket is a network protocol used for real-time communication. Combining the powerful functions of the two, we can create an efficient real-time image processing system. This article will introduce how to implement this system using JavaScript and WebSocket, and provide specific code examples. First, we need to clarify the requirements and goals of the real-time image processing system. Suppose we have a camera device that can collect real-time image data


