Implementation of mobile web music player based on vue
This article mainly introduces the implementation of the mobile web music player based on vue. It has certain reference value. Now I share it with everyone. Friends in need can refer to it
Initial project
Project GitHub address: https://github.com/bjw1234/vu...
Project demonstration address: http://music.baijiawei.top
Learn this project It took too long, and it is finally completed. It is a relatively large and complex vue project. If you think it is good, you are welcome to star.
Long article warning...
^_^||
Project initialization
// 安装vue脚手架工具
npm install vue-cli -g

// 初始化webpack应用
vue init webpack vue-music
Mixin used in the project
// 背景图片
bg-image($url)
  background-image: url($url + "@2x.png")
  @media (-webkit-min-device-pixel-ratio: 3),(min-device-pixel-ratio: 3)
    background-image: url($url + "@3x.png")

// 不换行
no-wrap()
  text-overflow: ellipsis
  overflow: hidden
  white-space: nowrap

// 扩展点击区域
extend-click()
  position: relative
  &:before
    content: ''
    position: absolute
    top: -10px
    left: -10px
    right: -10px
    bottom: -10px
Configuration path Alias
resolve: {
    extensions: ['.js', '.vue', '.json'],
    alias: {
      '@': resolve('src'),
      'common': resolve('src/common')
    }
}300 millisecond delay and click-through problem on the mobile side
fastclick: Handle the 300 millisecond delay and click-through problem on the mobile side click event.
First execute the command to install fastclick. After
npm install fastclick --save
, introduce it in main.js and bind it to body
import FastClick from 'fastclick';

FastClick.attach(document.body);
Note: When fastclick conflicts with other module clicks , when the click event is unavailable, you can add the needsclick class to the corresponding dom to solve the problem.
Further encapsulation of jsonp
Download the original jsonp module:
npm install jsonp --save
Encapsulate again:
import originJSONP from 'jsonp';

/**
 * 做一个简单的jsonp封装
 * @param url
 * @param data
 * @param option
 * @return {Promise}
 */
export default function jsonp (url, data, option) {
  return new Promise((resolve, reject) => {
    url = `${url}?${_obj2String(data)}`;
    originJSONP(url, option, (err, data) => {
      if (!err) {
        resolve(data);
      } else {
        reject(err);
      }
    });
  });
};

function _obj2String (obj, arr = [], index = 0) {
  for (let item in obj) {
    arr[index++] = [item, obj[item]];
  }
  return new URLSearchParams(arr).toString();
}vue’s life cycle function
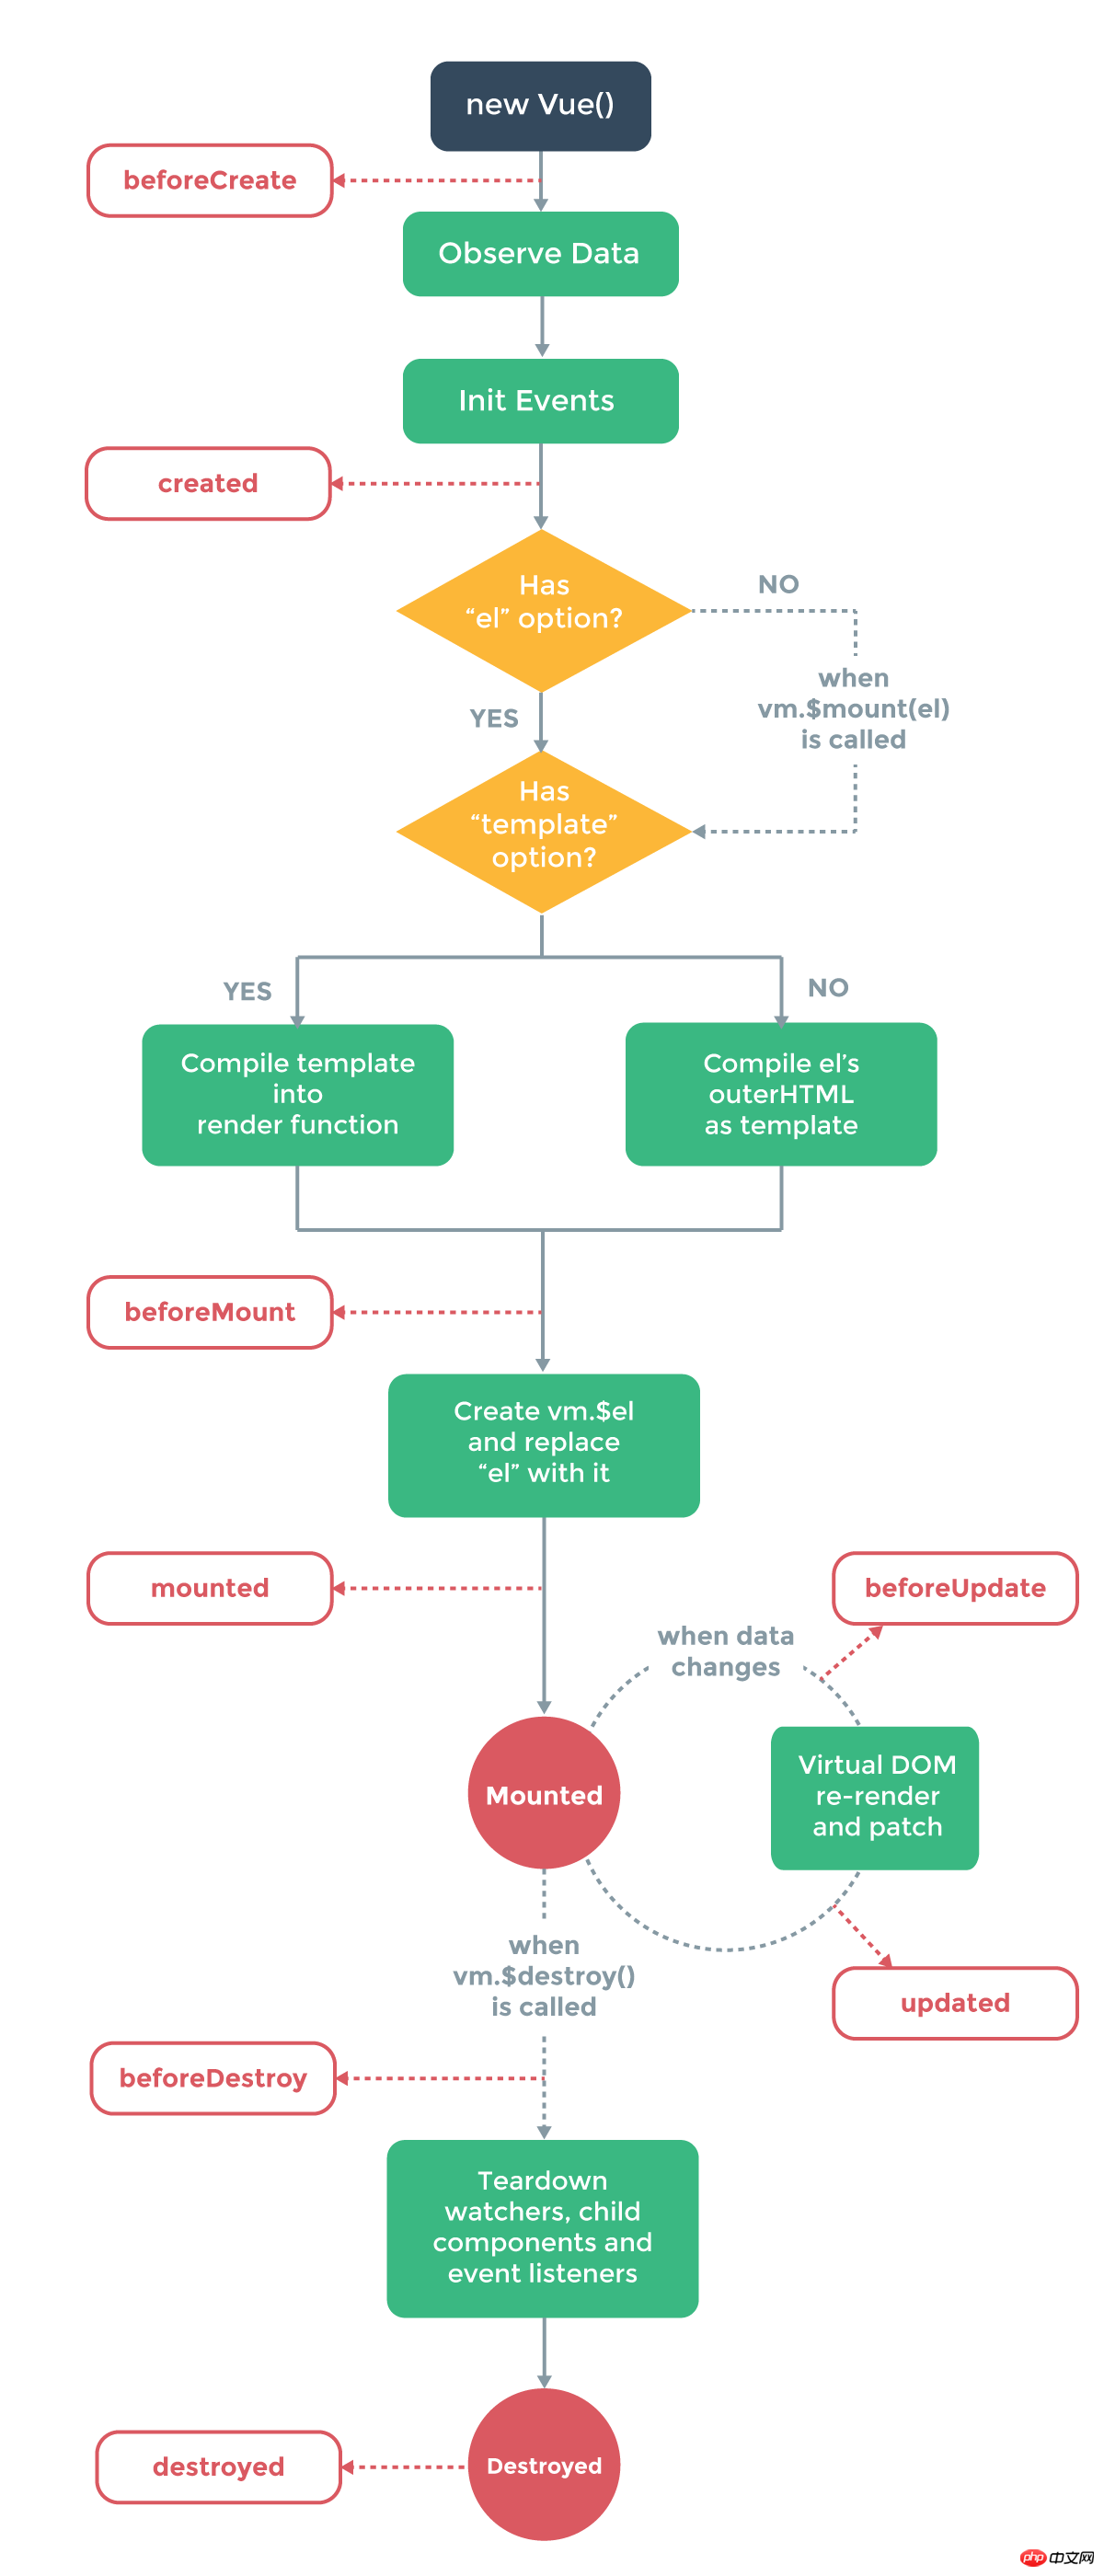
Note: When using the keep-alive component, when switching to other routes, the ## of the previous component will be called. #deactivatedHook function, when switching back, the activated function will be called.
Note:
- ##1.better-scroll only processes the first one in the container Scroll of child elements.
- 2. Make sure that the child element exceeds the parent element so that it can scroll correctly.
- Initialization:
import BScroll from 'better-scroll';

let wrapper = document.querySelector('.wrapper');
let scroll = new BScroll(wrapper,{
    // 配置项
});.wrapper position: fixed width: 100% top: 88px bottom: 0 .scroll height: 100% overflow: hidden
Troubleshooting (reason for failure to scroll:)
- 1. The height of the inner container does not exceed outer container.
- 2. dom is initialized before rendering is completed
- better-scroll
.
3. Changed the visibility of dom without recalculating the scroll. - For 3: When the dom is displayed, add a 20 millisecond delay, and then call the
- refresh
method.
Request proxy in development mode
When in development mode, some backend interfaces need to be used. In order to prevent cross-domain problems,
vue-cliProvides a very powerful http-proxy-middleware package. Our requests can be proxied. Enter config/index.js
Just configure the following code: <div class="code" style="position:relative; padding:0px; margin:0px;"><pre class="brush:php;toolbar:false">proxyTable: {
'/getDescList': {
target: 'http://127.0.0.1:7070/desclist', // 后端接口地址
changeOrigin: true,
// secure: false,
pathRewrite: {
'^/getDescList': '/'
}
}
}</pre><div class="contentsignin">Copy after login</div></div>The effect of negative margins
- marin-left
or
margin-topis a negative value: it will move the element in the corresponding direction.leftmeans moving in the left and right direction,topmeans moving in the up and down direction. That is to say, theposition of the element in the document flow will change. - margin-right
or
margin-bottomis a negative value: it will not move the element (the element does not change), but will Move the elements behind this element forward. That is to say, ifmargin-bottomis a negative value, then the elements below the element willmove up; ifmargin-rightis a negative value, then The element to the right of this element willmoveto the left, thus covering the element. Configuring sub-routes
Requirements: A singer details page is required under the singer page.
export default new Router({
    routes:[
        {
            path: '/',
            component: Singer,
            children: [
                {
                    path: ':id',
                    compoonent: SingerDetail
                }
            ]
        },
        ...
    ]
});When the user click is detected, the route jumps:
this.$router.push({
  path: `singer/${singer.id}`
});

// 别忘了在`Singer`页面中:
<router-view></router-view>Using Vuex
What is Vuex?
Simply put:
Vuex Solve the data communication and status management between multiple components in the project. Vuex separates state management and processes it in a unified way, using one-way data flow to manage data. The purpose is responsible for triggering the action (
) and then changing the corresponding state (State), thereby reflecting it on the view (View).
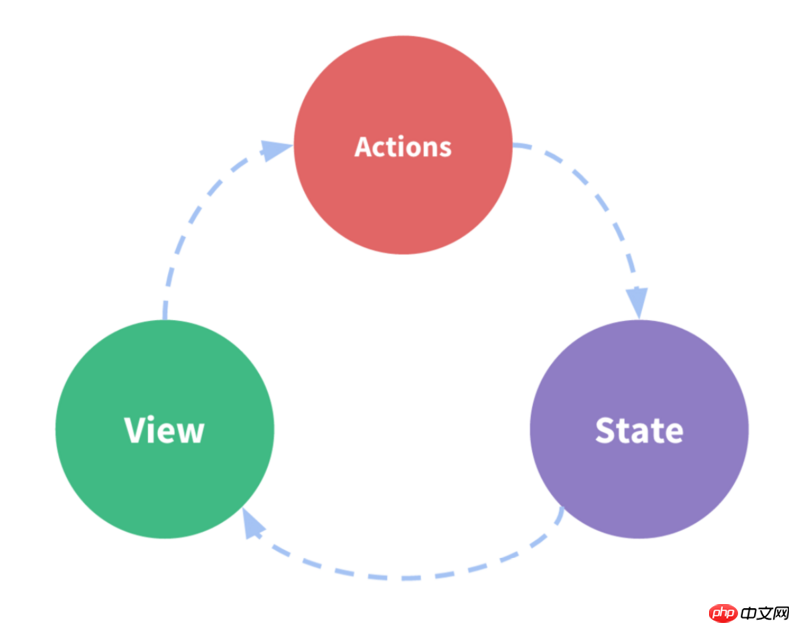 How to use Vuex?
npm install vuex --save
import Vuex from 'vuex';
import Vue from 'Vue';

Vue.use(Vuex);
The application structure developed using Vuex should be like this:
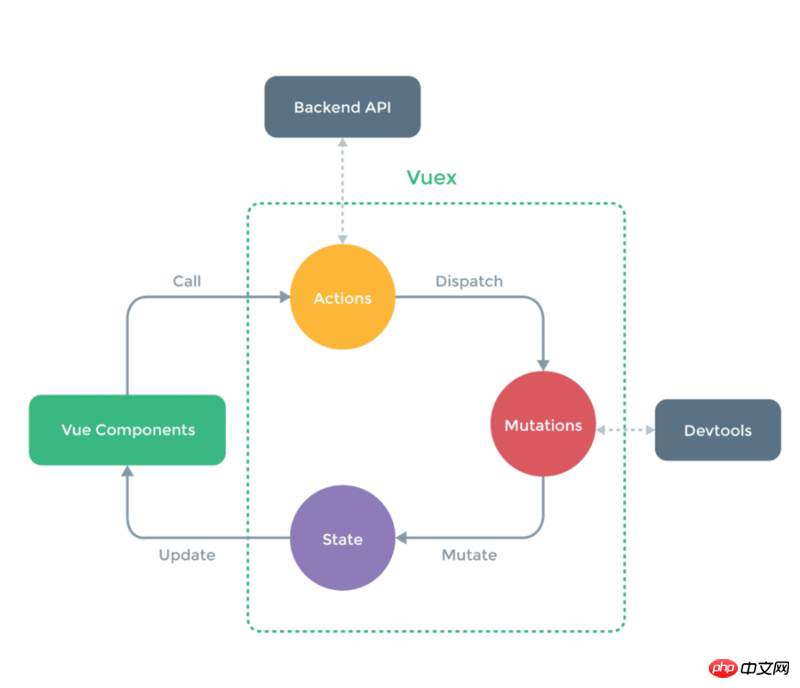
- ## State
store object into the root node when using it. You can use this.$store.state later. Get the status directly.
import store from './store';
..

new Vue({
    el: '#app',
    store,
    render: h => h(App)
});So what is this store? Where did it come from?
store可以理解为一个容器,包含应用中的state。实例化生成store的过程是:
const mutations = {...};
const actions = {...};
const state = {...};

// 实例化store对象并导出
export defautl new Vuex.Store({
    state,
    actions,
    mutations
});Mutations
中文意思是“变化”,利用它可以来更改状态,本质上就是用来处理数据的函数。store.commit(mutationName)是用来触发一个mutation的方法。
需要记住的是,定义的mutation必须是同步函数。
const mutations = {
    changState(state) {
        // 在这里改变state中的数据
    }
};

// 可以在组件中这样触发
this.$store.commit('changeState');Actions
Actions也可以用于改变状态,不过是通过触发mutation实现的,重要的是可以包含异步操作。
直接触发可以使用this.$store.dispatch(actionName)方法。
简单的多组件数据交互
import Vue from 'vue';
import Vuex from 'vuex';

Vue.use(Vuex);

// 状态
const state = {
  singer: {}
};

// 跟踪状态的变化
const mutations = {
  setSinger (state, singer) {
    state.singer = singer;
  }
};

// 实例化store对象
export default new Vuex.Store({
  state,
  mutations
});

// 在singer组件中提交数据
this.$store.commit('setSinger',singer);

// 在singer-detail组件中接收数据
let singer = this.$store.state.singer;vuex稍微复杂点的使用
在上面的小栗子中,我们把sate、mutations等其他一些内容写在了一起,
但是这种方式不适合大型点的项目。最好能将这些内容拎出来,单独作为一个文件来使用。
在src/store目录中新建以下文件:
state.js 用于存储状态信息
const sate = {
    singer: {}
};

export default state;mutation-types.js 保存一些常量(mutations中函数的函数名)
export const SET_SINGER = 'SET_SINGER';
mutations.js 用于更改状态(state中的数据)
import * as types from './mutation-types';

// 通过这个函数可以传入payload信息
const mutations = {
    [types.SET_SINGER](state,singer){
        state.singer = singer;
    }
};

export default mutations;getters.js 对状态获取的封装
export const singer = state => state.singer;
actions.js 对mutation进行封装,或者执行一些异步操作
// 暂时没有什么异步操作
index.js store的入口文件
// 入口文件
import Vue from 'vue';
import Vuex from 'vuex';
import state from './state';
import mutations from './mutations';
import * as actions from './actions';
import * as getters from './getters';
import createLogger from 'vuex/dist/logger';

Vue.use(Vuex);

// 调试环境下开启严格模式
const debug = process.env.NODE_ENV !== 'production';

// 创建store对象并导出
export default new Vuex.Store({
  state,
  actions,
  getters,
  mutations,
  strict: debug,
  plugins: debug ? [createLogger()] : []
});使用:
// main.js中引入
import store from './store';
有了以上内容,那么我们就可以在业务中去使用了:
例如:多组件之间的的数据交互。
需求:singer组件中需要将用户点击的那个singer对象传递给组件singer-detail组件。
singer.vue 组件中:
// 使用这个语法糖
import { mapMutations } from 'vuex';

methods:{
    ...mapMutations({
        // 将这个函数(setSinger)和mutations中用于修改状态的函数关联起来
        setSinger: 'SET_SINGER'
    });
}

// 传参
this.setSinger(singer);

// 语法糖的本质
this.$store.commit('setSinger', singer); singer-detail.vue 组件中:
我们就可以去使用这个数据了,当然也是使用我们的语法糖啦。
import { mapGetters } from 'vuex';

export default {
    // 使用一个计算属性
    computed: {
        ...mapGetters([
            'singer'   // 这个就是getters.js中的那个singer
        ]);
    },
    created(){
        console.log(this.singer);
    }
}

// 语法糖的本质:
let singer = this.$store.state.singer;js中给CSS添加prefix
我们一定遇到过这种情况:
需要用JS写CSS动画。但我们又不得不处理前缀的问题。
所以一般是这样写的:
this.$refs.image.style.transform = `scale(${scale})`;
this.$refs.image.style.webkitTansform = `scale(${scale})`;
...那么问题来了,怎样用JS处理这种情况呢?
思路:
检测浏览器的能力。
返回带着前缀的CSS样式。
代码实现:
let elementStyle = document.createElement('p').style;

// 得到合适的浏览器前缀
let vendor = (() => {
  let transformNames = {
    webkit: 'webkitTransform',
    Moz: 'MozTransform',
    O: 'OTransform',
    ms: 'msTransform',
    standard: 'transform'
  };

  for (let key in transformNames) {
    let support = elementStyle[transformNames[key]] !== undefined;
    if (support) {
      return key;
    }
  }
  return false;
})();

// 对外暴露的方法
export function prefixStyle (style) {
  if (vendor === false) {
    return style;
  }
  if (vendor === 'standard') {
    return style;
  }
  let result = vendor + style.charAt(0).toUpperCase() + style.substr(1);
  return result;
}使用案例:
// 导入该模块
import { prefixStyle } from 'common/js/dom';

// 加了合适前缀的CSS属性
const TRANSFORM = prefixStyle('transform');

// 使用该CSS属性
this.$refs.image.style[TRANSFORM] = `scale(${scale})`;移动端的touch事件
随着触屏设备的普及,w3c为移动端web新增了touch事件。
最基本的touch事件包括4个事件:
touchstart 当在屏幕上按下手指时触发
当用户手指触摸到的触摸屏的时候触发。事件对象的 target 就是 touch 发生位置的那个元素。
touchmove 当在屏幕上移动手指时触发
即使手指移出了 原来的target元素,但 touchmove 仍然会被一直触发,而且 target 仍然是原来的 target 元素。
touchend 当在屏幕上抬起手指时触发
当用户的手指抬起的时候,会触发 touchend 事件。如果用户的手指从触屏设备的边缘移出了触屏设备,也会触发 touchend 事件。
touchend 事件的 target 也是与 touchstart 的 target 一致,即使已经移出了元素。
touchcancel 当一些更高级别的事件发生的时候(如电话接入或者弹出信息)会取消当前的touch操作,即触发touchcancel。一般会在touchcancel时暂停游戏、存档等操作。
如果你使用了触摸事件,可以调用 event.preventDefault()来阻止鼠标事件被触发。
与移动端相关的interface主要有三个:
TouchEvent 表示触摸状态发生改变时触发的event
可以通过检查触摸事件的 TouchEvent.type 属性来确定当前事件属于哪种类型。
dom.addEventListener('touchstart',(e) => {
    // 获取事件类型
    let type = e.type;
    // toch事件发生时那个位置的元素对象
    let target = e.target;

});Touch 表示用户和触屏设备之间接触时单独的交互点(a single point of contact)
screenX、screenY:触点相对于屏幕左边缘或上边缘的x、y坐标。clientX、clientY:触点相对于浏览器viewport左边缘或上边缘的x、y坐标。(不包含滚动距离)
pageX、pageY:触点相对于document的左边缘或上边缘的x、y坐标。与client不同的是,包含左边滚动的距离。
target:触摸开始时的element。
// 获取touchList
let touchList = e.changedTouches;
// 获取第i个touch对象
let touch = touchList[i];

touch.screenX
touch.clientX
touch.pageX
touch.target
...
TouchList 表示一组touches。当发生多点触摸的时候才用的到。
如果一个用户用三根手指接触屏幕(或者触控板), 与之相关的TouchList对于每根手指都会生成一个 Touch 对象, 共计 3 个.
可以通过三种方式获取这个对象:
dom.addEventListener('touchstart',(e) => {
    // 这个 TouchList对象列出了和这个触摸事件对应的那些发生了变化的 Touch 对象
    e.changedTouches
    // 这个TouchList列出了那些 touchstart发生在这个元素,并且还没有离开 touch surface 的touch point(手指)
    e.targetTouches
    // 这个 TouchList 列出了事件触发时: touch suface上所有的 touch point。
    e.touches
});播放器内核开发
audio标签
对于音乐的播放,我们使用了audio标签,监听它的事件和操作DOM,可以达到对音乐播放、
暂停、进度控制等操作。
<audio>
</audio>
对audio进行操作
let audio = this.$refs.audio;
// 暂停和播放
audio.pause();
audio.play();

// Audio对象的属性(部分)

audio.currentTime // 设置或返回音频中的当前播放位置(以秒计)。

audio.duration    // 返回音频的长度(以秒计)。

audio.loop    // 设置或返回音频是否应在结束时再次播放。(默认false)

audio.volume    // 设置或返回音频的音量。[0,1]

// Audio对象多媒体事件(Media Events)

onerror // 加载发生错误时的回调

ontimeupdate // 当播放位置改变时调用
updateTime(e) {
    if(this.currentSongReady){
        // 获取当前播放的进度
        this.currentSongTime=e.traget.currentTime;
    }
}
oncanplay // 能够播放时调用

// 通过监听这个事件,设置标志位,这个标志位可以帮助我们
// 防止用户快速切换歌曲引起一些错误。
songCanPlay(){
    this.currentSongReady = true;
}


onended // 到达结尾时调用

onplay、onpause...进度条组件
1.progress-bar.vue接收一个percent参数,用来显示当前播放的一个进度。
2.对于进度条用户手动拖动进度的实现。
<p>
</p>
思路:主要是通过监听ontouchstart、ontouchmove、ontouchend事件来完成。
// 首先得定义一个`touch`对象
let touch = {};

// 在监听的方法中
touchStart(e){
    this.touch.initialized = true;
    // 获取touch的起始位置
    this.touch.startX = e.touches[0].pageX;
    // 获取整个进度条的宽度
    this.touch.barW = xxx;
    // 获取已经播放的进度
    this.touch.offset = xxx;
}

touchMove(e){
    // 判断有无初始化
    ...
    // 获取用户滑动的距离
    let deltaX = e.touches[0].pageX - this.touch.startX;
    let barW = xxx; // 进度条的宽度 - 拖动btn的宽度
    let offset = Math.min(Math.max(0, this.touch.offset + detail), barW);

    // 最后设置btn的位置和progress的进度就OK
    ...
}

touchEnd(){
    this.touch.initialized = false;
    // 然后将进度推送出去就好了
    this.$emit('percentChange',percent);
}svg实现圆形进度条
<template>
  <p>
    <svg>
      <circle></circle>
      <circle></circle>
    </svg>
    <slot></slot>
  </p>
</template>
通过svg可以实现各种进度条,有一个问题,怎样去动态的修改它的进度值呢?
这就不能不提 SVG Stroke 属性
stroke 定义一条线,文本或元素轮廓颜色
stroke-width 文本或元素轮廓的厚度
stroke-dasharray 该属性可用于创建虚线
stroke-dashoffset 设置虚线边框的偏移量
OK,知道了以上属性,就足以实现一个可设置进度的SVG进度条了。
思路:stroke-dasharray适用于创建虚线的,如果这个虚线长度为整个轮廓的周长呢。stroke-dashoffset可以设置虚线的偏移量,利用这两个属性,我们就可以完成对进度的控制。
且看一个小栗子: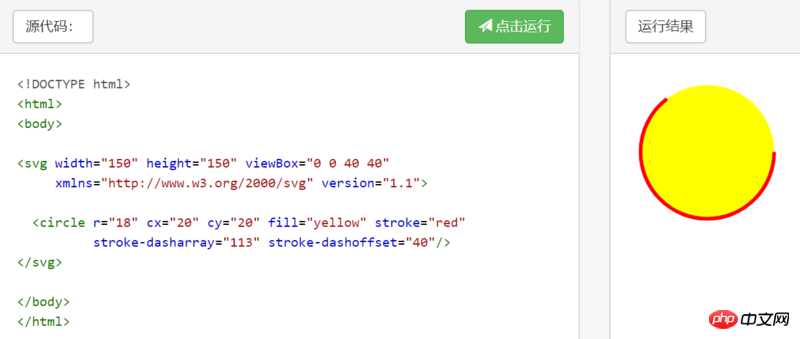
所以,通过父组件传入的percent,不断地修改stroke-dashoffset就能达到进度的显示了。
全屏和退出全屏
// 全屏显示
document.documentElement.webkitRequestFullScreen();
// 退出全屏
document.webkitExitFullscreen();

// 1.得根据不同的浏览器添加前缀
// 2.程序主动调用不管用,得用户操作才可以(点击按钮)
歌词页的显示
通过网络接口获取的歌词: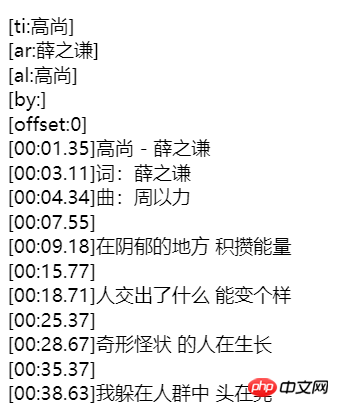
对于歌词的解析,播放是通过一个插件lyric-parser完成的。
这个插件很简单:
1.通过正则把时间和对应的歌词切分出来创建成对象。
2.当调用play方法时,通过定时器完成歌词的播放,并将对应的行号和歌词通过回调函数传递出去。
当播放的歌词超过5行时,就可以使用封装的scroll组件完成滚动操作。
if (lineNum > 5) {
  let elements = this.$refs.lyricLine;
  this.$refs.lyricScroll.scrollToElement(elements[lineNum - 5], 1000);
} else {
  this.$refs.lyricScroll.scrollTo(0, 0, 1000);
}Vue中的mixin
为什么要使用mixin?
多个组件公用一样的代码,我们可以将这部分抽离出来作为mixin,只要引入对应的组件中就可以了。
例如下面的mixin:
import { mapGetters } from 'vuex';

export const playListMixin = {

  mounted () {
    this.handlePlayList(this.playList);
  },
  // 当路由对应的页面激活时调用
  activated () {
    this.handlePlayList(this.playList);
  },
  watch: {
    playList (newPlayList) {
      this.handlePlayList(newPlayList);
    }
  },
  computed: {
    ...mapGetters([
      'playList'
    ])
  },
  methods: {
      // 这个方法需要对应的组件自己去实现,直接调用抛出错误
    handlePlayList () {
      throw new Error('Components must implement handlePlayList method.');
    }
  }
};有了mixin我们在组件中就可以这样使用了:
import { playListMixin } from 'common/js/mixin';

export default{
    mixins: [playListMixin],
    ...
}节流处理
在搜索页面,我们需要处理用户的输入,然后向服务器发起请求。
为了不必要的请求、节省流量和提高页面性能,我们都有必要做节流处理。
在搜索框search-box这个基础组件中:
// 在created钩子中,我们监听用户输入字符串(query)变化,然后将变化后的字符串
// 提交给父组件

// 可以看到在回调函数中,又包了一层debounce函数

created () {
  this.$watch('query', debounce(() => {
    this.$emit('queryChange', this.query);
  }, 500));
}所以debounce函数,就是我们的节流函数,这个函数,接收一个函数,返回一个新的函数
function debounce(func,delay){
    let timer = null;
    return function(...args){
        if(timer){
            clearTimeout(timer);
        }
        timer = setTimeout(()=>{
            func.apply(this,args);
        },delay)
    }
}

// 测试
function show(){
    console.log('hello...');
}

var func = debounce(show,3000);

// 调用
func();

// 连续调用时,没有超过三秒是不会有任何输出的animation动画
语法:
animation: name duration timing-function delay iteration-count direction fill-mode play-state;
animation: 动画名称 执行时间 速度曲线 延时时间 执行次数 动画播放顺序 结束时应用的样式 播放的状态(paused|running)
封装localStorage操作
const __VERSION__ = '1.0.1';
const store = {
  version: __VERSION__,
  storage: window.localStorage,
  session: {
    storage: window.sessionStorage
  }
};

// 操作store的api
const api = {
  set (key, val) {
    if (this.disabled) {
      return false;
    }
    if (val === undefined) {
      return this.remove(key);
    }
    this.storage.setItem(key, this.serialize(val));
    return val;
  },
  get (key, val) {
    if (this.disabled) {
      return false;
    }
    let result = this.storage.getItem(key);
    if (!result) {
      return val;
    }
    return this.deSerialize(result);
  },
  getAll () {
    if (this.disabled) {
      return false;
    }
    let ret = {};
    for (let key in this.storage) {
      if (this.storage.hasOwnProperty(key)) {
        ret[key] = this.get(key);
      }
    }
    return ret;
  },
  remove (key) {
    if (this.disabled) {
      return false;
    }
    this.storage.removeItem(key);
  },
  removeAll () {
    if (this.disabled) {
      return false;
    }
    this.storage.clear();
  },
  forEach (cb) {
    if (this.disabled) {
      return false;
    }
    for (let key in this.storage) {
      if (this.storage.hasOwnProperty(key)) {
        cb && cb(key, this.get(key));
      }
    }
  },
  has (key) {
    if (this.disabled) {
      return false;
    }
    return key === this.get(key);
  },
  serialize (val) {
    try {
      return JSON.stringify(val) || undefined;
    } catch (e) {
      return undefined;
    }
  },
  deSerialize (val) {
    if (typeof val !== 'string') {
      return undefined;
    }
    try {
      return JSON.parse(val) || undefined;
    } catch (e) {
      return undefined;
    }
  }
};

// 扩展store对象
Object.assign(store, api);
Object.assign(store.session, api);

// 浏览器能力检测
try {
  let testKey = 'test_key';
  store.set(testKey, testKey);
  if (store.get(testKey) !== testKey) {
    store.disabled = true;
  }
  store.remove(testKey);
} catch (e) {
  store.disabled = true;
}

export default store;路由懒加载
为什么需要?
如果开发的App太大的话,就会导致首屏渲染过慢,为了增强用户体验,加快渲染速度,
需要用到懒加载功能。让首屏的内容先加载出来,其他路由下的组件按需加载。
vue官网描述:
异步组件
在大型应用中,我们可能需要将应用分割成小一些的代码块,并且只在需要的时候才从服务器加载一个模块。
为了简化,Vue 允许你以一个工厂函数的方式定义你的组件,这个工厂函数会异步解析你的组件定义。
Vue 只有在这个组件需要被渲染的时候才会触发该工厂函数,且会把结果缓存起来供未来重渲染。
const AsyncComponent = () => ({
  // 需要加载的组件 (应该是一个 `Promise` 对象)
  component: import('./MyComponent.vue'),
  // 异步组件加载时使用的组件
  loading: LoadingComponent,
  // 加载失败时使用的组件
  error: ErrorComponent,
  // 展示加载时组件的延时时间。默认值是 200 (毫秒)
  delay: 200,
  // 如果提供了超时时间且组件加载也超时了,
  // 则使用加载失败时使用的组件。默认值是:`Infinity`
  timeout: 3000
})注意:如果你希望在 Vue Router 的路由组件中使用上述语法的话,你必须使用 Vue Router 2.4.0+ 版本。
当然为了简单起见:
在router/index.js路由配置文件中这样加载组件:
// import Recommend from '@/components/recommend/recommend';
const Recommend = () => ({
  component: import('@/components/recommend/recommend')
});以上就是本文的全部内容,希望对大家的学习有所帮助,更多相关内容请关注PHP中文网!
相关推荐:
The above is the detailed content of Implementation of mobile web music player based on vue. For more information, please follow other related articles on the PHP Chinese website!

Hot AI Tools

Undresser.AI Undress
AI-powered app for creating realistic nude photos

AI Clothes Remover
Online AI tool for removing clothes from photos.

Undress AI Tool
Undress images for free

Clothoff.io
AI clothes remover

Video Face Swap
Swap faces in any video effortlessly with our completely free AI face swap tool!

Hot Article

Hot Tools

Notepad++7.3.1
Easy-to-use and free code editor

SublimeText3 Chinese version
Chinese version, very easy to use

Zend Studio 13.0.1
Powerful PHP integrated development environment

Dreamweaver CS6
Visual web development tools

SublimeText3 Mac version
God-level code editing software (SublimeText3)

Hot Topics
 1386
1386
 52
52
 Table Border in HTML
Sep 04, 2024 pm 04:49 PM
Guide to Table Border in HTML. Here we discuss multiple ways for defining table-border with examples of the Table Border in HTML.
 HTML margin-left
Sep 04, 2024 pm 04:48 PM
Guide to HTML margin-left. Here we discuss a brief overview on HTML margin-left and its Examples along with its Code Implementation.
 Nested Table in HTML
Sep 04, 2024 pm 04:49 PM
This is a guide to Nested Table in HTML. Here we discuss how to create a table within the table along with the respective examples.
 HTML Table Layout
Sep 04, 2024 pm 04:54 PM
Guide to HTML Table Layout. Here we discuss the Values of HTML Table Layout along with the examples and outputs n detail.
 HTML Input Placeholder
Sep 04, 2024 pm 04:54 PM
Guide to HTML Input Placeholder. Here we discuss the Examples of HTML Input Placeholder along with the codes and outputs.
 HTML Ordered List
Sep 04, 2024 pm 04:43 PM
Guide to the HTML Ordered List. Here we also discuss introduction of HTML Ordered list and types along with their example respectively
 Moving Text in HTML
Sep 04, 2024 pm 04:45 PM
Guide to Moving Text in HTML. Here we discuss an introduction, how marquee tag work with syntax and examples to implement.
 HTML onclick Button
Sep 04, 2024 pm 04:49 PM
Guide to HTML onclick Button. Here we discuss their introduction, working, examples and onclick Event in various events respectively.


