Follow me to learn PS Day 02: Opening and storing PS
Learn PS from me
Day 02: Opening and storing PS files
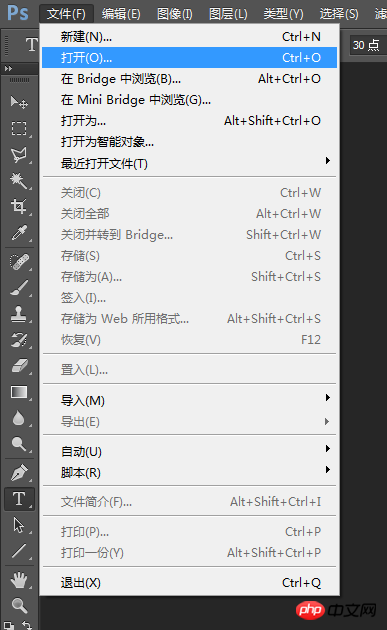
Click "File - Open ”, or the shortcut key Ctrl “O”, you can also double-click the center of the panel to open the directory where the file is located, and double-click to open the file.

After opening the file, we can use PS to operate.
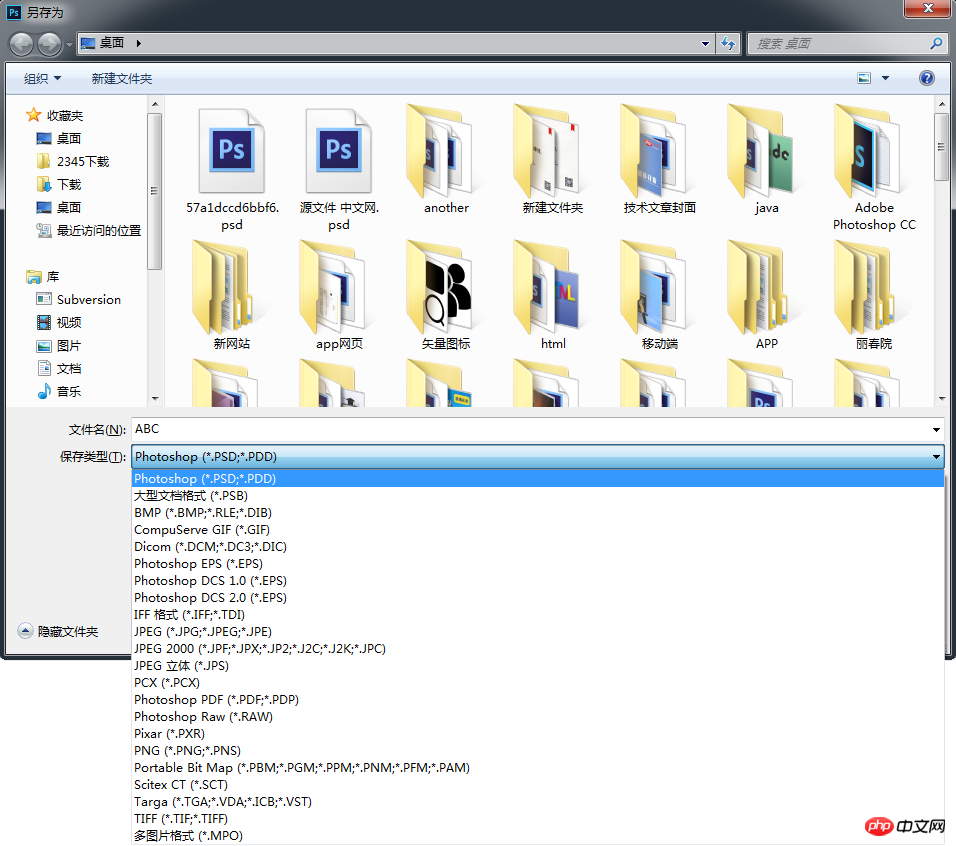
After the document is completed, we need to save it. As we said before, the file name can be entered when saving. Click "File-Save", or the shortcut key Ctrl "S", or you can use the shortcut key Ctrl shift S to save as a certain file. The pop-up cross-section is shown in the figure below.
 We can see that many formats can be stored, just select the file type you want to store.
The following are commonly used file types:
JPG format: The full name is JPEG. JPEG pictures store a single raster image in 24-bit color. If the image is completed, it can be saved in JPG format.
PNG format: mainly used to store transparent layers
GIF format: mainly used to store animated images
PSD format: Photoshop’s own format, saves all layers Information, you can still continue to do it after opening the software next time.
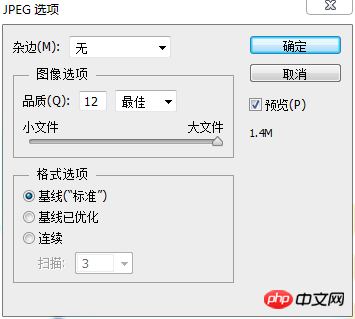
For example, when we choose the storage format as JPG, the following interface pops up

Select the corresponding image quality. The higher the quality, the larger the file.
Today we mainly talk about the creation and storage of PS documents. In the next section, we will introduce the types of toolboxes in detail.
The above is the detailed content of Follow me to learn PS Day 02: Opening and storing PS. For more information, please follow other related articles on the PHP Chinese website!

Hot AI Tools

Undresser.AI Undress
AI-powered app for creating realistic nude photos

AI Clothes Remover
Online AI tool for removing clothes from photos.

Undress AI Tool
Undress images for free

Clothoff.io
AI clothes remover

AI Hentai Generator
Generate AI Hentai for free.

Hot Article

Hot Tools

Notepad++7.3.1
Easy-to-use and free code editor

SublimeText3 Chinese version
Chinese version, very easy to use

Zend Studio 13.0.1
Powerful PHP integrated development environment

Dreamweaver CS6
Visual web development tools

SublimeText3 Mac version
God-level code editing software (SublimeText3)

Hot Topics
 1376
1376
 52
52
 Huawei will launch innovative MED storage products next year: rack capacity exceeds 10 PB and power consumption is less than 2 kW
Mar 07, 2024 pm 10:43 PM
This website reported on March 7 that Dr. Zhou Yuefeng, President of Huawei's Data Storage Product Line, recently attended the MWC2024 conference and specifically demonstrated the new generation OceanStorArctic magnetoelectric storage solution designed for warm data (WarmData) and cold data (ColdData). Zhou Yuefeng, President of Huawei's data storage product line, released a series of innovative solutions. Image source: Huawei's official press release attached to this site is as follows: The cost of this solution is 20% lower than that of magnetic tape, and its power consumption is 90% lower than that of hard disks. According to foreign technology media blocksandfiles, a Huawei spokesperson also revealed information about the magnetoelectric storage solution: Huawei's magnetoelectronic disk (MED) is a major innovation in magnetic storage media. First generation ME
 Vue3+TS+Vite development skills: how to encrypt and store data
Sep 10, 2023 pm 04:51 PM
Vue3+TS+Vite development tips: How to encrypt and store data. With the rapid development of Internet technology, data security and privacy protection are becoming more and more important. In the Vue3+TS+Vite development environment, how to encrypt and store data is a problem that every developer needs to face. This article will introduce some common data encryption and storage techniques to help developers improve application security and user experience. 1. Data Encryption Front-end Data Encryption Front-end encryption is an important part of protecting data security. Commonly used
 Introduction to the process of extracting line drawings in PS
Apr 01, 2024 pm 12:51 PM
1. Open the software and import a piece of material, as shown in the picture below. 2. Then ctrl+shift+u to remove color. 3. Then press ctrl+J to copy the layer. 4. Then reverse ctrl+I, and then set the layer blending mode to Color Dodge. 5. Click Filter--Others--Minimum. 6. In the pop-up dialog box, set the radius to 2 and click OK. 7. Finally, you can see the line draft extracted.
 How to automate tasks using PowerShell
Feb 20, 2024 pm 01:51 PM
If you are an IT administrator or technology expert, you must be aware of the importance of automation. Especially for Windows users, Microsoft PowerShell is one of the best automation tools. Microsoft offers a variety of tools for your automation needs, without the need to install third-party applications. This guide will detail how to leverage PowerShell to automate tasks. What is a PowerShell script? If you have experience using PowerShell, you may have used commands to configure your operating system. A script is a collection of these commands in a .ps1 file. .ps1 files contain scripts executed by PowerShell, such as basic Get-Help
 Complete list of ps shortcut keys
Mar 11, 2024 pm 04:31 PM
1. Ctrl + N: Create a new document. 2. Ctrl + O: Open a file. 3. Ctrl + S: Save the current file. 4. Ctrl + Shift + S: Save as. 5. Ctrl + W: Close the current document. 6. Ctrl + Q: Exit Photoshop. 7. Ctrl + Z: Undo. 8. Ctrl + Y: Redo. 9. Ctrl + X: Cut the selected content. 10. Ctrl + C: Copy the selected content.
 Cannot use PS shortcut keys to fill
Feb 19, 2024 am 09:18 AM
With the development of the digital age, image processing software has become an indispensable part of our life and work. Among them, Photoshop (PS for short) developed by Adobe is one of the most famous image processing software. It has powerful functions and flexible operation, and is deeply loved by users. However, when using PS, some users reported that the shortcut key "Fill" cannot be used normally, which brings troubles to the user experience. Shortcut keys are a quick operation method provided in the software to avoid tedious mouse click operations.
 What is the ps curve shortcut key?
Aug 22, 2023 am 10:44 AM
The ps curve shortcut key is Ctrl+M. Other curve shortcut keys: 1. Convert to point control curve, Alt+Shift+Ctrl+T; 2. Automatically align the curve, Alt+Shift+Ctrl+O; 3. Restore the default curve, Ctrl+Alt+Shift+R; 4. Copy the curve, Ctrl+Alt+Shift+C; 5. Paste the curve, Ctrl+Alt+Shift+V; 6. Adjust the curve slope, Shift+up and down arrows; 7. Adjust the curve brightness, Shift+left and right arrows
 Git installation process on Ubuntu
Mar 20, 2024 pm 04:51 PM
Git is a fast, reliable, and adaptable distributed version control system. It is designed to support distributed, non-linear workflows, making it ideal for software development teams of all sizes. Each Git working directory is an independent repository with a complete history of all changes and the ability to track versions even without network access or a central server. GitHub is a Git repository hosted on the cloud that provides all the features of distributed revision control. GitHub is a Git repository hosted on the cloud. Unlike Git which is a CLI tool, GitHub has a web-based graphical user interface. It is used for version control, which involves collaborating with other developers and tracking changes to scripts and


