 Java
Java
 javaTutorial
 Android (Java) code manually implements dependency injection-detailed technical explanation
Android (Java) code manually implements dependency injection-detailed technical explanation
Dependency injection in Android (Java) code generation technology, I believe everyone has heard of this term in daily development. For example, those who develop Android use third-party libraries such as Butterknife and Greendao. We use a technology called Instant generation of code during compilation, and then we can use the classes generated by compilation to assist our development and reduce our workload. This technology sounds quite advanced. Compilation During code generation, how to do this? It seems that I have never heard that compilation can also generate code. Let's take a look at this magical technology!
Principle of compile-time code generation
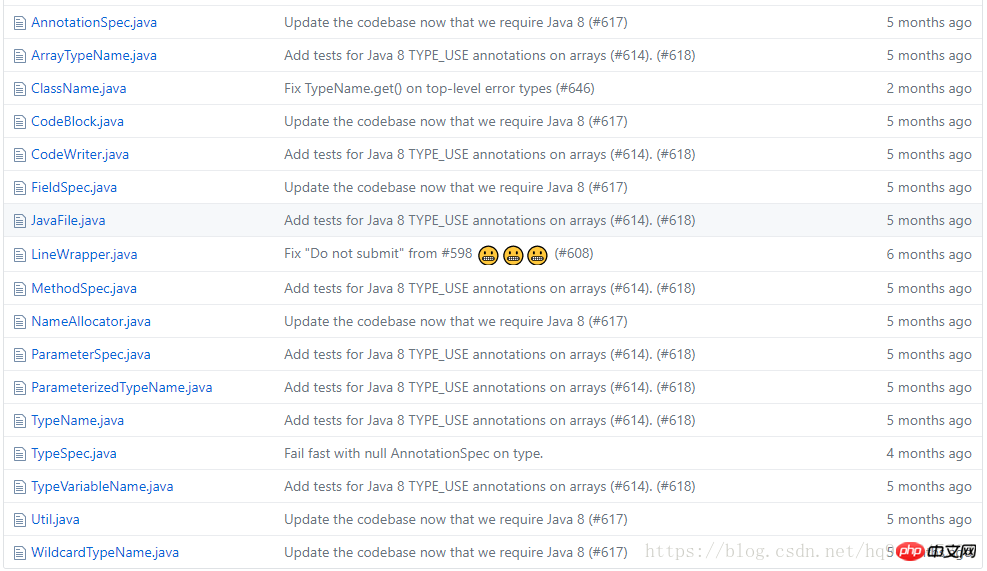
First of all, we may know more or less about a technology called JavaPoet. First, let’s start with it. Let’s Looking at its source code, you will find that it does not seem to do anything advanced. There are only a dozen classes in total, and most of them just encapsulate some classes, provide some interfaces for easy use, and also provide a tool class for We use, as shown in the figure, its source code only has the following classes.
 We are confused at this time. Isn't it the library that helps us to generate code during compilation?
To be precise, it is not. Then what is its function? It actually only completes half of the functions we are talking about, which is code generation, and it is simple and easy-to-understand code generation, because it is encapsulated and basically provides responses to some common code generation requirements. method, greatly reducing code complexity. Compared with what we want, there is one less generated during compilation. So how to do this?
AbstractProcessor. This class may not be used normally, but it is also It doesn't matter, let's take a brief look at it. First of all, you can understand it as an abstract annotation processor, which is located below javax.annotation.processing.AbstractProcessor; and is used for Class that scans and processes annotations during compilation, we want to implement functions like ButterKnife, first define an own annotation processor, and then inherit it, as you can see below
public class MyProcessor extends AbstractProcessor{
    @Override
    public boolean process(Set<? extends TypeElement> set, RoundEnvironment roundEnvironment) {        return false;
    }
}Then, how to make the jvm call the annotation processor we wrote during compilation? A quick way is to use Google's open source library auto, and then use the AutoService annotation it provides to implement it. Another way is to do it yourself Manually create the specified folder and then configure the path of our annotation processor.
AbstractProcessor, here is MyProcessor, and then call the implementation class The process method performs the corresponding operations, and then our work of generating code can be written here in the process, and then the specific method of generating code can be simplified with the help of JavaPoet tools. Because our code generation tool is
executed during compilation, the final generated java code will be compiled together with the ordinary java code and used as an ordinary class, so it will not affect the final program In terms of runtime performance, at most the compilation speed is a little slower because of the extra classes and code that need to be generated.
annotations parameter of the process() method of our MyProcessor annotation processor. This parameter It is used to store all the scanned non-meta annotations during compilation (non-meta annotations are also custom annotations, there are four meta annotations in total, except for meta annotations, the rest are custom annotations), and then we traverse this Collection, when we get our custom annotations, the corresponding logic will be executed. The specific code is as follows, where XXXAnnotation is the name of your custom annotation
for (TypeElement element : annotations) {    if (element.getQualifiedName().toString().equals(XXXAnnotation.class.getCanonicalName())) {        //执行你的逻辑
    }
}getSupportedAnnotationTypes() method and ## of the AbstractProcessor class #getSupportedSourceVersion() method, getSupportedAnnotationTypes() method is used to specify which annotation the annotation processor is used to process, getSupportedSourceVersion() method is used to specify the java version, The general value is SourceVersion.latestSupported(). <p>完成以上工作后,对于自定义注解作用的对象,编译期间就会自动执行相应<code>process() 里的逻辑,比如生成辅助类,这个辅助类其实就可以理解为依赖类,这个编译期间通过注解生成辅助类的过程,就相当于实现了注入。
到这里,一整个依赖注入的思路和实现方法已经全部打通。
下面我们来动手实现一个小例子吧!
动手实现
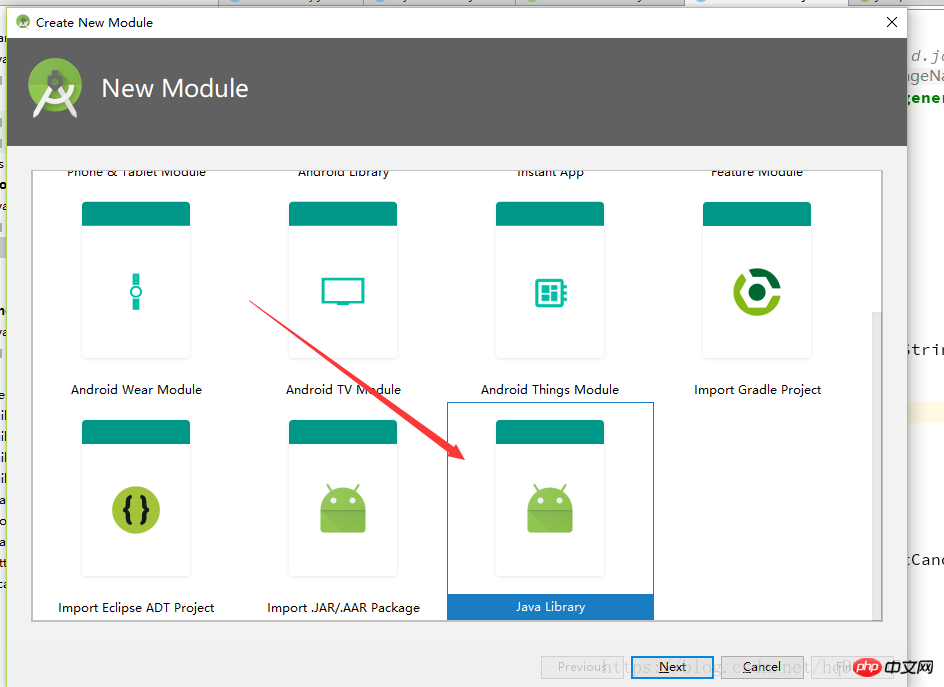
首先我们新建一个Android工程,按照默认的配置就好,新建完毕后,会有个默认的app的module,我们暂且不管它,然后直接新建一个java module,新建方式为file -> New -> New Module
然后选择Java Libary,这里给libary取名为javapoet  然后在module对应的build.gradle下,加入下面两个依赖
implementation 'com.squareup:javapoet:1.11.1'implementation 'com.google.auto.service:auto-service:1.0-rc4'
第一个依赖是javaPoet的依赖,第二个是Google开源库auto的依赖
上面提到让jvm加载我们自己的注解处理器有两种方式,这里我们先试一下用谷歌的这个开源库
这个module用来编写我们的注解处理器的实现类,先放着,待会再写。
继续新建一个java module,我这里取名为libannotation,然后在里面新建一个自定义注解,内容如下
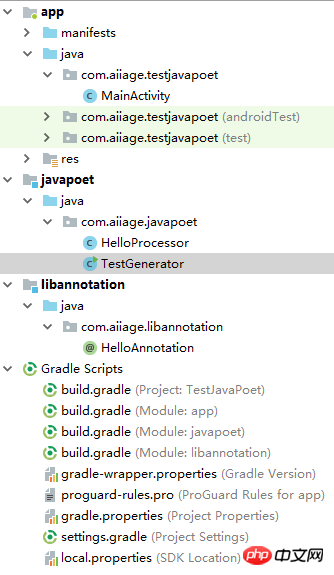
@Retention(RetentionPolicy.CLASS)@Target(ElementType.TYPE)public @interface HelloAnnotation {}@Retention(RetentionPolicy.CLASS)表示我们定义的这个注解会留存在class字节码文件中 ,但是在运行时是没有的,@Target(ElementType.TYPE) 表示我们的这个注解作用对象是类,然后我们看下整个目录的样子, 
TestGenerator是一个我写的测试JavaPoet的测试类,可以忽略
现在我们开始写代码,首先在javapoet的build.gradle中加入libannotation module的依赖,如下
implementation project(path: ':libannotation')
然后在javapoet module中新建HelloProcessor类,用AutoService标注它,然后继承AbstractProcessor方法,重写相应的方法,具体怎么写,原理里解释的比较详细,然后注释里我作了详细说明,如下
import com.aiiage.libannotation.HelloAnnotation;import com.google.auto.service.AutoService;import com.squareup.javapoet.JavaFile;import com.squareup.javapoet.MethodSpec;import com.squareup.javapoet.TypeSpec;import java.io.IOException;import java.util.Collections;import java.util.Set;import javax.annotation.processing.AbstractProcessor;import javax.annotation.processing.Filer;import javax.annotation.processing.ProcessingEnvironment;import javax.annotation.processing.Processor;import javax.annotation.processing.RoundEnvironment;import javax.lang.model.SourceVersion;import javax.lang.model.element.Modifier;import javax.lang.model.element.TypeElement;/**
 * Created By HuangQing on 2018/7/20 15:38
 **/@AutoService(Processor.class)public class HelloProcessor extends AbstractProcessor {
    private Filer filer;    @Override
    public synchronized void init(ProcessingEnvironment processingEnv) {        super.init(processingEnv);
        filer = processingEnv.getFiler(); // 获得filer对象,用来创建文件
    }    @Override
    public boolean process(Set<? extends TypeElement> annotations, RoundEnvironment roundEnv) {        for (TypeElement element : annotations) {//遍历扫描到的注解集合
            if (element.getQualifiedName().toString().equals(HelloAnnotation.class.getCanonicalName())) {                // 当前注解是我们自定义的注解,也就是HelloAnnotation时,执行下列代码
                TypeSpec helloWorld = TypeSpec.classBuilder("HelloWorld")//声明类名为HelloWorld
                        .addModifiers(Modifier.PUBLIC, Modifier.FINAL)//声明类的修饰符为 public final
                        .addMethod(getMethodSpec("hello1", "Hello"))//为HelloWorld类添加名为hello1的方法,返回值为Hello
                        .addMethod(getMethodSpec("hello2", "Java"))//同上
                        .addMethod(getMethodSpec("hello3", "Poet!"))//同上
                        .build();                try {                    // 建立 com.aiiage.testjavapoet.HelloWorld.java 对象
                    JavaFile javaFile = JavaFile.builder("com.aiiage.testjavapoet", helloWorld)
                            .addFileComment(" This codes are generated automatically. Do not modify!")
                            .build();                    // 写入文件
                    javaFile.writeTo(filer);
                } catch (IOException e) {
                    e.printStackTrace();
                }
            }
        }        return true;
    }    /**
     * @param methodStr  方法名
     * @param returnStr  返回值
     * @return
     */
    private static MethodSpec getMethodSpec(String methodStr, String returnStr) {        return MethodSpec.methodBuilder(methodStr)
                .addModifiers(Modifier.PUBLIC, Modifier.STATIC)//指定方法修饰符为 public static
                .returns(String.class) //指定返回值为String类型
                .addStatement("return $S", returnStr) //拼接返回值语句
                .build();
    }    @Override
    public Set<String> getSupportedAnnotationTypes() {        return Collections.singleton(HelloAnnotation.class.getCanonicalName());
    }    @Override
    public SourceVersion getSupportedSourceVersion() {        return SourceVersion.latestSupported();
    }
}上述代码中,一定不要忘了加AutoService的注解,通过这个注解,我们的HelloProcessor注解处理器相当于执行了一个注册的过程,这样才会被jvm在编译时加载,代码生成部分最终生成的文件代码长下面这个样子,可以结合注释对着体会下,还是很方便的,有了javapoet之后
import java.lang.String;public final class HelloWorld {
  public static String hello1() {    return "Hello";
  }  public static String hello2() {    return "Java";
  }  public static String hello3() {    return "Poet!";
  }
}ok,代码方面准备完毕。
接下来我们为app module添加依赖,如下
//必须使用annotationProcessor,而不是implementation//annotationProcessor修饰的,最终不会打包到apk中,可理解为在编译时执行的annotationProcessor project(':javapoet')implementation project(':libannotation')
然后我们手动编译一下项目,build -> make project,然后我们来到熟悉的MainActivity,首先使用我们的自定义注解标注MainActivity,要标在class上面,因为我们自定义的注解作用范围是Type,然后用一个TextView简单显示一下注入的HelloWorld类的几个静态方法,如下
@HelloAnnotationpublic class MainActivity extends AppCompatActivity {

    @Override
    protected void onCreate(Bundle savedInstanceState) {        super.onCreate(savedInstanceState);
        setContentView(R.layout.activity_main);
        TextView tv=findViewById(R.id.tv);
        String str1="";
        str1+=HelloWorld.hello1()+" ";
        str1+=HelloWorld.hello2()+" ";
        str1+=HelloWorld.hello3();
        tv.setText(str1);
    }
}编译运行,看到Hello Java Poet字样即表示成功!
然后我们上面提到,除了使用Google开源库auto实现注册注解处理器外,还可以使用手动配置的方式,手动配置的方式如下
在自定义注解处理器的module中,这里也就是javapoet的module中,在main目录下创建出resources目录,然后在resources目录下创建出META-INF目录,然后在META-INF目录下创建出services目录,然后在services目录下创建一个名为javax.annotation.processing.Processor 的文件,在该文件中声明我们的注解处理器:
com.aiiage.javapoet.HelloProcessor;
结语
这样我们就完成了一个最简单的依赖注入的实现,掌握其原理后,我们就不难明白类似ButterKnife、GreenDao是怎么实现的了,不过我们这个只是一个简单的功能,不得不感叹要生成那么多的代码,这得是一个多么心细和考验耐心的活啊!
相关推荐:
php生成Android客户端扫描可登录的二维码,android客户端
The above is the detailed content of Android (Java) code manually implements dependency injection-detailed technical explanation. For more information, please follow other related articles on the PHP Chinese website!

Hot AI Tools

Undresser.AI Undress
AI-powered app for creating realistic nude photos

AI Clothes Remover
Online AI tool for removing clothes from photos.

Undress AI Tool
Undress images for free

Clothoff.io
AI clothes remover

Video Face Swap
Swap faces in any video effortlessly with our completely free AI face swap tool!

Hot Article

Hot Tools

Notepad++7.3.1
Easy-to-use and free code editor

SublimeText3 Chinese version
Chinese version, very easy to use

Zend Studio 13.0.1
Powerful PHP integrated development environment

Dreamweaver CS6
Visual web development tools

SublimeText3 Mac version
God-level code editing software (SublimeText3)

Hot Topics
 1389
1389
 52
52
 How to elegantly obtain entity class variable names to build database query conditions?
Apr 19, 2025 pm 11:42 PM
When using MyBatis-Plus or other ORM frameworks for database operations, it is often necessary to construct query conditions based on the attribute name of the entity class. If you manually every time...
 How to simplify field mapping issues in system docking using MapStruct?
Apr 19, 2025 pm 06:21 PM
Field mapping processing in system docking often encounters a difficult problem when performing system docking: how to effectively map the interface fields of system A...
 How does IntelliJ IDEA identify the port number of a Spring Boot project without outputting a log?
Apr 19, 2025 pm 11:45 PM
Start Spring using IntelliJIDEAUltimate version...
 Is the company's security software causing the application to fail to run? How to troubleshoot and solve it?
Apr 19, 2025 pm 04:51 PM
Troubleshooting and solutions to the company's security software that causes some applications to not function properly. Many companies will deploy security software in order to ensure internal network security. ...
 What is the difference between memory leaks in Java programs on ARM and x86 architecture CPUs?
Apr 19, 2025 pm 11:18 PM
Analysis of memory leak phenomenon of Java programs on different architecture CPUs. This article will discuss a case where a Java program exhibits different memory behaviors on ARM and x86 architecture CPUs...
 How to safely convert Java objects to arrays?
Apr 19, 2025 pm 11:33 PM
Conversion of Java Objects and Arrays: In-depth discussion of the risks and correct methods of cast type conversion Many Java beginners will encounter the conversion of an object into an array...
 How to convert names to numbers to implement sorting within groups?
Apr 19, 2025 pm 01:57 PM
How to convert names to numbers to implement sorting within groups? When sorting users in groups, it is often necessary to convert the user's name into numbers so that it can be different...
 How do I convert names to numbers to implement sorting and maintain consistency in groups?
Apr 19, 2025 pm 11:30 PM
Solutions to convert names to numbers to implement sorting In many application scenarios, users may need to sort in groups, especially in one...


