Introduction to users and permissions in mongoDB
The content of this article is an introduction to users and permissions in mongoDB. It has a good reference value and I hope it can help friends in need.
Preface
For databases, users and permissions are a very important part, because they involve security. So what are the users and permissions of mongoDB?
Instructions
Environment Description
The mongoDB version used in this article is 3.6, and the operating system is windows.
Other instructions
Due to space limitations, this article will not introduce the process from downloading to installing the database. Regarding installation tutorials, there are a large number of tutorials on the Internet. You can follow these tutorials to install and run it. This article will focus on the users and permissions part of mongoDB.
Server and client
For mongoDB, it is divided into server and client.
In the installation directory of the windows environment, double-click to open mongod.exe to start the mongoDB service.
When the service is started, you can double-click mongo.exe to open the client to connect to the mongoDB service.
Enable authorization mode
After mongoDB is installed, if you directly use mongod.exe to start the service, the default is not to enable authorization mode, if your mongoDB does not enable authorization mode , then anyone can log in to the mongoDB server without a username and password, and do whatever they want with your database, or even directly delete the database and run away. Therefore, in a production environment, please make sure you remember to turn on authorization mode.
So, how to enable authorization mode?
Open cmd, enter the bin directory of the installation directory, and execute the following command:
mongod --auth --port 27017 --dbpath /data/db
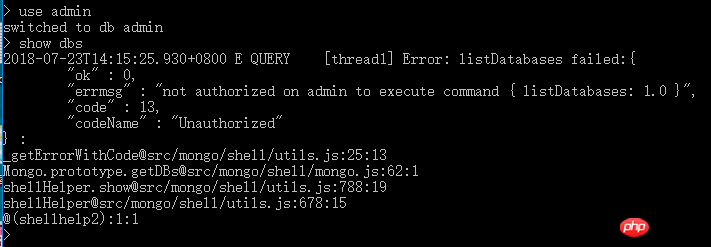
After turning on the authorization mode, open mongo.exe, and under the admin database, execute show dbs, at this time, the database will report an error, reminding you that there is no authorization. As follows:

First, open the mongoDB service in
non-authorized mode.
mongod --port 27017 --dbpath /data/db
use admin
db.createUser(
  {
    user: "larry",
    pwd: "123456",
    roles: [ { role: "userAdminAnyDatabase", db: "admin" } ]
  }
)First, close all mongo shell windows above.
Then open the mongoDB service in
authorization mode.
mongod --auth --port 27017 --dbpath /data/db
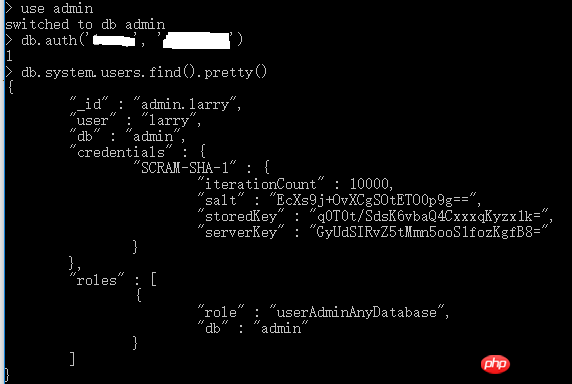
db.auth().

The result returns 1, indicating that the administrator larry logged in successfully.
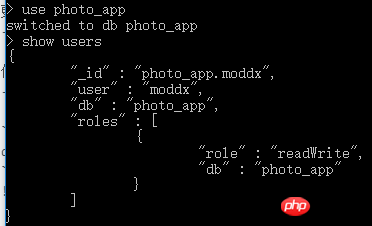
Next, use this administrator to create a normal user moddx for the photo_app database, and specify its permissions as readWrite.
use photo_app
db.createUser(
{
  user: "moddx",
  pwd: "123456",
  roles: [{ role: "readWrite", db: "photo_app"}]
}
)admin account, and then execute the following command:
db.system.users.find().pretty()

show users

The command to delete ordinary user moddx is as follows:
db.dropUser("moddx", {w: "majority", wtimeout: 5000})db.revokeRolesFromUser(
"moddx",
[
{ role: "readWrite", db: "photo_app" }
]
)use photo_app
db.grantRolesToUser(
"moddx",
[ "readWrite" , { role: "read", db: "demodb" } ],
{ w: "majority" , wtimeout: 4000 }
)use photo_app
db.changeUserPassword("moddx", "newpwd")[MongoDB] mongodb and php php mongodb update php connection mongodb php mongodb not authorize
MongoDB Journey (2) Basic Operations (MongoDB Javascript Shell)
The above is the detailed content of Introduction to users and permissions in mongoDB. For more information, please follow other related articles on the PHP Chinese website!

Hot AI Tools

Undresser.AI Undress
AI-powered app for creating realistic nude photos

AI Clothes Remover
Online AI tool for removing clothes from photos.

Undress AI Tool
Undress images for free

Clothoff.io
AI clothes remover

AI Hentai Generator
Generate AI Hentai for free.

Hot Article

Hot Tools

Notepad++7.3.1
Easy-to-use and free code editor

SublimeText3 Chinese version
Chinese version, very easy to use

Zend Studio 13.0.1
Powerful PHP integrated development environment

Dreamweaver CS6
Visual web development tools

SublimeText3 Mac version
God-level code editing software (SublimeText3)

Hot Topics
 Which version is generally used for mongodb?
Apr 07, 2024 pm 05:48 PM
It is recommended to use the latest version of MongoDB (currently 5.0) as it provides the latest features and improvements. When selecting a version, you need to consider functional requirements, compatibility, stability, and community support. For example, the latest version has features such as transactions and aggregation pipeline optimization. Make sure the version is compatible with the application. For production environments, choose the long-term support version. The latest version has more active community support.
 The difference between nodejs and vuejs
Apr 21, 2024 am 04:17 AM
Node.js is a server-side JavaScript runtime, while Vue.js is a client-side JavaScript framework for creating interactive user interfaces. Node.js is used for server-side development, such as back-end service API development and data processing, while Vue.js is used for client-side development, such as single-page applications and responsive user interfaces.
 Experience sharing on implementing real-time recommendation system using MongoDB
Nov 03, 2023 pm 04:37 PM
With the development of the Internet, people's lives are becoming more and more digital, and the demand for personalization is becoming stronger and stronger. In this era of information explosion, users are often faced with massive amounts of information and have no choice, so the importance of real-time recommendation systems has become increasingly prominent. This article will share the experience of using MongoDB to implement a real-time recommendation system, hoping to provide some inspiration and help to developers. 1. Introduction to MongoDB MongoDB is an open source NoSQL database known for its high performance, easy scalability and flexible data model. Compared to biography
 Where is the database created by mongodb?
Apr 07, 2024 pm 05:39 PM
The data of the MongoDB database is stored in the specified data directory, which can be located in the local file system, network file system or cloud storage. The specific location is as follows: Local file system: The default path is Linux/macOS:/data/db, Windows: C:\data\db. Network file system: The path depends on the file system. Cloud Storage: The path is determined by the cloud storage provider.
 What are the advantages of mongodb database
Apr 07, 2024 pm 05:21 PM
The MongoDB database is known for its flexibility, scalability, and high performance. Its advantages include: a document data model that allows data to be stored in a flexible and unstructured way. Horizontal scalability to multiple servers via sharding. Query flexibility, supporting complex queries and aggregation operations. Data replication and fault tolerance ensure data redundancy and high availability. JSON support for easy integration with front-end applications. High performance for fast response even when processing large amounts of data. Open source, customizable and free to use.
 What does mongodb mean?
Apr 07, 2024 pm 05:57 PM
MongoDB is a document-oriented, distributed database system used to store and manage large amounts of structured and unstructured data. Its core concepts include document storage and distribution, and its main features include dynamic schema, indexing, aggregation, map-reduce and replication. It is widely used in content management systems, e-commerce platforms, social media websites, IoT applications, and mobile application development.
 Where are the mongodb database files?
Apr 07, 2024 pm 05:42 PM
The MongoDB database file is located in the MongoDB data directory, which is /data/db by default, which contains .bson (document data), ns (collection information), journal (write operation records), wiredTiger (data when using the WiredTiger storage engine ) and config (database configuration information) and other files.
 How to open mongodb
Apr 07, 2024 pm 06:15 PM
On Linux/macOS: Create the data directory and start the "mongod" service. On Windows: Create the data directory and start the MongoDB service from Service Manager. In Docker: Run the "docker run" command. On other platforms: Please consult the MongoDB documentation. Verification method: Run the "mongo" command to connect and view the server version.


