 Web Front-end
 JS Tutorial
 Implementing the React series from 0 to 1: implementation of life cycle and diff
Implementing the React series from 0 to 1: implementation of life cycle and diff

This series of articles implements a (x)react while straightening out the backbone content of the React framework (JSX/virtual DOM/component/life cycle/diff algorithm/...)
Implementing the React series from 0 to 1 - JSX and Virtual DOM
Implementing the React series from 0 to 1 - components and state|props
Life cycle
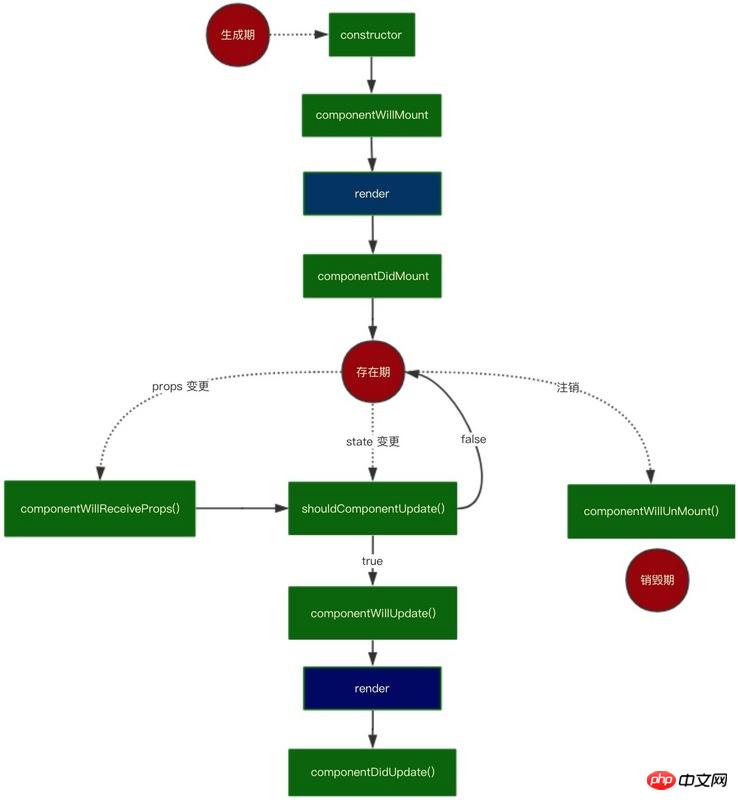
Let’s first review the life cycle of React, which is represented by a flow chart as follows:

The The flow chart presents the life cycle of react relatively clearly. It is divided into 3 stages - generation period, existence period and destruction period.
Because the life cycle hook function exists in the custom component, make some adjustments to the previous _render function as follows:
// 原来的 _render 函数,为了将职责拆分得更细,将 virtual dom 转为 real dom 的函数单独抽离出来
function vdomToDom(vdom) {
  if (_.isFunction(vdom.nodeName)) {        // 为了更加方便地书写生命周期逻辑,将解析自定义组件逻辑和一般 html 标签的逻辑分离开
    const component = createComponent(vdom) // 构造组件
    setProps(component)                     // 更改组件 props
    renderComponent(component)              // 渲染组件,将 dom 节点赋值到 component
    return component.base                   // 返回真实 dom
  }
  ...
}We can add componentWillMount within the setProps function (before rendering) , componentWillReceiveProps method, setProps function is as follows:
function setProps(component) {
  if (component && component.componentWillMount) {
    component.componentWillMount()
  } else if (component.base && component.componentWillReceiveProps) {
    component.componentWillReceiveProps(component.props) // 后面待实现
  }
}Then we add componentDidMount, shouldComponentUpdate, in the renderComponent function componentWillUpdate, componentDidUpdate Method
function renderComponent(component) {
  if (component.base && component.shouldComponentUpdate) {
    const bool = component.shouldComponentUpdate(component.props, component.state)
    if (!bool && bool !== undefined) {
      return false // shouldComponentUpdate() 返回 false,则生命周期终止
    }
  }
  if (component.base && component.componentWillUpdate) {
    component.componentWillUpdate()
  }

  const rendered = component.render()
  const base = vdomToDom(rendered)

  if (component.base && component.componentDidUpdate) {
    component.componentDidUpdate()
  } else if (component && component.componentDidMount) {
    component.componentDidMount()
  }

  if (component.base && component.base.parentNode) { // setState 进入此逻辑
    component.base.parentNode.replaceChild(base, component.base)
  }

  component.base = base  // 标志符
}Test life cycle
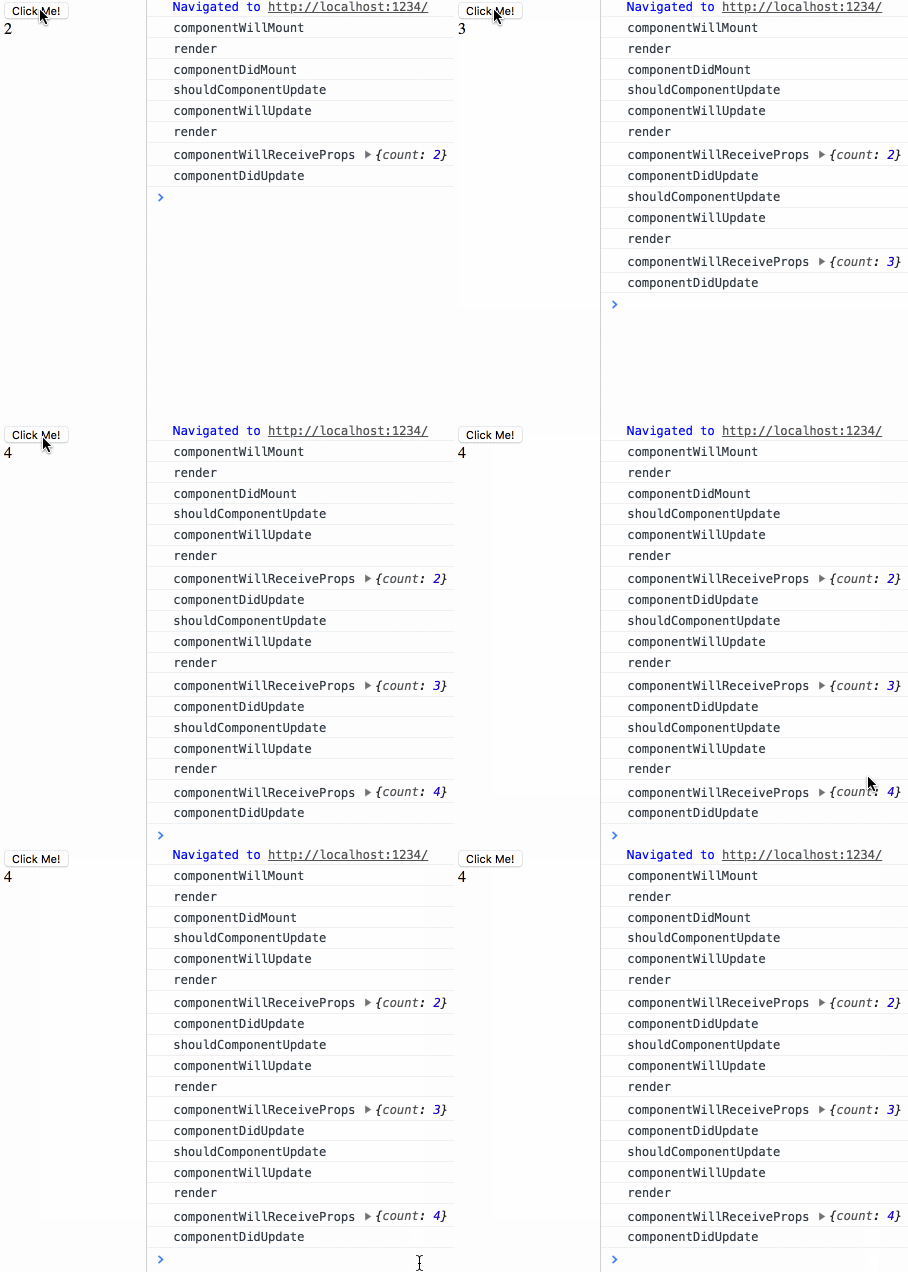
Test the following use case:
class A extends Component {
componentWillReceiveProps(props) {
console.log('componentWillReceiveProps')
}
render() {
return (
<p>{this.props.count}</p>
)
}
}
class B extends Component {
constructor(props) {
super(props)
this.state = {
count: 1
}
}
componentWillMount() {
console.log('componentWillMount')
}
componentDidMount() {
console.log('componentDidMount')
}
shouldComponentUpdate(nextProps, nextState) {
console.log('shouldComponentUpdate', nextProps, nextState)
return true
}
componentWillUpdate() {
console.log('componentWillUpdate')
}
componentDidUpdate() {
console.log('componentDidUpdate')
}
click() {
this.setState({
count: ++this.state.count
})
}
render() {
console.log('render')
return (
<p>
<button onClick={this.click.bind(this)}>Click Me!</button>
<A count={this.state.count} />
</p>
)
}
}
ReactDOM.render(
<B />,
document.getElementById('root')
)The output result when the page is loaded is as follows:
componentWillMount
render
componentDidMount
The output result when clicking the button is as follows:
shouldComponentUpdate
componentWillUpdate
render
componentDidUpdate
Implementation of diff
In react, the idea of diff implementation is to compare the old and new virtual dom, and compare the patch ( Patch) is rendered to the page to achieve partial refresh; this article draws on the diff implementation in preact and simple-react. The general idea is to compare the old dom node and the new virtual dom node. According to different comparison types (text nodes, non-text nodes, custom components) to call the corresponding logic to achieve partial rendering of the page. The overall structure of the code is as follows:
/**
 * 比较旧的 dom 节点和新的 virtual dom 节点:
 * @param {*} oldDom  旧的 dom 节点
 * @param {*} newVdom 新的 virtual dom 节点
 */
function diff(oldDom, newVdom) {
  ...
  if (_.isString(newVdom)) {
    return diffTextDom(oldDom, newVdom)   // 对比文本 dom 节点
  }

  if (oldDom.nodeName.toLowerCase() !== newVdom.nodeName) {
    diffNotTextDom(oldDom, newVdom)       // 对比非文本 dom 节点
  }

  if (_.isFunction(newVdom.nodeName)) {
    return diffComponent(oldDom, newVdom) // 对比自定义组件
  }

  diffAttribute(oldDom, newVdom)          // 对比属性

  if (newVdom.children.length > 0) {
    diffChild(oldDom, newVdom)            // 遍历对比子节点
  }

  return oldDom
}The following implements the corresponding logic according to different comparison types.
Compare text nodes
First compare simple text nodes, the code is as follows:
// 对比文本节点
function diffTextDom(oldDom, newVdom) {
  let dom = oldDom
  if (oldDom && oldDom.nodeType === 3) {  // 如果老节点是文本节点
    if (oldDom.textContent !== newVdom) { // 这里一个细节:textContent/innerHTML/innerText 的区别
      oldDom.textContent = newVdom
    }
  } else {                                // 如果旧 dom 元素不为文本节点
    dom = document.createTextNode(newVdom)
    if (oldDom && oldDom.parentNode) {
      oldDom.parentNode.replaceChild(dom, oldDom)
    }
  }
  return dom
}Compare non-text nodes
Compare non-text nodes, The idea is to replace old nodes at the same level with new nodes. The code is as follows:
// 对比非文本节点
function diffNotTextDom(oldDom, newVdom) {
  const newDom = document.createElement(newVdom.nodeName);
  [...oldDom.childNodes].map(newDom.appendChild) // 将旧节点下的元素添加到新节点下
  if (oldDom && oldDom.parentNode) {
    oldDom.parentNode.replaceChild(oldDom, newDom)
  }
}Compare custom components
The idea of comparing custom components is: If the old and new components are different, directly Replace the old component with the new component; if the old and new components are the same, assign the props of the new component to the old component, and then do a diff comparison of the old components before and after obtaining the new props. The code is as follows:
// 对比自定义组件
function diffComponent(oldDom, newVdom) {
  if (oldDom._component && (oldDom._component.constructor !== newVdom.nodeName)) { // 如果新老组件不同,则直接将新组件替换老组件
    const newDom = vdomToDom(newVdom)
    oldDom._component.parentNode.insertBefore(newDom, oldDom._component)
    oldDom._component.parentNode.removeChild(oldDom._component)
  } else {
    setProps(oldDom._component, newVdom.attributes) // 如果新老组件相同,则将新组件的 props 赋到老组件上
    renderComponent(oldDom._component)              // 对获得新 props 前后的老组件做 diff 比较(renderComponent 中调用了 diff)
  }
}Traverse and compare child nodes
There are two strategies for traversing and comparing child nodes: one is to only compare nodes at the same level, and the other is to add key attributes to nodes. Their purpose is to reduce space complexity. The code is as follows:
// 对比子节点
function diffChild(oldDom, newVdom) {
  const keyed = {}
  const children = []
  const oldChildNodes = oldDom.childNodes
  for (let i = 0; i < oldChildNodes.length; i++) {
    if (oldChildNodes[i].key) { // 将含有 key 的节点存进对象 keyed
      keyed[oldChildNodes[i].key] = oldChildNodes[i]
    } else {                    // 将不含有 key 的节点存进数组 children
      children.push(oldChildNodes[i])
    }
  }

  const newChildNodes = newVdom.children
  let child
  for (let i = 0; i < newChildNodes.length; i++) {
    if (keyed[newChildNodes[i].key]) {  // 对应上面存在 key 的情形
      child = keyed[newChildNodes[i].key]
      keyed[newChildNodes[i].key] = undefined
    } else {                            // 对应上面不存在 key 的情形
      for (let j = 0; j < children.length; j++) {
        if (isSameNodeType(children[i], newChildNodes[i])) { // 如果不存在 key,则优先找到节点类型相同的元素
          child = children[i]
          children[i] = undefined
          break
        }
      }
    }
    diff(child, newChildNodes[i]) // 递归比较
  }
}Test
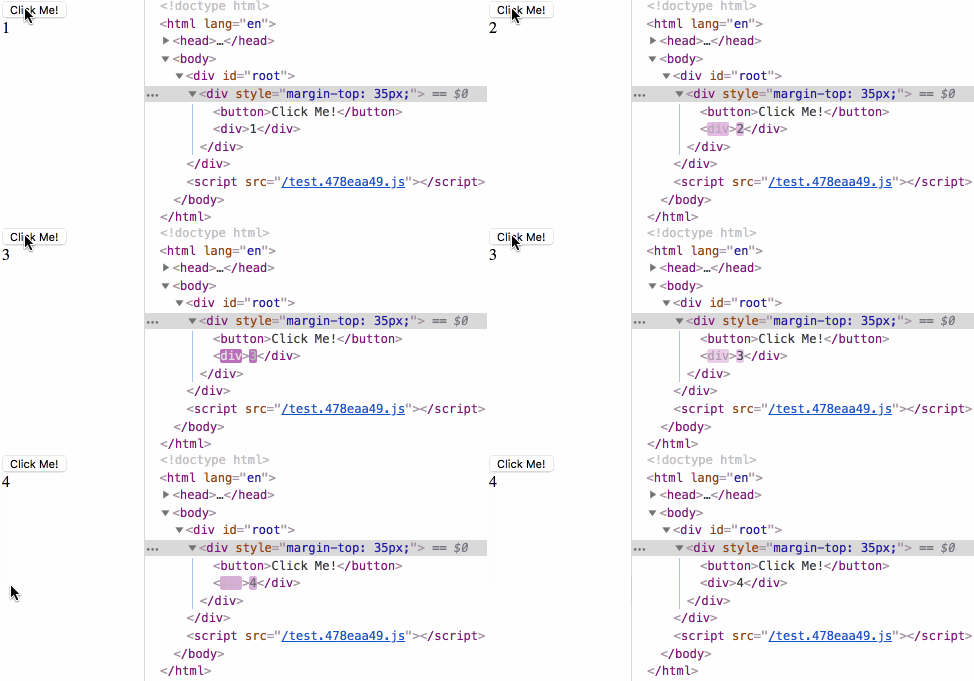
In the life cycle section, the componentWillReceiveProps method has not yet run through. Just modify the setProps function slightly:
/**
 * 更改属性,componentWillMount 和 componentWillReceiveProps 方法
 */
function setProps(component, attributes) {
  if (attributes) {
    component.props = attributes // 这段逻辑对应上文自定义组件比较中新老组件相同时 setProps 的逻辑
  }

  if (component && component.base && component.componentWillReceiveProps) {
    component.componentWillReceiveProps(component.props)
  } else if (component && component.componentWillMount) {
    component.componentWillMount()
  }
}To test the life The last test case in the cycle section:
Life cycle test

- ## diff test

React component life Cycle instance analysis
Detailed explanation of React component life cycle
Related videos:Virtual dom-React framework video tutorial
The above is the detailed content of Implementing the React series from 0 to 1: implementation of life cycle and diff. For more information, please follow other related articles on the PHP Chinese website!

Hot AI Tools

Undresser.AI Undress
AI-powered app for creating realistic nude photos

AI Clothes Remover
Online AI tool for removing clothes from photos.

Undress AI Tool
Undress images for free

Clothoff.io
AI clothes remover

AI Hentai Generator
Generate AI Hentai for free.

Hot Article

Hot Tools

Notepad++7.3.1
Easy-to-use and free code editor

SublimeText3 Chinese version
Chinese version, very easy to use

Zend Studio 13.0.1
Powerful PHP integrated development environment

Dreamweaver CS6
Visual web development tools

SublimeText3 Mac version
God-level code editing software (SublimeText3)

Hot Topics
 1376
1376
 52
52
 How to implement an online speech recognition system using WebSocket and JavaScript
Dec 17, 2023 pm 02:54 PM
How to use WebSocket and JavaScript to implement an online speech recognition system Introduction: With the continuous development of technology, speech recognition technology has become an important part of the field of artificial intelligence. The online speech recognition system based on WebSocket and JavaScript has the characteristics of low latency, real-time and cross-platform, and has become a widely used solution. This article will introduce how to use WebSocket and JavaScript to implement an online speech recognition system.
 WebSocket and JavaScript: key technologies for implementing real-time monitoring systems
Dec 17, 2023 pm 05:30 PM
WebSocket and JavaScript: Key technologies for realizing real-time monitoring systems Introduction: With the rapid development of Internet technology, real-time monitoring systems have been widely used in various fields. One of the key technologies to achieve real-time monitoring is the combination of WebSocket and JavaScript. This article will introduce the application of WebSocket and JavaScript in real-time monitoring systems, give code examples, and explain their implementation principles in detail. 1. WebSocket technology
 How to implement an online reservation system using WebSocket and JavaScript
Dec 17, 2023 am 09:39 AM
How to use WebSocket and JavaScript to implement an online reservation system. In today's digital era, more and more businesses and services need to provide online reservation functions. It is crucial to implement an efficient and real-time online reservation system. This article will introduce how to use WebSocket and JavaScript to implement an online reservation system, and provide specific code examples. 1. What is WebSocket? WebSocket is a full-duplex method on a single TCP connection.
 How to use JavaScript and WebSocket to implement a real-time online ordering system
Dec 17, 2023 pm 12:09 PM
Introduction to how to use JavaScript and WebSocket to implement a real-time online ordering system: With the popularity of the Internet and the advancement of technology, more and more restaurants have begun to provide online ordering services. In order to implement a real-time online ordering system, we can use JavaScript and WebSocket technology. WebSocket is a full-duplex communication protocol based on the TCP protocol, which can realize real-time two-way communication between the client and the server. In the real-time online ordering system, when the user selects dishes and places an order
 JavaScript and WebSocket: Building an efficient real-time weather forecasting system
Dec 17, 2023 pm 05:13 PM
JavaScript and WebSocket: Building an efficient real-time weather forecast system Introduction: Today, the accuracy of weather forecasts is of great significance to daily life and decision-making. As technology develops, we can provide more accurate and reliable weather forecasts by obtaining weather data in real time. In this article, we will learn how to use JavaScript and WebSocket technology to build an efficient real-time weather forecast system. This article will demonstrate the implementation process through specific code examples. We
 Simple JavaScript Tutorial: How to Get HTTP Status Code
Jan 05, 2024 pm 06:08 PM
JavaScript tutorial: How to get HTTP status code, specific code examples are required. Preface: In web development, data interaction with the server is often involved. When communicating with the server, we often need to obtain the returned HTTP status code to determine whether the operation is successful, and perform corresponding processing based on different status codes. This article will teach you how to use JavaScript to obtain HTTP status codes and provide some practical code examples. Using XMLHttpRequest
 How to use insertBefore in javascript
Nov 24, 2023 am 11:56 AM
Usage: In JavaScript, the insertBefore() method is used to insert a new node in the DOM tree. This method requires two parameters: the new node to be inserted and the reference node (that is, the node where the new node will be inserted).
 How to get HTTP status code in JavaScript the easy way
Jan 05, 2024 pm 01:37 PM
Introduction to the method of obtaining HTTP status code in JavaScript: In front-end development, we often need to deal with the interaction with the back-end interface, and HTTP status code is a very important part of it. Understanding and obtaining HTTP status codes helps us better handle the data returned by the interface. This article will introduce how to use JavaScript to obtain HTTP status codes and provide specific code examples. 1. What is HTTP status code? HTTP status code means that when the browser initiates a request to the server, the service


