
 WeChat Applet
Mini Program Development
WeChat applet example: code to implement custom date control
WeChat Applet
Mini Program Development
WeChat applet example: code to implement custom date control
WeChat applet example: code to implement custom date control

本篇文章给大家带来的内容是关于微信小程序实例:实现自定义日期控件的代码,有一定的参考价值,有需要的朋友可以参考一下,希望对你有所帮助。
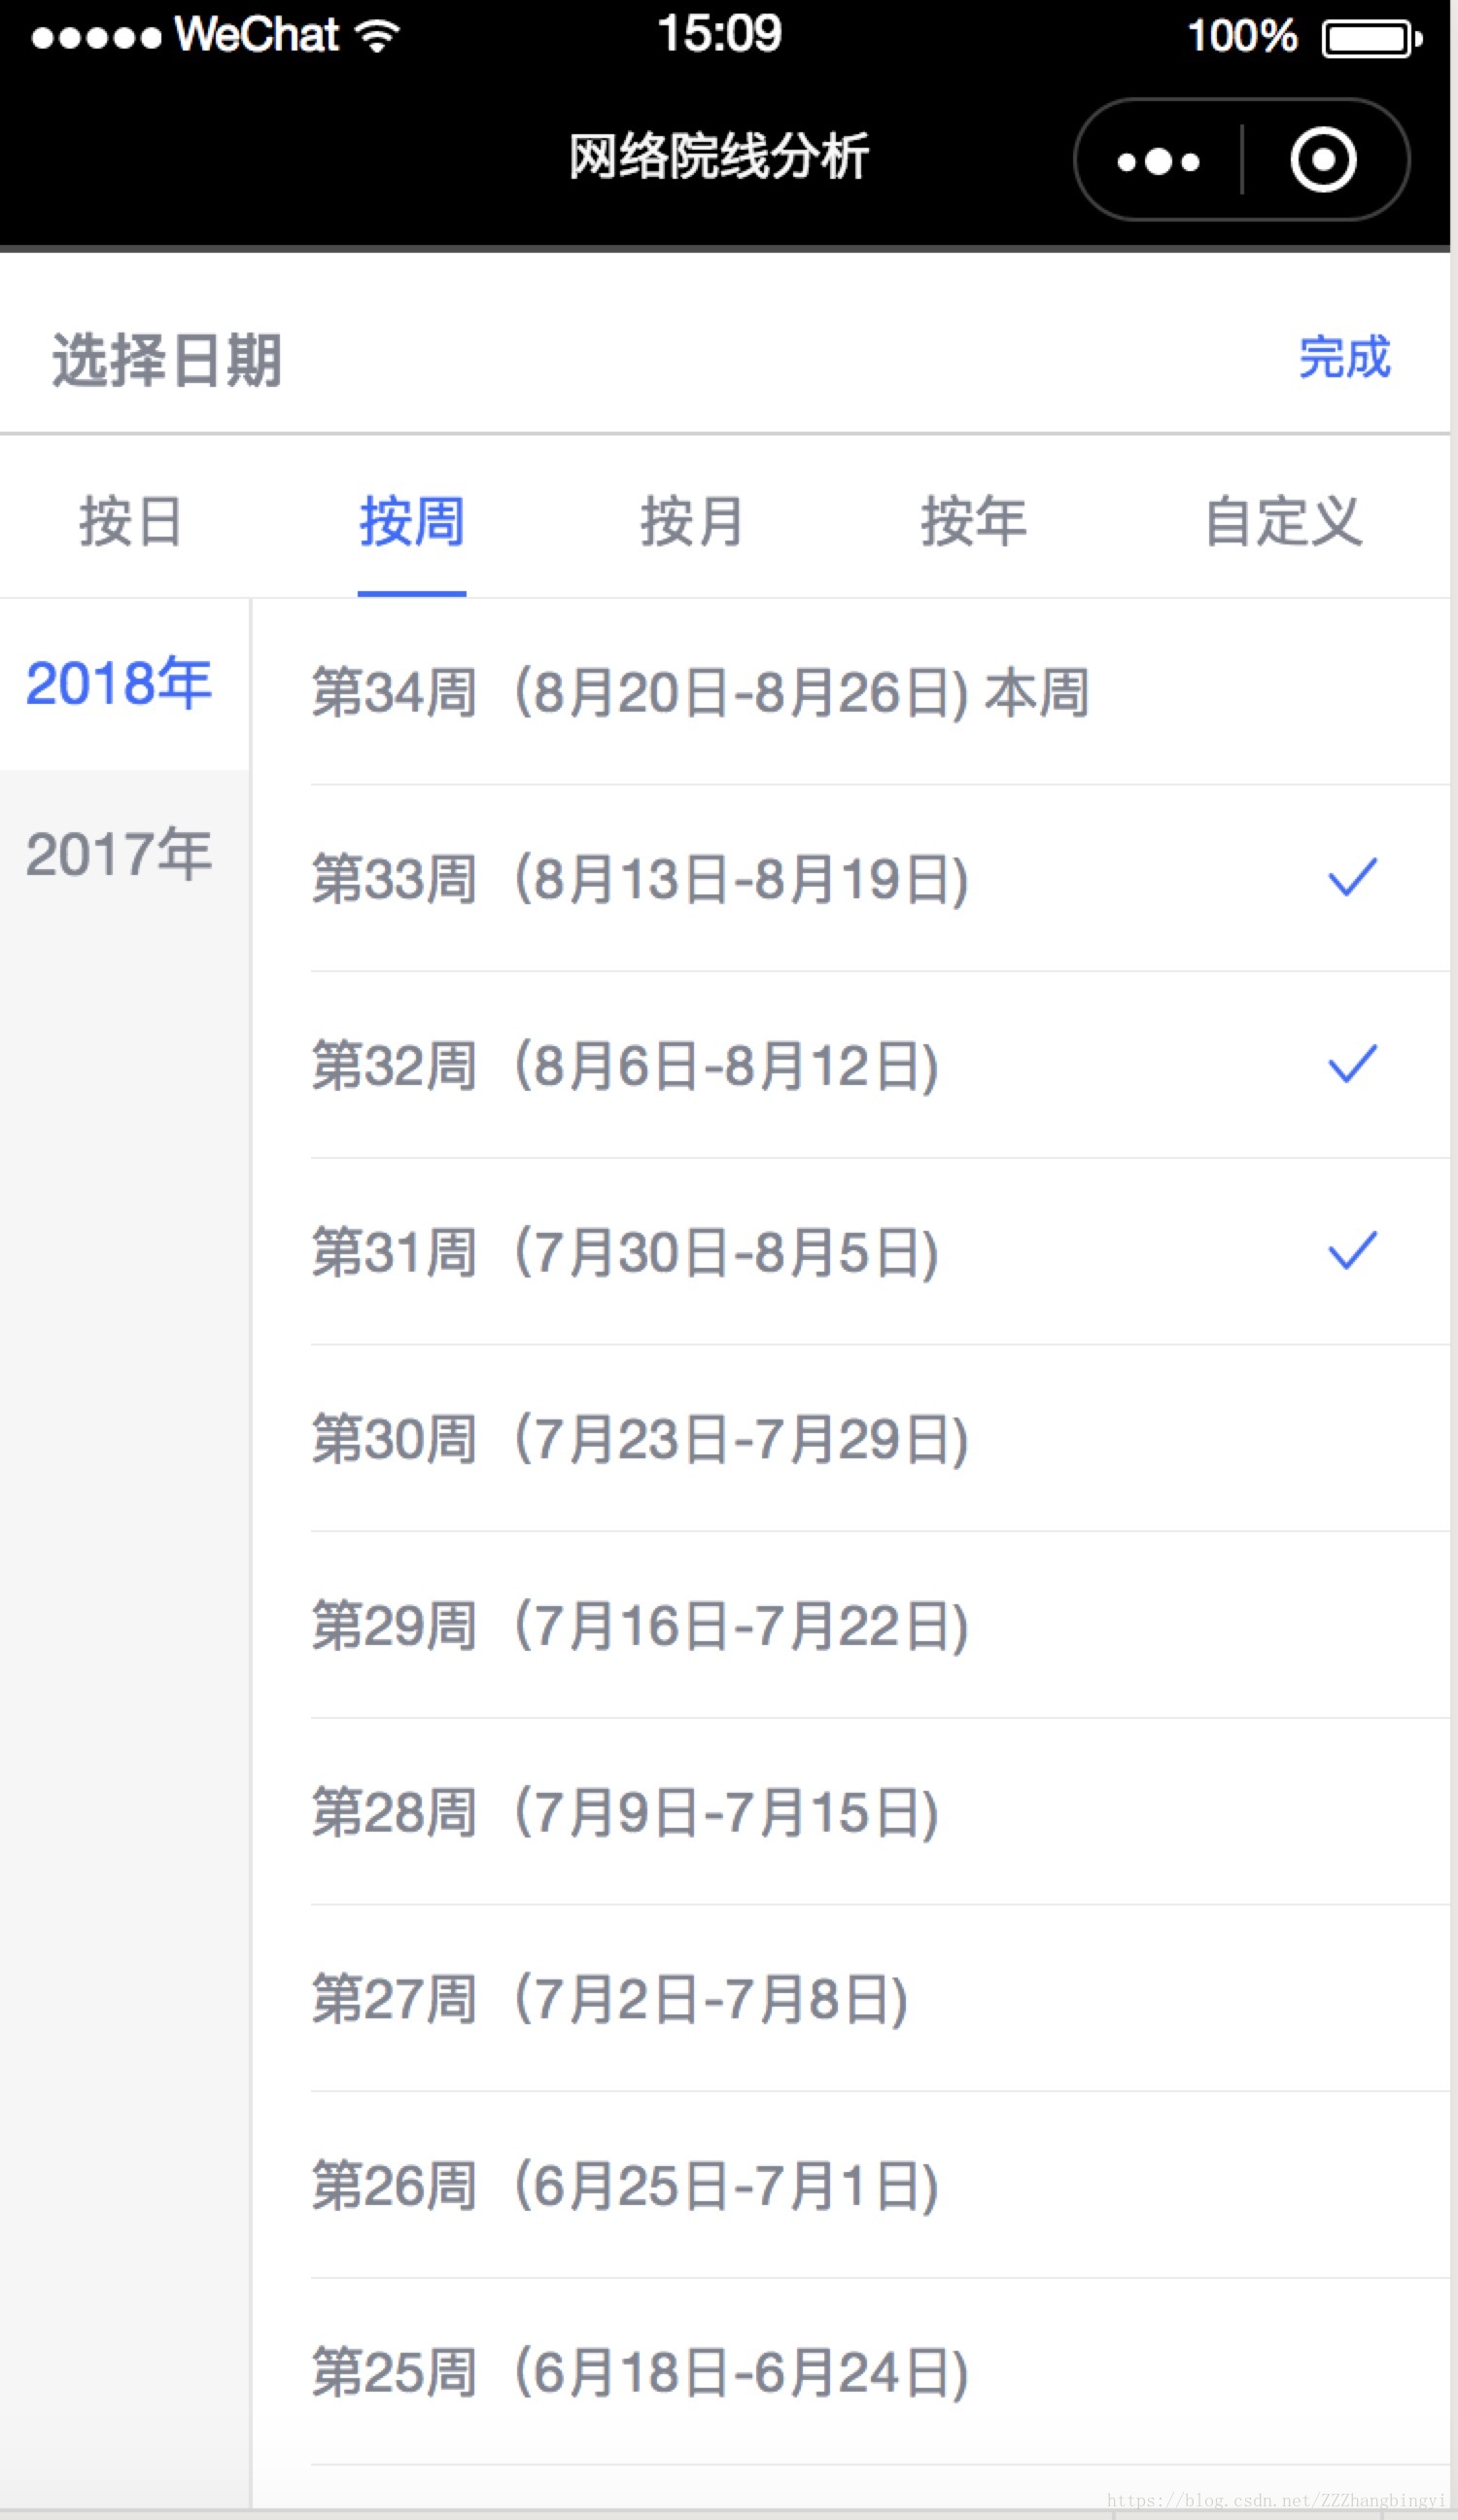
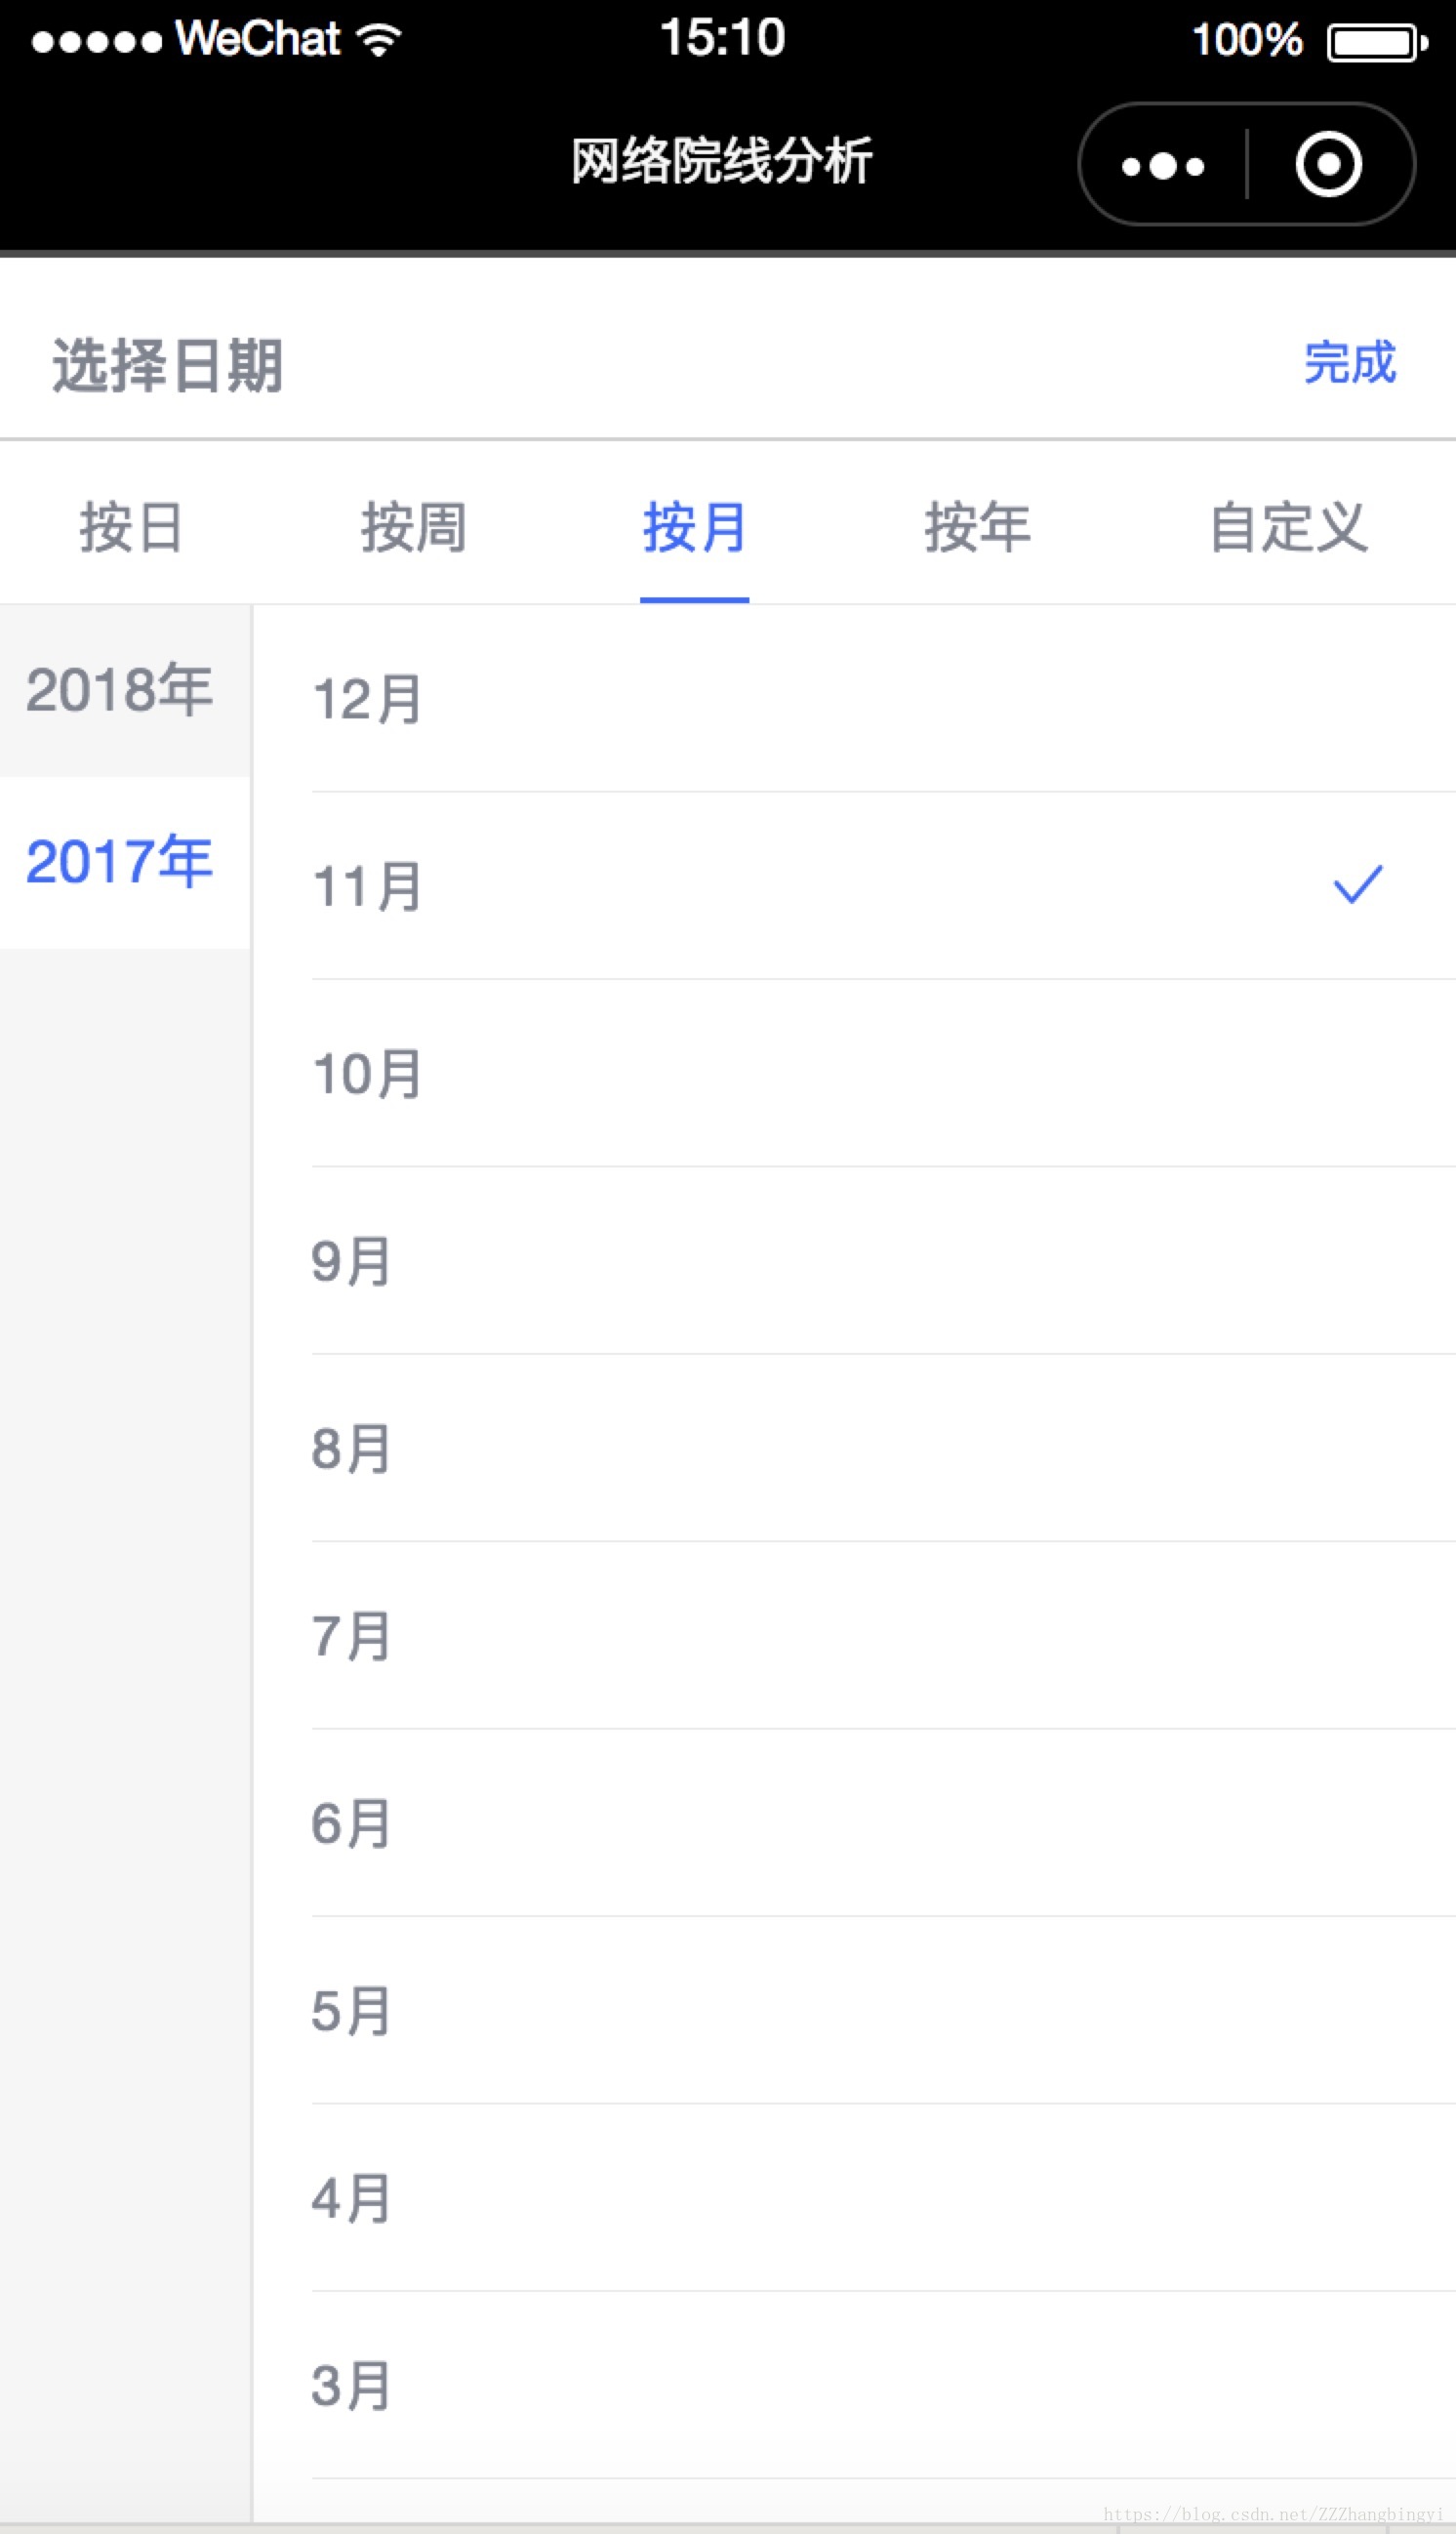
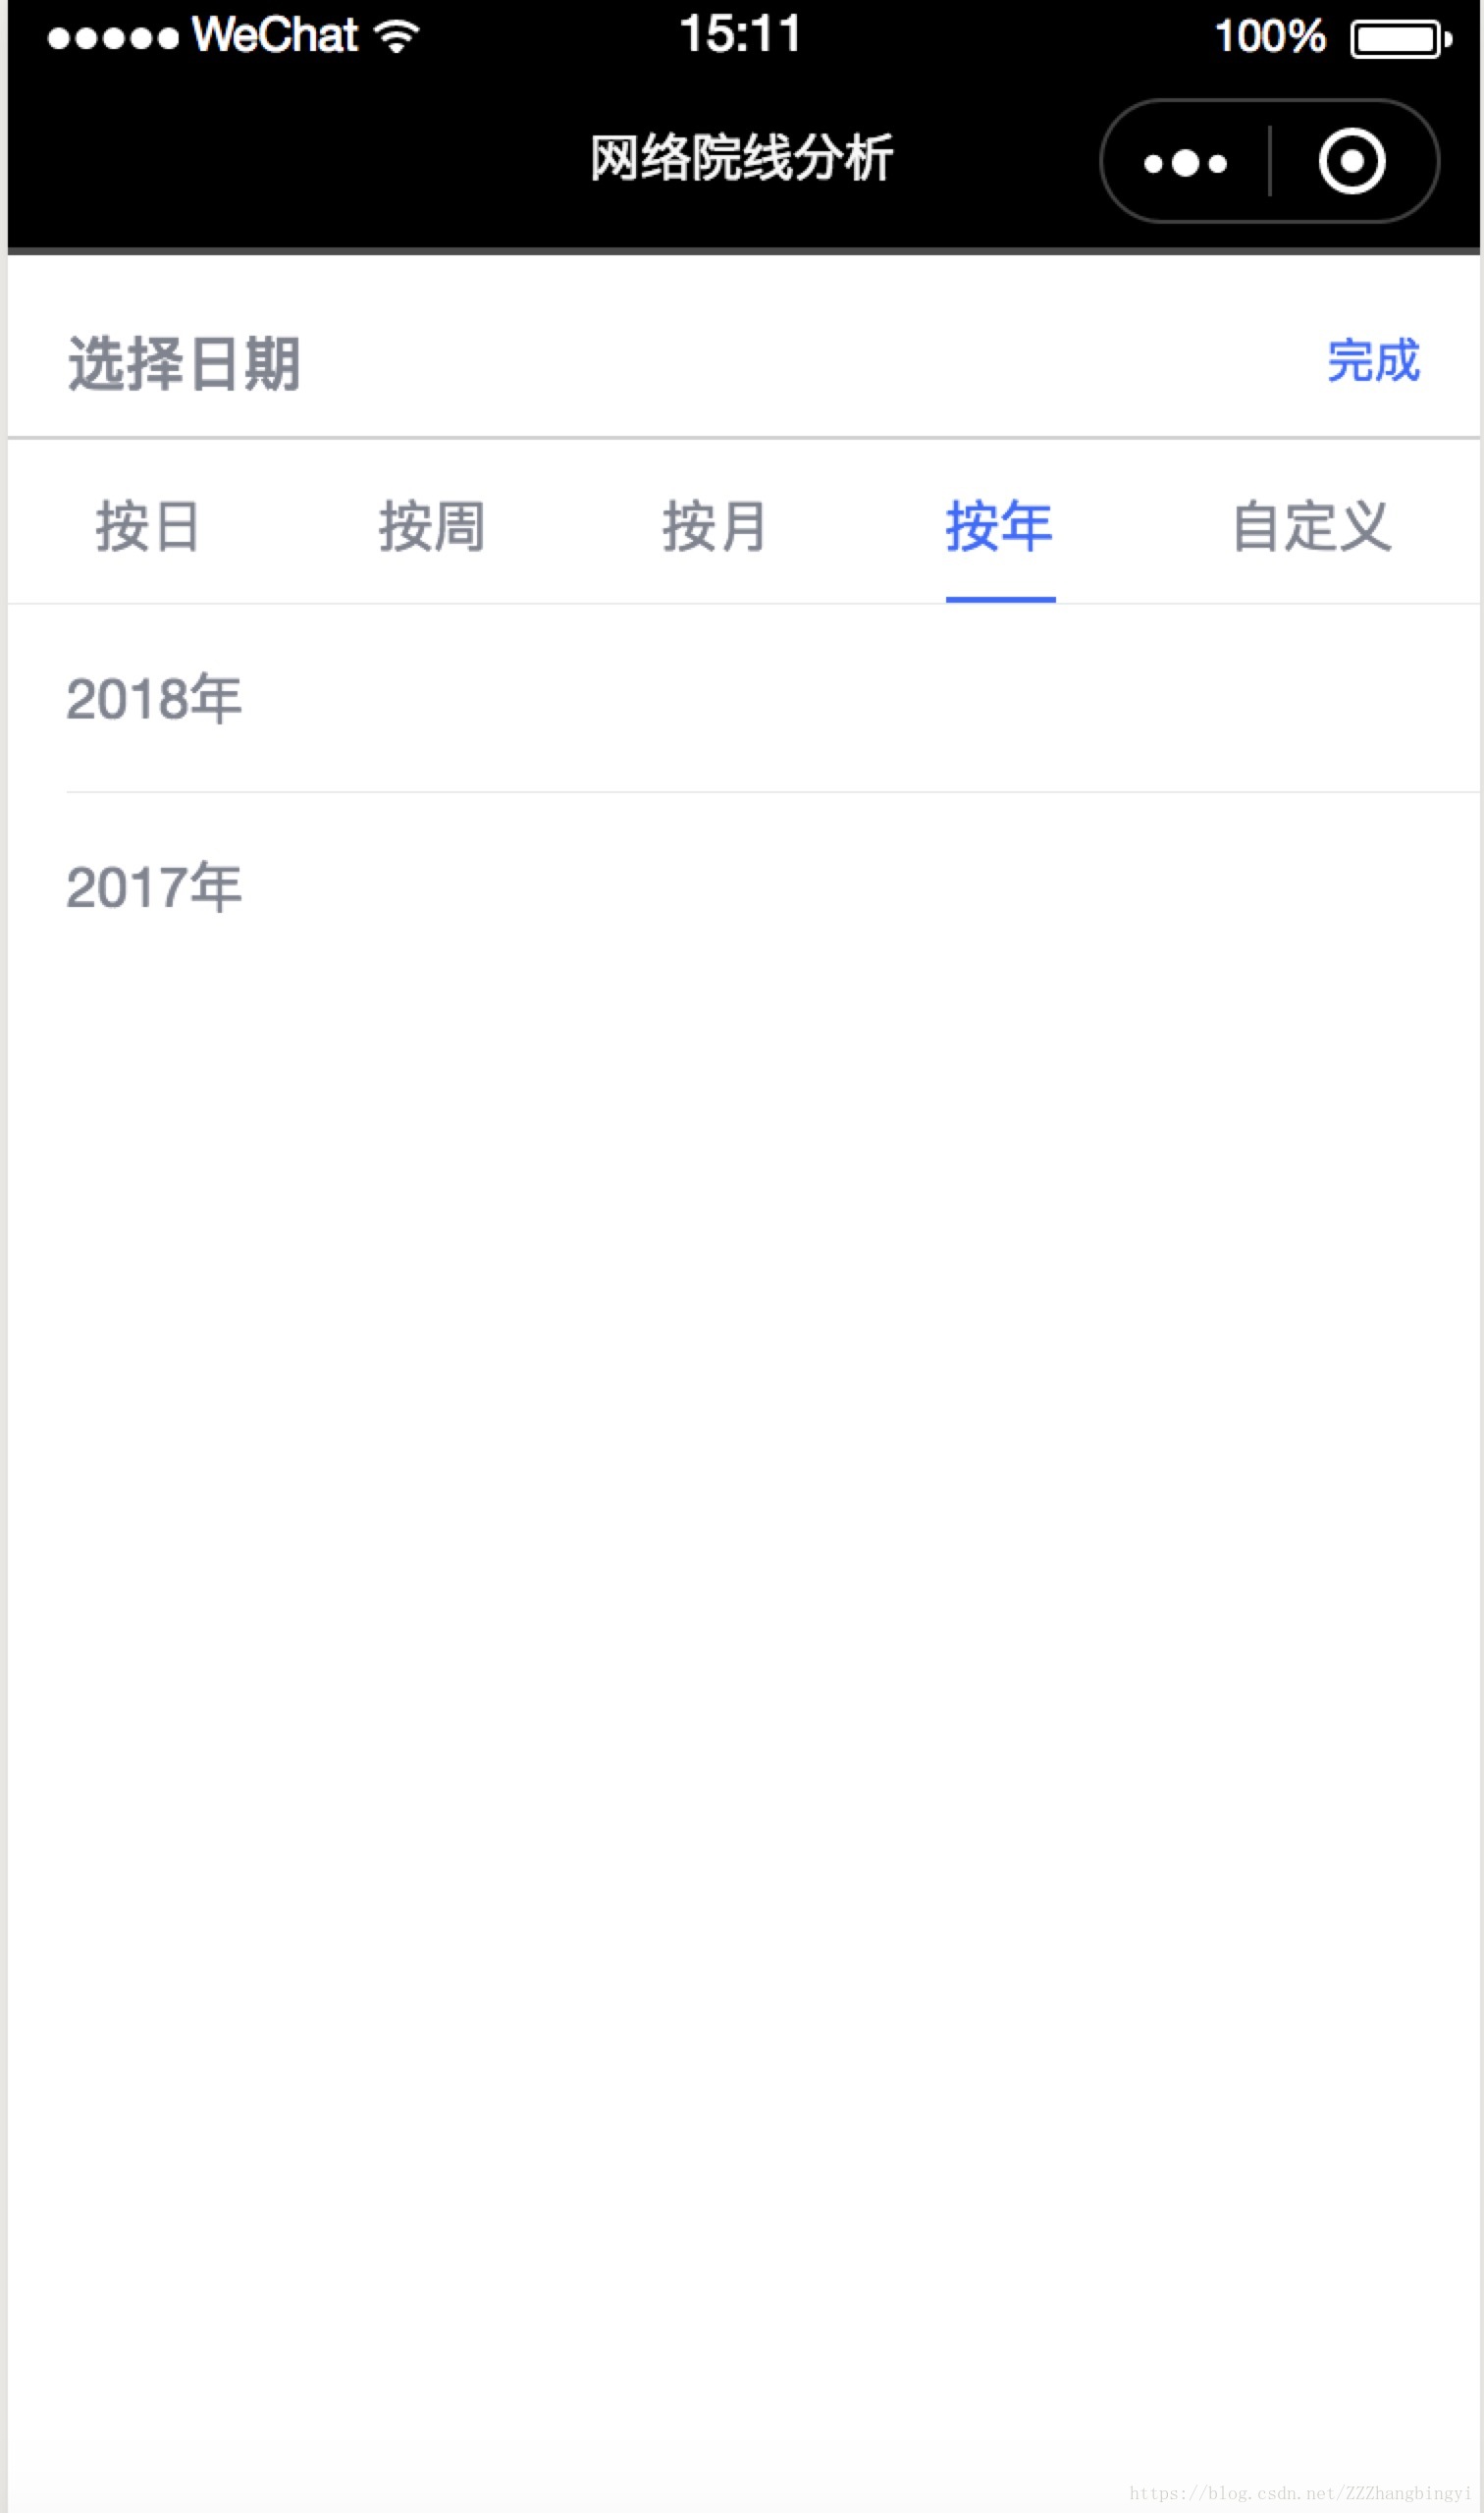
最近在研究微信小程序,需要实现一个自定义日期的功能,类似于猫眼app上选择日期,可以按日、按周、按月、按年、自定义日期,为此特地将其写成了一个组件,供有需要的朋友参考。
本人所用框架是wepy,所以此组件结构为wepy代码结构。
大致介绍:
1.按日的日历控件采用的极点日历插件,详情请看:https://github.com/czcaiwj/calendar;
2.组件中所用到的一些组件为ivew weapp组件,详情使用请看我的另一篇分享:https://www.jianshu.com/p/e07b7cf5e494;
3.组件中按周选择,周我是从2017年至今取的,具体实现可看我另一篇分享:https://www.jianshu.com/p/5112df795162;在本篇onLoad()方法里也有实现;因本人开发需要,设定功能为按周可多选,这个可以根据自身开发需求调整;
4.本组件时间默认从17年开始至今,也可根据自身实际需求调整。
实现效果: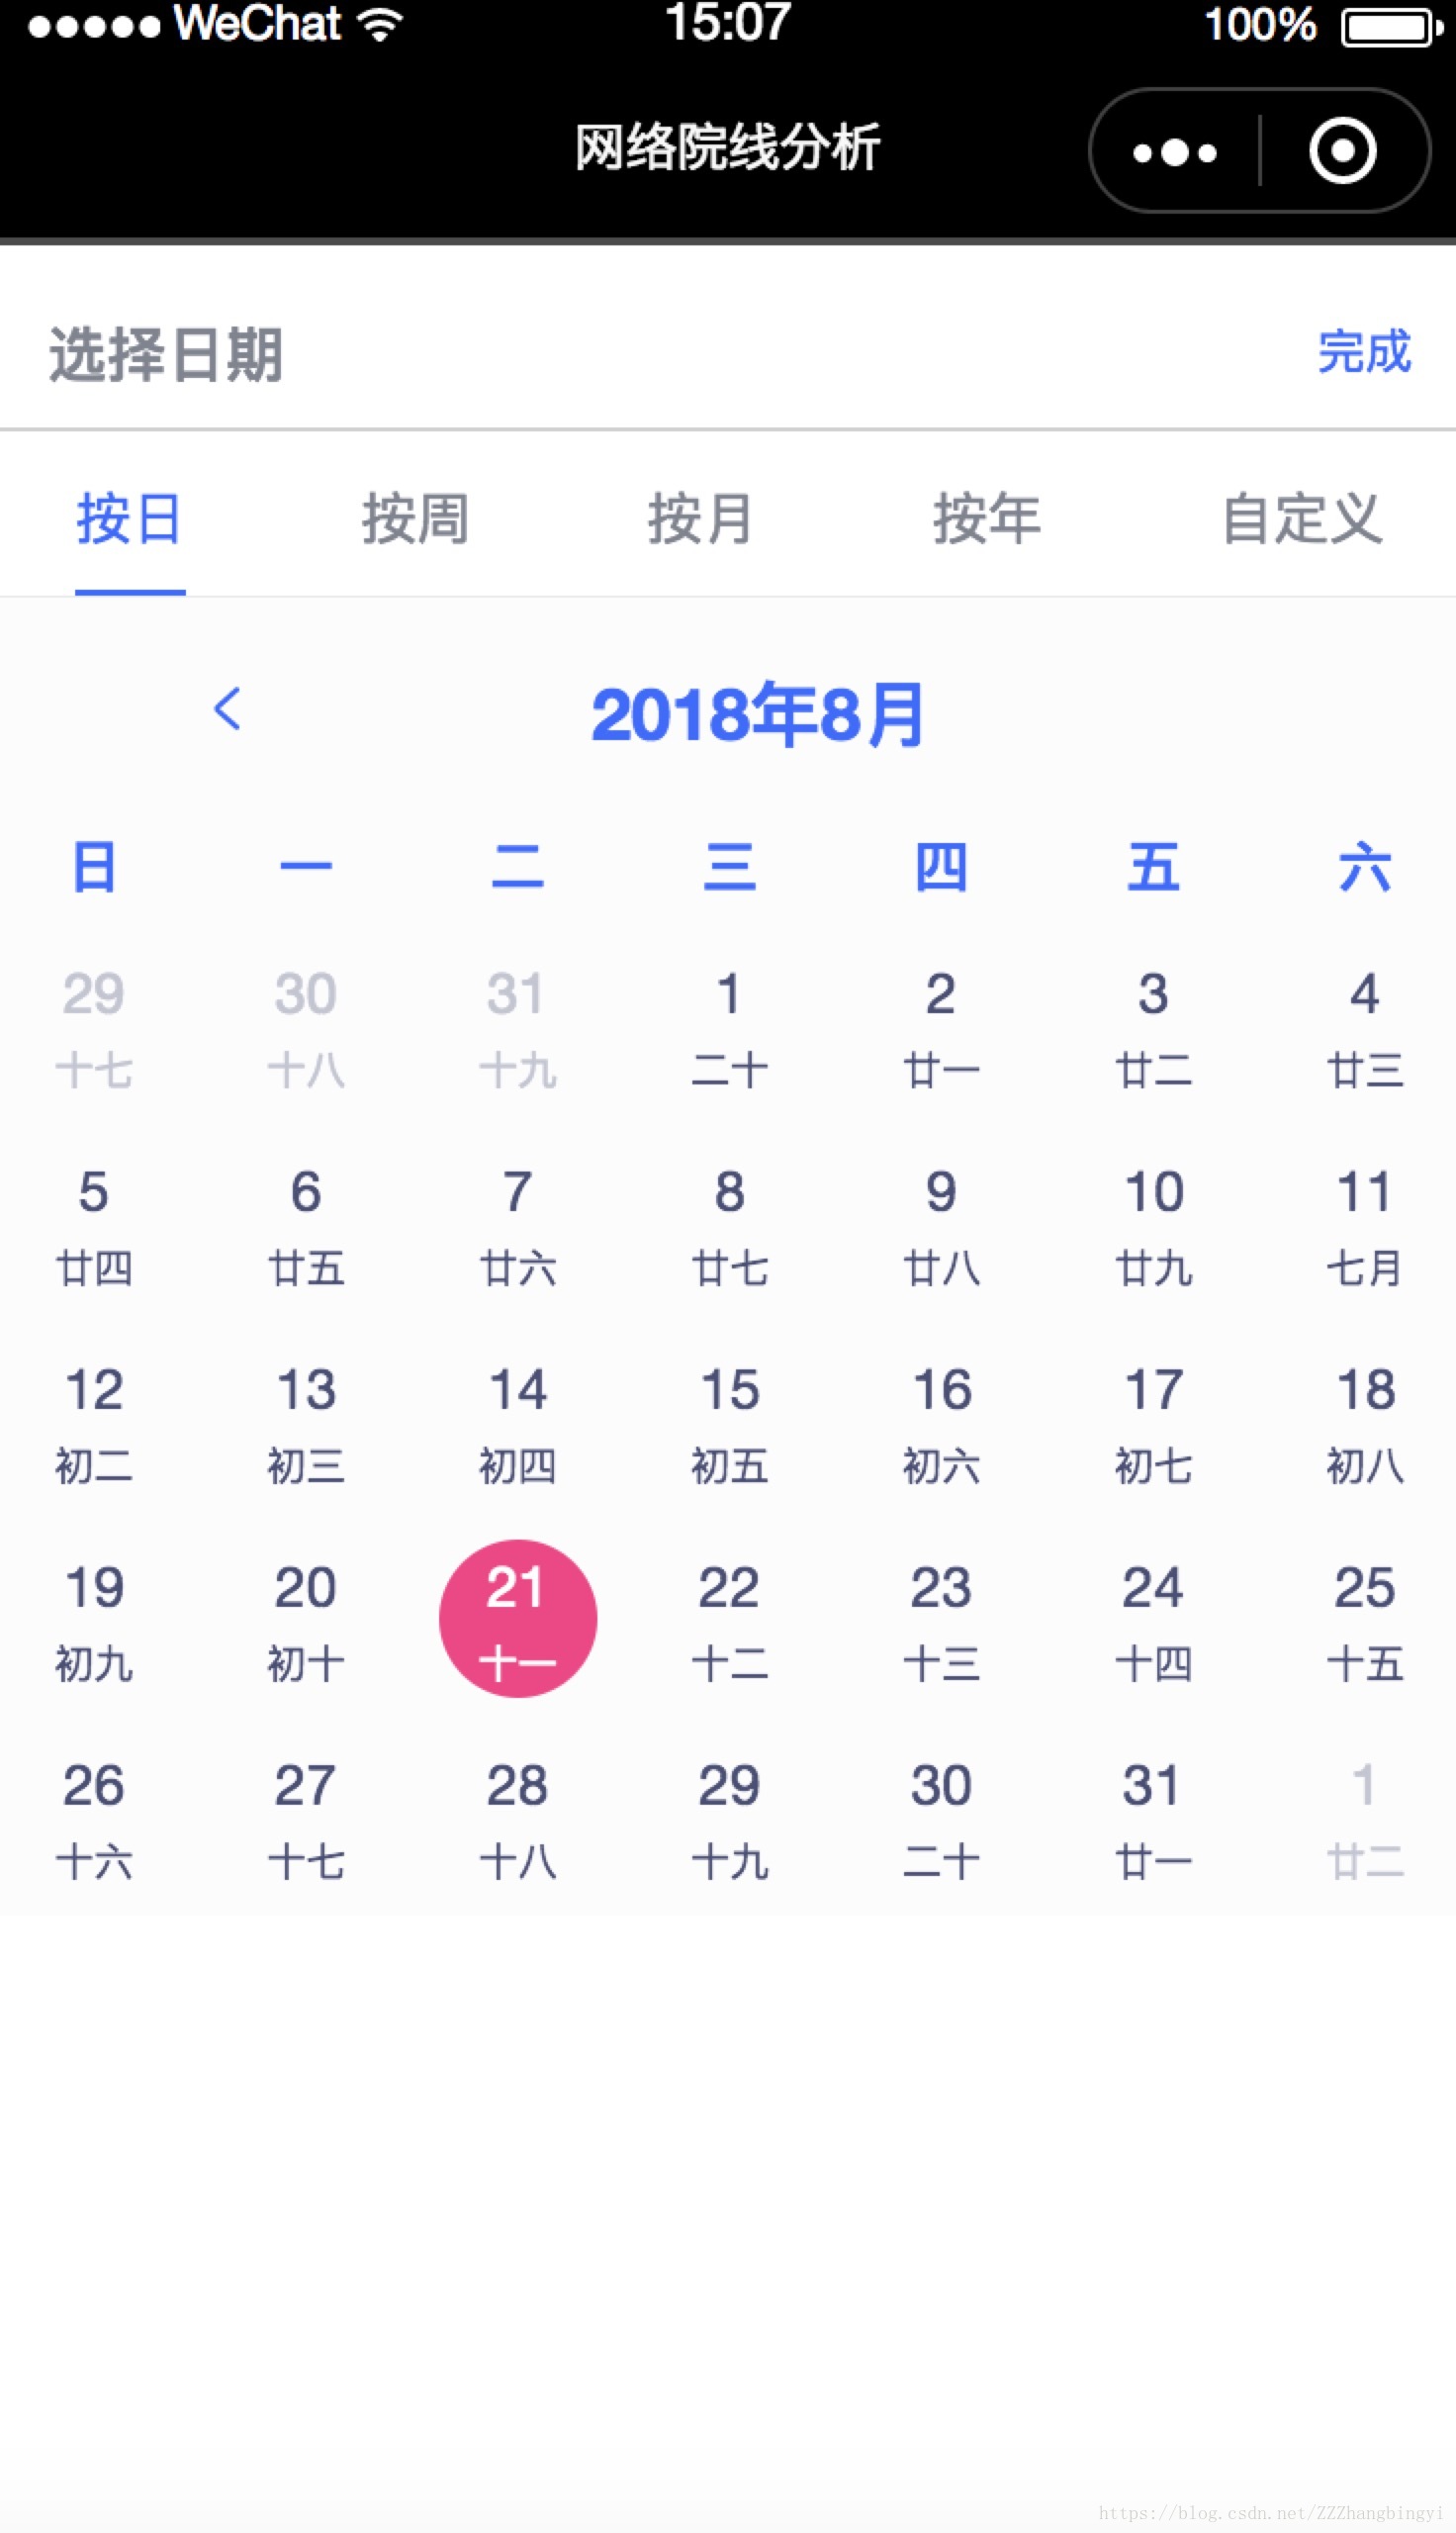

代码如下:
<style type="less">
.home {
height: 100%;
.calendar-header {
font-size: large;
color: #406BF8;
}
.calendar-board {
color: #406BF8;
}
.week_year_style {
font-size: 30 rpx;
padding: 20 rpx 15 rpx;
text-align: center;
}
.week_selectyear_style {
background-color: #fff;
color: #406BF8;
}
.calendar {
background-color: #fcfcfc;
//padding-top: 10px;
}
}
</style>
<template>
<view class="home page">
<i-tabs current="{{ currentTab }}" color="#406BF8" bindchange="handleChangeTab">
<i-tab key="按日" title="按日"></i-tab>
<i-tab key="按周" title="按周"></i-tab>
<i-tab key="按月" title="按月"></i-tab>
<i-tab key="按年" title="按年"></i-tab>
<i-tab key="自定义" title="自定义"></i-tab>
</i-tabs>
<view hidden="{{currentTab != '按日'}}" style="margin-top: 30rpx">
<calendar cell-size="40"
show-more-days="true"
lunar="true"
weeks-type="cn"
calendar-style="calendar"
header-style="calendar-header"
board-style="calendar-board"
days-color="{{days_style}}"
start-date="2017-01"
end-date="2018-08"
binddayClick="dayClick"
bindnextMonth="next"
bindprevMonth="prev"
/>
</view>
<view hidden="{{currentTab != '按周'}}">
<view style="display: flex">
<view style="width: 160rpx;background-color: #f6f6f6;border-right: 1rpx solid #e6e6e6">
<block wx:for="{{yearArray}}" wx:for-item="item" wx:key="item">
<view class="week_year_style {{weeksYears==item?'week_selectyear_style':''}}"
bindtap='changeWeekYear({{item}})'>{{item + '年'}}
</view>
</block>
</view>
<scroll-view scroll-y style="height: 600px;">
<i-cell-group>
<block wx:for="{{weeksArray[weeksYears]}}" wx:for-item="category" wx:key="category">
<i-cell title="{{category.weeks}}" bindtap="handleWeeksChange('{{index}}')">
<i-icon wx:if="{{category.select}}" type="right" size="20" color="#406BF8"
slot="footer"/>
</i-cell>
</block>
</i-cell-group>
</scroll-view>
</view>
</view>
<view hidden="{{currentTab != '按月'}}">
<view style="display: flex">
<view style="width: 160rpx;background-color: #f6f6f6;border-right: 1rpx solid #e6e6e6">
<block wx:for="{{yearArray}}" wx:for-item="item" wx:key="item">
<view class="week_year_style {{monthYear==item?'week_selectyear_style':''}}"
bindtap='changeMonthYear({{item}})'>{{item + '年'}}
</view>
</block>
</view>
<scroll-view scroll-y style="height: 600px;">
<i-cell-group>
<block wx:for="{{monthYear==year?currentMonthArray:fullMonthArray}}" wx:for-item="category"
wx:key="*this">
<i-cell title="{{category+'月'}}" bindtap="handleMonthChange('{{category}}')">
<i-icon wx:if="{{category==selectMonth}}" type="right" size="20" color="#406BF8"
slot="footer"/>
</i-cell>
</block>
</i-cell-group>
</scroll-view>
</view>
</view>
<view hidden="{{currentTab != '按年'}}">
<i-cell-group>
<block wx:for="{{yearArray}}" wx:for-item="category" wx:key="category">
<i-cell title="{{category+'年'}}" bindtap="handleYearChange('{{category}}')">
<i-icon wx:if="{{category==selectYear }}" type="right" size="20" color="#406BF8" slot="footer"/>
</i-cell>
</block>
</i-cell-group>
</view>
<view hidden="{{currentTab != '自定义'}}" style="margin-top: 30rpx">
<calendar cell-size="40"
show-more-days="true"
lunar="true"
weeks-type="cn"
calendar-style="calendar"
header-style="calendar-header"
board-style="calendar-board"
days-color="{{define_days_style}}"
start-date="2017-01"
end-date="2018-08"
binddayClick="dayClick_define"
bindnextMonth="next_define"
bindprevMonth="prev_define"
/>
</view>
</view>
</template>
<script>
import wepy from 'wepy';
const MONTHS = ['Jan.', 'Feb.', 'Mar.', 'Apr.', 'May.', 'June.', 'July.', 'Aug.', 'Sept.', 'Oct.', 'Nov.', 'Dec.'];
export default class TabsContent extends wepy.component {
props = {
openDateModal: {
type: Boolean,
default: false,
twoWay: true
},
dateSelect: {
type: String,
default: '',
twoWay: true
},
dateFilter: {
type: String,
default: '',
twoWay: true
},
filterWeekArray: {
type: String,
default: '',
twoWay: true
},
filterWeekSelect: {
type: String,
default: '',
twoWay: true
}
};
data = {
currentTab: '按日', //Tabs页切换
year: new Date().getFullYear(), // 年份
month: new Date().getMonth() + 1, // 月份
day: new Date().getDate(),
str: MONTHS[new Date().getMonth()], // 月份字符串
days_style: [{month: 'current', day: new Date().getDate(), color: '#fff', background: '#eb4986'}], //按日选中日期样式
selectDate: [], //按日选择的日期
yearArray: [], //从2017年起至今
weeksYears: new Date().getFullYear(), //按周选择了哪一年
weeksArray: {}, //从2017年起至今的所有周
selectWeekArray: [], //选择的周
fullMonthArray: [12, 11, 10, 9, 8, 7, 6, 5, 4, 3, 2, 1],
currentMonthArray: [], //今年过了几个月
monthYear: new Date().getFullYear(), //按月选择了哪一年
selectMonth: 0, //按月选择了哪一月
selectYear: 0, //按年选择了哪一年
define_days_style: [{month: 'current', day: new Date().getDate(), color: '#fff', background: '#eb4986'}], //自定义日期格式
selectDate_define: []
};
methods = {
handleChangeTab({detail}) {
this.currentTab = detail.key
this.dateFilter = this.currentTab
},
dayClick: function (event) {
let style = (event.detail.year == this.year && event.detail.month == this.month) ?
[{month: 'current', day: new Date().getDate(), color: '#fff', background: '#eb4986'},
{month: 'current', day: event.detail.day, color: '#fff', background: '#406BF8'}] :
[{month: 'current', day: event.detail.day, color: '#fff', background: '#406BF8'}]
this.days_style = style
this.selectDate = [event.detail.year, event.detail.month, event.detail.day]
this.openDateModal = false
this.dateFilter = this.currentTab
this.dateSelect = [event.detail.year, event.detail.month, event.detail.day]
},
next: function (event) {
if (event.detail.currentYear == this.year && event.detail.currentMonth == this.month)
this.days_style = [{
month: 'current',
day: new Date().getDate(),
color: '#fff',
background: '#eb4986'
}]
else this.days_style = [vent.detail.year, event.detail.month, event.detail.day]
},
prev: function (event) {
this.days_style = []
},
changeWeekYear(year) {
this.weeksYears = year
},
handleWeeksChange(weekIndex) {
this.weeksArray[this.weeksYears][weekIndex].select = !this.weeksArray[this.weeksYears][weekIndex].select
if (this.selectWeekArray[this.weeksYears]) {
let bool = this.selectWeekArray[this.weeksYears].some(index => index == weekIndex)
if (bool) { //真 已存在 delete
//if(this.selectWeekArray[this.weeksYears].length>1)
this.selectWeekArray[this.weeksYears].remove(weekIndex)
} else { //假 push
this.selectWeekArray[this.weeksYears].push(weekIndex)
this.selectWeekArray[this.weeksYears].sort()
}
} else {
let temp = {}
temp[this.weeksYears] = []
let a = [weekIndex]
temp[this.weeksYears] = a
this.selectWeekArray = temp
}
this.filterWeekSelect = this.selectWeekArray //回调到父级页面
},
changeMonthYear(year) {
this.monthYear = year
},
handleMonthChange(month) {
this.selectMonth = month
this.openDateModal = false
this.dateFilter = this.currentTab
this.dateSelect = [this.monthYear, this.selectMonth]
},
handleYearChange(year) {
this.selectYear = year
this.openDateModal = false
this.dateFilter = this.currentTab
this.dateSelect = [year]
},
dayClick_define: function (event) {
let style = []
if (this.selectDate_define.length == 0) { //第一次点击
this.selectDate_define.push([event.detail.year, event.detail.month, event.detail.day])
if (event.detail.year == this.year && event.detail.month == this.mounth) {
style = [{month: 'current', day: new Date().getDate(), color: '#fff', background: '#eb4986'},
{month: 'current', day: event.detail.day, color: '#fff', background: '#406BF8'}]
}
this.define_days_style = style
} else if (this.selectDate_define.length == 1) { //选中第二个日期就关闭页面
this.selectDate_define.push([event.detail.year, event.detail.month, event.detail.day])
this.define_days_style.push({
month: 'current',
day: event.detail.day,
color: '#fff',
background: '#406BF8'
})
this.openDateModal = false
this.dateFilter = this.currentTab
this.dateSelect = this.selectDate_define
} else { //重新自定义日期
this.selectDate_define = [[event.detail.year, event.detail.month, event.detail.day]]
style = [{month: 'current', day: new Date().getDate(), color: '#fff', background: '#eb4986'},
{month: 'current', day: event.detail.day, color: '#fff', background: '#406BF8'}]
this.define_days_style = style
}
},
next_define: function (event) {
if (event.detail.currentYear == this.year && event.detail.currentMonth == this.month)
this.define_days_style = [{
month: 'current',
day: new Date().getDate(),
color: '#fff',
background: '#eb4986'
}]
else this.define_days_style = [event.detail.year, event.detail.month, event.detail.day]
},
prev_define: function (event) {
this.define_days_style = []
},
};
onLoad() {
let currentYear = new Date().getFullYear()
let currentMonth = new Date().getMonth() + 1
for (var i = currentYear; i >= 2017; i--) {
this.yearArray.push(i)
}
for (var i = currentMonth; i >= 1; i--) {
this.currentMonthArray.push(i)
}
let weeksArray = {} //计算2017年至今的所有周
for (var i = 0; i <= this.yearArray.length; i++) {
let index = 1;
let temp = []
if (i == 0) { //今年
for (let i of createWeeks(this.yearArray[i])) {
let start = i[0],
end = i[1];
if (end <= new Date().getTime() || (start <= new Date().getTime() && end >= new Date().getTime())) {
let a = start <= new Date().getTime() && end >= new Date().getTime() ?
'第' + formatDig(index++) + '周(' + formatDate(start) + '日-' + formatDate(end) + '日)' + ' 本周' :
'第' + formatDig(index++) + '周(' + formatDate(start) + '日-' + formatDate(end) + '日)'
temp.push({'weeks': a, 'select': false})
}
}
} else {
for (let i of createWeeks(this.yearArray[i])) {
let start = i[0],
end = i[1];
let a = '第' + formatDig(index++) + '周(' + formatDate(start) + '日-' + formatDate(end) + '日)'
temp.push({'weeks': a, 'select': false})
}
}
if (this.yearArray[i] != undefined) {
weeksArray[this.yearArray[i]] = temp.reverse();
}
}
this.weeksArray = weeksArray
this.filterWeekArray = weeksArray
}
}
function formatDig(num) {
//return num>9?''+num:'0'+num;
return num;
}
function formatDate(mill) {
var y = new Date(mill);
let raws = [
//y.getFullYear(),
formatDig(y.getMonth() + 1),
formatDig(y.getDate()),
//y.getDay()||7 //获取星期几
];
//let format=['年','月','日 星期'];
let format = ['月', '日'];
return String.raw({raw: raws}, ...format);
}
function* createWeeks(year) {
const ONE_DAY = 24 * 3600 * 1000;
let start = new Date(year, 0, 1),
end = new Date(year, 11, 31);
let firstDay = start.getDay() || 7,
lastDay = end.getDay() || 7;
let startTime = +start,
endTime = startTime + (7 - firstDay) * ONE_DAY,
_endTime = end - (7 - lastDay) * ONE_DAY;
yield [startTime, endTime];
startTime = endTime + ONE_DAY;
endTime = endTime + 7 * ONE_DAY;
while (endTime < _endTime) {
yield [startTime, endTime];
startTime = endTime + ONE_DAY;
endTime = endTime + 7 * ONE_DAY;
}
yield [startTime, +end];
}
Array.prototype.remove = function (val) {
var index = this.indexOf(val);
if (index > -1) {
this.splice(index, 1);
}
};
</script>相关推荐:
The above is the detailed content of WeChat applet example: code to implement custom date control. For more information, please follow other related articles on the PHP Chinese website!

Hot AI Tools

Undresser.AI Undress
AI-powered app for creating realistic nude photos

AI Clothes Remover
Online AI tool for removing clothes from photos.

Undress AI Tool
Undress images for free

Clothoff.io
AI clothes remover

Video Face Swap
Swap faces in any video effortlessly with our completely free AI face swap tool!

Hot Article
Hot Tools

Notepad++7.3.1
Easy-to-use and free code editor

SublimeText3 Chinese version
Chinese version, very easy to use

Zend Studio 13.0.1
Powerful PHP integrated development environment

Dreamweaver CS6
Visual web development tools

SublimeText3 Mac version
God-level code editing software (SublimeText3)
Hot Topics
 1386
1386
 52
52

 Develop WeChat applet using Python
Jun 17, 2023 pm 06:34 PM
Develop WeChat applet using Python
Jun 17, 2023 pm 06:34 PM
With the popularity of mobile Internet technology and smartphones, WeChat has become an indispensable application in people's lives. WeChat mini programs allow people to directly use mini programs to solve some simple needs without downloading and installing applications. This article will introduce how to use Python to develop WeChat applet. 1. Preparation Before using Python to develop WeChat applet, you need to install the relevant Python library. It is recommended to use the two libraries wxpy and itchat here. wxpy is a WeChat machine
 Can small programs use react?
Dec 29, 2022 am 11:06 AM
Can small programs use react?
Dec 29, 2022 am 11:06 AM
Mini programs can use react. How to use it: 1. Implement a renderer based on "react-reconciler" and generate a DSL; 2. Create a mini program component to parse and render DSL; 3. Install npm and execute the developer Build npm in the tool; 4. Introduce the package into your own page, and then use the API to complete the development.
 Implement card flipping effects in WeChat mini programs
Nov 21, 2023 am 10:55 AM
Implement card flipping effects in WeChat mini programs
Nov 21, 2023 am 10:55 AM
Implementing card flipping effects in WeChat mini programs In WeChat mini programs, implementing card flipping effects is a common animation effect that can improve user experience and the attractiveness of interface interactions. The following will introduce in detail how to implement the special effect of card flipping in the WeChat applet and provide relevant code examples. First, you need to define two card elements in the page layout file of the mini program, one for displaying the front content and one for displaying the back content. The specific sample code is as follows: <!--index.wxml-->&l
 Alipay launched the 'Chinese Character Picking-Rare Characters' mini program to collect and supplement the rare character library
Oct 31, 2023 pm 09:25 PM
Alipay launched the 'Chinese Character Picking-Rare Characters' mini program to collect and supplement the rare character library
Oct 31, 2023 pm 09:25 PM
According to news from this site on October 31, on May 27 this year, Ant Group announced the launch of the "Chinese Character Picking Project", and recently ushered in new progress: Alipay launched the "Chinese Character Picking-Uncommon Characters" mini program to collect collections from the society Rare characters supplement the rare character library and provide different input experiences for rare characters to help improve the rare character input method in Alipay. Currently, users can enter the "Uncommon Characters" applet by searching for keywords such as "Chinese character pick-up" and "rare characters". In the mini program, users can submit pictures of rare characters that have not been recognized and entered by the system. After confirmation, Alipay engineers will make additional entries into the font library. This website noticed that users can also experience the latest word-splitting input method in the mini program. This input method is designed for rare words with unclear pronunciation. User dismantling
 How uniapp achieves rapid conversion between mini programs and H5
Oct 20, 2023 pm 02:12 PM
How uniapp achieves rapid conversion between mini programs and H5
Oct 20, 2023 pm 02:12 PM
How uniapp can achieve rapid conversion between mini programs and H5 requires specific code examples. In recent years, with the development of the mobile Internet and the popularity of smartphones, mini programs and H5 have become indispensable application forms. As a cross-platform development framework, uniapp can quickly realize the conversion between small programs and H5 based on a set of codes, greatly improving development efficiency. This article will introduce how uniapp can achieve rapid conversion between mini programs and H5, and give specific code examples. 1. Introduction to uniapp unia
 Tutorial on writing a simple chat program in Python
May 08, 2023 pm 06:37 PM
Tutorial on writing a simple chat program in Python
May 08, 2023 pm 06:37 PM
Implementation idea: Establishing the server side of thread, so as to process the various functions of the chat room. The establishment of the x02 client is much simpler than the server. The function of the client is only to send and receive messages, and to enter specific characters according to specific rules. To achieve the use of different functions, therefore, on the client side, you only need to use two threads, one is dedicated to receiving messages, and the other is dedicated to sending messages. As for why not use one, that is because, only
 How to operate mini program registration
Sep 13, 2023 pm 04:36 PM
How to operate mini program registration
Sep 13, 2023 pm 04:36 PM
Mini program registration operation steps: 1. Prepare copies of personal ID cards, corporate business licenses, legal person ID cards and other filing materials; 2. Log in to the mini program management background; 3. Enter the mini program settings page; 4. Select " "Basic Settings"; 5. Fill in the filing information; 6. Upload the filing materials; 7. Submit the filing application; 8. Wait for the review results. If the filing is not passed, make modifications based on the reasons and resubmit the filing application; 9. The follow-up operations for the filing are Can.
 How to get membership in WeChat mini program
May 07, 2024 am 10:24 AM
How to get membership in WeChat mini program
May 07, 2024 am 10:24 AM
1. Open the WeChat mini program and enter the corresponding mini program page. 2. Find the member-related entrance on the mini program page. Usually the member entrance is in the bottom navigation bar or personal center. 3. Click the membership portal to enter the membership application page. 4. On the membership application page, fill in relevant information, such as mobile phone number, name, etc. After completing the information, submit the application. 5. The mini program will review the membership application. After passing the review, the user can become a member of the WeChat mini program. 6. As a member, users will enjoy more membership rights, such as points, coupons, member-exclusive activities, etc.
