Follow me in PS Day 01: How to extract the seal from the document
Learn PS from me
##Day 01: How to extract the seal from the document
I don’t know if you have I don’t have this feeling. Every time I send documents such as contracts or drawings to others, I need to stamp them. This is very troublesome and cumbersome. Just imagine, if we use photoshop to cut out the official seal and print it directly on the document. It will be very convenient. Let the editor tell you how to extract the official seal from a document in photoshop. Let’s learn together.
First we find a piece of material on the Internet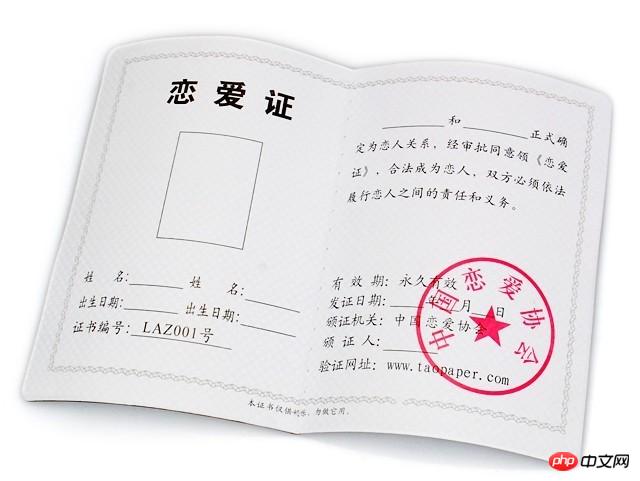
1. Open this picture in PS, Ctrl J Duplicate this layer to get layer 1
2. In layer 1, select "Select—Color Range"
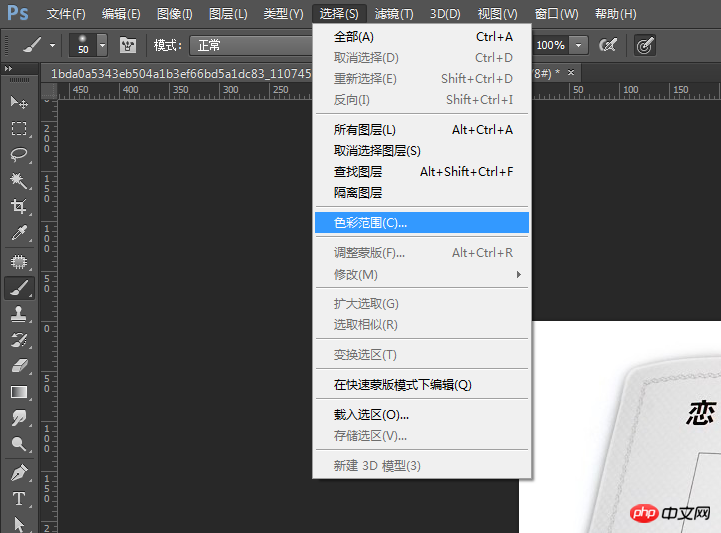
Then, a straw-style instruction appears in the pop-up box, click on the stamp area, absorb the color from the stamp, and set the following parameters
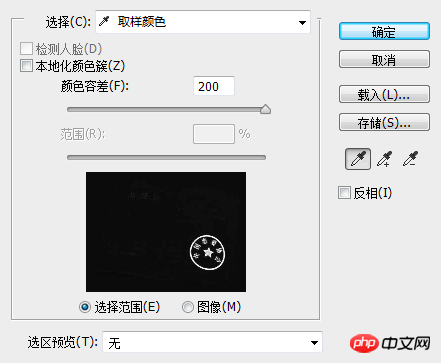
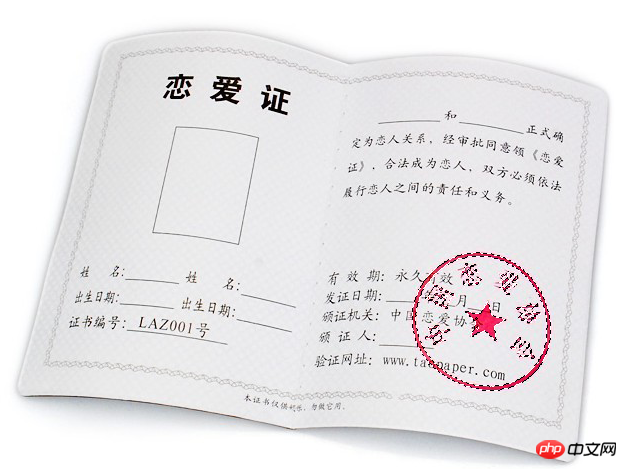
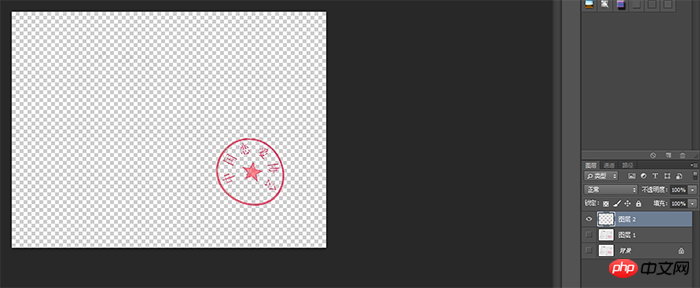
After getting the prototype , it may not be very clear, then you can continue to make multiple copies, and then ctrl E to merge the layers, or Ctrl J to copy the layers, so as to get a clear seal
The above is the detailed content of Follow me in PS Day 01: How to extract the seal from the document. For more information, please follow other related articles on the PHP Chinese website!

Hot AI Tools

Undresser.AI Undress
AI-powered app for creating realistic nude photos

AI Clothes Remover
Online AI tool for removing clothes from photos.

Undress AI Tool
Undress images for free

Clothoff.io
AI clothes remover

Video Face Swap
Swap faces in any video effortlessly with our completely free AI face swap tool!

Hot Article

Hot Tools

Notepad++7.3.1
Easy-to-use and free code editor

SublimeText3 Chinese version
Chinese version, very easy to use

Zend Studio 13.0.1
Powerful PHP integrated development environment

Dreamweaver CS6
Visual web development tools

SublimeText3 Mac version
God-level code editing software (SublimeText3)

Hot Topics
 1386
1386
 52
52
 How do you cut out a picture and put it in another picture in Meitu Xiuxiu? Meitu Xiu Xiu's tutorial on placing the cut picture on another picture!
Mar 15, 2024 pm 11:00 PM
1. How to cut out the beautiful picture Xiu Xiu and put it in another picture? Meitu Xiu Xiu’s tutorial on placing the cut picture on another picture! 1. Open the MeituXiuXiu app and click on the picture beautification function. 2. Open the photo album and select the picture you want to cut out. 3. Click the cutout button in the bottom navigation bar. 4. Select the area to cut out. 5. After cutting out the image, click the replace background icon. 6. Finally, click to import another picture, and the cut out picture can be placed on another picture.
 ps serial number cs5 permanently free 2020
Jul 13, 2023 am 10:06 AM
PS serial numbers cs5 permanent free 2020 include: 1. 1330-1384-7388-4265-2355-8589 (Chinese); 2. 1330-1409-7892-5799-0412-7680 (Chinese); 3. 1330-1616-1993 -8375-9492-6951 (Chinese); 4. 1330-1971-2669-5043-0398-7801 (Chinese), etc.
 How to put the cut out picture onto another picture in Xingtu? How to put the cut out picture on another picture!
Mar 15, 2024 pm 06:52 PM
1. How to put the cut out picture on another picture? How to put the cut out picture on another picture! 1. Open the Xingtu app, click Import, and import the picture you want to change. 2. Then click Import Picture under the picture and select the picture you want to cut out. 3. Then you can select an area to cut out, and you can also choose smart cutout for characters. 4. Adjust the size and position of the cut out picture. 5. Finally, click Merge Layers in the upper right corner to put the cut out picture on another picture.
 What to do if ps installation cannot write registry value error 160
Mar 22, 2023 pm 02:33 PM
Solution to error 160 when ps installation cannot write registry value: 1. Check whether there is 2345 software on the computer, and if so, uninstall the software; 2. Press "Win+R" and enter "Regedit" to open the system registry, and then Find "Photoshop.exe" and delete the Photoshop item.
 Java implements authenticity identification of official contract seal: from principle to practice
Sep 06, 2023 am 10:54 AM
Java realizes the authenticity identification of the official contract seal: from principle to practice Abstract: The authenticity identification of the official contract seal has always been an important issue, especially in the digital era. With the development of technology, the authenticity identification of the official contract seal based on Java has become an effective solution. plan. This article will go from principle to practice, detailing how to use Java to identify the authenticity of the official contract seal, and give code examples. Introduction With the development of society, contracts play an important role in daily life, and the authenticity of the official contract seal is particularly important. traditional contract seal
 How to delete selected area in ps
Aug 07, 2023 pm 01:46 PM
Steps to delete the selected area in PS: 1. Open the picture you want to edit; 2. Use the appropriate tool to create a selection; 3. You can use a variety of methods to delete the content in the selection, use the "Delete" key, use the "Healing Brush Tool" , use "Content-Aware Fill", use the "Stamp Tool", etc.; 4. Use tools to repair any obvious traces or defects to make the picture look more natural; 5. After completing editing, click "File" > in the menu bar "Save" to save the editing results.
 Introduction to the process of extracting line drawings in PS
Apr 01, 2024 pm 12:51 PM
1. Open the software and import a piece of material, as shown in the picture below. 2. Then ctrl+shift+u to remove color. 3. Then press ctrl+J to copy the layer. 4. Then reverse ctrl+I, and then set the layer blending mode to Color Dodge. 5. Click Filter--Others--Minimum. 6. In the pop-up dialog box, set the radius to 2 and click OK. 7. Finally, you can see the line draft extracted.
 What should I do if the PS interface font is too small?
Dec 01, 2022 am 11:31 AM
How to fix the PS interface font that is too small: 1. Open PS, click the "Edit" button on the top menu bar of PS to expand the editing menu; 2. Click the "Preferences" button in the expanded editing menu, and then click "Interface. .." button; 3. In the interface settings, set the user interface font size to "Large", set the UI scaling to "200%" and save the settings, then restart PS to take effect.


