Before we start working, we must set up the development environment.
If Node.js® and npm are not already on your machine, please install them first.
Go to the official website of Node.js, https://nodejs.org/en/, click the download button, download the latest version, and just go to the next step to install it. The software will automatically be written into the environment variables, so you can Use the node or npm (package management tool) command directly in the cmd command window.
Please run the commands node -v and npm -v in the terminal/console window first to verify that you are running node 6.9.x and npm 3.x.x or above. Older versions may have errors, newer versions are fine.
The full name of npm is a NodeJS package management and distribution tool, which has become an unofficial release Node module (package) standards.
Since the npm installation plug-in is downloaded from a foreign server, it is greatly affected by the network, and exceptions may occur. Then the Taobao team produced a complete npmjs.org image, using cnpm instead of npm. The usage of cnpm is the same as that of nodejs npm, except that in When executing the command, change npm to cnpm.
Enter in the cmd command window and press Enter
npm install cnpm -g --registry=https://registry.npm.taobao.org
When the installation is complete, enter cnpm -v. When the version number appears, the installation is successful.
If your Internet speed is fast enough, the operation of installing cnpm is optional. The author once used cnpm to download the dependency files of an ng5 project. It had no impact during development, but an error occurred when using ng build --prod. I still don't know what the problem was. So the following operations are based on npm.
Enter the following command in cmd to install Angular CLI globally.
npm install -g @angular/cli
After that, enter ng -v. When the version number appears, the installation is successful. If the version number of Angular CLI is above 1.5, the newly created project will be Angular 5.0 version.
ng is the abbreviation of angular.
Integrated Development Environment (IDE, Integrated Development Environment) is an application used to provide a program development environment, generally including a code editor, compiler tools such as browsers, debuggers, and graphical user interfaces. It is an integrated development software service suite that integrates code writing functions, analysis functions, compilation functions, debugging functions, etc. All software or software packages (groups) with this feature can be called integrated development environments.
Angular IDE by Webclipse
intellij idea
Visual Studio Code
webstorm
Please choose an IDE that you like and are familiar with, which will improve your work efficiency. The author's IDE is webstorm.
Open a terminal window.
Run the following command to generate a new project and the skeleton code of the application:
ng new my-app
my-app is the name of the project and can be defined arbitrarily.
Please wait. It takes a lot of time to create a new project. Most of the time it is installing those npm packages, which are about more than 200M.
Enter the project directory and start the server.
cd my-app
ng serve --open
ng serve command will start the development server, listen for file changes, and rebuild the application when these files are modified.
Use the --open (or -o) parameter to automatically open the browser and access http://localhost:4200/.
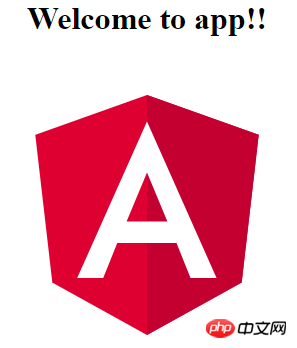
This app will greet you with a message: 
This CLI creates our first Angular component. It is the root component called app-root. You can find it in the ./src/app/app.component.ts directory.
Open this component file and change the title attribute from Welcome to app!! to Welcome to My First Angular App!!:
src/app/app.component.ts:
export class AppComponent {
  title = 'My First Angular App';
}The browser will automatically refresh, and we will see the modified title. Not bad, but it could be a little better looking.
Open src/app/app.component.css and set some styles for this component.
src/app/app.component.css:
h1 {
  color: #369;
  font-family: Arial, Helvetica, sans-serif;
  font-size: 250%;
}
Editing our first Angular component successfully!
The Angular CLI project is the basis for rapid experimentation and development of enterprise solutions.
The first file you have to look at is README.md. It provides some basic information on how to use CLI commands.
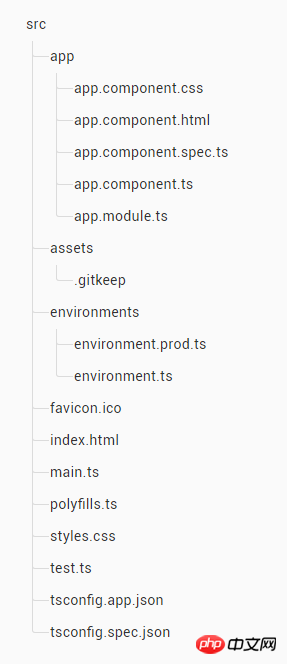
Your application code is located in the src folder. All Angular components, templates, styles, images, and anything else your app needs is there. Files outside this folder are used to provide support for building applications. 
app/app.component.{ts,html,css,spec.ts}
Define the AppComponent component using HTML templates, CSS styles and unit tests . It is the root component, and as the application grows it becomes the root node of a tree of components.
app/app.module.ts
Define AppModule. This root module will tell Angular how to assemble the application. Currently, it only declares AppComponent. It will declare more components later.
assets/*
You can put pictures and anything else in this folder. When building the application, they will all be copied to the release package.
environments/*
This folder contains files prepared for each target environment, which export some configuration variables used in the application. These files will be replaced when building the application. For example, you may use different API endpoint addresses in the production environment, or use different statistics token parameters. Even use some mock services. The CLI takes all of this into consideration for you.
favicon.ico
Every website hopes that it will look better in the bookmarks bar. Please replace it with your own icon.
index.html
This is the HTML file of the main page that others see when they visit your website. In most cases you won't need to edit it. The CLI will automatically add all js and css files when building the app, so you don't have to manually add any <script> or <link> tags here. </script>
main.ts
This is the main entry point of the application. Use the JIT compiler to compile this application and start the application's root module AppModule to run it in the browser. You can also use the AOT compiler without modifying any code - just pass the --aot parameter to ng build or ng serve.
polyfills.ts
Different browsers have different levels of support for web standards. Polyfills can help us standardize these differences. Just using core-js and zone.js is usually enough, but you can also check the browser support guide for more information.
styles.css
Here are your global styles. In most cases, you'll want to use local styles within your components for easier maintenance, but you still need to centrally store styles that affect your entire application here.
test.ts
This is the main entry point for unit testing. It has some custom configuration that you may not be familiar with, but you don't need to edit anything here.
tsconfig.{app|spec}.json
TypeScript compiler configuration file. tsconfig.app.json is prepared for Angular applications, while tsconfig.spec.json is prepared for unit testing.
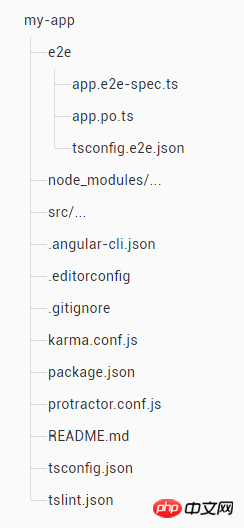
The src/ folder is one of the root folders of the project. Other files are used to help you build, test, maintain, document, and release your application. They are placed in the root directory, level with src/. 
e2e/
Under e2e/ it is an end-to-end test. They are not under src/ because end-to-end testing is actually independent of the application. It is only suitable for testing your application. That's why it has its own tsconfig.json.
node_modules/
Node.js creates this folder and places all third-party modules listed in package.json in it.
.angular-cli.json
Angular CLI configuration file. In this file, we can set a series of default values and configure which files to include when the project is compiled. To learn more, see its official documentation. (If you want to learn more, go to PHP Chinese website AngularJS Development Manual to learn)
.editorconfig
A simple configuration file for your editor to ensure participation Everyone on your project has a basic editor configuration. Most editors support .editorconfig files, see http://php.cn/course/47.html for details.
.gitignore
A Git configuration file used to ensure that certain automatically generated files will not be submitted to the source code control system.
karma.conf.js
Give Karma’s unit test configuration, which will be used when running ng test.
package.json
npm configuration file, which lists the third-party dependency packages used by the project. You can also add your own custom scripts here.
protractor.conf.js
The end-to-end test configuration file for Protractor, which will be used when running ng e2e.
README.md
The basic document of the project, with CLI command information pre-written. Don't forget to improve it with project documentation so that everyone who looks at this repository can build your app accordingly.
tsconfig.json
TypeScript compiler configuration, your IDE will use it to provide you with better help.
tslint.json
Configuration information for TSLint and Codelyzer, which will be used when running ng lint. The Lint function can help you maintain a unified code style.
Okay, this article ends here (if you want to see more, go to the PHP Chinese website AngularJS User Manual to learn). If you have any questions, you can leave a message below.
The above is the detailed content of Setting up the Angular 5.0 development environment and creating the first ng5 project. For more information, please follow other related articles on the PHP Chinese website!