 Web Front-end
 JS Tutorial
 How to make navigation in React-Native? Details of react-native navigation bar production (complete code attached)
How to make navigation in React-Native? Details of react-native navigation bar production (complete code attached)
This article mainly introduces the function of react-native navigation and how to use react to make it navigable. Then read the following article
1. Navigation functions that are indispensable for every App
We know that whether it is bottom Button switching or page jumps, they are collectively called navigation functions. With these functions, a complete App The basic skeleton will come out, and then the entire skeleton can be filled with business logic. In React-Native, Facebook has also launched navigation components. However, the performance of complex business logic is relatively poor, so the third-party The navigation component react-navigation was born, and Facebook also recommended the use of this component. It can be seen that this navigation component has superior capabilities. This component mainly includes three core functional components: TabNavigator, StackNavigator, and DrawerNavigation. The functions implemented respectively: Tab navigation, page jump , drawer effect (side sliding menu), only the first two components are recorded today.
2. The target effect to be achieved this time


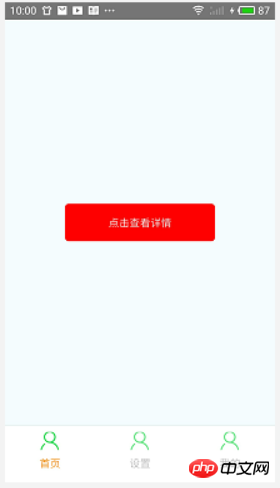
What we want to achieve this time is the two screenshots above. There are three screenshots at the bottom of the main interface. A Tab to switch the navigation of the main interface. The homepage simulation provides an entrance to the secondary page and the second screenshot effect. Next, use code to implement it.
3. Preliminary exploration of react-navigation using TabNavigator
1. Installation
Installation: npm install –save react-navigation -save
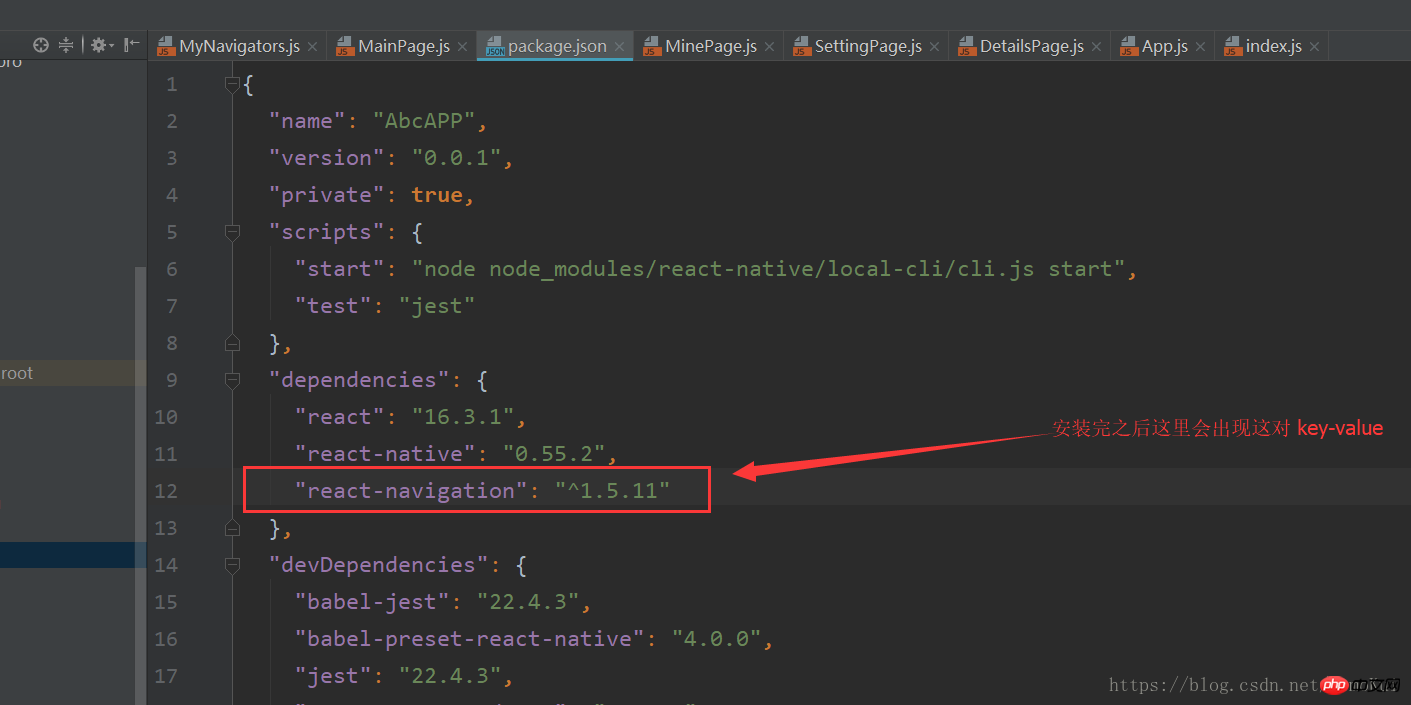
After installation, check the value corresponding to dependencies in the package.json file. There will be an additional key-value corresponding to react-navigation and version number:  You can also check react- in the node_modules folder in the root directory. navigation component package, if you have it, you can basically be sure that the installation is successful.
2. Routing configuration
Personally, I think the Tab navigation in RN is easier to operate than Android. RN configures the page switching target corresponding to each Tab by itself. Everything must be configured by yourself. After the basic framework is configured, it can be used everywhere. Let’s first conquer the bottom Tab switching function. (If you want to see more, go to the PHP Chinese website React Reference Manual column to learn)
Interface analysis:
The three Tab buttons at the bottom (implemented using TabNavigator)
Each Tab corresponds to three different pages (three pages need to be prepared)
Based on the above simple analysis, we first create three pages. I named them as: MainPage, SettingPage, and MinePage, which correspond to: Homepage, Settings, and My.
MainPage.js
import React, { Component } from 'react';
import {
AppRegistry,
StyleSheet,
Text,
Image,
View,
TouchableOpacity
} from 'react-native';
export default class MinePage extends Component {
// 此处设置 Tab 的名称和一些样式,这里的会覆盖掉配置路由文件的样式,下面会讲
static navigationOptions = {
headerTitle: '首页',
tabBarLabel: '首页',
tabBarIcon:<Image style={{height: 30, width: 30}}
source={require('./ic_tab_mine.png')}/>
};
render() { const { navigate } = this.props.navigation; return (
<View style={styles.container}>
<Text>首页界面</Text>
</View>
);
}
}const styles = StyleSheet.create({
container: {
flex: 1,
backgroundColor: '#F5FCFF',
},
});The other two pages can be deduced by analogy.
After the page is prepared, create the Tab navigation routing configuration file and name it: MyNavigators.js
import React from 'react';
import {StackNavigator, TabNavigator} from 'react-navigation';
import MainPage from '../pages/MainPage';   // 首页import SettingPage from '../pages/SettingPage';   // 设置页面import MinePage from '../pages/MinePage';          // 我的页面import DetailsPage from '../pages/DetailsPage';     // 详情页// 注册tabsconst Tabs = TabNavigator({
    Home: {
        screen: MainPage,
    },
    Set: {
        screen: SettingPage,
    },
    Me: {
        screen: MinePage,
    }
}, {
    animationEnabled: false, // 切换页面时是否有动画效果
    tabBarPosition: 'bottom', // 显示在底端,android 默认是显示在页面顶端的
    swipeEnabled: false, // 是否可以左右滑动切换tab
    backBehavior: 'none', // 按 back 键是否跳转到第一个Tab(首页), none 为不跳转
    tabBarOptions: {
        activeTintColor: '#ff8500', // 文字和图片选中颜色
        inactiveTintColor: '#999', // 文字和图片未选中颜色
        showIcon: true, // android 默认不显示 icon, 需要设置为 true 才会显示
        indicatorStyle: {
            height: 0  // 如TabBar下面显示有一条线,可以设高度为0后隐藏
        },
        style: {
            backgroundColor: '#fff', // TabBar 背景色
        },
        labelStyle: {
            fontSize: 14, // 文字大小
        },
    },
});
export default StackNavigator({
        Main: {
            screen: Tabs
        },
        DetailsPage: { // 详情页
            screen: DetailsPage
        },
    },
    {
        headerMode: 'screen',  // 标题导航
        initialRouteName: 'Main', // 默认先加载的页面组件
        mode: 'modal'       // 定义跳转风格(card、modal)
});Register TabNavigator to receive two parameters (Tab target Page, some tab styles), the target page can be imported just prepared, and the style can be defined according to needs.
Configure the page component stack routing function StackNavigator. Note that all page components in the App must be configured here, just like registering all activities in the manifest file in Android.
Note again: As a whole component, Tab should configure all corresponding pages here in the form of page components.
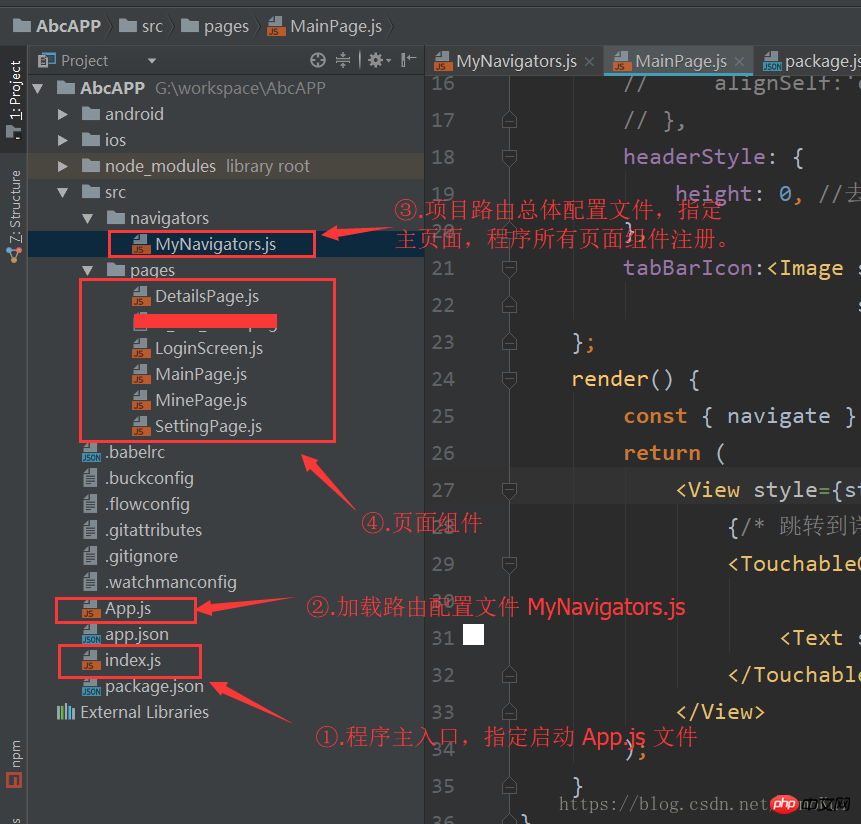
To get started, in order to improve the readability of the project code logic, I first created a separate App.js file, and then put the routing component I just created separately.
import React, {Component} from 'react';import MyNavigators from './src/navigators/MyNavigators';
export default class App extends Component {
    render() {        return (            // 路由组件
            <MyNavigators/>
        );
    }
}Modify the index.js file to load the App.js file after the program starts.
import { AppRegistry } from 'react-native';import App from './App';
AppRegistry.registerComponent('AbcAPP', () => App);Now run the program and you will see that the bottom navigation Tab has been loaded.
3. Preliminary exploration of react-navigation using StackNavigator to jump to the secondary page
As long as the component is registered in StackNavigator, it will have this attribute navigation, and there is a navigation(str,prm) in this attribute ) method, the first parameter is the name of the target component ( The name is a custom name registered in the routing configuration file, don’t confuse it with the file name) The second parameter can be passed or not. If both When two page components need to communicate, for example, when jumping with parameters, you can use the second parameter to pass the value in the format of key-value. For example, the rendering is as follows:
MainPage.js file
import React, { Component } from 'react';
import {
StyleSheet,
Text,
View,
Image,
TouchableOpacity
} from 'react-native';
export default class MainPage extends Component {
static navigationOptions = { // headerTitle:'首页',
tabBarLabel: '首页', // headerTitleStyle:{
// fontSize:18,
// fontWeight:'400',
// alignSelf:'center',
// },
headerStyle: {
height: 0, //去掉标题
},
tabBarIcon:<Image style={{height: 30, width: 30}}
source={require('./ic_tab_mine.png')}/>
};
render() { // 获取 navigate 属性
const { navigate } = this.props.navigation; return (
<View style={styles.container}> // 跳转到详情页,并传递两个数据 title、des。
<TouchableOpacity style={{width:200,height: 50, backgroundColor: 'red', borderRadius:5,justifyContent: 'center', alignItems: 'center'}}
onPress={() => navigate('DetailsPage', { title: '详情页',des:'回到上一页' })} >
<Text style={{color:"#FFF"}}>点击查看详情</Text>
</TouchableOpacity>
</View>
);
}
}const styles = StyleSheet.create({
container: {
flex: 1,
backgroundColor: '#F5FCFF',
justifyContent: 'center',
alignItems: 'center'
},
});DetailsPage.js file (remember to register the details page component in MyNavigators.js)
import React, {Component} from 'react';
import {
StyleSheet,
Text,
View,
TouchableOpacity
} from 'react-native';
export default class DetailsPage extends Component {
//接收上一个页面传过来的title显示出来
static navigationOptions = ({navigation}) => ({
headerTitle: navigation.state.params.title,
headerTitleStyle:{
fontSize:18,
fontWeight:'400',
alignSelf:'center'
},
headerStyle: {height: 65, backgroundColor: '#FFF'},
headerRight: <View><Text style={{paddingRight: 14, color: '#000', fontSize: 18}}>编辑</Text></View>,
headerBackTitle: '回去',
headerTruncatedBackTitle: '返回'
}); // 点击返回上一页方法
backFunction= () => { //返回首页方法 navigation属性中的自带的返回方法
this.props.navigation.goBack();
}
render() { return (
<View style={styles.container}>
<TouchableOpacity
style={{width:200,height: 50, backgroundColor: 'green', borderRadius:5,justifyContent: 'center', alignItems: 'center'}}
onPress={() => { this.backFunction()
}}>
<Text style={{color:"#FFF"}}>{this.props.navigation.state.params.des}</Text>
</TouchableOpacity>
</View>
);
}
}
const styles = StyleSheet.create({ container: {
flex: 1,
backgroundColor: '#F5FCFF',
alignItems:'center',
justifyContent:'center'
},
});After recording, use the above The obtained attribute values, styles, etc. can be Baidu online. Finally, the project structure directory is given:

This article ends here (if you want to see more, go to the PHP Chinese website React User Manual column to learn). If you have any questions, you can leave a message below.
The above is the detailed content of How to make navigation in React-Native? Details of react-native navigation bar production (complete code attached). For more information, please follow other related articles on the PHP Chinese website!

Hot AI Tools

Undresser.AI Undress
AI-powered app for creating realistic nude photos

AI Clothes Remover
Online AI tool for removing clothes from photos.

Undress AI Tool
Undress images for free

Clothoff.io
AI clothes remover

Video Face Swap
Swap faces in any video effortlessly with our completely free AI face swap tool!

Hot Article

Hot Tools

Notepad++7.3.1
Easy-to-use and free code editor

SublimeText3 Chinese version
Chinese version, very easy to use

Zend Studio 13.0.1
Powerful PHP integrated development environment

Dreamweaver CS6
Visual web development tools

SublimeText3 Mac version
God-level code editing software (SublimeText3)

Hot Topics
 1386
1386
 52
52
 New report delivers damning assessment of rumoured Samsung Galaxy S25, Galaxy S25 Plus and Galaxy S25 Ultra camera upgrades
Sep 12, 2024 pm 12:23 PM
In recent days, Ice Universe has been steadily revealing details about the Galaxy S25 Ultra, which is widely believed to be Samsung's next flagship smartphone. Among other things, the leaker claimed that Samsung only plans to bring one camera upgrade
 Samsung Galaxy S25 Ultra leaks in first render images with rumoured design changes revealed
Sep 11, 2024 am 06:37 AM
OnLeaks has now partnered with Android Headlines to provide a first look at the Galaxy S25 Ultra, a few days after a failed attempt to generate upwards of $4,000 from his X (formerly Twitter) followers. For context, the render images embedded below h
 IFA 2024 | TCL\'s NXTPAPER 14 won\'t match the Galaxy Tab S10 Ultra in performance, but it nearly matches it in size
Sep 07, 2024 am 06:35 AM
Alongside announcing two new smartphones, TCL has also announced a new Android tablet called the NXTPAPER 14, and its massive screen size is one of its selling points. The NXTPAPER 14 features version 3.0 of TCL's signature brand of matte LCD panels
 Vivo Y300 Pro packs 6,500 mAh battery in a slim 7.69 mm body
Sep 07, 2024 am 06:39 AM
The Vivo Y300 Pro just got fully revealed, and it's one of the slimmest mid-range Android phones with a large battery. To be exact, the smartphone is only 7.69 mm thick but features a 6,500 mAh battery. This is the same capacity as the recently launc
 Samsung Galaxy S24 FE billed to launch for less than expected in four colours and two memory options
Sep 12, 2024 pm 09:21 PM
Samsung has not offered any hints yet about when it will update its Fan Edition (FE) smartphone series. As it stands, the Galaxy S23 FE remains the company's most recent edition, having been presented at the start of October 2023. However, plenty of
 New report delivers damning assessment of rumoured Samsung Galaxy S25, Galaxy S25 Plus and Galaxy S25 Ultra camera upgrades
Sep 12, 2024 pm 12:22 PM
In recent days, Ice Universe has been steadily revealing details about the Galaxy S25 Ultra, which is widely believed to be Samsung's next flagship smartphone. Among other things, the leaker claimed that Samsung only plans to bring one camera upgrade
 Xiaomi Redmi Note 14 Pro Plus arrives as first Qualcomm Snapdragon 7s Gen 3 smartphone with Light Hunter 800 camera
Sep 27, 2024 am 06:23 AM
The Redmi Note 14 Pro Plus is now official as a direct successor to last year'sRedmi Note 13 Pro Plus(curr. $375 on Amazon). As expected, the Redmi Note 14 Pro Plus heads up the Redmi Note 14 series alongside theRedmi Note 14and Redmi Note 14 Pro. Li
 iQOO Z9 Turbo Plus: Reservations begin for the potentially beefed-up series flagship
Sep 10, 2024 am 06:45 AM
OnePlus'sister brand iQOO has a 2023-4 product cycle that might be nearlyover; nevertheless, the brand has declared that it is not done with itsZ9series just yet. Its final, and possibly highest-end,Turbo+variant has just beenannouncedas predicted. T


