This article mainly talks about a collection of some simple and practical knowledge about react. Now let’s take a look at the specific content of this article
1.1 Display of three states of component life cycle:
- Mounting: The real dom structure has been inserted
- Updating: Being re-rendered
- Unmounting: The real dom structure has been moved out
1.2 Processing function about the life cycle (will means called before entering the state, did means called after entering the state)
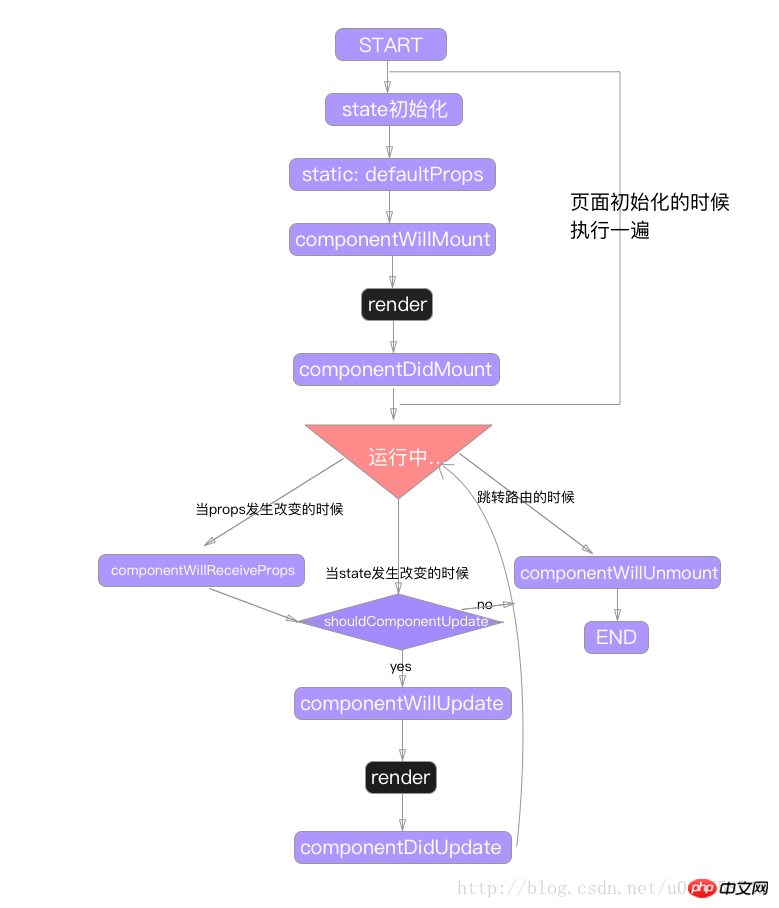
1.3 The execution sequence of the component life cycle is as shown in the figure below: 
1 In react, add a name to the dom node through ref, and then we get it through this.refs.ref name
eg:
render(){    return (
        <p ref = "demo">this is a test</p>
    )
}As shown in the above code, when we need to obtain the p tag, we can perform a series of operations through this.refs.demo, just like in native javascript through document. The same thing is obtained by getElementById;
1. The value in the controlled form component must be bound to the state attribute, and needs to be passed onChange method to change the value;
eg:
export default class Demo extends React.Component{
            constructor(props){                super(props)                this.state = {
                    testInput: ''
                }
            }
            handleInput = (e) => {
                let str = ''
                if(e.target.value.length >= 8){                    str = e.target.value.splice(0,5) + '...'
                }                this.setState({
                    testInput: str
                })
            }
            render(){                return (
                    <p>
                        <input type="text" value={ this.state.testInput } onChange={ this.handleInput }>
                    </p>
                )
            }
}static: propTypes = {
userName: React.PropTypes.bool.isRequired, //表示是必填项且是布尔类型
passWord: React.PropTypes.number //表示必须是数值类型
}More methods about attribute verification...
The props in the component mainly implement the transmission of data from the parent component to the child component
As shown in the demo below
DemoTest.js
import React,{Component} from 'react'import Test from './Test.js'export default class Demo extends Component{
    constructor(props){        super(props)        this.state={
        }
    }
    render(){        return(
            <p>
                <Test wenzi="按钮"/>
                <p>内容</p>
            </p>
        )
    }
}Test.js
import React,{Component} from 'react'export default class Demo extends Component{
    constructor(props){        super(props)        this.state={
        }
    }
    render(){        return(
            <input type="button" value={ this.props.wenzi }/>
        )
    }
}The Test component can receive the wenzi value passed in the DemoTest component (if you want to know more, go to the PHP Chinese website React Reference Manual column to learn)

Explanation: This effect can also be achieved if we use props, but in that case, it will undoubtedly be more troublesome. The code below is
import React,{Component} from 'react'class Child extends Component{
constructor(props){ super(props) this.state={
}
} static contextTypes = {
wenzi: React.PropTypes.string
}
render(){ return(
<p>
<input type="button" value={ this.context.wenzi }/>
</p>
)
}
}class Son extends Component{
constructor(props){ super(props) this.state={
}
}
render(){ return(
<p>
<Child />
</p>
)
}
}
export default class Parent extends Component{
constructor(props){ super(props) this.state={
}
}
getChildContext = () => { return{
wenzi: '测试按钮'
}
} static childContextTypes = {
wenzi: React.PropTypes.string
}
render(){ return(
<p>
<Son />
</p>
)
}
} effect achieved through context: 
react-addons-css The -transition-group component only provides the animation function of displaying and hiding the content;
Basic usage:
1. Install->import
2. Which part do you want to have the display and hide animation? Just wrap it with this component
<ReactCSSTransitionGroup    transitionName="example"
    transitionAppear={true}
    transitionEnterTimeout={500}
transitionLeaveTimeout={300}>{ items }</ReactCSSTransitionGroup>Set some display and hidden css styles according to the specified transitionName value
.example-enter{
//此处填写的是进入的样式 eg: opacity: 0;
}.example-enter.example-enter-active{
//此处填写的是进入结束的样式 eg: opacity: 1;
    transition: opacity 500ms ease-in;
}.example-leave{
//此处填写的是离开的样式 eg: opacity: 1;
}.example-leave.example-leave-active{
//此处填写的是离开结束的样式 eg: opacity: 0;
    transition: opacity 500ms ease-in;
}//注意: 下方初始化的状态还要结合transitionAppear={true}为true才可以.example-appear{    //初始化时候的状态
    opacity: 0;
}
.example-appear.example-appear-active{
//初始化结束时候的状态eg: opacity: 1;
    transition: opacity 500ms ease-in;
}Click to view more information...
Basic usage code record:
//首先是引入
import { Route,Router,browserHistory } from 'react-router'
render(){
    return(
        //这里使用了browserHistory优化了路径,路径上就不会有#了        <Router history={browserHistory}>
            <Route path="/" compontent={ AppContainer }>
                //指定默认情况下加载的子组件                <IndexRoute component={ HomeContainer }/>
                <Route path="home" component={ HomeContainer } />
                <Route path="about" component={ AboutContainer } />
                <Route path="list" component={ ListContainer }>
                    <Route path="detail" component={ DetailContainer }/>
                </Route>
            </Route>
        </Router>
    )
}Note: About the difference between browserHistory and hashHistory
1.browserHistory is not supported in lower version browsers. But hashHistory supports
2. When using browserHistory, you can’t access it by directly copying and pasting the link into a new page, but hashHistory can
3. If you use browserHistory, # will not appear on the address bar, but when you use hashHistory, it will A # sign appears
4. The browserHistory component will only be executed once during execution, while the hashHistory component will be executed twice. In this case, there may be problems with the operations of some life cycle functions
Prerequisite: Cooperation Webpack works together to achieve on-demand loading: that is, in addition to the components required for the homepage, other components are loaded only after being accessed. . .
import { Route,Router,browserHistory } from 'react-router'render(){ return( //这里使用了browserHistory优化了路径,路径上就不会有#了
<Router history={browserHistory}>
<Route path="/" compontent={ AppContainer }> //指定默认情况下加载的子组件
<IndexRoute component={ HomeContainer }/>
<Route path="home" getComponent={
(nextState,callback) => { require.ensure([],(require) => {
callback(null,require('组件路径地址').default)
},"自定义一个名字")
}
}
/>
<Route path="list" component={ ListContainer }>
<Route path="detail" component={ DetailContainer }/>
</Route>
</Route>
</Router>
)
}this.props.params.参数名
this.props.location.query.参数名
React User Manual column to learn ), if you have any questions, you can leave a message below.
The above is the detailed content of A collection of simple and practical knowledge points about React (with example code). For more information, please follow other related articles on the PHP Chinese website!