 Daily Programming
 Mysql Knowledge
 How to use phpmyadmin to add, delete, modify and check databases and data tables? (Pictures + Video)
How to use phpmyadmin to add, delete, modify and check databases and data tables? (Pictures + Video)
This article will introduce to you the relevant summary in phpmyadmin usage tutorial, which is to use phpmyadmin to perform some basic operations such as adding, deleting, modifying and checking the database and data tables.
phpmyadmin is a commonly used database manager. Newbies who want to install phpmyadmin can refer to this article [phpMyAdmin latest download and installation tutorial]. Below we will give you a detailed introduction through specific pictures and texts, phpmyadmin's relevant knowledge points for operating database data tables.
1. phpmyadmin creates a new database
Open the phpmyadmin interface, click on the database column, create a new database named mymysql, and select the character set.
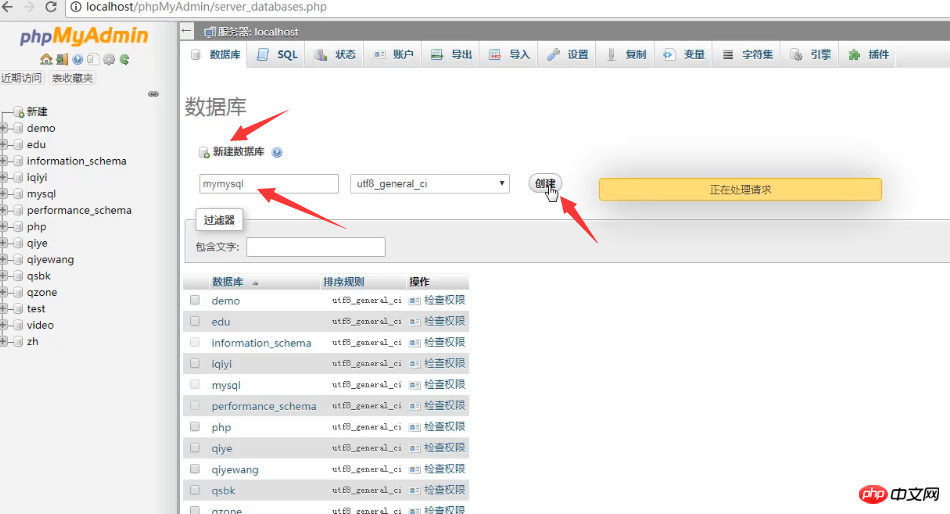
2. Rename the database
Click on the operation interface and rename the mymysql data to myhome.
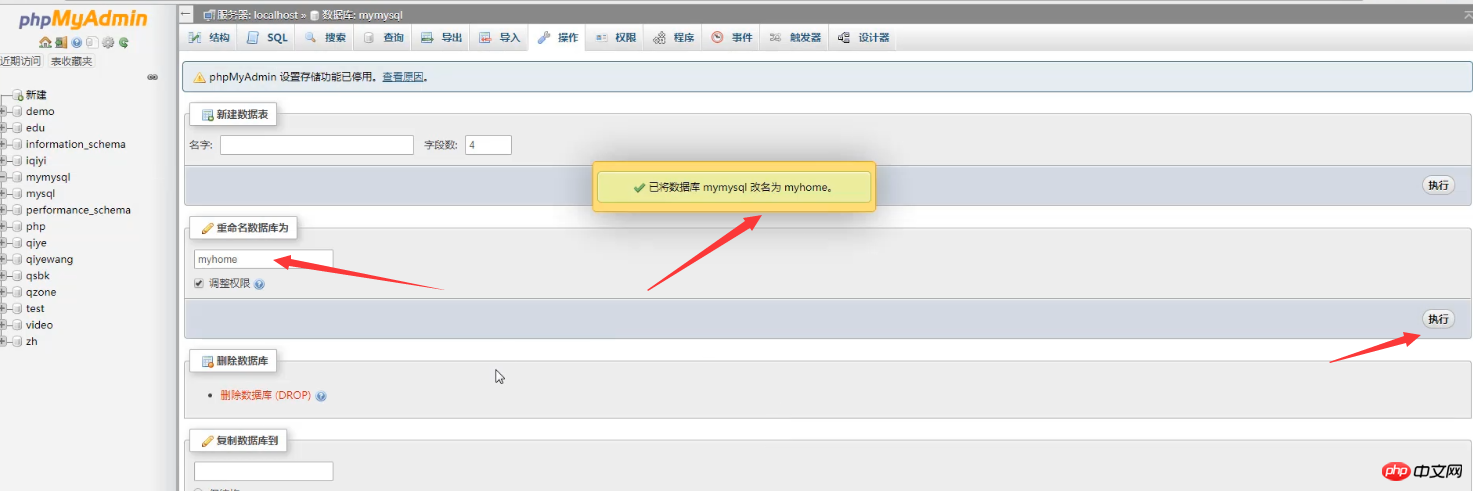
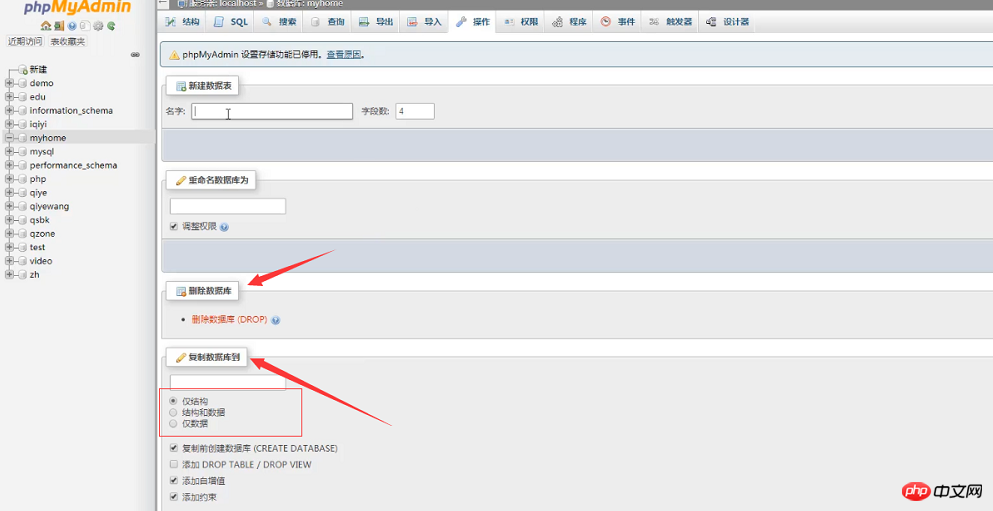
3. Delete database and copy database
In the operation interface, you can choose to delete the database or copy it When copying a database, you can choose to copy only structure, structure and data, or data only.
4. Create a new data table
Open the myhome database and create a new data table named admin.

#Then add the corresponding fields in the data table.
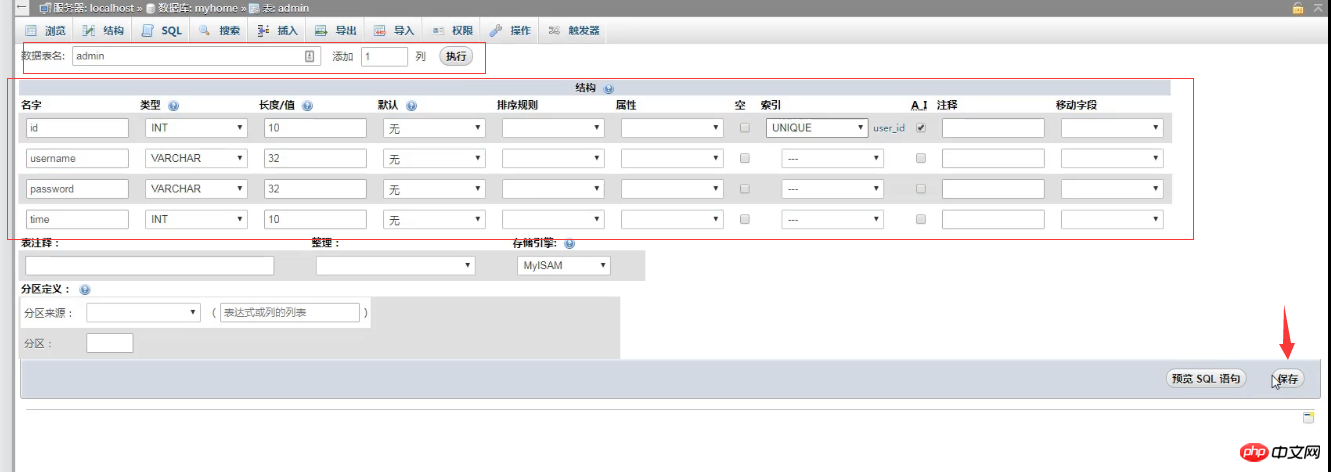
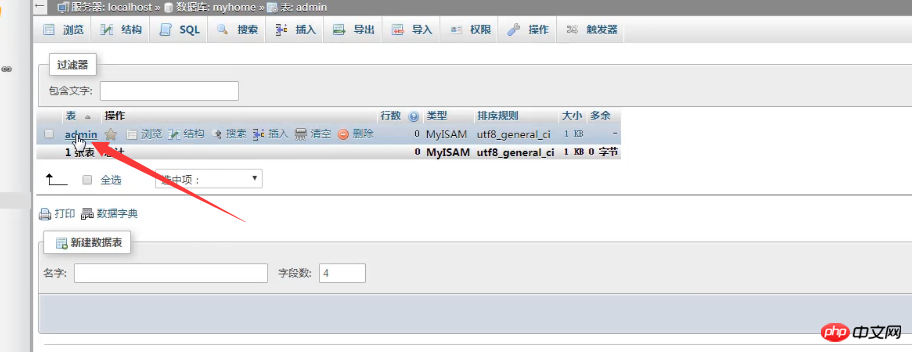
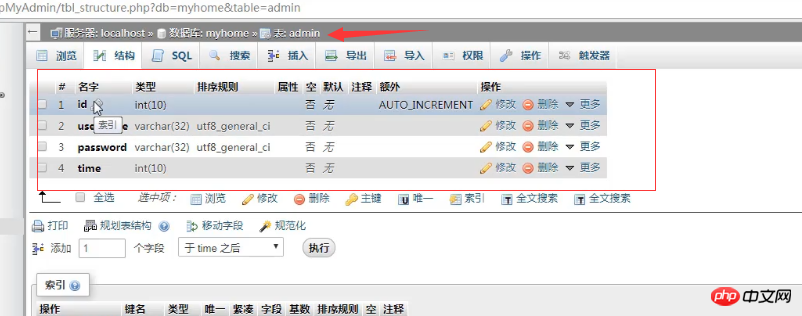
#5. Modify the data table Medium field type
In the structure, select the field to modify.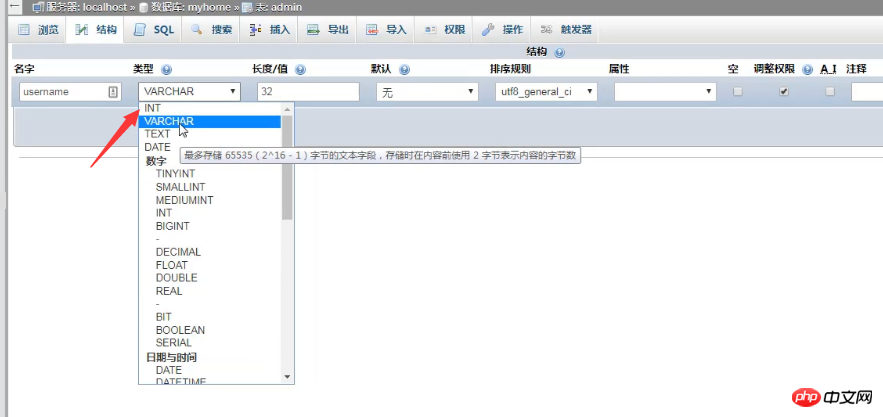
6. Move the data table
Move the data table to a specified location in the operation interface inside the database.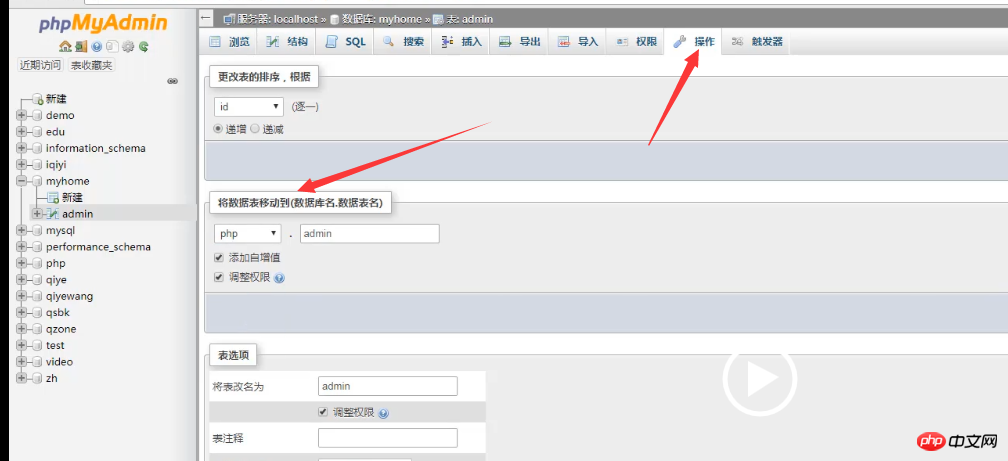
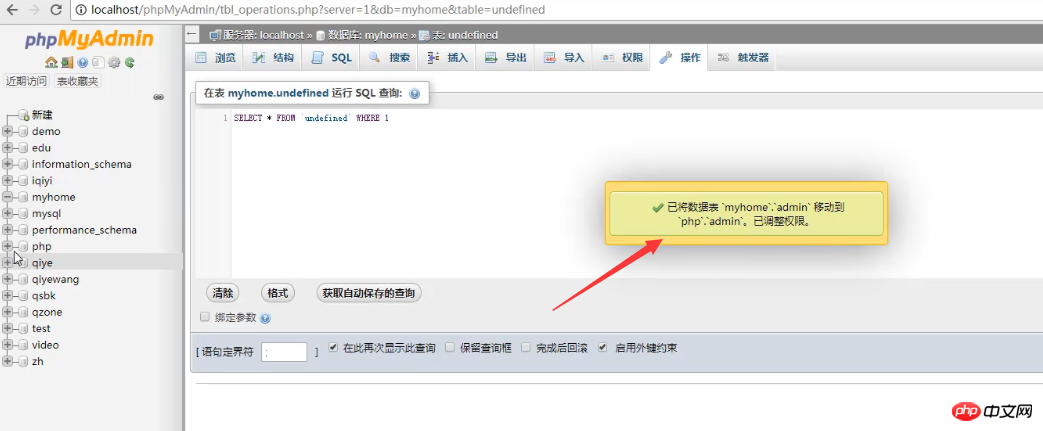
Select the data table to be deleted or copied, and click to open the operation interface. Perform operations such as deleting, clearing, and copying data tables.
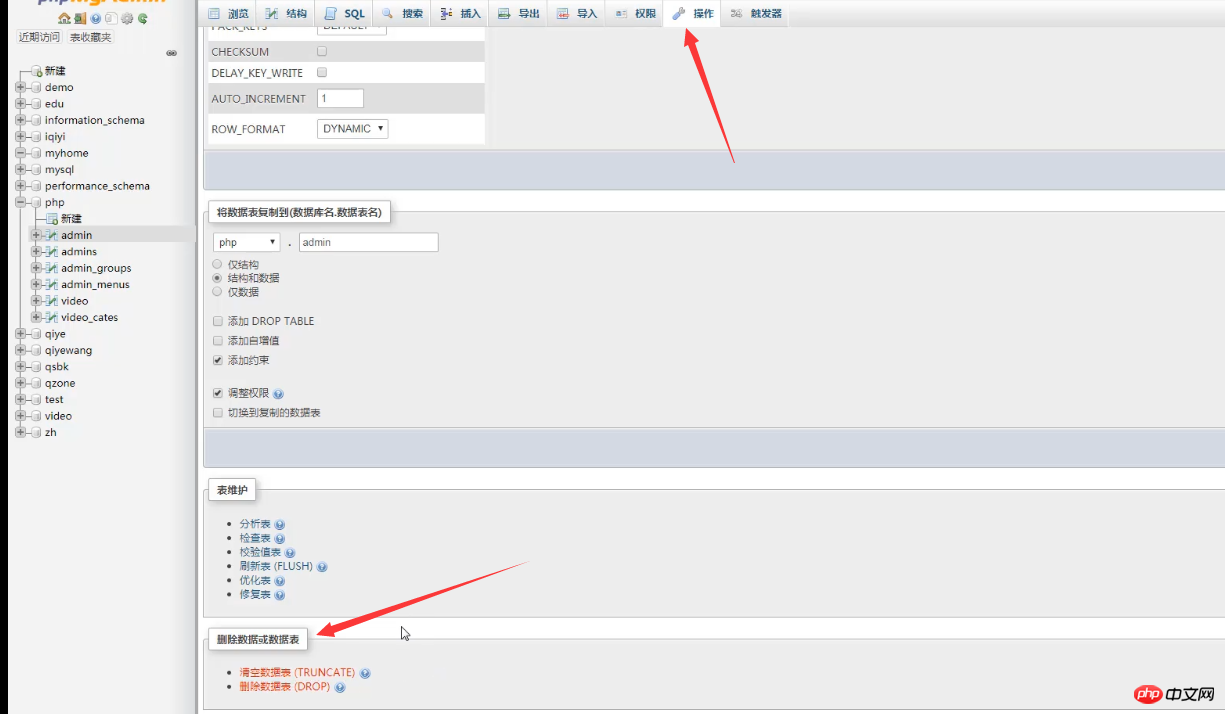
:After deleting and clearing the database or data table, it cannot be recovered, so please operate with caution. Then the above is an introduction to the
phpmyadmin usage tutorialon creating, deleting, renaming and other related operations of databases and data tables! For more related tutorials, please visit php Chinese website mysql video tutorial, welcome to refer to and learn!
The above is the detailed content of How to use phpmyadmin to add, delete, modify and check databases and data tables? (Pictures + Video). For more information, please follow other related articles on the PHP Chinese website!

Hot AI Tools

Undresser.AI Undress
AI-powered app for creating realistic nude photos

AI Clothes Remover
Online AI tool for removing clothes from photos.

Undress AI Tool
Undress images for free

Clothoff.io
AI clothes remover

AI Hentai Generator
Generate AI Hentai for free.

Hot Article

Hot Tools

Notepad++7.3.1
Easy-to-use and free code editor

SublimeText3 Chinese version
Chinese version, very easy to use

Zend Studio 13.0.1
Powerful PHP integrated development environment

Dreamweaver CS6
Visual web development tools

SublimeText3 Mac version
God-level code editing software (SublimeText3)

Hot Topics
 1382
1382
 52
52
 What are stored procedures and functions in MySQL?
Mar 20, 2025 pm 03:04 PM
The article discusses stored procedures and functions in MySQL, focusing on their definitions, performance benefits, and usage scenarios. Key differences include return values and invocation methods.
 How do you secure your MySQL server against unauthorized access?
Mar 20, 2025 pm 03:20 PM
The article discusses securing MySQL servers against unauthorized access through password management, limiting remote access, using encryption, and regular updates. It also covers monitoring and detecting suspicious activities to enhance security.
 How do you use roles to manage user permissions?
Mar 20, 2025 pm 03:19 PM
The article discusses using roles to manage user permissions efficiently, detailing role definition, permission assignment, and dynamic adjustments. It emphasizes best practices for role-based access control and how roles simplify user management acr
 How do you set passwords for user accounts in MySQL?
Mar 20, 2025 pm 03:18 PM
The article discusses methods for setting and securing MySQL user account passwords, best practices for password security, remote password changes, and ensuring compliance with password policies.
 How do you grant permissions to execute stored procedures and functions?
Mar 20, 2025 pm 03:12 PM
Article discusses granting execute permissions on stored procedures and functions, focusing on SQL commands and best practices for secure, multi-user database management.
 How do you grant privileges to a user using the GRANT statement?
Mar 20, 2025 pm 03:15 PM
The article explains the use of the GRANT statement in SQL to assign various privileges like SELECT, INSERT, and UPDATE to users or roles on specific database objects. It also covers revoking privileges with the REVOKE statement and granting privileg
 How do you use variables in stored procedures and functions?
Mar 20, 2025 pm 03:08 PM
The article discusses using variables in SQL stored procedures and functions to enhance flexibility and reusability, detailing declaration, assignment, usage, scope, and output. It also covers best practices and common pitfalls to avoid when using va
 What are the different types of privileges in MySQL?
Mar 20, 2025 pm 03:16 PM
Article discusses MySQL privileges: global, database, table, column, routine, and proxy user types. It explains granting, revoking privileges, and best practices for secure management. Over-privileging risks are highlighted.


