How does SpringBoot integrate Jsp and Thymeleaf?
The content of this article is about how SpringBoot integrates Jsp and Thymeleaf. It has certain reference value. Friends in need can refer to it. I hope it will be helpful to you.
Preface
This article mainly talks about SpringBootintegrationJsp and SpringBootintegrationThymeleaf, Implement a simple user addition, deletion, modification and query example project. To state upfront, there are three items, two integrated individually and one integrating them all together. If you need one of them, just look at the introduction of the corresponding section. If you need the project source code, you can jump directly to the bottom and download the project code through the link.
SpringBoot integrates Jsp
Development preparation
Environment requirements
JDK: 1.7 or above
SQL: MySql
Here we need to create a user table in mysql to store user information.
The database script is as follows:
CREATE TABLE `t_user` (
  `id` int(11) NOT NULL AUTO_INCREMENT COMMENT '自增id',
  `name` varchar(10) DEFAULT NULL COMMENT '姓名',
  `age` int(2) DEFAULT NULL COMMENT '年龄',
  `password` varchar(24) NOT NULL COMMENT '密码',
  PRIMARY KEY (`id`)
) ENGINE=InnoDB AUTO_INCREMENT=17 DEFAULT CHARSET=utf8
After creating the new table, we will create the project.
Our project is an ordinary web project created through maven.
After creating the project, we need to download the corresponding jar package and then carry out related development.
For these jar packages, we can just add the jars related to springBoot and Jsp in the pom.xml file.
Relevant comments are written in it, so I won’t go into details here.
Maven dependencies are as follows:
 <dependencies>
        <!-- Spring Boot Web 依赖 核心 -->
        <dependency>
            <groupId>org.springframework.boot</groupId>
            <artifactId>spring-boot-starter-web</artifactId>
        </dependency>

        <!-- Spring Boot 热部署 class文件之后会自动重启 -->
        <dependency>
            <groupId>org.springframework.boot</groupId>
            <artifactId>spring-boot-devtools</artifactId>
            <optional>true</optional>
        </dependency>
        <!-- Spring Boot Test 依赖 -->
        <dependency>
            <groupId>org.springframework.boot</groupId>
            <artifactId>spring-boot-starter-test</artifactId>
            <scope>test</scope>
        </dependency>

        <!-- Spring Boot JPA -->
        <dependency>
            <groupId>org.springframework.boot</groupId>
            <artifactId>spring-boot-starter-data-jpa</artifactId>
        </dependency>

          <!-- Spring Boot Mybatis 依赖 -->
        <dependency>
            <groupId>org.mybatis.spring.boot</groupId>
            <artifactId>mybatis-spring-boot-starter</artifactId>
            <version>${mybatis-spring-boot}</version>
        </dependency>

        <dependency>
            <groupId>mysql</groupId>
            <artifactId>mysql-connector-java</artifactId>
        </dependency>

        <!--fastjson 相关jar -->
        <dependency>
            <groupId>com.alibaba</groupId>
            <artifactId>fastjson</artifactId>
            <version>${fastjson}</version>
        </dependency>

                <!--JSP 依赖  -->
        <!-- servlet依赖. -->
        <dependency>
            <groupId>javax.servlet</groupId>
            <artifactId>jstl</artifactId>
        </dependency>

        <dependency>
            <groupId>javax.servlet</groupId>
            <artifactId>javax.servlet-api</artifactId>
            <scope>provided</scope>
        </dependency>

        <!-- tomcat的支持.-->
        <dependency>
            <groupId>org.apache.tomcat.embed</groupId>
            <artifactId>tomcat-embed-jasper</artifactId>
            <scope>provided</scope>
        </dependency>
</dependencies>After the relevant Jar package is downloaded, we will confirm the project structure.
First is the background related package description:
src/main/java
com.pancm.web - Controller 层
com.pancm.dao - 数据操作层 DAO
com.pancm.pojo- 实体类
com.pancm.service - 业务逻辑层
Application - 应用启动类

src/main/resources
application.properties - 应用配置文件,应用启动会自动读取配置
Front-end related file storage description:
src/main/webapp
WEB-INF - web.xml web相关的核心配置
WEB-INF/jsp - JSP文件的存放路径
Overall project structure diagram: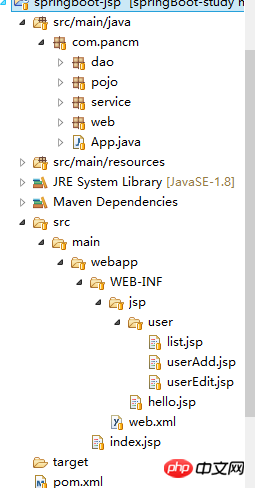
Project structure After confirmation, we will add the corresponding configuration.
Just add the corresponding configuration in application.properties.
The configuration of the data source is similar to the previous one. What needs to be paid attention to is the related configuration of Jsp.
Since springBoot’s default supported template is Thymeleaf, we need to make corresponding changes here.
The configuration is as follows:
## 编码 banner.charset=UTF-8 server.tomcat.uri-encoding=UTF-8 spring.http.encoding.charset=UTF-8 spring.http.encoding.enabled=true spring.http.encoding.force=true spring.messages.encoding=UTF-8 ## 端口 server.port=8088 ## 数据源 spring.datasource.url=jdbc:mysql://localhost:3306/springBoot?useUnicode=true&characterEncoding=utf8 spring.datasource.username=root spring.datasource.password=123456 spring.datasource.driver-class-name=com.mysql.jdbc.Driver ## JSP配置 # 页面默认前缀 spring.mvc.view.prefix=/WEB-INF/jsp/ # 响应页面默认后缀 spring.mvc.view.suffix=.jsp
Code writing
In fact, the code here is basically the same as that described in the previous article. The only difference is that here I JPA is used to operate the database (that is, by the way, the use of the JPA framework).
The first is the entity class. Because JPA is used here, it is a little different from the previous one and some annotations are added.
Entity: Indicates that this is an entity class.
Table: The name of the data table mapped by this entity class.
Column: Specify the attributes of the field, nullable indicates whether it is non-empty, and unique indicates whether it is unique.
Then the code of the entity class is as follows:
@Entity
@Table(name = "t_user")
public class User {

     /** 编号 */
     @Id
     @GeneratedValue
     private Long id;
     /** 姓名 */
     @Column(nullable = false, unique = true)
     private String name;
     /** 密码*/
     @Column(nullable = false)
     private String password;
     /** 年龄 */
     @Column(nullable = false)
     private Integer age;

    //getter和setter略
}Since JPA is used, the dao layer only needs to inherit the JpaRepository class. , you need to specify the entity class and primary key type.
dao layer code is as follows:
@Mapper
public interface UserDao extends JpaRepository<User, Long>{

}The business layer can be called as before. Although JPA is used, the method is also very simple. Just add and modify it. Use save to delete, findOne to search by ID, findAll to query all, etc.
services code is as follows:
@Service
public class UserServiceImpl implements UserService {

    @Autowired
    private UserDao userDao;


    @Override
    public boolean addUser(User user) {
        boolean flag=false;
        try{
            userDao.save(user);
            flag=true;
        }catch(Exception e){
            System.out.println("新增失败!");
            e.printStackTrace();
        }
        return flag;
    }

    @Override
    public boolean updateUser(User user) {
        boolean flag=false;
        try{
            userDao.save(user);
            flag=true;
        }catch(Exception e){
            System.out.println("修改失败!");
            e.printStackTrace();
        }
        return flag;
    }

    @Override
    public boolean deleteUser(Long id) {
        boolean flag=false;
        try{
            userDao.delete(id);
            flag=true;
        }catch(Exception e){
            System.out.println("删除失败!");
            e.printStackTrace();
        }
        return flag;
    }

    @Override
    public User findUserById(Long id) {
        return userDao.findOne(id);
    }

    @Override
    public List<User> findAll() {
        return userDao.findAll();
    }
}When it comes to the control layer, the interface is still provided for Jsp to call, but the annotations of the class here cannot use the previousRestControllerThis annotation returns data in json format, but sometimes we need to jump to the interface when returning, so we should use the Controller annotation. If the data format you want to return in a method is json, just add the annotation ResponseBody to the method.
The control layer code is as follows:
@Controller
public class UserRestController {
        @Autowired
        private UserService userService;

        @RequestMapping("/hello")
        public String hello() {
            return "hello";
        }

        @RequestMapping("/")
        public String index() {
            return "redirect:/list";
        }


        @RequestMapping("/list")
        public String list(Model model) {
            System.out.println("查询所有");
            List<User> users=userService.findAll();
            model.addAttribute("users", users);
            return "user/list";
        }

        @RequestMapping("/toAdd")
        public String toAdd() {
            return "user/userAdd";
        }

        @RequestMapping("/add")
        public String add(User user) {
            userService.addUser(user);
            return "redirect:/list";
        }

        @RequestMapping("/toEdit")
        public String toEdit(Model model,Long id) {
            User user=userService.findUserById(id);
            model.addAttribute("user", user);
            return "user/userEdit";
        }

        @RequestMapping("/edit")
        public String edit(User user) {
            userService.updateUser(user);
            return "redirect:/list";
        }


        @RequestMapping("/toDelete")
        public String delete(Long id) {
            userService.deleteUser(id);
            return "redirect:/list";
        }
}Functional test
That’s it for the introduction of the back-end code. As for the front-end JSP code, I won’t say more. (The main reason is that the interface is too ugly...), we start the project directly and check the effect.
Start the project and enter in the browser: http://localhost:8088/list
Main interface: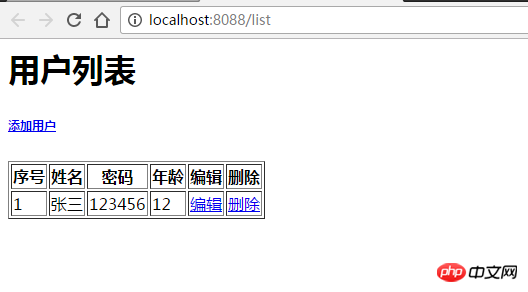
After adding a piece of data Interface: 
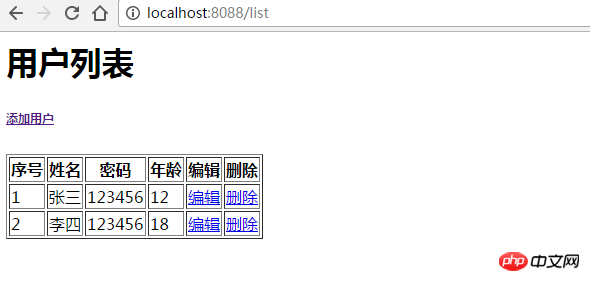
Other modifications and deletions can also be achieved, but here we will not post pictures one by one.
springBoot integration Jsp ends here.
SringBoot integrates Thymeleaf
Introduction to Thymeleaf
Thymeleaf is a template engine that can be used for Web and non-Web applications. It can use XML/XHTML/HTML5, JavaScript, CSS, and even text file.
The use of Thymeleaf
I am not very proficient in using Thymeleaf. This is not the main content of this article. You can check the official documentation for details.
https://www.thymeleaf.org/documentation.html
Development preparation
It is basically the same as the above SringBoot integration Jsp, so I won’t go into details here.
由于SpringBoot默认的模版引擎就是Thymeleaf,所以Maven 依赖这块只需要在原先的springBoot项目添加Thymeleaf的依赖就行。
  <dependency>
            <groupId>org.springframework.boot</groupId>
            <artifactId>spring-boot-starter-thymeleaf</artifactId>
</dependency>application.properties 配置这块,可以和之前的项目基本一致,需要注意的也只有spring.thymeleaf.cache配置,为false的时候是关闭Thymeleaf的缓存,更改界面之后会自动重启然后生效。
SringBoot整合Thymeleaf和SringBoot整合Jsp有个比较大的不同是,Thymeleaf的资源文件是放在src/main/resources目录下,Jsp的是放在src/main/webapp目录下。其中resources目录下的的static目录用于放置静态内容,比如css、js、jpg图片等。templates目录用于放置项目使用的页面模板,也就是.html文件。
它的项目结构图如下: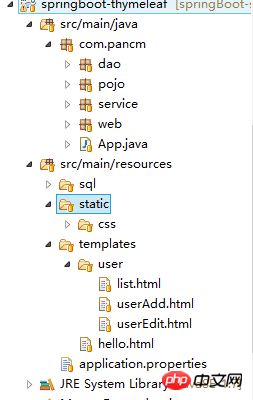
代码基本和SringBoot整合Jsp一致,这里就不在赘述了。
功能测试
启动该项目,在浏览器输入:http://localhost:8085
主界面:
修改用户数据之后的: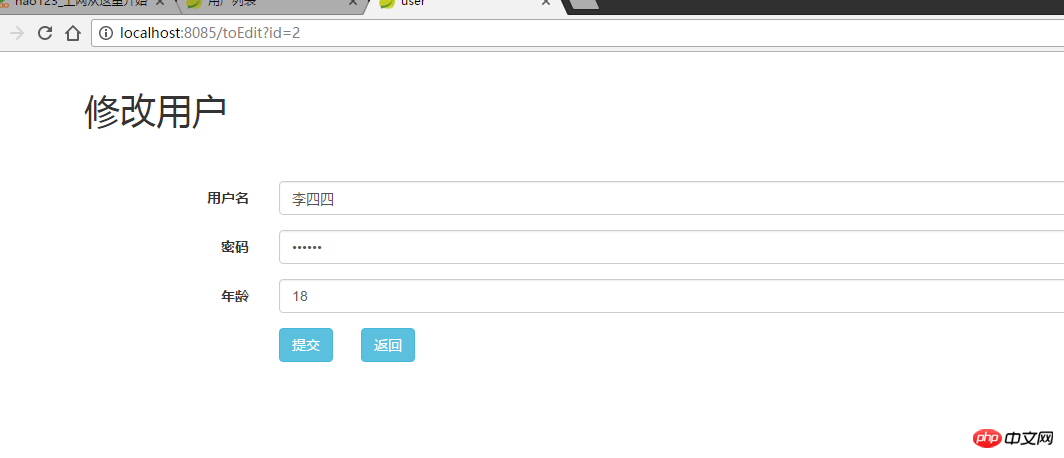
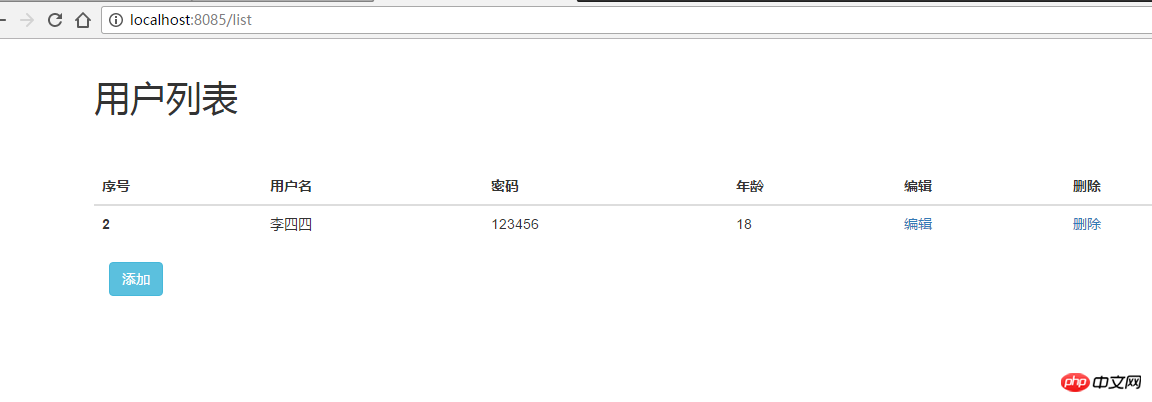
其它的功能也是可以实现的,这里就不再过多贴图了。
springBoot整合 Thymeleaf到这就结束了。
SpringBoot整合Jsp和Thymeleaf
注:这个是后来新加的一个项目。
SpringBoot单独整合Jsp和Thymeleaf都还好,没出现什么问题。但是在一起之后,就有了改变,因为SpringBoot默认的模板引擎是Thymeleaf,加上JSP之后,JSP的模板引擎并不会生效。但是如果想用JSP模板,此时的禁用到Thymeleaf,虽然可以通过多态更改配置实现,但是感觉太过麻烦了。于是研究了一下,找到了共存的方法。
和前面来两个项目区别如下:
之前的Jsp和Thymeleaf配置都是在application.properties
文件中,这里我将它们的配置改到代码中获取。
2.之前Thymeleaf相关文件是放在 src/main/resources 目录下,这里移动到WEB-INF目录下,和之前的jsp文件夹同级。
3.增加一个控制层,严格区分访问Jsp和Thymeleaf的路径。访问Jsp的路径前缀加上jsp,访问Thymeleaf前缀加上templates。
那么新增的配置代码如下:
@Configuration
@EnableWebMvc
@ComponentScan
public class WebConfig extends WebMvcConfigurerAdapter {

       @Bean
       public ViewResolver viewResolver() {
           InternalResourceViewResolver resolver = new InternalResourceViewResolver();
           resolver.setPrefix("/WEB-INF/");
           resolver.setSuffix(".jsp");
           resolver.setViewNames("jsp/*");
           resolver.setOrder(2);
           return resolver;
       }

       @Bean
       public ITemplateResolver templateResolver() {
           SpringResourceTemplateResolver templateResolver = new SpringResourceTemplateResolver();
           templateResolver.setTemplateMode("HTML5");
           templateResolver.setPrefix("/WEB-INF/");
           templateResolver.setSuffix(".html");
           templateResolver.setCharacterEncoding("utf-8");
           templateResolver.setCacheable(false);
           return templateResolver;
       }

       @Bean
       public SpringTemplateEngine templateEngine() {
           SpringTemplateEngine templateEngine = new SpringTemplateEngine();
           templateEngine.setTemplateResolver(templateResolver());
           return templateEngine;
       }

       @Bean
       public ThymeleafViewResolver viewResolverThymeLeaf() {
           ThymeleafViewResolver viewResolver = new ThymeleafViewResolver();
           viewResolver.setTemplateEngine(templateEngine());
           viewResolver.setCharacterEncoding("utf-8");
           viewResolver.setViewNames(new String[]{"thymeleaf/*"});
           viewResolver.setOrder(1);
           return viewResolver;
       }

       @Override
       public void configureDefaultServletHandling(DefaultServletHandlerConfigurer configurer) {
           configurer.enable();
       }

       @Override
       public void addResourceHandlers(ResourceHandlerRegistry registry) {
           super.addResourceHandlers(registry);
       }
}项目的结构图如下: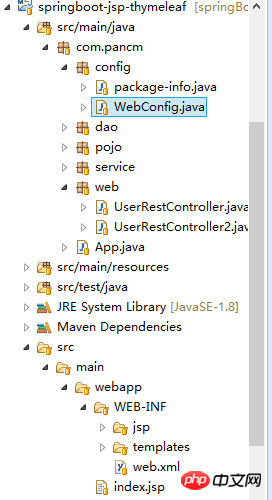
功能测试
在浏览器输入:http://localhost:8089/list
查看Thymeleaf模板的界面
在浏览器输入:http://localhost:8089/list2
查看JSP模板的界面
可以看到已经成功整合。
关于SpringBoot整合Jsp和Thymeleaf 到这里就结束了。
SpringBoot整合Jsp的项目工程地址:
https://github.com/xuwujing/springBoot-study/tree/master/springboot-jsp-jpa
SpringBoot整合Thymeleaf的项目工程地址:
https://github.com/xuwujing/springBoot-study/tree/master/springboot-thymeleaf
SpringBoot整合Jsp和Thymeleaf的项目工程地址:
https://github.com/xuwujing/springBoot-study/tree/master/springboot-jsp-thymeleaf
相关推荐:
SpringBoot整合Netty并使用Protobuf进行数据传输的实现过程
The above is the detailed content of How does SpringBoot integrate Jsp and Thymeleaf?. For more information, please follow other related articles on the PHP Chinese website!

Hot AI Tools

Undresser.AI Undress
AI-powered app for creating realistic nude photos

AI Clothes Remover
Online AI tool for removing clothes from photos.

Undress AI Tool
Undress images for free

Clothoff.io
AI clothes remover

AI Hentai Generator
Generate AI Hentai for free.

Hot Article

Hot Tools

Notepad++7.3.1
Easy-to-use and free code editor

SublimeText3 Chinese version
Chinese version, very easy to use

Zend Studio 13.0.1
Powerful PHP integrated development environment

Dreamweaver CS6
Visual web development tools

SublimeText3 Mac version
God-level code editing software (SublimeText3)

Hot Topics
 1385
1385
 52
52


