What is session in node? How to use?
The content of this article is about what is session in node? How to use? It has certain reference value. Friends in need can refer to it. I hope it will be helpful to you.
Preface
In the previous article, cookies in node were introduced. This article will continue to explain the session.
What is session
Session is just a session, so what is a session?
Session is a concept with a larger granularity than connection. A session may contain multiple connections, and each connection is considered an operation of the session.
When the user jumps between Web pages, the variables stored in the Session object will not be lost, but will persist throughout the user session.
When a user requests a Web page from an application, the Web server will automatically create a Session object if the user does not already have a session. When a session expires or is abandoned, the server terminates the session.
Having said so much, let’s take a look at this product first.

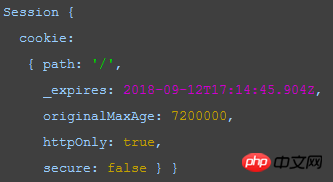
It turns out that the session generated by the session middleware is an object, which contains cookie information.
session in node
First, install the express framework, cookieParser middleware, express-session middleware
npm i express --save
npm i cookie-parser --save
npm i express-session --save
By default, the Express session middleware stores session information It is stored in memory and needs to be signed cookie, so when using cookieParser(), you must pass it a secret key. If there is no secret key, it will prompt Error: secret option required for sessions
The code is as follows:
var express = require('express');
var cookieParser = require('cookie-parser');
var session = require('express-session');

var app = express()
app.use(cookieParser())

const hour = 1000 * 60 * 60;
var sessionOpts = {
  // 设置密钥
  secret: 'a cool secret',
  // Forces the session to be saved back to the session store
  resave: true,
  // Forces a session that is "uninitialized" to be saved to the store.
  saveUninitialized: true,
  // 设置会话cookie名, 默认是connect.sid
  key: 'myapp_sid',
  // If secure is set to true, and you access your site over HTTP, the cookie will not be set.
  cookie: { maxAge: hour * 2, secure: false }
}
app.use(session(sessionOpts))

app.use(function(req, res, next) {
  if (req.url === '/favicon.ico') {
    return
  }

  // 同一个浏览器而言,req是同一个
  var sess = req.session;
  console.log(sess)

  if (sess.views) {
    sess.views++;
  } else {
    sess.views = 1;
  }
  res.setHeader('Content-Type', 'text/html');
  res.write('<p>views: ' + sess.views + '</p>');
  res.end();
});

app.listen(4000);The above code implements a simple page view count Function.
Run the above code, you can open the browser, continuously refresh the page, and observe the sess value printed in the node program.
We found that when the page is refreshed in the same browser, the same session is printed on the console, but the value of views has changed. In other words, multiple http connections correspond to the same session.
session stored in redis
By default, Express session middleware stores session information in memory, but during development and production, it is best to have a persistent and scalable The data stores your session data. The express community has created several session stores that use databases, including MongoDB, Redis, Memcached, PostgreSQL, and others. But low-latency key/value storage is most suitable for this kind of volatile data. Here we first use redis to store session information.
First, install the connect-redis module
npm i connect-redis --save
The code is as follows:
var express = require('express');
var cookieParser = require('cookie-parser');
var session = require('express-session');

var RedisStore = require('connect-redis')(session);

var app = express()
app.use(cookieParser())

var options = {
  host: '127.0.0.1',
  port: 6379,
  db: 1, // Database index to use. Defaults to Redis's default (0).
  prefix: 'ID:' // Key prefix defaulting to "sess:"
  // pass: 'aaa' // Password for Redis authentication
}

const hour = 1000 * 60 * 60;
var sessionOpts = {
  store: new RedisStore(options),
  // 设置密钥
  secret: 'a cool secret',
  // Forces the session to be saved back to the session store
  resave: true,
  // Forces a session that is "uninitialized" to be saved to the store.
  saveUninitialized: true,
  // 设置会话cookie名
  key: 'myapp_sid',
  // If secure is set to true, and you access your site over HTTP, the cookie will not be set.
  cookie: { maxAge: hour * 8, secure: false }
}
app.use(session(sessionOpts)) // 如果没有secret,会提醒 Error: secret option required for sessions

app.use(function(req, res, next) {
  if (req.url === '/favicon.ico') {
    return
  }

  var sess = req.session;
  var id = req.sessionID; // session ID, 只读
  console.log(sess, id);

  if (sess.views) {
    sess.views++; // 如果放在res.end()后,不会自增
    res.setHeader('Content-Type', 'text/html');
    res.write('<p>views: ' + sess.views + '</p>');
    res.write('<p>expires in: ' + (sess.cookie.maxAge / 1000) + 's</p>');
    res.end();
  } else {
    sess.views = 1;
    res.end('welcome to the session demo. refresh!');
  }
});

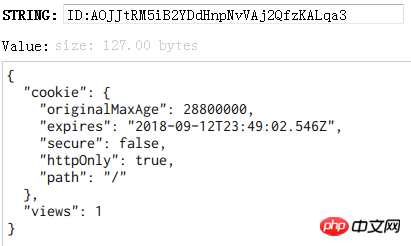
app.listen(4000);In the above program, the session information is stored in the db1 database of redis. After running, refresh Browser, the information in the database is as follows:

session is stored in mongoDb
First, you must install the connect-mongo module
npm i connect-mongo --save
The code is as follows:
var express = require('express');
var cookieParser = require('cookie-parser');
var session = require('express-session');

var MongoStore = require('connect-mongo')(session);
const hour = 1000 * 60 * 60

var app = express()
app.use(cookieParser())
app.use(session({
  secret: 'a cool secret',
  key: 'mongo_sid',
  cookie: { maxAge: hour * 8, secure: false },
  resave: true,
  saveUninitialized: true,
  store: new MongoStore({
    url: 'mongodb://@localhost:27017/demodb'
  })
}));

app.use(function(req, res, next) {
  if (req.url === '/favicon.ico') {
    return
  }

  var sess = req.session;
  var id = req.sessionID; // session ID, 只读
  console.log(sess, id);

  if (sess.views) {
    sess.views++;
  } else {
    sess.views = 1;
  }

  res.setHeader('Content-Type', 'text/html');
  res.write('<p>views: ' + sess.views + '</p>');
  res.write('<p>expires in: ' + (sess.cookie.maxAge / 1000) + 's</p>');
  res.write('<p>httpOnly: ' + sess.cookie.httpOnly + '</p>');
  res.write('<p>path: ' + sess.cookie.path + '</p>');
  res.write('<p>secure: ' + sess.cookie.secure + '</p>');
  res.end();
});

app.listen(4000);After running, refresh the browser page and find that the following session information has been stored in the sessions collection in the demodb database.

Some people may ask: The result is seen, but what happened in the process?
In fact, when the browser initiates the first request, the session middleware will generate a session object (which contains cookie information). This session object will be stored in the mongoDb database. At the same time, the request returns , the browser client will automatically save the cookie in this session object. Note that the browser saves the cookie, not the session object.
This cookie has an expiration time, for example, the setting in the above code is 8 hours. In other words, this cookie will automatically disappear in the browser after 8 hours.
Related recommendations:
How to use socket.io_node.js in node’s express
The above is the detailed content of What is session in node? How to use?. For more information, please follow other related articles on the PHP Chinese website!

Hot AI Tools

Undresser.AI Undress
AI-powered app for creating realistic nude photos

AI Clothes Remover
Online AI tool for removing clothes from photos.

Undress AI Tool
Undress images for free

Clothoff.io
AI clothes remover

Video Face Swap
Swap faces in any video effortlessly with our completely free AI face swap tool!

Hot Article

Hot Tools

Notepad++7.3.1
Easy-to-use and free code editor

SublimeText3 Chinese version
Chinese version, very easy to use

Zend Studio 13.0.1
Powerful PHP integrated development environment

Dreamweaver CS6
Visual web development tools

SublimeText3 Mac version
God-level code editing software (SublimeText3)

Hot Topics
 1386
1386
 52
52
 PostgreSQL performance optimization under Debian
Apr 12, 2025 pm 08:18 PM
To improve the performance of PostgreSQL database in Debian systems, it is necessary to comprehensively consider hardware, configuration, indexing, query and other aspects. The following strategies can effectively optimize database performance: 1. Hardware resource optimization memory expansion: Adequate memory is crucial to cache data and indexes. High-speed storage: Using SSD SSD drives can significantly improve I/O performance. Multi-core processor: Make full use of multi-core processors to implement parallel query processing. 2. Database parameter tuning shared_buffers: According to the system memory size setting, it is recommended to set it to 25%-40% of system memory. work_mem: Controls the memory of sorting and hashing operations, usually set to 64MB to 256M
 How to sort mongodb index
Apr 12, 2025 am 08:45 AM
Sorting index is a type of MongoDB index that allows sorting documents in a collection by specific fields. Creating a sort index allows you to quickly sort query results without additional sorting operations. Advantages include quick sorting, override queries, and on-demand sorting. The syntax is db.collection.createIndex({ field: <sort order> }), where <sort order> is 1 (ascending order) or -1 (descending order). You can also create multi-field sorting indexes that sort multiple fields.
 How to optimize the performance of debian readdir
Apr 13, 2025 am 08:48 AM
In Debian systems, readdir system calls are used to read directory contents. If its performance is not good, try the following optimization strategy: Simplify the number of directory files: Split large directories into multiple small directories as much as possible, reducing the number of items processed per readdir call. Enable directory content caching: build a cache mechanism, update the cache regularly or when directory content changes, and reduce frequent calls to readdir. Memory caches (such as Memcached or Redis) or local caches (such as files or databases) can be considered. Adopt efficient data structure: If you implement directory traversal by yourself, select more efficient data structures (such as hash tables instead of linear search) to store and access directory information
 What is the CentOS MongoDB backup strategy?
Apr 14, 2025 pm 04:51 PM
Detailed explanation of MongoDB efficient backup strategy under CentOS system This article will introduce in detail the various strategies for implementing MongoDB backup on CentOS system to ensure data security and business continuity. We will cover manual backups, timed backups, automated script backups, and backup methods in Docker container environments, and provide best practices for backup file management. Manual backup: Use the mongodump command to perform manual full backup, for example: mongodump-hlocalhost:27017-u username-p password-d database name-o/backup directory This command will export the data and metadata of the specified database to the specified backup directory.
 How to set mongodb command
Apr 12, 2025 am 09:24 AM
To set up a MongoDB database, you can use the command line (use and db.createCollection()) or the mongo shell (mongo, use and db.createCollection()). Other setting options include viewing database (show dbs), viewing collections (show collections), deleting database (db.dropDatabase()), deleting collections (db.&lt;collection_name&gt;.drop()), inserting documents (db.&lt;collecti
 How to encrypt data in Debian MongoDB
Apr 12, 2025 pm 08:03 PM
Encrypting MongoDB database on a Debian system requires following the following steps: Step 1: Install MongoDB First, make sure your Debian system has MongoDB installed. If not, please refer to the official MongoDB document for installation: https://docs.mongodb.com/manual/tutorial/install-mongodb-on-debian/Step 2: Generate the encryption key file Create a file containing the encryption key and set the correct permissions: ddif=/dev/urandomof=/etc/mongodb-keyfilebs=512
 Difference between mongodb and redis
Apr 12, 2025 am 07:36 AM
The main differences between MongoDB and Redis are: Data Model: MongoDB uses a document model, while Redis uses a key-value pair. Data Type: MongoDB supports complex data structures, while Redis supports basic data types. Query Language: MongoDB uses a SQL-like query language, while Redis uses a proprietary command set. Transactions: MongoDB supports transactions, but Redis does not. Purpose: MongoDB is suitable for storing complex data and performing associated queries, while Redis is suitable for caching and high-performance applications. Architecture: MongoDB persists data to disk, and Redis saves it by default


