Based on the introduction, this article focuses on how to use the qemu-img tool to convert image files in other formats into VHD or RAW format, focusing on the specific steps.
Convert image format
ECS only supports importing image files in RAW, VHD and qcow2 formats. Other image files need to be converted into formats before importing. This article introduces how to use the qemu-img tool to convert image files in other formats into VHD or RAW format. qemu-img can convert RAW, qcow2, VMDK, VDI, VHD (vpc), VHDX, qcow1 or QED format images into VHD format, and can also achieve mutual conversion between RAW and VHD formats.
The local system is Windows operating system
Follow the following steps to install qemu-img and convert the image file format:
Download qemu -img and complete the installation. The installation path of this example is C:\Program Files\qemu.
Configure environment variables for qemu-img:
Select Start > Computer, right-click Properties.
In the left navigation bar, click Advanced System Settings.
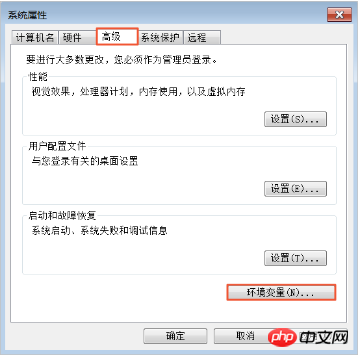
In the System Properties dialog box, click the Advanced tab and click Environment Variables.

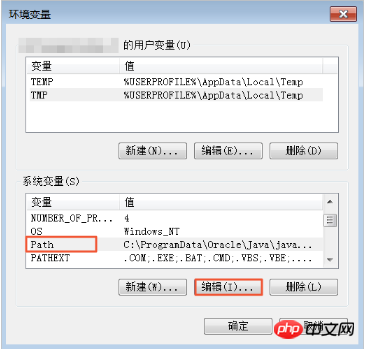
In the Environment Variables dialog box, find Path in the System Variables section and click Edit. If the Path variable does not exist, click New. 
Add system variable value:
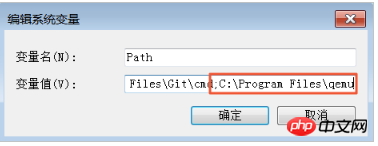
If you are editing system variables, add C:\Program Files\qemu in the variable value, and separate different variable values with half-width semicolons. (;) separated.

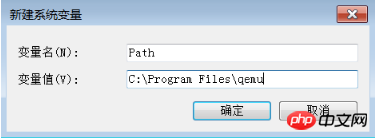
If you are creating a new system variable, enter Path in the variable name and C:\Program Files\qemu in the variable value. 
Test whether the environment variables are successfully configured: Open the Windows command prompt and run qemu-img --help. If the display is normal, the environment variables have been configured.
In the command prompt, use cd [the directory where the source image file is located] to switch the file directory, for example, cd D:\ConvertImage.
Run the qemu-img convert -f qcow2 -O raw centos.qcow2 centos.raw command to convert the image file format, where:
-f parameter value is the format of the source image file. The parameter value of
-O (must be uppercase) is the target image format, source image file name and target file name.
After the conversion is completed, the target file will appear in the directory where the source image file is located.
The local system is Linux operating system
Follow the following steps to install qemu-img and convert the image file format:
Install qemu -img, the example is as follows:
If the local operating system is Ubuntu, run apt install qemu-img.
If the local operating system is CentOS, run yum install qemu-img.
Run the qemu-img convert -f qcow2 -O raw centos.qcow2 centos.raw command to convert the image file format, where:
-f parameter value is the format of the source image file. The parameter value of
-O (must be uppercase) is the target image format, source image file name and target file name.
After the conversion is completed, the target file will appear in the directory where the source image file is located.
FAQ
If an error is reported when installing qemu-img, and there is no clear prompt about which dependent libraries are missing, you can follow cloud-init The libraries shown in the requirements.txt file, and run pip install -r requirements.txt to install all dependent libraries.
Next step
Import custom image
The above is the detailed content of How to use the qemu-img tool to convert image files in other formats into VHD or RAW format. For more information, please follow other related articles on the PHP Chinese website!