Home Web Front-end H5 Tutorial HTML5 uses canvas to achieve the effect of converting pictures to sketches

HTML5 uses canvas to achieve the effect of converting pictures to sketches

Sep 25, 2018 pm 05:41 PM
canvas html5

This chapter will introduce you to how HTML5 uses canvas to achieve the effect of converting pictures to sketches. It has certain reference value. Friends in need can refer to it. I hope it will be helpful to you.

Sketch filter principle:
The most basic algorithm is:
1. Decolorization; (Decolorization formula: gray = 0.3 red 0.59 green 0.11 * blue)
2. Copy Color layer, and invert the color;
3. Perform Gaussian blur on the inverted image;
4. Select the color dodge effect in the overlay mode of the blurred image.
Dodging formula: C =MIN(A (A×B)/(255-B),255), where C is the mixing result, A is the pixel after decolorization, and B is the pixel after Gaussian blur .

Let’s take a look at the effect comparison chart first:
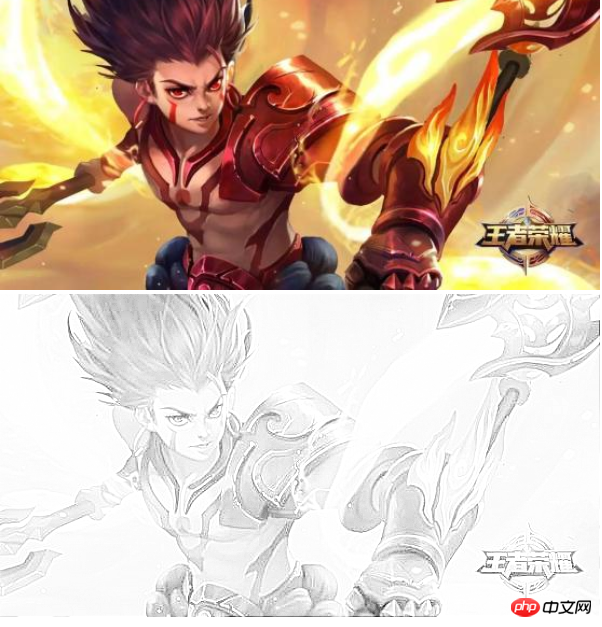
HTML5 uses canvas to achieve the effect of converting pictures to sketches

sigma can adjust the effect.

Code example:

1

2

3

4

5

6

7

8

9

10

11

12

13

14

15

16

17

18

19

20

21

22

23

24

25

26

27

28

29

30

31

32

33

34

35

36

37

38

39

40

41

42

43

44

45

46

47

48

49

50

51

52

53

54

55

56

57

58

59

60

61

62

63

64

65

66

67

68

69

70

71

72

73

74

75

76

77

78

79

80

81

82

83

84

85

86

87

88

89

90

91

92

93

94

95

96

97

98

99

100

101

102

103

104

105

106

107

108

109

110

111

112

113

114

115

116

117

118

119

120

121

122

123

124

125

126

127

128

129

130

131

132

133

134

135

136

137

138

139

140

141

142

143

144

145

146

147

148

149

150

151

152

153

154

155

156

157

158

159

160

161

162

163

164

165

166

167

168

169

170

171

172

173

174

175

176

177

178

179

180

181

182

183

184

185

186

187

188

189

190

191

192

193

194

195

196

197

198

199

200

<!DOCTYPE html>

<html>

    <head>

        <meta charset="UTF-8">

        <title></title>

    </head>

    <body>

        <div id="controls">

            <input type="file" name="" id="imgs" value=""/>

            <br />

            <!--<input type="range" name="" id="range_radius" value="10"  oninput="changeRadius()"/>

            radius:<span id="value_radius">1</span>

            <br />-->

            <input type="range" name="" id="range_sigma" value="40"  oninput="changeSigma()"/>

            sigma:<span id="value_sigma">0.8</span>

            <br />

            <a href="" download="canvas_love.png" id="save_href">下载</a>

        </div>

        <canvas id="canvas1" width="" height=""></canvas>

        <br>

        <canvas id="canvas2" width="" height=""></canvas>

        <script type="text/javascript">

            var eleImg = document.getElementById("imgs");

            var eleRadius = document.getElementById("range_radius");

            var eleSigma = document.getElementById("range_sigma");


            var valueRadius = document.getElementById("value_radius");

            var valueSigma = document.getElementById("value_sigma");


            var svaeHref = document.getElementById("save_href");


            var imgSrc = "img/2.jpg";

            var radius = 1;

            var sigma = 0.8;


            eleImg.addEventListener("input",function (e) {

                var fileObj = e.currentTarget.files[0]

                 if (window.FileReader) {   

                    var reader = new FileReader();   

                    reader.readAsDataURL(fileObj);   

                    //监听文件读取结束后事件   

                    reader.onloadend = function (e) {

                        imgSrc = e.target.result;    //e.target.result就是最后的路径地址

                        sketch()

                    };   

                }

            });


            var butSave = document.getElementById("save");


            function changeRadius() {

                valueRadius.innerText = eleRadius.value/10;

                radius = eleRadius.value/10;

                sketch()

            }


            function changeSigma() {

                valueSigma.innerText = eleSigma.value/50;

                sigma = eleSigma.value/50;

                sketch()

            }


            var canvas1 = document.querySelector("#canvas1");

            var cxt1 = canvas1.getContext("2d");


            var canvas = document.querySelector("#canvas2");

            var cxt = canvas.getContext("2d");


            function sketch() {

                cxt1.clearRect(0,0,canvas1.width,canvas1.height);

                cxt.clearRect(0,0,canvas.width,canvas.height);

                var img = new Image();

                img.src = imgSrc;

                img.onload = function () {


                    canvas1.width = 600;

                    canvas1.height = (img.height/img.width)*600;

                    cxt1.drawImage(img, 0, 0, canvas1.width, canvas1.height);


                    canvas.width = 600;

                    canvas.height = (img.height/img.width)*600;

                    cxt.drawImage(img, 0, 0, canvas.width, canvas.height);

                    var imageData = cxt.getImageData(0, 0, canvas.width, canvas.height);  //对于 ImageData 对象中的每个像素,都存在着四方面的信息,即 RGBA 值

                    var imageData_length = imageData.data.length/4;

//                  var originData = JSON.parse(JSON.stringify(imageData))


                    // 解析之后进行算法运算

                    var originData = [];

                    for (var i = 0; i < imageData_length; i++) {

                        var red = imageData.data[i*4];

                        var green = imageData.data[i*4 + 1];

                        var blue = imageData.data[i*4 + 2];

                        var gray = 0.3 * red + 0.59 * green + 0.11 * blue;//去色

                        originData.push(gray)

                        originData.push(gray)

                        originData.push(gray)

                        originData.push(imageData.data[i * 4 + 3])

                        var anti_data = 255 - gray;//取反


                        imageData.data[i * 4] = anti_data;

                        imageData.data[i * 4 + 1] = anti_data;

                        imageData.data[i * 4 + 2] = anti_data;

                    }

                    imageData = gaussBlur(imageData, radius, sigma)//高斯模糊


                    for (var i = 0; i < imageData_length; i++) {

                        var dodge_data = Math.min((originData[i*4] + (originData[i*4]*imageData.data[i * 4])/(255-imageData.data[i * 4])), 255)//减淡


                        imageData.data[i * 4] = dodge_data;

                        imageData.data[i * 4 + 1] = dodge_data;

                        imageData.data[i * 4 + 2] = dodge_data;

                    }

                    console.log(imageData)

                    cxt.putImageData(imageData, 0, 0);

                    var tempSrc = canvas.toDataURL("image/png");

                    svaeHref.href=tempSrc;

                }

            }


            sketch()


            function gaussBlur(imgData, radius, sigma) {

                var pixes = imgData.data,

                    width = imgData.width,

                    height = imgData.height;


                radius = radius || 5;

                sigma = sigma || radius / 3;


                var gaussEdge = radius * 2 + 1;    // 高斯矩阵的边长


                var gaussMatrix = [],

                    gaussSum = 0,

                    a = 1 / (2 * sigma * sigma * Math.PI),

                    b = -a * Math.PI;


                for (var i=-radius; i<=radius; i++) {

                    for (var j=-radius; j<=radius; j++) {

                        var gxy = a * Math.exp((i * i + j * j) * b);

                        gaussMatrix.push(gxy);

                        gaussSum += gxy;    // 得到高斯矩阵的和,用来归一化

                    }

                }

                var gaussNum = (radius + 1) * (radius + 1);

                for (var i=0; i<gaussNum; i++) {

                    gaussMatrix[i] = gaussMatrix[i] / gaussSum;    // 除gaussSum是归一化

                }


                //console.log(gaussMatrix);


                // 循环计算整个图像每个像素高斯处理之后的值

                for (var x=0; x<width;x++) {

                    for (var y=0; y<height; y++) {

                        var r = 0,

                            g = 0,

                            b = 0;


                        //console.log(1);


                        // 计算每个点的高斯处理之后的值

                        for (var i=-radius; i<=radius; i++) {

                            // 处理边缘

                            var m = handleEdge(i, x, width);

                            for (var j=-radius; j<=radius; j++) {

                                // 处理边缘

                                var mm = handleEdge(j, y, height);


                                var currentPixId = (mm * width + m) * 4;


                                var jj = j + radius;

                                var ii = i + radius;

                                r += pixes[currentPixId] * gaussMatrix[jj * gaussEdge + ii];

                                g += pixes[currentPixId + 1] * gaussMatrix[jj * gaussEdge + ii];

                                b += pixes[currentPixId + 2] * gaussMatrix[jj * gaussEdge + ii];


                            }

                        }

                        var pixId = (y * width + x) * 4;


                        pixes[pixId] = ~~r;

                        pixes[pixId + 1] = ~~g;

                        pixes[pixId + 2] = ~~b;

                    }

                }

                imgData.data = pixes;

                return imgData;

            }


            function handleEdge(i, x, w) {

                var  m = x + i;

                if (m < 0) {

                    m = -m;

                } else if (m >= w) {

                    m = w + i - x;

                }

                return m;

            }

        </script>

    </body>

</html>

Copy after login

The above is all the code for converting images to sketches using canvas. You can compile and debug it yourself.

The above is the detailed content of HTML5 uses canvas to achieve the effect of converting pictures to sketches. For more information, please follow other related articles on the PHP Chinese website!

Statement of this Website
The content of this article is voluntarily contributed by netizens, and the copyright belongs to the original author. This site does not assume corresponding legal responsibility. If you find any content suspected of plagiarism or infringement, please contact admin@php.cn

Hot AI Tools

Undresser.AI Undress

Undresser.AI Undress

AI-powered app for creating realistic nude photos

AI Clothes Remover

AI Clothes Remover

Online AI tool for removing clothes from photos.

Undress AI Tool

Undress AI Tool

Undress images for free

Clothoff.io

Clothoff.io

AI clothes remover

Video Face Swap

Video Face Swap

Swap faces in any video effortlessly with our completely free AI face swap tool!

Hot Tools

Notepad++7.3.1

Notepad++7.3.1

Easy-to-use and free code editor

SublimeText3 Chinese version

SublimeText3 Chinese version

Chinese version, very easy to use

Zend Studio 13.0.1

Zend Studio 13.0.1

Powerful PHP integrated development environment

Dreamweaver CS6

Dreamweaver CS6

Visual web development tools

SublimeText3 Mac version

SublimeText3 Mac version

God-level code editing software (SublimeText3)

Table Border in HTML Table Border in HTML Sep 04, 2024 pm 04:49 PM

Guide to Table Border in HTML. Here we discuss multiple ways for defining table-border with examples of the Table Border in HTML.

HTML margin-left HTML margin-left Sep 04, 2024 pm 04:48 PM

Guide to HTML margin-left. Here we discuss a brief overview on HTML margin-left and its Examples along with its Code Implementation.

Nested Table in HTML Nested Table in HTML Sep 04, 2024 pm 04:49 PM

This is a guide to Nested Table in HTML. Here we discuss how to create a table within the table along with the respective examples.

HTML Table Layout HTML Table Layout Sep 04, 2024 pm 04:54 PM

Guide to HTML Table Layout. Here we discuss the Values of HTML Table Layout along with the examples and outputs n detail.

HTML Input Placeholder HTML Input Placeholder Sep 04, 2024 pm 04:54 PM

Guide to HTML Input Placeholder. Here we discuss the Examples of HTML Input Placeholder along with the codes and outputs.

Moving Text in HTML Moving Text in HTML Sep 04, 2024 pm 04:45 PM

Guide to Moving Text in HTML. Here we discuss an introduction, how marquee tag work with syntax and examples to implement.

HTML Ordered List HTML Ordered List Sep 04, 2024 pm 04:43 PM

Guide to the HTML Ordered List. Here we also discuss introduction of HTML Ordered list and types along with their example respectively

HTML onclick Button HTML onclick Button Sep 04, 2024 pm 04:49 PM

Guide to HTML onclick Button. Here we discuss their introduction, working, examples and onclick Event in various events respectively.

See all articles