The content of this article is about how to conduct a link test when obvious packet loss is detected in ping. It has certain reference value. Friends in need can refer to it. I hope it will be helpful to you.
Windows instance network access packet loss delay is high
When website access is very slow or inaccessible, if other obvious problems are eliminated and obvious packet loss is detected in ping, it is recommended that you Perform link testing. In a Windows environment, you can use the WinMTR tool (preferred) or the TRACERT command line tool to conduct a link test to determine the source of the problem.
Normally, please follow the steps below:
Use the link test tool to detect network conditions and server status.
Analyze and process based on the link test results.
WinMTR tool (priority use)
mtr (My traceroute) is a network testing tool that integrates tracert and ping. Graphical interface for commands. Ping and tracert are usually used to detect network conditions and server status. The specific description is as follows:

WinMTR is the graphical implementation of the mtr tool in the Windows environment and is suitable for Windows. Traceroute and ping test. WinMTR sends ICMP packets for detection by default and cannot be switched.
Compared with the TRACERT command line tool, WinMTR can avoid the impact of node fluctuations on test results, and the test results are more accurate. In Windows environment, it is recommended to use WinMTR for link testing first. (Click the official website to download and obtain.)
Operation steps
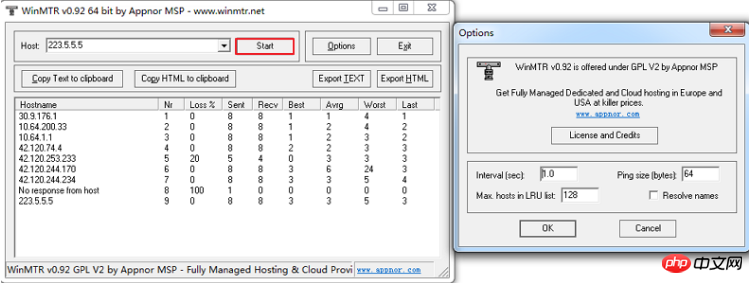
After downloading WinMTR from the official website, directly decompress and run it. After running the program, enter the target server domain name or IP in the Host field (without leading spaces).

Click Start to start testing. (After starting the test, the corresponding button changes to Stop.)
After running for a period of time, click Stop to stop the test.
Note: You can test for a few more minutes and export the results after the test is completed.
Copy Text to clipboard: Copy the test results to the clipboard in text format.
Copy HTML to clipboard: Copy the test results to the clipboard in HTML format.
Export TEXT: Export the test results to the specified file in text format.
Export HTML: Export the test results to the specified file in HTML format.
Options: Optional parameters. Specific details include:
Interval (sec): The interval (expiration) time of each detection, the default is 1 second.
Ping size(bytes): The packet size used by ping detection, the default is 64 bytes.
Max hosts in LRU list: The maximum number of hosts supported by the LRU list, the default value is 128.
Resolve names: Display related nodes by domain name through reverse IP query.
View the return results after WinMTR is run.
Description: Under the default configuration, the WinMTR test results are explained as follows:
The first column (Hostname): the IP or domain name of each node host that needs to be passed to reach the destination server.
Second column (Nr): Node number.
The third column (Loss%): node packet loss rate. The percentage of ping packet reply failures can be used to determine which node (line) is faulty, whether it is the computer room where the server is located or the international routing trunk road.
The fourth column (Sent): the number of data packets sent.
The fifth column (Recv): The number of successfully received data packets.
The sixth, seventh, eighth and ninth columns (Best, Avg, Worst, Last): are the minimum, average, maximum value of the response time and the response time of the last data packet respectively.
TRACERT command line tool
TRACERT (Trace Route) is a network diagnostic command line utility that comes with Windows and is used to trace Internet protocols (IP) The path that a packet takes to reach its destination address.
TRACERT determines a route to a destination address by sending an ICMP packet to the destination address. In these packets, TRACERT uses different IP Time to Live (TTL) values. Since routers along the route are required to decrement the TTL by at least 1 before forwarding the packet, the TTL is actually equivalent to a hop counter. When a packet's TTL reaches zero (0), the node sends an ICMP Time Exceeded message to the source computer.
TRACERT sends a packet with a TTL of 1 for the first time and increases the TTL by 1 on each subsequent transmission until the destination address responds or the maximum value of the TTL is reached. The ICMP timeout message sent back by the intermediate router contains the information of the corresponding node.
Operation steps
Click the Start menu at the bottom of the desktop and select Run.
After opening the run box, enter cmd in the box and click OK.
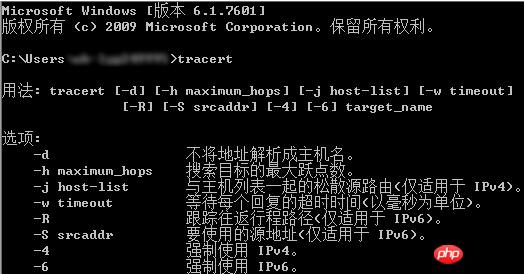
In the command running interface, enter tracert and press Enter. The interface will display the usage instructions of tracert.

According to the specific usage, enter the target address to be tracked.
Example
 C:\> tracert -d 223.5.5.5
 通过最多 30 个跃点跟踪到 223.5.5.5 的路由
   1     *        *        *     请求超时。
   2    9 ms     3 ms    12 ms   192.168.17.20
   3    4 ms     9 ms     2 ms   111.1.20.41
   4    9 ms     2 ms     1 ms   111.1.34.197
   5   11 ms     *        *      211.140.0.57
   6    3 ms     2 ms     2 ms   211.138.114.62
   7    2 ms     2 ms     1 ms   42.120.244.190
   8   32 ms     4 ms     3 ms   42.120.244.238
   9     *        *        *     请求超时。
   10   3 ms     2 ms     2 ms   223.5.5.5
Analyzing link test results
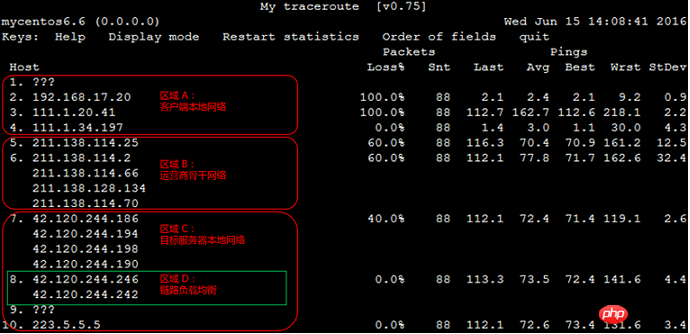
The following link test result example diagram is used as a basis for explanation:

Operation steps
Judge each area Whether there are exceptions and handle them separately according to the conditions of each region.
Area A: Client local network, that is, local LAN and local network provider network. For abnormalities in this area and node issues related to the client's local network, please troubleshoot and analyze the local network; for node issues related to the local network provider's network, please provide feedback to the local operator.
Area B: Carrier backbone network. For abnormalities in this area, you can query the operator based on the abnormal node IP, and then report the problem to the corresponding operator directly or through Alibaba Cloud after-sales technical support.
Area C: The local network of the target server, that is, the network provider network to which the target host belongs. For abnormalities in this area, the problem needs to be reported to the network provider to which the target host belongs.
Combine Avg (average) and StDev (standard deviation) to determine whether there is an abnormality in each node.
If StDev is very high, observe the Best and Wrst of the corresponding node synchronously to determine whether there is an abnormality in the corresponding node.
If StDev is not high, use Avg to determine whether there is an abnormality in the corresponding node.
Note: There is no specific time range standard for the above StDev to be high or not high. A relative evaluation needs to be made based on the delay values of other columns of the same node. For example, if Avg is 30 ms, then when StDev is 25 ms, this is considered a high deviation. And if Avg is 325 ms, the same StDev (25 ms) is considered to be a low deviation.
Check the node packet loss rate. If Loss% is not zero, it means there may be a problem with this hop network.
There are usually two reasons for node packet loss:
Artificially limiting the ICMP sending rate of the node, resulting in packet loss.
There is indeed an abnormality in the node, resulting in packet loss.
Determine the reason for packet loss of the current abnormal node.
If no subsequent nodes lose packets, it means that the packet loss of the current node is due to the operator's policy restrictions and can be ignored. As shown in the 2nd hop in the previous link test result example diagram.
If subsequent nodes also experience packet loss, it means that there is a network abnormality on the current node, resulting in packet loss. As shown in the link test result example diagram above, hop 5 is shown.
Note: The above two situations may occur at the same time, that is, the corresponding node has both policy speed limit and network abnormality. For this situation, if the current node and its subsequent nodes continuously experience packet loss, and the packet loss rates of each node are different, the packet loss rate of the last few hops usually prevails. As shown in the link test result example picture above, packet loss occurred at the 5th, 6th, and 7th hops. Therefore, the final packet loss situation is based on 40% of the 7th hop as a reference.
Confirm whether the node is abnormal by checking whether there is an obvious delay. Analyze from the following two aspects:
If the delay after a certain hop increases significantly, it is usually judged that the node has a network abnormality. As shown in the link test result example picture above, the delay of subsequent nodes after the 5th hop increases significantly, and it is inferred that a network abnormality occurs at the 5th hop node.
Note: High latency does not necessarily mean that there is an abnormality in the corresponding node. Large latency may also be caused by the data return link. It is recommended to analyze it together with the reverse link test.
ICMP policy rate limit may also cause the delay of the corresponding node to increase sharply, but subsequent nodes will usually return to normal. As shown in the link test result example above, the third hop has a 100% packet loss rate, and the delay also increases significantly. But then the node delay immediately returned to normal. Therefore, it is determined that the sudden increase in delay and packet loss of the node is due to the policy speed limit.
Other suggestions
Alibaba Cloud's computer rooms in mainland China and other countries or regions have dedicated lines for network communication to reduce packet loss during communication. rate, it is recommended to use high-speed channels.
If the host packet drop and delay are very high, it is recommended to conduct WinMTR two-way testing, that is, local to server and server to local testing. If you cannot log in remotely, please log in through the management terminal.
The above is the detailed content of How to perform a link test when obvious packet loss is detected in ping. For more information, please follow other related articles on the PHP Chinese website!