This article brings you a detailed introduction to SMTP for sending emails in Python (with code). It has certain reference value. Friends in need can refer to it. I hope it will be helpful to you.
How to use Python to send the generated test report as an email attachment?
Python's smtplib provides a very convenient way to send emails, which simply encapsulates the SMTP protocol.
Python supports SMTP with two modules: smtplib and email. Among them, email is responsible for constructing emails, and smtplib is responsible for sending emails.
Let’s understand the basic idea of sending a file attachment of an unknown MIME type in Python:
0、前提:导入邮件发送模块
        from email.mime.text import MIMEText
        from email.mime.multipart import MIMEMultipart
        import smtplib
1、构造MIMEMultipart对象作为根容器
2、构造MIMEText对象作为邮件显示内容并附加到根容器
    a、读入文件内容并格式化
    b、设置附件头
3、设置根容器属性
4、得到格式化后的完整文本
5、用smtp发送邮件
6、封装成sendEmail类。
Think of us at the same time Several elements for sending emails:
1、服务器。以QQ邮箱举例,则为smtp.qq.com
2、端口号。有465和587,请使用587
3、发送者。
4、密码。密码总不能直接写在文件里吧?哈哈,这里需要使用qq邮箱获取授权码。
5、收件人。(可能还不止一个)
6、发送邮件的主题subject。
7、邮件文本内容。
8、附件。
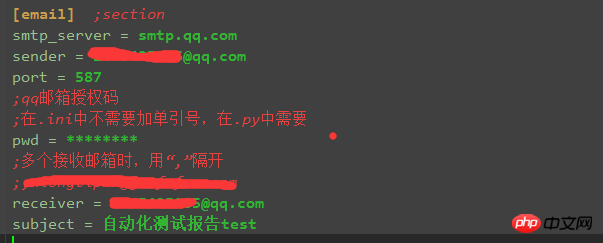
Because I have written before how to read the .ini configuration file, so in this section, some elements for sending emails are placed in the configuration file. The configuration file is as follows:

The corresponding script for reading the configuration file is: (readConfig.py part)
import os
import configparser

# config
cur_path = os.path.dirname(os.path.relpath(__file__))
configPath = os.path.join(cur_path,'config.ini')
conf = configparser.ConfigParser()
conf.read(configPath)

def get_smtpServer(smtpServer):
    smtp_server = conf.get('email',smtpServer)
    return smtp_server
#
......After building the MIMEMultipart() email root container object, you need to use the root container to define various elements of the email, such as email subject, sender from, recipient to, email body, Email attachments, etc.
# 构建根容器
msg = MIMEMultipart()

# 邮件主题、发送人、收件人、内容,此部分可以来自配置文件,也可以直接填入
msg['Subject'] = self.mail_subject  # u'自动化测试报告'
msg['from'] = self.mail_sender
msg['to'] = self.mail_pwd
# 邮件正文部分body,1、可以用HTML自己自定义body内容;2、读取其他文件的内容为body
# body = "您好,<p>这里是使用Python登录邮箱,并发送附件的测试"
with open(reportFile,'r',encoding='UTF-8') as f:
     body = f.read()
msg.attach(MIMEText(_text=body, _subtype='html', _charset='utf-8'))  # _charset 是指Content_type的类型</p>
# 添加附件
attachment = MIMEText(_text=open(reportFile, 'rb').read(), _subtype='base64',_charset= 'utf-8')
attachment['Content-Type'] = 'application/octet-stream'
attachment['Content-Disposition'] = 'attachment;filename = "result.html"'
msg.attach(attachment)
Send four steps: obtain server connection, log in to the mailbox, send the email, and exit.
It's roughly as follows:
try:
      smtp = smtplib.SMTP_SSL(host=self.mail_smtpserver, port=self.mail_port)  # 继承自SMTP
except:
      smtp = smtplib.SMTP()
      smtp.connect(self.mail_smtpserver, self.mail_port)

# smtp.set_debuglevel(1)
# 创建安全连接,加密SMTP
smtp.starttls()     # Puts the connection to the SMTP server into TLS mode.
# 用户名和密码
smtp.login(user=self.mail_sender, password=self.mail_pwd)

# 函数:sendmail(self, from_addr, to_addrs, msg, mail_options=[],rcpt_options=[]):
smtp.sendmail(self.mail_sender, self.mail_receiverList, msg.as_string())
smtp.quit()
Added a sentence smtp.starttls(). This sentence is used to encrypt the SMTP session to ensure that emails are sent safely and cannot be eavesdropped.
After creating the SMTP object, call the starttls() method immediately.
In fact, the entire email sending module is completed.
I encountered several problems during this process, and I would like to post them here to share them with you.
Throw error 535
Throwing error: smtplib.SMTPAuthenticationError: (535, b'Error:
xc7xebxcaxb9xd3xc3xcaxdaxc8xa8xc2xebxb5xc7xc2xbcxa1xa3xcfxeaxc7xe9xc7xebxbfxb4:
http://service.mail.qq.com/cg...')
Solution: Click the last link, it is actually because of the authorization code problem
Continue to report the error after replacing the authorization code, 535
Solution: Replace the port. Because there are two ssl protocol ports for qq mailbox: 465/587.
Error report: smtplib.SMTPAuthenticationError: (530, b'Must issue a STARTTLS command first.')
Solution: Before login(), add: smtp.starttls()
Paste the entire file below. This file depends on other files, so it is for reference only, but the method is the same.
import smtplib
from email.mime.text import MIMEText
from email.mime.multipart import MIMEMultipart
from email.mime.base import MIMEBase

class SendEmail(object):
    '''
    发送邮件模块封装,属性均从config.ini文件获得
    '''
    def __init__(self, smtpServer, mailPort, mailSender, mailPwd, mailtoList, mailSubject):
        self.mail_smtpserver = smtpServer
        self.mail_port = mailPort
        self.mail_sender = mailSender
        self.mail_pwd = mailPwd
        # 接收邮件列表
        self.mail_receiverList = mailtoList
        self.mail_subject = mailSubject
        # self.mail_content = mailContent

    def sendFile(self, reportFile):
        '''
        发送各种类型的附件
        '''
        # 构建根容器
        msg = MIMEMultipart()

        # 邮件正文部分body,1、可以用HTML自己自定义body内容;2、读取其他文件的内容为body
        # body = "您好,<p>这里是使用Python登录邮箱,并发送附件的测试"
        with open(reportFile,'r',encoding='UTF-8') as f:
            body = f.read()

        # _charset 是指Content_type的类型
        msg.attach(MIMEText(_text=body, _subtype='html', _charset='utf-8'))

        # 邮件主题、发送人、收件人、内容
        msg['Subject'] = self.mail_subject  # u'自动化测试报告'
        msg['from'] = self.mail_sender
        msg['to'] = self.mail_pwd

        # 添加附件
        attachment = MIMEText(_text=open(reportFile, 'rb').read(), _subtype='base64',_charset= 'utf-8')
        attachment['Content-Type'] = 'application/octet-stream'
        attachment['Content-Disposition'] = 'attachment;filename = "result.html"'
        msg.attach(attachment)

        try:
            smtp = smtplib.SMTP_SSL(host=self.mail_smtpserver, port=self.mail_port)  # 继承自SMTP
        except:
            smtp = smtplib.SMTP()
            smtp.connect(self.mail_smtpserver, self.mail_port)

        # smtp.set_debuglevel(1)
        # 创建安全连接,加密SMTP
        smtp.starttls()     # Puts the connection to the SMTP server into TLS mode.
        # 用户名和密码
        smtp.login(user=self.mail_sender, password=self.mail_pwd)

        # 函数:sendmail(self, from_addr, to_addrs, msg, mail_options=[],rcpt_options=[]):
        smtp.sendmail(self.mail_sender, self.mail_receiverList, msg.as_string())
        smtp.quit()

# 调试代码
if __name__ == "__main__":
    mail_smtpserver = 'smtp.qq.com'
    mail_port = 587
    mail_sender = '@qq.com'
    mail_pwd = ''
    mail_receiverList = ['@qq.com', '@163.com']
    mail_subject = u'自动化测试报告'
    s = SendEmail(mail_smtpserver, mail_port, mail_sender, mail_pwd, mail_receiverList, mail_subject)
    s.sendFile('F:\Python_project\PythonLearnning_2018\send_email\sendEmail_Test.html.tar.gz')
print('--- test end --- ')</p>The above is the detailed content of Detailed introduction to sending emails through python SMTP (with code). For more information, please follow other related articles on the PHP Chinese website!