Analysis and implementation of virtual dom principle process
The content of this article is about the analysis and implementation of the virtual dom principle process. It has certain reference value. Friends in need can refer to it. I hope it will be helpful to you.
Background
As we all know, the DOM node is the most expensive browser resource on a web page. The DOM is very slow and very large. Most web page performance problems are caused by JavaScript modifying the DOM. caused. We use Javascript to manipulate DOM, and the operation efficiency is often very low. Since DOM is represented as a tree structure, something in the DOM will change every time, so the changes to the DOM are very fast, but the changed elements, and its The children have to go through the Reflow/Layout phase, and then the browser has to redraw the changes, which is slow. Therefore, the more times you reflow/redraw, the more laggy your application becomes. However, Javascript runs very fast, and the virtual DOM is a layer placed between JS and HTML. It can obtain the difference objects after comparison by comparing the old and new DOM, and then actually render the difference parts to the page in a targeted manner, thereby reducing actual DOM operations and ultimately achieving the purpose of performance optimization.
Virtual dom principle process
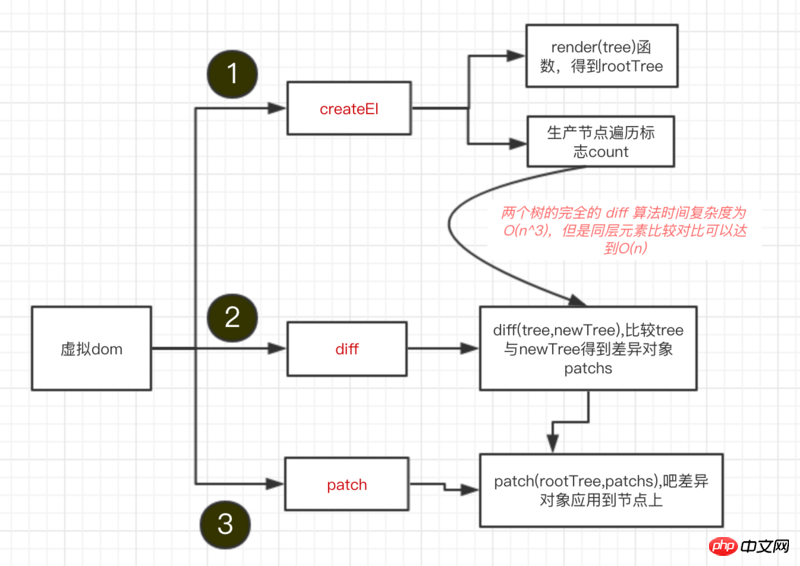
There are three simple summary points:
Use JavaScript to simulate the DOM tree and render the DOM tree
Compare the old and new DOM trees and get the compared difference object
Apply the difference object to the rendered DOM tree.
The following is a flow chart:

Below we use code to implement a flow chart step by step
Use JavaScript to simulate the DOM tree and render it on the page
In fact, the virtual DOM is a mapping of the JS object structure. Let's implement this process step by step.
We can easily simulate the structure of a DOM tree using JS. For example, use such a function createEl(tagName, props, children) to create a DOM structure.
tagName tag name, props is the object of attributes, and children is the child node.
Then render it to the page, the code is as follows:
const createEl = (tagName, props, children) => new CreactEl(tagName, props, children)

const vdom = createEl('p', { 'id': 'box' }, [
  createEl('h1', { style: 'color: pink' }, ['I am H1']),
  createEl('ul', {class: 'list'}, [createEl('li', ['#list1']), createEl('li', ['#list2'])]),
  createEl('p', ['I am p'])
])

const rootnode = vdom.render()
document.body.appendChild(rootnode)Through the above function, call vdom.render() so that we can build a DOM tree as shown below, Then render it to the page
<div id="box">
  <h1 id="I-nbsp-am-nbsp-H">I am H1</h1>
  <ul class="list">
    <li>#list1</li>
    <li>#list2</li>
  </ul>
  <p>I am p</p>
</div>Let’s take a look at the CreactEl.js code process:
import { setAttr } from './utils'
class CreateEl {
  constructor (tagName, props, children) {
    // 当只有两个参数的时候 例如 celement(el, [123])
    if (Array.isArray(props)) {
      children = props
      props = {}
    }
    // tagName, props, children数据保存到this对象上
    this.tagName = tagName
    this.props = props || {}
    this.children = children || []
    this.key = props ? props.key : undefined

    let count = 0
    this.children.forEach(child => {
      if (child instanceof CreateEl) {
        count += child.count
      } else {
        child = '' + child
      }
      count++
    })
    // 给每一个节点设置一个count
    this.count = count
  }
  // 构建一个 dom 树
  render () {
    // 创建dom
    const el = document.createElement(this.tagName)
    const props = this.props
    // 循环所有属性,然后设置属性
    for (let [key, val] of Object.entries(props)) {
      setAttr(el, key, val)
    }
    this.children.forEach(child => {
      // 递归循环 构建tree
      let childEl = (child instanceof CreateEl) ? child.render() : document.createTextNode(child)
      el.appendChild(childEl)
    })
    return el
  }
}The function of the above render function is to create the node and then set the node properties. , and finally created recursively. In this way we get a DOM tree, and then insert (appendChild) into the page.
Compare the old and new DOM trees and get the difference objects
Above, we have created a DOM tree, then created a different DOM tree, and then compared it to get the difference objects object.
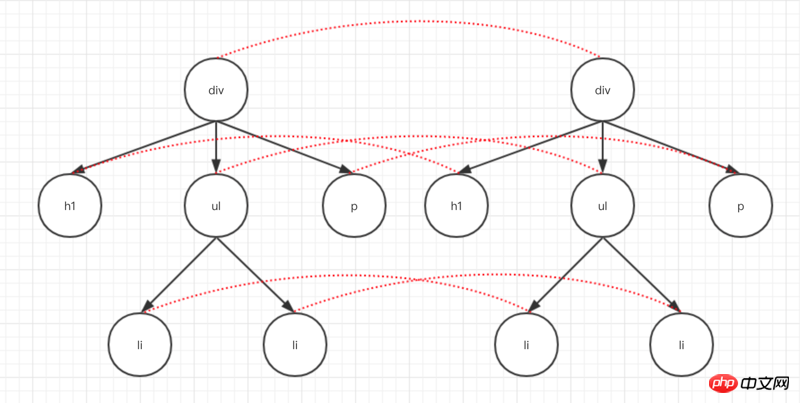
Comparing the difference between two DOM trees is the core part of virtual DOM. This is also what people often call the diff algorithm of virtual DOM. The time complexity of comparing the difference between two complete trees is O(n^ 3). However, cross-level DOM tree comparisons are rarely used in our web, so comparing one level with another, the algorithm complexity can reach O(n). As shown below

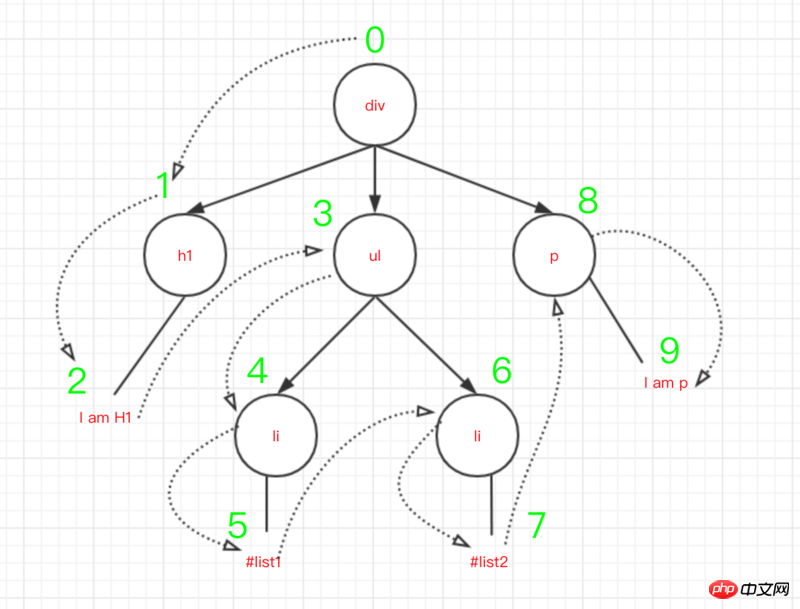
In fact, in the code, we will start traversal from the root node, and when traversing, the differences of each node (including text differences , different attributes, different nodes) records are saved. As shown below:

The differences between the two nodes can be summarized as follows.
0 直接替换原有节点
1 调整子节点,包括移动、删除等
2 修改节点属性
3 修改节点文本内容
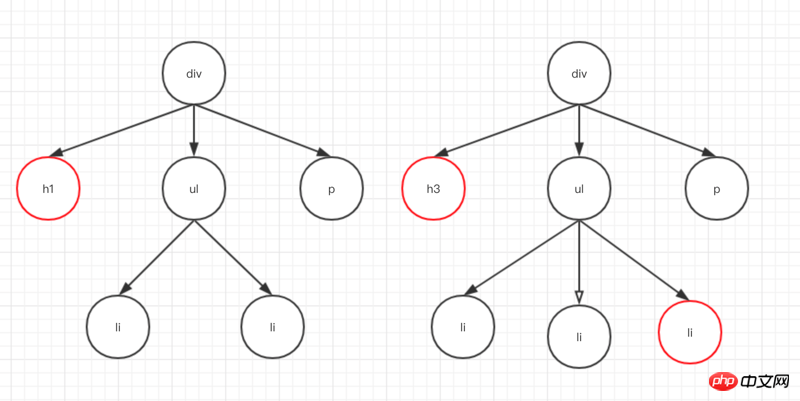
For example, the following two trees Compare and record the differences.

Mainly traverses the index of the resume (see Figure 3), then starts the comparison from the root node, records the difference objects after comparing, and continues from the left Compare subtrees, record differences, and continue traversing. The main process is as follows
// 这是比较两个树找到最小移动量的算法是Levenshtein距离,即O(n * m)
// 具体请看 https://www.npmjs.com/package/list-diff2
import listDiff from 'list-diff2'
// 比较两棵树
function diff (oldTree, newTree) {
  // 节点的遍历顺序
  let index = 0
  // 在遍历过程中记录节点的差异
  let patches = {}
  // 深度优先遍历两棵树
  deepTraversal(oldTree, newTree, index, patches)
  // 得到的差异对象返回出去
  return patches
}

function deepTraversal(oldNode, newNode, index, patches) {
  let currentPatch = []
  // ...中间有很多对patches的处理
  // 递归比较子节点是否相同
  diffChildren(oldNode.children, newNode.children, index, patches, currentPatch)
  if (currentPatch.length) {
    // 那个index节点的差异记录下来
    patches[index] = currentPatch
  }
}

// 子数的diff
function diffChildren (oldChildren, newChildren, index, patches, currentPatch) {
  const diffs = listDiff(oldChildren, newChildren)
  newChildren = diffs.children
  // ...省略记录差异对象
  let leftNode = null
  let currentNodeIndex = index
  oldChildren.forEach((child, i) => {
    const newChild = newChildren[i]
    // index相加
    currentNodeIndex = (leftNode && leftNode.count) ? currentNodeIndex + leftNode.count + 1 : currentNodeIndex + 1
    // 深度遍历,递归
    deepTraversal(child, newChild, currentNodeIndex, patches)
    // 从左树开始
    leftNode = child
  })
}Then we call diff(tree, newTree) until the final difference object looks like this.
{
  "1": [
    {
      "type": 0,
      "node": {
        "tagName": "h3",
        "props": {
          "style": "color: green"
        },
        "children": [
          "I am H1"
        ],
        "count": 1
      }
    }
  ]
  ...
}key represents that node, here we are the second one, that is, h1 will be changed to h3, and some are omitted The two difference object codes are not posted~~
Then take a look at the complete code of diff.js, as follows
import listDiff from 'list-diff2'
// 每个节点有四种变动
export const REPLACE = 0 // 替换原有节点
export const REORDER = 1 // 调整子节点,包括移动、删除等
export const PROPS = 2 // 修改节点属性
export const TEXT = 3 // 修改节点文本内容

export function diff (oldTree, newTree) {
  // 节点的遍历顺序
  let index = 0
  // 在遍历过程中记录节点的差异
  let patches = {}
  // 深度优先遍历两棵树
  deepTraversal(oldTree, newTree, index, patches)
  // 得到的差异对象返回出去
  return patches
}

function deepTraversal(oldNode, newNode, index, patches) {
  let currentPatch = []
  if (newNode === null) { // 如果新节点没有的话直接不用比较了
    return
  }
  if (typeof oldNode === 'string' && typeof newNode === 'string') {
    // 比较文本节点
    if (oldNode !== newNode) {
      currentPatch.push({
        type: TEXT,
        content: newNode
      })
    }
  } else if (oldNode.tagName === newNode.tagName && oldNode.key === newNode.key) {
    // 节点类型相同
    // 比较节点的属性是否相同
    let propasPatches = diffProps(oldNode, newNode)
    if (propasPatches) {
      currentPatch.push({
        type: PROPS,
        props: propsPatches
      })
    }
    // 递归比较子节点是否相同
    diffChildren(oldNode.children, newNode.children, index, patches, currentPatch)
  } else {
    // 节点不一样,直接替换
    currentPatch.push({ type: REPLACE, node: newNode })
  }

  if (currentPatch.length) {
    // 那个index节点的差异记录下来
    patches[index] = currentPatch
  }

}

// 子数的diff
function diffChildren (oldChildren, newChildren, index, patches, currentPatch) {
  var diffs = listDiff(oldChildren, newChildren)
  newChildren = diffs.children
  // 如果调整子节点,包括移动、删除等的话
  if (diffs.moves.length) {
    var reorderPatch = {
      type: REORDER,
      moves: diffs.moves
    }
    currentPatch.push(reorderPatch)
  }

  var leftNode = null
  var currentNodeIndex = index
  oldChildren.forEach((child, i) => {
    var newChild = newChildren[i]
    // index相加
    currentNodeIndex = (leftNode && leftNode.count) ? currentNodeIndex + leftNode.count + 1 : currentNodeIndex + 1
    // 深度遍历,从左树开始
    deepTraversal(child, newChild, currentNodeIndex, patches)
    // 从左树开始
    leftNode = child
  })
}

// 记录属性的差异
function diffProps (oldNode, newNode) {
  let count = 0 // 声明一个有没没有属性变更的标志
  const oldProps = oldNode.props
  const newProps = newNode.props
  const propsPatches = {}

  // 找出不同的属性
  for (let [key, val] of Object.entries(oldProps)) {
    // 新的不等于旧的
    if (newProps[key] !== val) {
      count++
      propsPatches[key] = newProps[key]
    }
  }
  // 找出新增的属性
  for (let [key, val] of Object.entries(newProps)) {
    if (!oldProps.hasOwnProperty(key)) {
      count++
      propsPatches[key] = val
    }
  }
  // 没有新增 也没有不同的属性 直接返回null
  if (count === 0) {
    return null
  }

  return propsPatches
}After getting the difference object, the only thing left is to apply the difference object to our dom above the node.
Apply the difference object to the rendered dom tree
It’s actually much simpler here. After the difference object we obtained above, we then select the same depth traversal. If there is a difference in that node, determine which of the above four types it is, and directly modify the node according to the difference object.
function patch (node, patches) {
  // 也是从0开始
  const step = {
    index: 0
  }
  // 深度遍历
  deepTraversal(node, step, patches)
}

// 深度优先遍历dom结构
function deepTraversal(node, step, patches) {
  // 拿到当前差异对象
  const currentPatches = patches[step.index]
  const len = node.childNodes ? node.childNodes.length : 0
  for (let i = 0; i < len; i++) {
    const child = node.childNodes[i]
    step.index++
    deepTraversal(child, step, patches)
  }
  //如果当前节点存在差异
  if (currentPatches) {
    // 把差异对象应用到当前节点上
    applyPatches(node, currentPatches)
  }
}In this way, calling patch(rootnode, patches) can directly change the different nodes in a targeted manner.
The complete code of path.js is as follows:
import {REPLACE, REORDER, PROPS, TEXT} from './diff'
import { setAttr } from './utils'

export function patch (node, patches) {
  // 也是从0开始
  const step = {
    index: 0
  }
  // 深度遍历
  deepTraversal(node, step, patches)
}

// 深度优先遍历dom结构
function deepTraversal(node, step, patches) {
  // 拿到当前差异对象
  const currentPatches = patches[step.index]
  const len = node.childNodes ? node.childNodes.length : 0
  for (let i = 0; i < len; i++) {
    const child = node.childNodes[i]
    step.index++
    deepTraversal(child, step, patches)
  }
  //如果当前节点存在差异
  if (currentPatches) {
    // 把差异对象应用到当前节点上
    applyPatches(node, currentPatches)
  }
}

// 把差异对象应用到当前节点上
function applyPatches(node, currentPatches) {
  currentPatches.forEach(currentPatch => {
    switch (currentPatch.type) {
      // 0: 替换原有节点
      case REPLACE:
        var newNode = (typeof currentPatch.node === 'string') ?  document.createTextNode(currentPatch.node) : currentPatch.node.render()
        node.parentNode.replaceChild(newNode, node)
        break
      // 1: 调整子节点,包括移动、删除等
      case REORDER:
        moveChildren(node, currentPatch.moves)
        break
      // 2: 修改节点属性
      case PROPS:
        for (let [key, val] of Object.entries(currentPatch.props)) {
          if (val === undefined) {
            node.removeAttribute(key)
          } else {
            setAttr(node, key, val)
          }
        }
        break;
      // 3:修改节点文本内容
      case TEXT:
        if (node.textContent) {
          node.textContent = currentPatch.content
        } else {
          node.nodeValue = currentPatch.content
        }
        break;
      default:
        throw new Error('Unknow patch type ' + currentPatch.type);
    }
  })
}

// 调整子节点,包括移动、删除等
function moveChildren (node, moves) {
  let staticNodelist = Array.from(node.childNodes)
  const maps = {}
  staticNodelist.forEach(node => {
    if (node.nodeType === 1) {
      const key = node.getAttribute('key')
      if (key) {
        maps[key] = node
      }
    }
  })
  moves.forEach(move => {
    const index = move.index
    if (move.type === 0) { // 变动类型为删除的节点
      if (staticNodeList[index] === node.childNodes[index]) {
        node.removeChild(node.childNodes[index]);
      }
      staticNodeList.splice(index, 1);
    } else {
      let insertNode = maps[move.item.key]
          ? maps[move.item.key] : (typeof move.item === 'object')
          ? move.item.render() : document.createTextNode(move.item)
      staticNodelist.splice(index, 0, insertNode);
      node.insertBefore(insertNode, node.childNodes[index] || null)
    }
  })
}到这里,最基本的虚拟DOM原理已经讲完了,也简单了实现了一个虚拟DOM.
The above is the detailed content of Analysis and implementation of virtual dom principle process. For more information, please follow other related articles on the PHP Chinese website!

Hot AI Tools

Undresser.AI Undress
AI-powered app for creating realistic nude photos

AI Clothes Remover
Online AI tool for removing clothes from photos.

Undress AI Tool
Undress images for free

Clothoff.io
AI clothes remover

Video Face Swap
Swap faces in any video effortlessly with our completely free AI face swap tool!

Hot Article

Hot Tools

Notepad++7.3.1
Easy-to-use and free code editor

SublimeText3 Chinese version
Chinese version, very easy to use

Zend Studio 13.0.1
Powerful PHP integrated development environment

Dreamweaver CS6
Visual web development tools

SublimeText3 Mac version
God-level code editing software (SublimeText3)

Hot Topics
 1392
1392
 52
52
 How to implement an online speech recognition system using WebSocket and JavaScript
Dec 17, 2023 pm 02:54 PM
How to use WebSocket and JavaScript to implement an online speech recognition system Introduction: With the continuous development of technology, speech recognition technology has become an important part of the field of artificial intelligence. The online speech recognition system based on WebSocket and JavaScript has the characteristics of low latency, real-time and cross-platform, and has become a widely used solution. This article will introduce how to use WebSocket and JavaScript to implement an online speech recognition system.
 WebSocket and JavaScript: key technologies for implementing real-time monitoring systems
Dec 17, 2023 pm 05:30 PM
WebSocket and JavaScript: Key technologies for realizing real-time monitoring systems Introduction: With the rapid development of Internet technology, real-time monitoring systems have been widely used in various fields. One of the key technologies to achieve real-time monitoring is the combination of WebSocket and JavaScript. This article will introduce the application of WebSocket and JavaScript in real-time monitoring systems, give code examples, and explain their implementation principles in detail. 1. WebSocket technology
 How to use JavaScript and WebSocket to implement a real-time online ordering system
Dec 17, 2023 pm 12:09 PM
Introduction to how to use JavaScript and WebSocket to implement a real-time online ordering system: With the popularity of the Internet and the advancement of technology, more and more restaurants have begun to provide online ordering services. In order to implement a real-time online ordering system, we can use JavaScript and WebSocket technology. WebSocket is a full-duplex communication protocol based on the TCP protocol, which can realize real-time two-way communication between the client and the server. In the real-time online ordering system, when the user selects dishes and places an order
 How to implement an online reservation system using WebSocket and JavaScript
Dec 17, 2023 am 09:39 AM
How to use WebSocket and JavaScript to implement an online reservation system. In today's digital era, more and more businesses and services need to provide online reservation functions. It is crucial to implement an efficient and real-time online reservation system. This article will introduce how to use WebSocket and JavaScript to implement an online reservation system, and provide specific code examples. 1. What is WebSocket? WebSocket is a full-duplex method on a single TCP connection.
 JavaScript and WebSocket: Building an efficient real-time weather forecasting system
Dec 17, 2023 pm 05:13 PM
JavaScript and WebSocket: Building an efficient real-time weather forecast system Introduction: Today, the accuracy of weather forecasts is of great significance to daily life and decision-making. As technology develops, we can provide more accurate and reliable weather forecasts by obtaining weather data in real time. In this article, we will learn how to use JavaScript and WebSocket technology to build an efficient real-time weather forecast system. This article will demonstrate the implementation process through specific code examples. We
 Simple JavaScript Tutorial: How to Get HTTP Status Code
Jan 05, 2024 pm 06:08 PM
JavaScript tutorial: How to get HTTP status code, specific code examples are required. Preface: In web development, data interaction with the server is often involved. When communicating with the server, we often need to obtain the returned HTTP status code to determine whether the operation is successful, and perform corresponding processing based on different status codes. This article will teach you how to use JavaScript to obtain HTTP status codes and provide some practical code examples. Using XMLHttpRequest
 How to use insertBefore in javascript
Nov 24, 2023 am 11:56 AM
Usage: In JavaScript, the insertBefore() method is used to insert a new node in the DOM tree. This method requires two parameters: the new node to be inserted and the reference node (that is, the node where the new node will be inserted).
 JavaScript and WebSocket: Building an efficient real-time image processing system
Dec 17, 2023 am 08:41 AM
JavaScript is a programming language widely used in web development, while WebSocket is a network protocol used for real-time communication. Combining the powerful functions of the two, we can create an efficient real-time image processing system. This article will introduce how to implement this system using JavaScript and WebSocket, and provide specific code examples. First, we need to clarify the requirements and goals of the real-time image processing system. Suppose we have a camera device that can collect real-time image data


