This article brings you a detailed introduction to the Thymeleaf template in SpringBoot. It has certain reference value. Friends in need can refer to it. I hope it will be helpful to you.
1. Preface
Thymeleaf emerged to replace JSP, although JSP has existed for a long time and has been used in Java Web It is everywhere in development, but it also has some flaws:
1. The most obvious problem with JSP is that it looks like HTML or XML, but it is not. Most JSP templates are in the form of HTML, but they are mixed with tags from various JSP tag libraries, making it very confusing.
2. The JSP specification is closely coupled with the Servlet specification. This means that it can only be used in Servlet-based web applications. JSP templates cannot be used as general templates (such as formatting emails), nor can they be used in non-Servlet Web applications.
Compared with JSP, Thymeleaf solves these shortcomings very well:
1. Thymeleaf templates are native and do not rely on tag libraries. It can be edited and rendered where raw HTML is accepted.
2. Because it is not coupled with the Servlet specification, therefore Thymeleaf Templates can go into areas that JSP cannot. This means that Thymeleaf templates, unlike JSPs, can be edited and even rendered in their original form without having to go through any kind of processing. Of course, we need Thymeleaf to process the template and render the final desired output. Even so, without any special processing, home.html can be loaded into a web browser and look similar to a full rendering.
Spring boot does not recommend using JSP to develop web.
2. Integrate Thymeleaf template engine
SpringBoot’s support for Thymeleaf template engine is also very simple:
1, pom.xml
<dependency>
    <groupId>org.springframework.boot</groupId>
    <artifactId>spring-boot-starter-thymeleaf</artifactId>
</dependency>At this time, SpringBoot's support for Thymeleaf templates is complete, and we can use Thymeleaf templates in Web development. Simple, right?
mentioned in previous articles
The key to SpringBoot is "convention". Since we have chosen such a simple configuration, we must comply with SpringBoot's requirements for Thymeleaf during development.
The most important point of the conventional solution is that the template files are placed in the templates directory, that is, the template parser prefix is /templates/ and the suffix is .html
2, application.yml
What if you don’t want the so-called conventional solution and want to make some customized configurations? Look below:
spring:
  thymeleaf:
    prefix: classpath:/templates/
    suffix: .html
    servlet:
      content-type: text/html
    enabled: true
    encoding: UTF-8
    mode: HTML5
cache: false3, WebConfig.java
If the above configuration cannot meet your requirements, you want to have more detailed control over Thymeleaf, including configuring the view parser, Template parser and template engine, then please see the solution below!
/**
 * 1、ThymeleafViewResolver 接收逻辑视图名称将它解析为视图
 * 2、SpringTemplateEngine会在Spring中启用Thymeleaf引擎,用来解析模板,并基于这些模板渲染结果
 * 3、TemplateResolver会最终定位和查找模板。
 */
@Configuration
public class WebConfig {
    /**
     * 配置 Thymeleaf 视图解析器 —— 将逻辑视图名称解析为 Thymeleaf 模板视图
     *
     * @param springTemplateEngine 模板引擎
     * @return
     */
    @Bean
    public ViewResolver viewResolver(SpringTemplateEngine springTemplateEngine){
        ThymeleafViewResolver resolver = new ThymeleafViewResolver();
        resolver.setTemplateEngine(springTemplateEngine);
        return resolver;
    }
    /**
     * 模板引擎 —— 处理模板并渲染结果
     *
     * @param templateResolver 模板解析器
     * @return
     */
    @Bean
    public SpringTemplateEngine springTemplateEngine(ITemplateResolver templateResolver) {
        SpringTemplateEngine springTemplateEngine = new SpringTemplateEngine();
        springTemplateEngine.setTemplateResolver(templateResolver);
        return springTemplateEngine;
    }
    /**
     * 模板解析器 —— 加载 Thymeleaf 模板
     *
     * @return
     */
    @Bean
    public ITemplateResolver templateResolver() {
        SpringResourceTemplateResolver templateResolver = new SpringResourceTemplateResolver();
        templateResolver.setPrefix("classpath:/templates/");
        templateResolver.setSuffix(".html");
        templateResolver.setTemplateMode(TemplateMode.HTML);
        templateResolver.setCacheable(false);
        templateResolver.setTemplateMode("HTML5");
        return templateResolver;
    }
}3. Use Thymeleaf template
After completing the above configuration, let us take a look at how to use Thymeleaf template in SpringBoot:
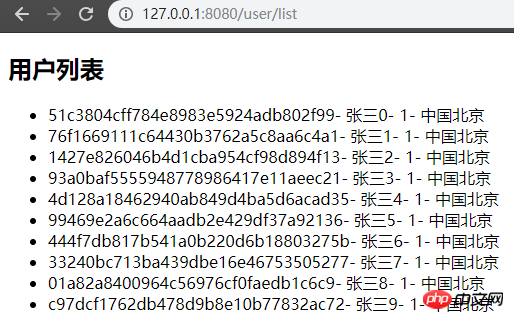
1. Template file - /templates/user/list.html
<!DOCTYPE html>
<html xmlns:th="http://www.thymeleaf.org">
<head>
    <meta charset="UTF-8" />
    <title>Insert title here</title>
</head>
<body>
<h2>用户列表</h2>
<div>
    <ul>
        <li  th:each="user:${users}">
            <span th:text="${user.uuid}"></span>-
            <span th:text="${user.name}"></span>-
            <span th:text="${user.age}"></span>-
            <span th:text="${user.address}"></span>
        </li>
    </ul>
</div>
</body>
</html>2. Control layer - ModelAndViews
Here Model refers to Yes: the control layer processes the request and returns the results that need to be rendered; Views refers to: the logical view name of the template (separated from front and back ends).
@Controller
@RequestMapping("/user")
public class UserController {

    @RequestMapping("/list")
    public String listUser(Model model) {
        List<UserDto> userList = new ArrayList<>();
        for (int i = 0; i < 10; i++) {
            userList.add(new UserDto(UUID.randomUUID().toString().replace("-", ""), "张三" + i, 1, "中国北京"));
        }
        model.addAttribute("users", userList);
        return "user/list";
    }
}3. Effect

##Demo source code: https:/ /github.com/JMCuixy/Thymeleaf
The above is the detailed content of Detailed introduction to Thymeleaf templates in SpringBoot. For more information, please follow other related articles on the PHP Chinese website!
 SpringBoot project building steps
 What is the difference between j2ee and springboot
 The difference between distributed and microservices
 index.html function
 How to open vsd file
 cad2012 serial number and key collection
 What directory search engines are there?
 How to set Chinese in vscode
 Is A5 bigger or B5 paper bigger?