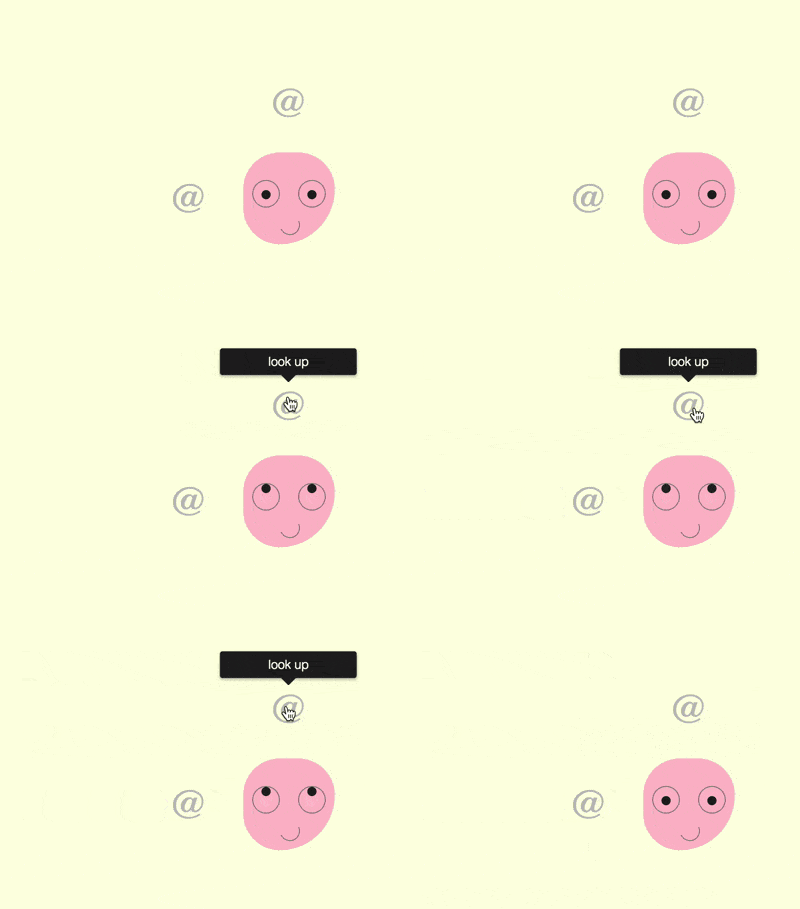
The content of this article is about how to use CSS and Vanilla.js to implement a set of tooltip prompt boxes (source code attached). It has certain reference value. Friends in need can refer to it. I hope It will help you.

https://github.com/comehope/front- end-daily-challenges
Define dom, the container contains a sub-container named .emoji, which represents an avatar and its sub-element eye left, eye right, mouth represent the left eye, right eye and mouth respectively:
<section>
    <div>
        <span></span>
        <span></span>
        <span></span>
    </div>
</section>
Centered display:
body {
    margin: 0;
    height: 100vh;
    display: flex;
    align-items: center;
    justify-content: center;
    background-color: lightyellow;
}Define the container size and alignment of child elements:
.container {
    position: relative;
    width: 20em;
    height: 20em;
    font-size: 10px;
    display: flex;
    align-items: center;
    justify-content: center;
}Define the outline of the avatar:
.emoji {
    position: relative;
    box-sizing: border-box;
    width: 10em;
    height: 10em;
    background-color: pink;
    border-radius: 50% 50% 75% 50%;
}Define the outline of the avatar’s eyes:
.emoji .eye {
    position: absolute;
    box-sizing: border-box;
    width: 3em;
    height: 3em;
    border: 0.1em solid gray;
    border-radius: 50%;
    top: 3em;
}

.emoji .eye.left {
    left: 1em;
}

.emoji .eye.right {
    right: 1em;
}Draw the eyeballs:
.emoji .eye.left::before,
.emoji .eye.right::before {
    content: '';
    position: absolute;
    width: 1em;
    height: 1em;
    background-color: #222;
    border-radius: 50%;
    top: 1em;
    left: calc((100% - 1em) / 2);
}Draw a smiling mouth:
.emoji .mouth {
    position: absolute;
    width: 2em;
    height: 2em;
    border: 0.1em solid;
    bottom: 1em;
    left: 40%;
    border-radius: 50%;
    border-color: transparent gray gray transparent;
    transform: rotate(20deg);
} Next, create the effect of turning the eyes in 4 directions.
Use 2 variables to represent the positioning position of the eyeball respectively:
.emoji .eye {
    --top: 1em;
    --left: calc((100% - 1em) / 2);
}

.emoji .eye.left::before,
.emoji .eye.right::before {
    top: var(--top);
    left: var(--left);
}Set the positioning position of the eyeball in 4 directions:
.emoji.top .eye {
    --top: 0;
}

.emoji.bottom .eye {
    --top: 1.8em;
}

.emoji.left .eye {
    --left: 0;
}

.emoji.right .eye {
    --left: 1.8em;
}At this time, if it is a dom element .emoji Add any of the 4 styles top, bottom, left, right, and the eyes will turn to the specific direction.
Add 4 elements to the dom, the content of each element is an @ character:
<section>
    <div>
        <!-- 略 -->
    </div>

    <span>@</span>
    <span>@</span>
    <span>@</span>
    <span>@</span>
</section>
Lay out the 4 elements around the avatar:
.tip {
    position: absolute;
    cursor: pointer;
    font-size: 4.5em;
    color: silver;
    font-family: sans-serif;
    font-weight: 100;
}

.tip.top {
    top: -15%;
}

.tip.bottom {
    bottom: -15%;
}

.tip.left {
    left: -15%;
}

.tip.right {
    right: -15%;
}Write a script , add a little interactive effect. When the mouse is hovering over @ in 4 directions, turn your eyes in the corresponding direction. The DIRECTION constant here stores 4 directions, the EVENTS constant stores 2 mouse events, and the $ constant wraps the operation of getting the dom element based on the class name:
const DIRECTIONS = ['top', 'bottom', 'left', 'right']
const EVENTS = ['mouseover', 'mouseout']
const $ = (className) => document.getElementsByClassName(className)[0]

DIRECTIONS.forEach(direction =>
    EVENTS.forEach((e) =>
        $(`tip ${direction}`).addEventListener(e, () =>
            $('emoji').classList.toggle(direction)
        )
    )
)Set the easing time for the eyeballs to make the animation smooth:
.emoji .eye.left::before,
.emoji .eye.right::before {
    transition: 0.3s;
} Next, create a tooltip prompt box.
Add the data-tip attribute to the dom with four @ symbols, the content of which is the tooltip information:
<section>
    <div>
        <!-- 略 -->
    </div>

    <span>@</span>
    <span>@</span>
    <span>@</span>
    <span>@</span>
</section>
Use the ::before pseudo-element to display the prompt information , the style is white text on a black background:
.tip::before {
    content: attr(data-tip);
    position: absolute;
    font-size: 0.3em;
    font-family: sans-serif;
    width: 10em;
    text-align: center;
    background-color: #222;
    color: white;
    padding: 0.5em;
    border-radius: 0.2em;
    box-shadow: 0 0.1em 0.3em rgba(0, 0, 0, 0.3);
}Position the top prompt box to the center above the top @ symbol:
.tip.top::before {
    top: 0;
    left: 50%;
    transform: translate(-50%, calc(-100% - 0.6em));
}Similarly, position the other three prompt boxes to the @ symbol Next to:
.tip.bottom::before {
    bottom: 0;
    left: 50%;
    transform: translate(-50%, calc(100% + 0.6em));
}

.tip.left::before {
    left: 0;
    top: 50%;
    transform: translate(calc(-100% - 0.6em), -50%);
}

.tip.right::before {
    right: 0;
    top: 50%;
    transform: translate(calc(100% + 0.6em), -50%);
}Use the ::after pseudo-element to draw an inverted triangle under the top tooltip:
.tip::after {
    content: '';
    position: absolute;
    font-size: 0.3em;
    width: 0;
    height: 0;
    color: #222;
    border: 0.6em solid transparent;
}

.tip.top::after {
    border-bottom-width: 0;
    border-top-color: currentColor;
    top: -0.6em;
    left: 50%;
    transform: translate(-50%, 0);
}Similarly, next to the other 3 tooltips Draw a triangle:
.tip.bottom::after {
    border-top-width: 0;
    border-bottom-color: currentColor;
    bottom: -0.6em;
    left: 50%;
    transform: translate(-50%, 0);
}

.tip.left::after {
    border-right-width: 0;
    border-left-color: currentColor;
    left: -0.6em;
    top: 50%;
    transform: translate(0, -50%);
}

.tip.right::after {
    border-left-width: 0;
    border-right-color: currentColor;
    right: -0.6em;
    top: 50%;
    transform: translate(0, -50%);
}Finally, hide the prompt box so that the prompt box only appears when the mouse is hovered:
.tip::before,
.tip::after {
    visibility: hidden;
    filter: opacity(0);
    transition: 0.3s;
}

.tip:hover::before,
.tip:hover::after {
    visibility: visible;
    filter: opacity(1);
}The above is the detailed content of How to use CSS and Vanilla.js to implement a set of tooltip prompt boxes (source code attached). For more information, please follow other related articles on the PHP Chinese website!