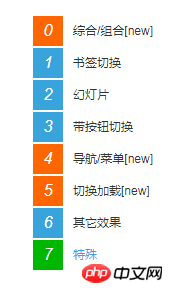
This article will introduce to you how to achieve the cool right-side floating menu bar effect with CSS. It has certain reference value. Friends in need can refer to it. I hope it will be helpful to you.
Default display effect:


<!DOCTYPE html>
<html>
    <head>
        <meta charset="UTF-8">
        <title></title>
        <script src="jquery-1.11.1.min.js"></script>
        <style type="text/css">
            *{margin:0;padding:0;}
            body{ color:#333;font:12px/20px Arial,"Microsoft YaHei","宋体",sans-serif; text-align:center; background:#fff;  }
            a{text-decoration:none;color:#333;}
            .rightNav{ position:fixed; width:140px;  right:0; top:100px; _position:absolute; text-align:left; cursor:pointer; background-image:url(about:blank);  }
            .rightNav a{ display:block; position:relative; height:30px; line-height:30px; margin-bottom:2px; background:#fff; padding-right:10px; width:130px; overflow:hidden;  cursor:pointer; right:-110px; }
            .rightNav a:hover{ text-decoration:none; color:#39A4DC;  }
            .rightNav a:hover em{ background:#00b700}
            .rightNav a em{ display:block; float:left; width:30px; background:#39A4DC; color:#fff; font-size:16px; text-align:center; margin-right:10px;}
            .rightNav a.new em{ background:#f60;}
        </style>
    </head>
    <body>
        <div class="rightNav">
            <a class="new" href="#effect0" style="right: -110px;"><em>0</em>综合/组合[new]</a>
            <a href="#effect1" style="right: -110px;"><em>1</em>书签切换</a>
            <a href="#effect2" style="right: -110px;"><em>2</em>幻灯片</a>
            <a href="#effect3" style="right: -110px;"><em>3</em>带按钮切换</a>
            <a class="new" href="#effect4" style="right: -110px;"><em>4</em>导航/菜单[new]</a>
            <a class="new" href="#effect5" style="right: -110px;"><em>5</em>切换加载[new]</a>
            <a href="#effectT1" style="right: -110px;"><em>6</em>其它效果</a>
            <a href="#effectT1" style="right: -110px;"><em>7</em>特殊</a>
        </div>
        <script type="text/javascript">

            //右侧导航
            var btb=$(".rightNav");
            var tempS;
            $(".rightNav").hover(function(){
                    var thisObj = $(this);
                    tempS = setTimeout(function(){
                    thisObj.find("a").each(function(i){
                        var tA=$(this);
                        console.log(i);
                        setTimeout(function(){ tA.animate({right:"0"},200);},50*i);
                    });
                },200);

            },function(){
                if(tempS){ clearTimeout(tempS); }
                $(this).find("a").each(function(i){
                    var tA=$(this);
                    setTimeout(function(){ tA.animate({right:"-110"},200,function(){
                    });},50*i);
                });

            });


        </script>
    </body>
</html>CSS Video Tutorial!
Related recommendations:php public welfare training video tutorial
##div/css graphic tutorialThe above is the detailed content of CSS to achieve cool right floating menu bar effect (code example). For more information, please follow other related articles on the PHP Chinese website!