This article brings you a detailed introduction to the SpringMVC workflow (with code). It has certain reference value. Friends in need can refer to it. I hope it will be helpful to you.
SpringMVC workflow:
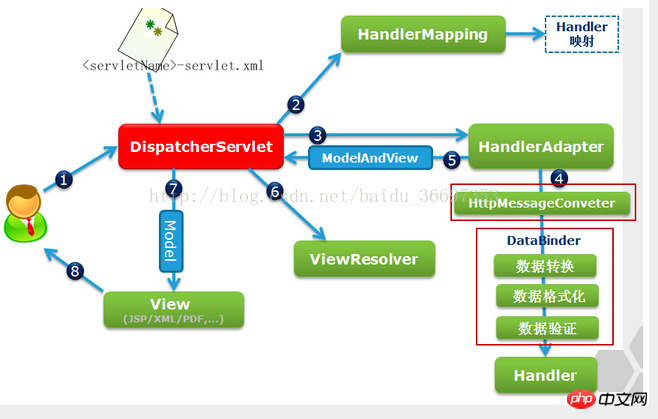
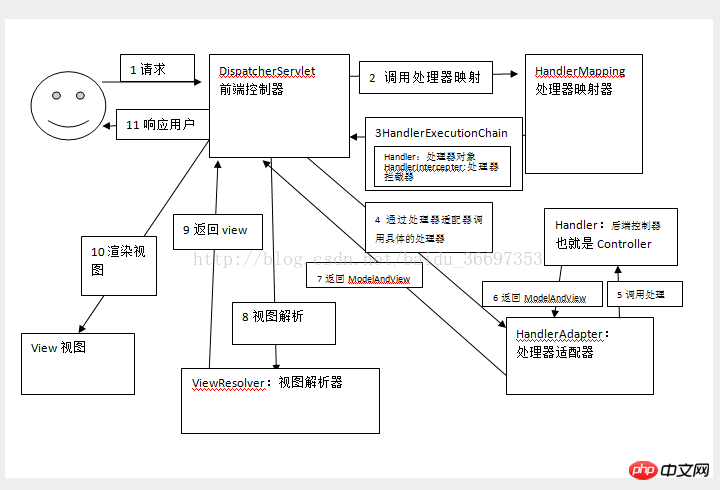
SpringMVC workflow description
1. User to server When sending a request, the request is obtained by the Spring front-end controller DispatcherServlet, as shown in the detailed figure in the first step 2. DispatcherServlet parses the request URL (for example, we send a request with the following URL http: //localhost:8080/SpringMVC/hello.action), you will get the request resource identifier (URI, equivalent to hello.action above). Then according to the URI, the handler mapper (HandlerMapping) is called to obtain all related objects configured by the Handler (including the Handler object and the interceptor corresponding to the Handler object), and finally returned in the form of a HandlerExecutionChain object. 3.DispatcherServlet gets the Handler returned above and selects a suitable HandlerAdapter. (Note: If the HandlerAdapter is successfully obtained, the preHandler(...) method of the interceptor will start to be executed at this time) 4. After selecting the appropriate HandlerAdapter, the Handler will start to be executed. During the process of filling in the Handler's parameters, Spring will do some extra work for you according to the configuration (we don't need to take care of it): EG:HttpMessageConveter: Will request the message (such as Json , xml and other data) into an object, and convert the object into the specified response informationData conversion: Convert the request message to data. For example, String is converted into Integer, Double, etc.Data radicalization: Format the data of the request message. Such as converting strings into formatted numbers or formatted dates, etc.Data verification: Verify the validity of the data (length, format, etc.), and store the verification results in BindingResult or Error5 . After the execution of the Handler is completed, a ModelAndView object (including the view name or the view name and the model) is returned to the DispatcherServlet 6. Based on the returned ModelAndView object, select a suitable ViewResolver and return it to the DispatcherServlet; 7. ViewResolver combines Model and View to render the view 8. Finally, return the view rendering result to the client Component noun explanation:2. Configure the front-end controller in web.xml
<servlet>
<servlet-name>springmvc</servlet-name>
<servlet-class>org.springframework.web.servlet.DispatcherServlet</servlet-class>
</servlet>
<!-- 让servlet随服务启动 -->
<servlet-mapping>
<servlet-name>springmvc</servlet-name>
<url-pattern>*.action</url-pattern>
</servlet-mapping>
3 cannot be found according to the jsp path.Settingsspringmvc Configuration file
<servlet>
<init-param>
<param-name>contextConfigLocation</param-name>
<param-value>WEB-INF/springmvc.xml</param-value>
</init-param>
</servlet>
4.Development Processor
public class Hello implements Controller{
	@Override
	public ModelAndView handleRequest(HttpServletRequest request, HttpServletResponse response) throws Exception {
		List list = new ArrayList<>();
		list.add("one");
		list.add("two");
		ModelAndView mv = new ModelAndView();
		mv.addObject("list",list);
		return mv;
	}
}5.在springmvc.xml中配置、
<!-- 配置适配器 -->
<bean class="org.springframework.web.servlet.mvc.SimpleControllerHandlerAdapter"></bean>
<!-- 处理器映射器  -->
<!-- 根据bean的 name 查找Handler , 将action的URL 配置在bean的name中-->
<bean class="org.springframework.web.servlet.handler.BeanNameUrlHandlerMapping"></bean>
<!-- 配置处理器 -->
<bean name="/hello.action" class="com.mt.controller.Hello"></bean>
<!-- 配置视图解析器 -->
<bean class="org.springframework.web.servlet.view.InternalResourceViewResolver"></bean>
6.视图开发 ,jsp文件
<%@ page language="java" contentType="text/html; charset=UTF-8"
pageEncoding="UTF-8"%>
<!DOCTYPE html PUBLIC "-//W3C//DTD HTML 4.01 Transitional//EN" "http://www.w3.org/TR/html4/loose.dtd">
<html>
<head>
<meta http-equiv="Content-Type" content="text/html; charset=UTF-8">
<title>Insert title here</title>
</head>
<body>
asdfadfadfa
${list }
</body>
</html>测试结果: 开启服务器后, 发送 http://localhost:8080/SpringMVC/hello.action的请求
页面显示:
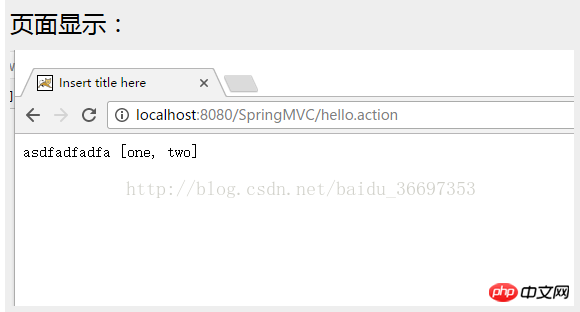
对应理解springMVC 的流程即可。
The above is the detailed content of Detailed introduction to SpringMVC workflow (with code). For more information, please follow other related articles on the PHP Chinese website!
 What to do if the specified module cannot be found
 What does independent direct connection mean?
 How about Ouyi Exchange?
 How to set up ftp server
 Win10 My Computer Icon Retrieval Tutorial
 Introduction to monitoring equipment of weather stations
 java environment variable configuration
 What are the uses of mysql
