

Margin border overlay problems and solutions in CSS

This article will introduce to you the problem and solution of margin boundary overlay in CSS. It has certain reference value. Friends in need can refer to it. I hope it will be helpful to you.
Do you understand the concept of CSS margin border overlay? Let me share with you. When an element appears on top of another element, the bottom border of the first element and the top border of the second element Overlay occurs.
In-depth analysis of CSS margin border overlay
Introduction to border overlay
Border overlay is a fairly simple concept. However, it can cause a lot of confusion when laying out web pages in practice. Simply put, when two vertical boundaries meet, they form a boundary. The height of this boundary is equal to the greater of the heights of the two superimposed boundaries.
When an element appears on top of another element, the bottom border of the first element overlaps the top border of the second element, see the picture:

◆The top border of an element overlaps the bottom border of the preceding element
When an element is contained within another element (assuming no padding or border separates the border), their top and / Or the bottom border also overlaps, as shown in the picture:
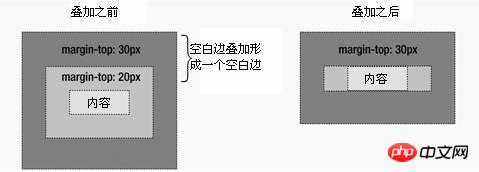
◆The top border of the element overlaps the top border of the parent element
Although at first glance It looks a little weird, but the border can even overlap itself. Suppose you have an empty element, it has a border, but no border or padding. In this case, the top border and the bottom border touch together, and they will overlap, as shown in the figure:

◆The top and bottom borders of the element overlap
If this boundary touches the boundary of another element, it will also overlap. See the picture:

◆The superimposed boundary of the empty element is different from the boundary of another element. The borders of an empty element overlap
This is why a series of empty paragraph elements take up very little space, because all their borders overlap together to form a small border.
Boundary overlay may seem a little strange at first, but it actually makes sense. Take, for example, a typical text page consisting of several paragraphs (see Figure 2-8). The space above the first paragraph is equal to the top margin of the paragraph. Without border overlay, the border between all subsequent paragraphs would be the sum of the adjacent top and bottom borders. This means the space between paragraphs is twice as large as the top of the page. If border overlapping occurs, the top and bottom borders between paragraphs overlap so that the distance is consistent everywhere.
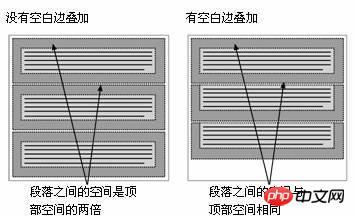
◆Border overlay maintains a consistent distance between elements
Border overlay only occurs at the vertical boundaries of block boxes in normal document flow. The boundaries between inline boxes, floated boxes, or absolutely positioned boxes do not overlap.
The problem of border overlay
Border overlay is a CSS feature that can cause a lot of trouble if misunderstood. Please refer to the simple example of a nested paragraph within a p element:
<div id="box">
<p>Thisparagraphhasa20pxmargin.</p>
<div>
The p box is set with a 10 pixel border and the paragraph is set with a 20 pixel border:
#box{
   margin:10px;
   background-color:#d5d5d5;
}
p{
   margin:20px;
   background-color:#6699ff;
}You will naturally think that the resulting style It will look like Figure 1-1, with a 20-pixel distance between the paragraph and the p, and a 10-pixel border around the outside of the p.
Figure 1-1

However, the resulting style actually looks like Figure 1-2.
Figure 1-2

Two situations happened here. First, the paragraph’s 20-pixel top and bottom borders overlap with the p’s 10-pixel border to form a single 20-pixel vertical border. Second, these boundaries are not surrounded by p, but protrude beyond the top and bottom of p. This occurs due to the way elements that have block-level children calculate their height.
如果元素没有垂直边框和填充,那么它的高度就是它包含的子元素的顶部和底部边框边缘之间的距离。因此,包含的子元素的顶部和底部空白边就突出到容器元素的外边。但是,有一个简单的解决方案。通过添加一个垂直边框或填充,空白边就不再叠了,而且元素的高度就是它包含的子元素的顶部和底部空白边边缘之间的距离。
为了让前面的示例看起来像图1-1这样,只需在p周围添加补白或边框:
#box{
   margin:10px;
   padding:1px;/*或者border:1pxsolidcolor;*/
   background-color:#d5d5d5;
}
p{
   margin:20px;
   background-color:#6699ff;
}边l界叠加的大多数问题可以通过添加透明边框或1px的补白来修复。
补充解决方案:
1.外层padding
2.透明边框border:1pxsolidtransparent;
3.绝对定位postion:absolute:
4.外层poverflow:hidden;
5.内层p 加float:left;display:inline;
6.外层p有时会用到zoom:1;
以上就是本篇的全部内容,更多相关教程请访问 CSS基础视频教程, CSS3视频教程,bootstrap视频教程!
The above is the detailed content of Margin border overlay problems and solutions in CSS. For more information, please follow other related articles on the PHP Chinese website!

Hot AI Tools

Undresser.AI Undress
AI-powered app for creating realistic nude photos

AI Clothes Remover
Online AI tool for removing clothes from photos.

Undress AI Tool
Undress images for free

Clothoff.io
AI clothes remover

Video Face Swap
Swap faces in any video effortlessly with our completely free AI face swap tool!

Hot Article
Hot Tools

Notepad++7.3.1
Easy-to-use and free code editor

SublimeText3 Chinese version
Chinese version, very easy to use

Zend Studio 13.0.1
Powerful PHP integrated development environment

Dreamweaver CS6
Visual web development tools

SublimeText3 Mac version
God-level code editing software (SublimeText3)
Hot Topics
 1389
1389
 52
52

 The Roles of HTML, CSS, and JavaScript: Core Responsibilities
Apr 08, 2025 pm 07:05 PM
The Roles of HTML, CSS, and JavaScript: Core Responsibilities
Apr 08, 2025 pm 07:05 PM
HTML defines the web structure, CSS is responsible for style and layout, and JavaScript gives dynamic interaction. The three perform their duties in web development and jointly build a colorful website.
 How to use bootstrap in vue
Apr 07, 2025 pm 11:33 PM
How to use bootstrap in vue
Apr 07, 2025 pm 11:33 PM
Using Bootstrap in Vue.js is divided into five steps: Install Bootstrap. Import Bootstrap in main.js. Use the Bootstrap component directly in the template. Optional: Custom style. Optional: Use plug-ins.
 How to write split lines on bootstrap
Apr 07, 2025 pm 03:12 PM
How to write split lines on bootstrap
Apr 07, 2025 pm 03:12 PM
There are two ways to create a Bootstrap split line: using the tag, which creates a horizontal split line. Use the CSS border property to create custom style split lines.
 Understanding HTML, CSS, and JavaScript: A Beginner's Guide
Apr 12, 2025 am 12:02 AM
Understanding HTML, CSS, and JavaScript: A Beginner's Guide
Apr 12, 2025 am 12:02 AM
WebdevelopmentreliesonHTML,CSS,andJavaScript:1)HTMLstructurescontent,2)CSSstylesit,and3)JavaScriptaddsinteractivity,formingthebasisofmodernwebexperiences.
 How to use bootstrap button
Apr 07, 2025 pm 03:09 PM
How to use bootstrap button
Apr 07, 2025 pm 03:09 PM
How to use the Bootstrap button? Introduce Bootstrap CSS to create button elements and add Bootstrap button class to add button text
 How to resize bootstrap
Apr 07, 2025 pm 03:18 PM
How to resize bootstrap
Apr 07, 2025 pm 03:18 PM
To adjust the size of elements in Bootstrap, you can use the dimension class, which includes: adjusting width: .col-, .w-, .mw-adjust height: .h-, .min-h-, .max-h-
 How to set up the framework for bootstrap
Apr 07, 2025 pm 03:27 PM
How to set up the framework for bootstrap
Apr 07, 2025 pm 03:27 PM
To set up the Bootstrap framework, you need to follow these steps: 1. Reference the Bootstrap file via CDN; 2. Download and host the file on your own server; 3. Include the Bootstrap file in HTML; 4. Compile Sass/Less as needed; 5. Import a custom file (optional). Once setup is complete, you can use Bootstrap's grid systems, components, and styles to create responsive websites and applications.
 How to insert pictures on bootstrap
Apr 07, 2025 pm 03:30 PM
How to insert pictures on bootstrap
Apr 07, 2025 pm 03:30 PM
There are several ways to insert images in Bootstrap: insert images directly, using the HTML img tag. With the Bootstrap image component, you can provide responsive images and more styles. Set the image size, use the img-fluid class to make the image adaptable. Set the border, using the img-bordered class. Set the rounded corners and use the img-rounded class. Set the shadow, use the shadow class. Resize and position the image, using CSS style. Using the background image, use the background-image CSS property.
