 Web Front-end
 H5 Tutorial
 Introduction to common terms and usage of animation tool DragonBones (picture)
Introduction to common terms and usage of animation tool DragonBones (picture)
This article brings you an introduction to the common terms and usage of the animation tool DragonBones (pictures). It has certain reference value. Friends in need can refer to it. I hope it will be helpful to you.
How to create more vivid animation effects with less art cost? Today I will introduce to you a set of open source 2D skeletal animation framework and tools - DragonBones, which includes the desktop skeletal animation production tool DragonBonesPro and a set of multi-language versions of the DragonBones skeletal animation library.

The following is an introduction to the common terms and usage of DragonBones.
1. DragonBones Commonly used terms in 2D skeletal animation
Skeleton: Armature is the most commonly used term in 2D skeletal animation, generally referring to many bones. composed of a whole. DragonBones also represent a character that can contain animations.
Skeleton (bone): Bone grid or bone is the most important basic unit that makes up the skeleton in the skeletal moving network. The bones themselves cannot be disassembled. They can be translated, rotated, scaled, and moved relative to each other in the skeleton. When combined, they form skeletal animation. In addition, there can be a parent-child relationship between bones. Generally speaking, under the default forward dynamics, the movement of the parent bone will drive the child bones to move together. For example, if a character lifts the upper arm, the lower arm, as the child bone of the upper arm, will also be lifted accordingly.
Slot: The slot is a container for displaying pictures in skeletal animation and belongs to the skeleton. Each slot can contain multiple images, but only one image will be displayed at a time. Each bone grid can contain multiple slots. The slot links the animation logic unit of the bone and the animation display unit of the picture, forming the bone-slot-picture, the basic bone structure in DragonBones skeletal animation.
Picture (texture): Picture is the element that displays the image. In the 2D skeletal system, the meaning of picture and texture is not much different, so it can also be called texture here.
Texture set: Texture set is a large image composed of packaged images, which facilitates resource integration, dissemination and loading in the game. If a hardware acceleration engine or Egret Runtime is used, texture set can greatly improve rendering efficiency. Therefore, the default interface provided by DragonBones for importing resources is to use texture sets.
Animation tweening: Generally, when designers do skeletal animation, they do not need to move the character in every frame, but only move the key in some key places (key frames). The key All between actions are replaced by procedurally generated tweens, which are animation tweens. Animation tweens can be linear or non-linear. Linear tweening means that the components on the tween are transformed (translated, rotated, scaled) at a constant speed. Non-linear tweening is generally represented by various curves, DragonBones By default, Bezier curves are used to represent nonlinear tweening.
Animation transition: Animation transition refers to the transition effect produced when switching from one animation to another. DragonBones provides a transition effect function when switching animation moving surfaces. As long as a transition time is set, a smooth transition effect can be automatically generated.
Animation fusion: Moving surface fusion provides the function of a character playing multiple animations at the same time. This function is generally used in two situations. The first type is that if the animation of a character is relatively complex, the upper body and lower body may need to be animated separately, and then they can be combined at will. The second type is if a character needs to be shot while running and the body leans back, that is, the running and being shot animations are inserted at the same time. The animation fusion function achieves these two needs by setting weights for different animations and adding animation masks to different bone paths. It should be noted that DragonBones only provides the animation fusion function in normal mode, and speed mode does not provide this function.
Forward dynamics (FK) and inverse dynamics (IK): In skeletal animation, generally speaking, the movement of child bones will be affected by the parent bone. For example, when the upper arm rotates, the forearm will also rotate. Follow the rotation, this is called forward dynamics, that is, the father affects the child. Of course, the opposite situation also exists in the real world. For example, someone punches you and you use your forearm to block it. When the forearm moves with force, it will also drive the big arm to move with force. This is called reverse power. study. When controlling bone path adjustment actions in DragonBones, the bones generally comply with the laws of forward dynamics, that is, when the parent bone is adjusted, the child bones will also be affected. If you want to adjust animation through reverse dynamics, you can choose the corresponding IK tool to achieve it.
First, after the installation is completed, open the welcome interface and select the project, as shown in Figure 1.
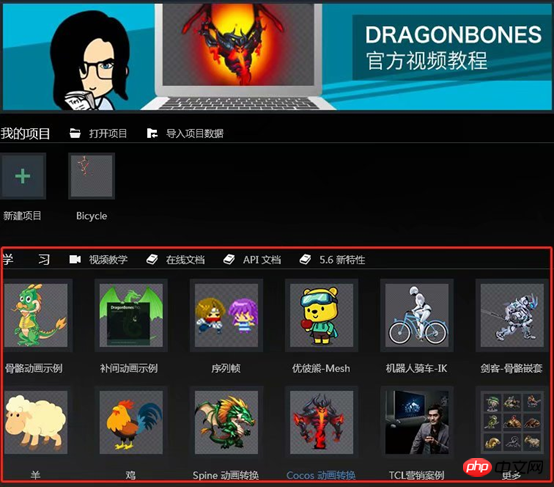
Figure 1
Then open the project you selected, as shown in Figure 2.
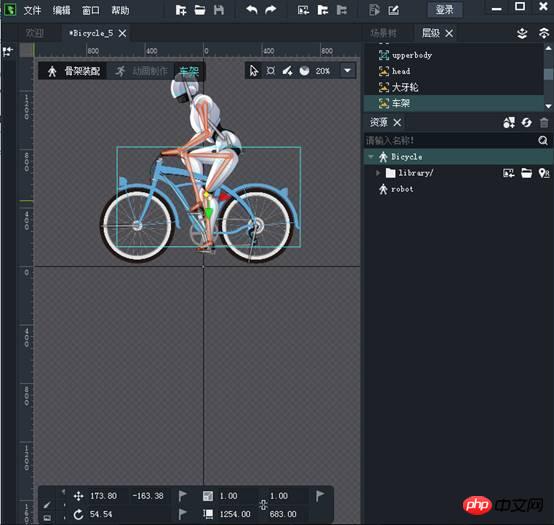
figure 2
Next, I will explain how to use each tool in Figure 2
1. System toolbar
The system toolbar contains the most commonly used functions , the button functions from left to right are: new project, open project, save project, undo, redo, import, export, preview work sharing, as shown in Figure 3.

Figure 3
New project: used to create a new project, click this button to open the new project dialog box.
Open project: Used to open an existing project. Click this button to open the system-specified file dialog box.
Save Project: If there are changes to the current project, the Save Project button will light up. Clicking the button will save the current project. After the project is saved, the Save Project button will dim.
Undo: Used to undo the last editing operation.
Redo: Used to redo the last undone editing operation.
Import: used to import a supported project file format, click this button to open the import dialog box
Export: used to export the project. Clicking this button will open the export dialog box.
Preview: Preview the running effect of the animation in the browser. If your project contains multiple animation clips, you can switch between them with a left-click of the mouse in the browser.
Work sharing: Open the work sharing and uploading page.
2. Main scene toolbar
The main scene toolbar is used to switch mouse modes during scene operations. From left to right, they are: Selection tool, Pose tool , hand tool, and bone creation tool, as shown in Figure 4.

Figure 4
Selection tool: When selecting a bone, click the mouse on the bone itself, hold down the left button to move, and you can move it arbitrarily in the X and Y directions skeleton. Click the mouse on the red X-axis (or green Y-axis) to translate in a single X-axis (Y-axis) direction. Drag the picture itself in the slot with the mouse and hold down the left button to move. You can move the bones in any direction of X and Y. Click the red X-axis (or green Y-axis) to select the single X-axis (Y-axis) Translate in the direction. Drag the zoom handle with the mouse to zoom the slot. Sockets can be rotated by clicking and holding the mouse in other areas (sockets can be selected and change state only in skeleton assembly mode).
Pose tool: When a bone is selected, the bone will rotate following the dragging of the mouse. When two or more bones are selected, the selected bones will follow the IK rules and follow the mouse drag.
Create Bone Tool: Select the Create Bone Tool, click the left mouse button in the main scene and drag to create bones. In addition, the main scene also supports some common operations:
Push and pull the mouse wheel to zoom in and out of the DragonBones Pro scene.
When the mouse is on the selection tool or hand tool, double-click anywhere with the left button to restore the scene size to 100%.
Right click on any area to deselect.
Weight tool: Weight represents the proportion of skin affected by different bone deformations. It is crucial to reasonably allocate the weight of each skin vertex.
3. Visible Optional Filter Panel
The Visible Optional Filter Panel is used to turn on and off the visibility, optionality, and inheritance of bones and slots. The editing switch is shown in Figure 5.

Figure 5
Visible: When turned on, the bone or slot is visible in the main scene; when turned off, the bone or slot is not visible in the main scene visible.
Optional: When turned on, bones or slots can be selected in the main scene; when turned off, bones or slots cannot be selected in the main scene.
Inheritance: When turned on, the bone or slot will inherit the editing of the parent bone; when turned off, the bone or slot will not inherit the editing of the parent bone.
4. Transformation panel
The transformation panel is used to display and modify the X and Y coordinates (relative to the parent bone), scaling, and rotation angle of bones or slots. and the size of the image (shown only for slots and images). The transformation panel is shown in Figure 6.

Figure 6
5. Scene tree panel
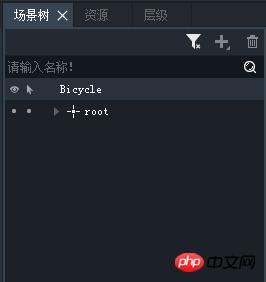
The scene tree panel is used to display and edit the main scene The parent-child tree relationship between bones and slots is shown in Figure 7.
Picture 7
The buttons in the upper right corner are: smart filtering, skeleton creation button and delete button. In skeleton assembly mode, double-clicking a bone or slot in the scene tree will pop up a renaming window. This panel is visible under both skeleton rigging and animation, but is not editable under animation. Bones and slots can be checked in the scene tree.
The following is the editing of the bone inheritance relationship in the scene tree:
The inheritance relationship between bones can be changed by dragging in the scene tree panel.
Child bones can be dragged to bones at the same level or above the parent.
The parent bone cannot be dragged under its child bones and the bones below it
6. Hierarchy panel
The hierarchy panel is used to display and edit the upper and lower hierarchical relationships of slots in the main scene. The hierarchical relationship between slots can be changed by dragging. After selecting the slot, you can also click the Up One Level and Down One Level buttons in the upper right corner or the shortcut key [] to change the hierarchical relationship. This panel only appears in skeleton assembly mode. The hierarchy panel is shown in Figure 8.
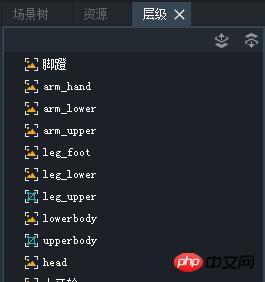
Figure 8
7, Resource Panel
All pictures used in the project are saved in the Resource Panel middle. The resource library of each DragonBonesPro project corresponds to a folder that actually exists in the system. DragonBones in the folder All PNG images supported by Pro will be displayed in the resource panel. Through other system folders to DragonBones Drag and drop PNG files in Pro's resource panel to add images to the resource library; the corresponding PNG files will also be copied to the corresponding resource library folder. You can also click the "Import Resources" button and specify the resource PNG file to be added in the pop-up system window. The resource panel is shown in Figure 9.
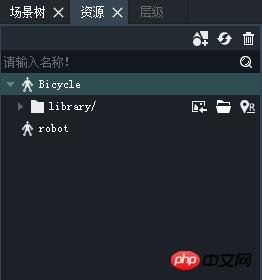
Figure 9
The buttons in the upper right corner are: import resource button, open library folder button and modify path button. This panel can only be displayed in skeleton assembly mode.
8. Edit mode switch button
The edit mode switch button is in the upper left corner of the scene and is used to switch between skeleton assembly and animation production, as shown in Figure 10 Show.

Figure 10
9. Animation panel
The animation panel is used to display and edit animation clips, such as As shown in Figure 11.
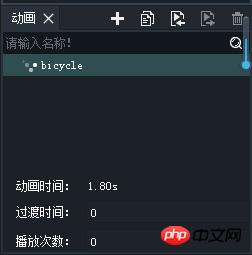
Figure 11
The buttons in the upper right corner are: create new animation clip button, clone animation clip button, rename and delete animation clip button. This panel can only be displayed under Animation. The three parameters below the animation panel are:
Animation time: cannot be edited, the unit is s. The actual duration of the animation clip is calculated based on the frame rate and the total number of frames of the animation clip.
Excess time: The default value is 0, editable, unit is s. Used to set the transition time between different moving surfaces in the game.
Number of plays: The default value is 0 and can be edited. Used to set the number of repetitions of the animation in the game. When set to 0, it means infinite repetition.
10. Timeline panel
The timeline panel is used for editing animation clips. This template can only be displayed under animation production, as shown in Figure 12.

Figure 12
Playback control tool
Playback control tool on the timeline panel for control Playback of animation clips. From left to right: return to first frame button, previous frame button, rewind button, play button, next frame button, last frame button, playback speed control slider, current frame, current time, frame rate, such as As shown in Figure 13. The control range of the playback speed control slider is 0.1x~10x. Current frame: editable, enter a specific frame number, and the green playback pointer will jump to the corresponding frame number. Drag the green pointer or play the moving circle, and the value of the current frame will change accordingly. Current time: Not editable, calculated based on current frame and frame rate. Frame rate: editable, default is 24fps. Set the number of animation frames per second, as shown in Figure 13.

Figure 13
Frame editing toolbar
Frame editing toolbar, from left to right: delete unnecessary frames, edit multiple frames, onion skin button, move frame to the right, move frame to the left, automatic keyframe button, curve editor, as shown in Figure 14 shown.

Figure 14
Delete unnecessary frames: Automatically check for unnecessary key frames in the entire timeline and delete them. Deleting unnecessary keyframes can slim down the animation file without affecting the animation presentation at all.
Onion skin button: switches onion skin function on and off.
Edit multiple frames: Select multiple frames to edit curves in batches.
Move keyframes to the left, move keyframes to the right: Click the button to move all keyframes to the right (left) of the selected keyframe. If the last frame on the left already has a keyframe, you can no longer move it to the left. The move keyframe button to the left will be grayed out, and the same will be true for the right side.
Auto keyframe button: This button has two states: white is off and red is on. When turned on, changes to bones or slots will automatically add keyframes on the frame of the green playhead and the corresponding bone or slot layer.
Curve Editor: Curve Editor In this panel, you can apply tweening between frames to achieve different tweening effects.
Timeline toolbar
Timeline toolbar, from left to right: collapse list, expand list, copy frame button, cut frame button, paste Frame button and delete frame button, as shown in Figure 15.

Figure 15
Collapse list: Collapse all layers on the timeline.
Expand list: Expand all layers on the timeline.
Copy frame button: Click this button after selecting the key frame, and the parameters of the frame will be copied to the clipboard.
Cut frame button: Click this button after selecting the key frame, and the parameters of the frame will be cut to the clipboard.
Paste frame button: The frame parameters in the clipboard can be pasted to any frame number and any layer in the timeline (frames of the bone layer and slot layer cannot be pasted to each other, and the parameters recorded in the key frame are the same as the previous key The relative change value of the frame, the relative change value of frame 0 is 0), and it can also overwrite the existing key frame.
Delete frame button: Delete the currently selected frame.
Add keyframe button: This button has 3 status buttons. White means no changes and no keyframes. Yellow indicates changes, no keyframes were added or updated. Red indicates no changes and keyframes have been added or updated. In the white or yellow state, clicking this button will add or update keyframes on the frame where the green play pointer is and the corresponding bone layer or slot layer. Clicking in the red state has no effect. If the bone or slot is changed in the red or white state, the button will change to yellow, indicating that the bone or slot has been changed. This button is unavailable when no bone or slot is selected.
Curve graph panel button: switch the curve graph panel on and off.
Timeline Zoom Tool
The Timeline Zoom Tool is used to control the scaling of the timeline, as shown in Figure 16. On the left are the fit-to-screen buttons, and the buttons to control zooming out and zooming in. Dragging the slider can also control zooming. As shown in Figure 16.

Figure 16
Onion Skin Tool
After turning on the onion skin function, N frames before and after will be displayed at the same time (Default is 3 frames) shadow map, which facilitates animators to better position character movements and make continuous animation smoother. Enter animation mode and click the onion skinning button on the timeline toolbar to turn on the onion skinning function, as shown in Figure 17.

Figure 17
After the onion skinning function is turned on, the animation on the main scene appears in blue (leading frame) and red (subsequent frames) shadows , the animation presents a shadow image effect, as shown in Figure 18.
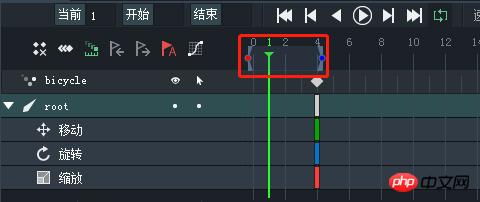
Figure 18
At the same time, the green playback pointer of the timeline will appear and the onion skin display area will be adjusted by default by 3 frames before and after. The handle is red, and the adjustment handle on the right is blue, as shown in Figure 19.

Picture 19
Drag the blue or red handle to adjust the number of frames displayed by the blue or red onion skin. The more frames covered, the more shadows will be displayed in the main menu. The onion skin display area will move as the green play pointer moves. During animation playback, the onion skin display area on the green playback pointer is hidden. On the main scene, the red and blue shadow images will play together with the original animation. The animation action of the blue shadow image precedes the original animation, and the animation action of the red shadow image lags behind the original animation.
Characteristics of onion skin: The longest blue or red onion skin display area cannot exceed the length of the animation clip itself. Although the animation clip plays in a loop by default, when the green play pointer is at frame 0, there is no red onion shadow puppet displayed in the main scene. When the green insertion pointer is at the last frame, there is no blue onion shadow puppet displayed in the main scene.
Timeline
Keyframes in the bone layer are white, keyframes in the slot layer are yellow, keyframes in the event layer are red, and contain events and jumps , the bone keyframe of the sound is pink. The first layer of the timeline is the arrangement of moving surfaces and cannot be edited directly. After adding keyframes to any other layer, a diamond-shaped square will appear on the animation clip layer, indicating that there are keyframes in one or more layers under the current frame. White represents bone layer keyframes, yellow represents slot layer keyframes, red represents event layer keyframes, and pink represents sky keyframes where multiple layers are mixed. Selecting the diamond box selects all keyframes under this frame number. You can pan left and right as a whole, drag, copy, cut, paste, and delete. As long as there are keyframes under the corresponding frame number, a red line will appear on the timeline ruler, and the timeline ruler will scroll with the up and down scroll bars of the timeline and will always be visible. The first level of the timeline is the bone layer or event layer, and the second level is the slot layer. The slot layer is indented one level to the right relative to the bone layer. The hierarchical relationship between parent and child bones is not reflected in the timeline. There is only one event layer. The selected layer will be highlighted, and the bones or slots of the corresponding layer will also be selected. Conversely, if the bones or slots are selected, the corresponding layer will also be selected. Keyframes can be dragged anywhere within the same layer of the timeline. The timeline panel is shown in Figure 20 shown.
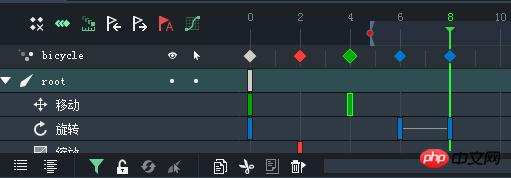
Figure 20
Curve Editor
Curve Editor In this panel, you can edit the frame Apply tweening between frames to achieve different tweening effects. For example, if you want a character's arm swing to be faster first and then slower during a running action, then you can select the first keyframe among the first two keyframes of the arm swing action, and then click the curve button on the timeline as shown As shown in 21, open the curve editor panel.
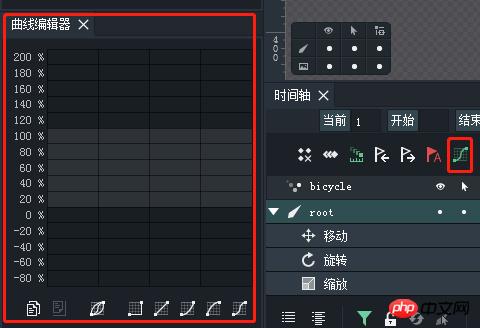
Figure 21
Linear tweening is used by default between key frames. It's just a straight line in the curve editor. You can see a row of buttons at the bottom of the panel, which are some easing effects preset in the tool, as shown in Figure 22.

Figure 22
Click these buttons to quickly change the curve into the corresponding effect, from left to right: no tweening, linear tweening , talk in, talk out, fade in and talk out (fade in means first slow and then fast, fade out means first fast and then slow, fade in and talk out means one fast and one slow), as shown in Figure 23.

Figure 23
If you are not satisfied with the effects of these presets, you can also drag the control points (white) on the control rods at both ends of the curve. The hollow dots) come from the free adjustment curve, as shown in Figure 24. Currently, the control point can only be adjusted between 100% and 200%. This restriction will be relaxed in future versions. When the curve enters the negative value area, it means that the animation first runs in the reverse direction for a period, and then runs in the forward direction. A curve exceeding 100% means that the animation will run beyond the target position and then run in the opposite direction to the target position.
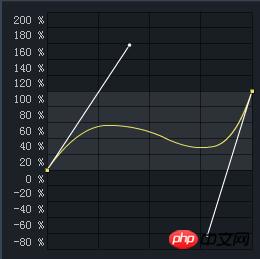
Figure 24
It is worth mentioning that the editing effect of the curve can be reflected in the animation of the scene in real time, and the designer can Play the animation while adjusting the curve preview effect. In addition, the adjustment of the curve changes the animation data instantly, and does not require the designer to click the keyframe button again to confirm the modification. If you are not satisfied with the modification effect, you can use the undo function to return to the state before modification.
3. Create a new animation project
DragonBonesPro provides convenient and fast projects.
1. New project
Open the new project on the welcome homepage, and a dialog box will pop up. Select to create a keel animation, as shown in Figure 25.
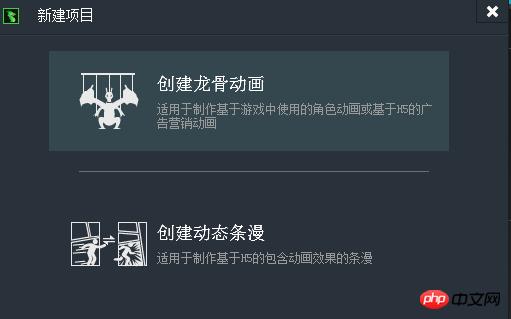
Figure 25
Click to create keel animation, and the following options will appear: skeleton animation template, frame-by-frame animation template, tween animation template, and custom , as shown in Figure 26.
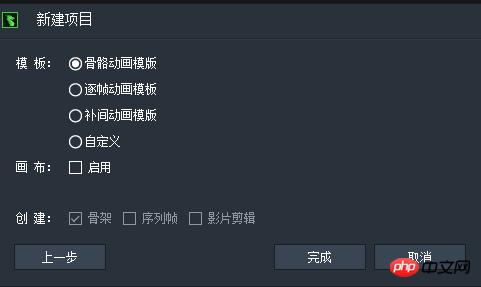
Figure 26
Click on the corresponding template and the relative template will be selected in the creation column. They just have different parameters and the same function. You can also After creating the project, right-click in the resources and a new component will appear, as shown in Figure 27.

Figure 27
Click on the new component, and the same selection will appear as in the figure, as shown in Figure 28.
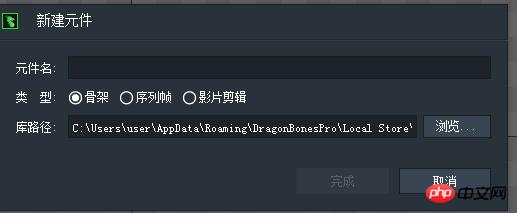
Figure 28
2. Add and delete pictures
Drag and drop pictures from the resource library to Main window:
If no layer is selected or the current frame of the selected layer has a non-empty keyframe, a picture layer named after the picture name will be automatically added to the timeline.
If a layer is selected and the current frame does not have a keyframe, a keyframe will be added to the current frame and the image will be added to the keyframe.
If the layer is selected and the current frame is an empty keyframe, the picture will be added to the empty keyframe, and the empty keyframe will become a non-empty keyframe.
3. Layer order
You can drag and drop in the timeline to change the overlay order of layers.
4. Import and export of projects
Import project DragonBones Pro Currently supports importing DragonBones data files (including json and xml) and data package files (including png and zip) in multiple formats. In addition, DragonBones Pro supports import plug-ins to expand the format of imported data. The officially announced Spine 2.x import plug-in and Cocos 1.x import plug-in can help DragonBones Pro imports Spine and Cocos data files. The import method is very simple, just drag and drop the data file or data package file that needs to be imported into the software. If the imported data file is a data file, the following figure will appear: The interface shown in 29.
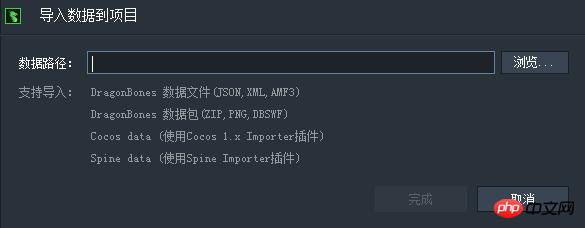
Figure 29
The software will intelligently search for the texture set file in the directory where the data file is located. If it is not found or the wrong one is found, remember to manually Modify the path, otherwise the image will not be found. If you import a data package file, there will be no problem that the texture set cannot be found. In addition, the software will automatically generate the project name. If you need to modify it, you can modify it manually.
DragonBonesPro can export the project into json or xml format, and the picture can be in the form of a texture set or a picture file. The export window is shown in Figure 30.
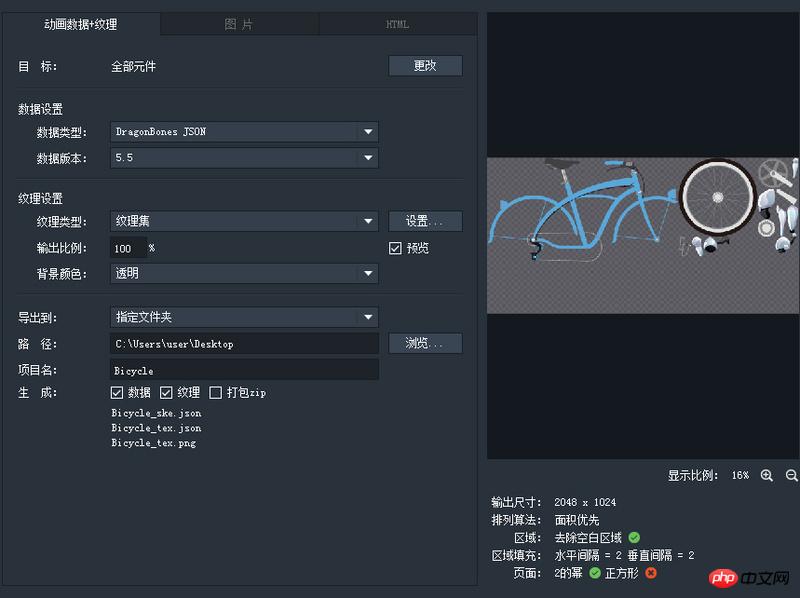
Figure 30
The output path defaults to "My Document Project Name", the user can specify it manually, if exporting zip package, the package file will appear in the specified output path.
If you export the project folder, a subdirectory with the same name as the project will be created under the specified output path, containing data files and pictures.
The output ratio defaults to 1.
Users can enter numerical values to control the scaling of exported projects.
"Fill Color" The check box defaults to an unchecked (transparent background) state. After checked, the user can click the color square on the right to open the color selection window and select the color that needs to be used as the background color "Pack zip" Check box, the default is unchecked, that is, the project folder is exported. When checked, the project file in the form of a zip package is exported. The psd file will be converted into a DragonBones data file below. In DragonBones A script file PSExportDB, jsx is provided in the Pro installation directory. Used to export design drawings in Photoshop into DragonBones format data pictures.
Note: On Mac system, you need to find DragonBones in the application Pro.app, then right-click and select Show Package Contents.
The script file is under /Contents/Resources/. The export method is as follows: Open the design drawing in Photshop, then select the "File->Script->Browse" command in the menu, and then open Find the PSExportDBjsx file in the system location example, select open, and the following dialog box will pop up:
Export PNGs to export images
ExportISON to export json files
Ignore Hidden LayersIgnore hidden layers
Image Scale overall The scaling ratio
is set according to the requirements. Click the OK button and Photoshop will start exporting. After the export is completed, a directory of DrgonBmes {PSD file name} will be generated in the directory where the design drawing is located. If you export Check PNGs and JSON at the same time, and there will be a json file and a Textuer directory with the same name as the psd file under it.
Under Texture are all png image files. Afterwards just drag the exported data file into DragonBones After setting up the picture log in Pro, the import can be completed. After importing, the relative position, size and hierarchical relationship of the pictures are exactly the same as in Photoshop.
The above is the detailed content of Introduction to common terms and usage of animation tool DragonBones (picture). For more information, please follow other related articles on the PHP Chinese website!

Hot AI Tools

Undresser.AI Undress
AI-powered app for creating realistic nude photos

AI Clothes Remover
Online AI tool for removing clothes from photos.

Undress AI Tool
Undress images for free

Clothoff.io
AI clothes remover

Video Face Swap
Swap faces in any video effortlessly with our completely free AI face swap tool!

Hot Article

Hot Tools

Notepad++7.3.1
Easy-to-use and free code editor

SublimeText3 Chinese version
Chinese version, very easy to use

Zend Studio 13.0.1
Powerful PHP integrated development environment

Dreamweaver CS6
Visual web development tools

SublimeText3 Mac version
God-level code editing software (SublimeText3)

Hot Topics
 1393
1393
 52
52
 1205
1205
 24
24
 How to use bootstrap in vue
Apr 07, 2025 pm 11:33 PM
Using Bootstrap in Vue.js is divided into five steps: Install Bootstrap. Import Bootstrap in main.js. Use the Bootstrap component directly in the template. Optional: Custom style. Optional: Use plug-ins.
 The Roles of HTML, CSS, and JavaScript: Core Responsibilities
Apr 08, 2025 pm 07:05 PM
HTML defines the web structure, CSS is responsible for style and layout, and JavaScript gives dynamic interaction. The three perform their duties in web development and jointly build a colorful website.
 How to write split lines on bootstrap
Apr 07, 2025 pm 03:12 PM
There are two ways to create a Bootstrap split line: using the tag, which creates a horizontal split line. Use the CSS border property to create custom style split lines.
 Understanding HTML, CSS, and JavaScript: A Beginner's Guide
Apr 12, 2025 am 12:02 AM
WebdevelopmentreliesonHTML,CSS,andJavaScript:1)HTMLstructurescontent,2)CSSstylesit,and3)JavaScriptaddsinteractivity,formingthebasisofmodernwebexperiences.
 How to use bootstrap button
Apr 07, 2025 pm 03:09 PM
How to use the Bootstrap button? Introduce Bootstrap CSS to create button elements and add Bootstrap button class to add button text
 How to set up the framework for bootstrap
Apr 07, 2025 pm 03:27 PM
To set up the Bootstrap framework, you need to follow these steps: 1. Reference the Bootstrap file via CDN; 2. Download and host the file on your own server; 3. Include the Bootstrap file in HTML; 4. Compile Sass/Less as needed; 5. Import a custom file (optional). Once setup is complete, you can use Bootstrap's grid systems, components, and styles to create responsive websites and applications.
 How to insert pictures on bootstrap
Apr 07, 2025 pm 03:30 PM
There are several ways to insert images in Bootstrap: insert images directly, using the HTML img tag. With the Bootstrap image component, you can provide responsive images and more styles. Set the image size, use the img-fluid class to make the image adaptable. Set the border, using the img-bordered class. Set the rounded corners and use the img-rounded class. Set the shadow, use the shadow class. Resize and position the image, using CSS style. Using the background image, use the background-image CSS property.
 How to resize bootstrap
Apr 07, 2025 pm 03:18 PM
To adjust the size of elements in Bootstrap, you can use the dimension class, which includes: adjusting width: .col-, .w-, .mw-adjust height: .h-, .min-h-, .max-h-


