How do vue files use echarts.js? (Two methods are introduced)
The content of this article is about how to use echarts.js in vue files? (Two methods are introduced), which has certain reference value. Friends in need can refer to it. I hope it will be helpful to you.
I need to use echarts in my recent work, because the project is developed using vue-cli. I found vue-echarts synthesized in vue on the Internet, but I didn’t want to use the data format specified in vue, so I made a simple demo of the vue project referencing native echarts. The implementation process is as follows: Two implementation methods are used
Preparation
1. Install echarts dependencies
Console input: npm install echarts --save
2.Global import
Introduced into main.js
import echarts from 'echarts'
Vue.prototype.$echarts = echarts
Create charts
The first way to create
Introduce multiple charts into a .vue file Chart
Create WelcomePage.vue
<template>
  <div>
    <h1 id="第一种在vue中使用echart的方式">第一种在vue中使用echart的方式</h1>

    <div>
      <div></div>
    </div>

    <div>
      <div></div>
    </div>

  </div>
</template>
<script>
// 引入基本模板,按需加载
let echarts = require('echarts/lib/echarts');
// 引入柱状图
require('echarts/lib/chart/bar');
// 引入柱状图
require('echarts/lib/chart/pie');
require('echarts/lib/component/tooltip');
require('echarts/lib/component/title');
export default {
name: "WelcomePage",
data () {
return { }
},
mounted(){
this.drawBar();
this.drawPie();
},
methods:{
drawBar(){
// 基于dom,初始化echarts实例
let barGraph = echarts.init(document.getElementById('barGraph'));
// 绘制图表
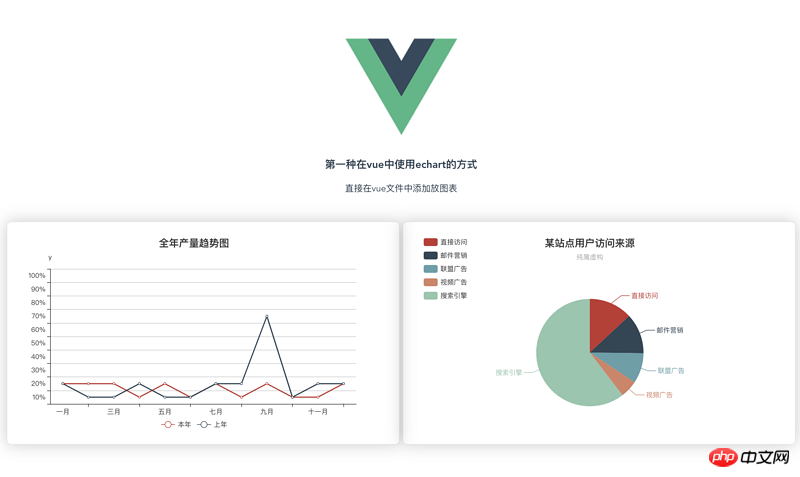
barGraph.setOption({
title: {
text: '全年产量趋势图',
left: 'center'
},
tooltip: {
trigger: 'item',
formatter: '{a} <br/>{b} : {c}'
},
legend: {
left: 'center',
data: ['本年', '上年'],
bottom:0
},
xAxis: {
type: 'category',
name: 'x',
splitLine: {show: false},
data: ['一月', '二月', '三月', '四月', '五月', '六月', '七月', '八月', '九月', '十月', '十一月', '十二月']
},
grid: {
left: '1%',
right: '2%',
bottom: '8%',
containLabel: true
},
yAxis: {
type: 'category',
name: 'y',
splitLine: {show: true},
data:['10%','20%','30%','40%','50%','60%','70%','80%','90%','100%']
},
series: [
{
name: '本年',
type: 'line',
data: [0.8, 0.98, 0.96, 0.27, 0.81, 0.47, 0.74, 0.23, .69, 0.25, 0.36, 0.56]
},
{
name: '上年',
type: 'line',
data: [1, 0.2, 0.4, 0.8, 0.16, 0.32, 0.64, 1.28, 5.6, 0.25, 0.63, 0.65, 0.12]
},
]
})
},
drawPie(){
let pieGraph = echarts.init(document.getElementById('pieGraph'));
pieGraph.setOption({
title : {
text: '某站点用户访问来源',
subtext: '纯属虚构',
x:'center'
},
tooltip : {
trigger: 'item',
formatter: "{a} <br/>{b} : {c} ({d}%)"
},
legend: {
orient: 'vertical',
left: 'left',
data: ['直接访问','邮件营销','联盟广告','视频广告','搜索引擎']
},
series : [
{
name: '访问来源',
type: 'pie',
radius : '55%',
center: ['50%', '60%'],
data:[
{value:335, name:'直接访问'},
{value:310, name:'邮件营销'},
{value:234, name:'联盟广告'},
{value:135, name:'视频广告'},
{value:1548, name:'搜索引擎'}
],
itemStyle: {
emphasis: {
shadowBlur: 10,
shadowOffsetX: 0,
shadowColor: 'rgba(0, 0, 0, 0.5)'
}
}
}
]
})
}
}
}
</script>The effect is as follows:

The second implementation method (in the form of a component)
Create the parent component father.vue
  <div>
    <h1 id="msg">{{ msg }}</h1>
    <p>第二种方式:通过组件的方式进行页面渲染</p>
    <div>
      <bar-graph></bar-graph>
    </div>

    <div>
      <pie-graph></pie-graph>
    </div>

</div><script>
// 引入两个子组件
import BarGraph from "./bargraph";
import PieGraph from "./piegraph";
export default {
name: "father",
components:{
BarGraph,
PieGraph,
},
data(){
return{
msg: '我是爸爸,想看我的儿子,眼睛请往下移',
}
}
}
</script>Create subcomponent barGraph.vue
   <div>
    <p>{{ msg }}</p>
    <div>
      <div></div>
    </div>
</div><script>
let echarts = require('echarts/lib/echarts');
// 引入柱状图
require('echarts/lib/chart/bar');
require('echarts/lib/component/tooltip');
require('echarts/lib/component/title');
// import echarts from 'echarts'
export default {
name: "bargraph",
// props:['id'], // 第一种接收父亲传过来的值的方式
props: {
id: {
type: String,
default: 'chart'
}
},
data(){
return {
msg: "我是第一个子组件--bar",
chart: null,
}
},
mounted(){
this.drawBar();
},
methods:{
drawBar(){
this.chart = echarts.init(document.getElementById(this.id));
let colors = ['#5793f3', '#d14a61', '#675bba'];
this.chart.setOption(
{
color: colors,
tooltip: {
trigger: 'axis',
axisPointer: {
type: 'cross'
}
},
grid: {
right: '20%'
},
toolbox: {
feature: {
dataView: {show: true, readOnly: false},
restore: {show: true},
saveAsImage: {show: true}
}
},
legend: {
data:['蒸发量','降水量','平均温度']
},
xAxis: [
{
type: 'category',
axisTick: {
alignWithLabel: true
},
data: ['1月','2月','3月','4月','5月','6月','7月','8月','9月','10月','11月','12月']
}
],
yAxis: [
{
type: 'value',
name: '蒸发量',
min: 0,
max: 250,
position: 'right',
axisLine: {
lineStyle: {
color: colors[0]
}
},
axisLabel: {
formatter: '{value} ml'
}
},
{
type: 'value',
name: '降水量',
min: 0,
max: 250,
position: 'right',
offset: 80,
axisLine: {
lineStyle: {
color: colors[1]
}
},
axisLabel: {
formatter: '{value} ml'
}
},
{
type: 'value',
name: '温度',
min: 0,
max: 25,
position: 'left',
axisLine: {
lineStyle: {
color: colors[2]
}
},
axisLabel: {
formatter: '{value} °C'
}
}
],
series: [
{
name:'蒸发量',
type:'bar',
data:[2.0, 4.9, 7.0, 23.2, 25.6, 76.7, 135.6, 162.2, 32.6, 20.0, 6.4, 3.3]
},
{
name:'降水量',
type:'bar',
yAxisIndex: 1,
data:[2.6, 5.9, 9.0, 26.4, 28.7, 70.7, 175.6, 182.2, 48.7, 18.8, 6.0, 2.3]
},
{
name:'平均温度',
type:'line',
yAxisIndex: 2,
data:[2.0, 2.2, 3.3, 4.5, 6.3, 10.2, 20.3, 23.4, 23.0, 16.5, 12.0, 6.2]
}
]
}
)
}
}
}
</script>Create pieGraph.vue
<template>
    <div>
      <p>{{ msg }}</p>

      <div>
        <div></div>
      </div>
    </div>
</template><script>
import echarts from 'echarts'
export default {
name: "piegraph",
props:{
id: {
type: String,
default: 'pieChart'
}
},
data(){
return{
msg: '我是第二个子组件--pie',
pieChart: null
}
},
mounted(){
this.drawPie();
},
methods: {
drawPie () {
this.pieChart = echarts.init(document.getElementById(this.id));
this.pieChart.setOption(
{
title : {
text: '某站点用户访问来源',
subtext: '纯属虚构',
x:'center'
},
tooltip : {
trigger: 'item',
formatter: "{a} <br/>{b} : {c} ({d}%)"
},
legend: {
orient: 'vertical',
left: 'left',
data: ['直接访问','邮件营销','联盟广告','视频广告','搜索引擎']
},
series : [
{
name: '访问来源',
type: 'pie',
radius : '55%',
center: ['50%', '60%'],
data:[
{value:335, name:'直接访问'},
{value:310, name:'邮件营销'},
{value:234, name:'联盟广告'},
{value:135, name:'视频广告'},
{value:1548, name:'搜索引擎'}
],
itemStyle: {
emphasis: {
shadowBlur: 10,
shadowOffsetX: 0,
shadowColor: 'rgba(0, 0, 0, 0.5)'
}
}
}
]
}
)
}
}
}
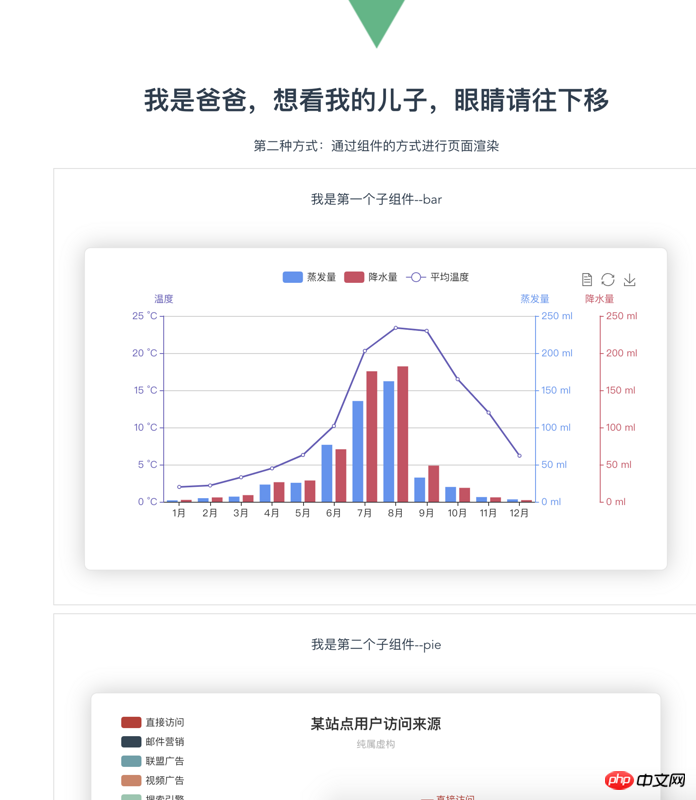
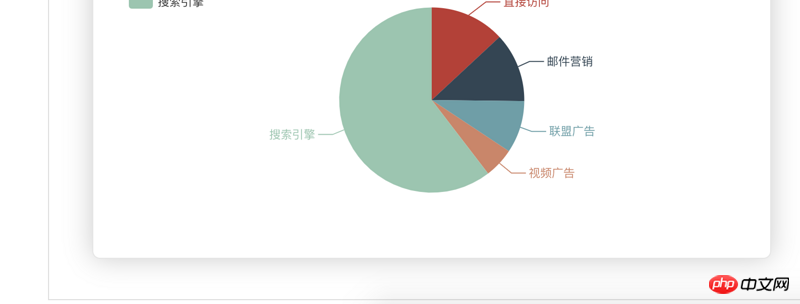
</script>The effect is as follows :


- #The routing file is as follows:
import WelcomePage from '@/components/WelcomePage'
import Father from '@/components/father'

import BarGraph from '@/components/bargraph'
import PieGraph from '@/components/piegraph'

export default new Router({
  routes: [
    {
      path: '/',
      name: 'WelcomePage',
      component: WelcomePage
    },
    {
      path: '/father',
      name: 'father',
      component: Father,
      children:[
        {
          path: '/bargraph',
          name: 'bargraph',
          component: BarGraph
        },
        {
          path: '/piegraph',
          name: 'piegraph',
          component: PieGraph
        }
      ]
    },
  ]
})The above is the detailed content of How do vue files use echarts.js? (Two methods are introduced). For more information, please follow other related articles on the PHP Chinese website!

Hot AI Tools

Undresser.AI Undress
AI-powered app for creating realistic nude photos

AI Clothes Remover
Online AI tool for removing clothes from photos.

Undress AI Tool
Undress images for free

Clothoff.io
AI clothes remover

Video Face Swap
Swap faces in any video effortlessly with our completely free AI face swap tool!

Hot Article

Hot Tools

Notepad++7.3.1
Easy-to-use and free code editor

SublimeText3 Chinese version
Chinese version, very easy to use

Zend Studio 13.0.1
Powerful PHP integrated development environment

Dreamweaver CS6
Visual web development tools

SublimeText3 Mac version
God-level code editing software (SublimeText3)

Hot Topics
 1387
1387
 52
52
 How to implement an online speech recognition system using WebSocket and JavaScript
Dec 17, 2023 pm 02:54 PM
How to use WebSocket and JavaScript to implement an online speech recognition system Introduction: With the continuous development of technology, speech recognition technology has become an important part of the field of artificial intelligence. The online speech recognition system based on WebSocket and JavaScript has the characteristics of low latency, real-time and cross-platform, and has become a widely used solution. This article will introduce how to use WebSocket and JavaScript to implement an online speech recognition system.
 WebSocket and JavaScript: key technologies for implementing real-time monitoring systems
Dec 17, 2023 pm 05:30 PM
WebSocket and JavaScript: Key technologies for realizing real-time monitoring systems Introduction: With the rapid development of Internet technology, real-time monitoring systems have been widely used in various fields. One of the key technologies to achieve real-time monitoring is the combination of WebSocket and JavaScript. This article will introduce the application of WebSocket and JavaScript in real-time monitoring systems, give code examples, and explain their implementation principles in detail. 1. WebSocket technology
 How to use JavaScript and WebSocket to implement a real-time online ordering system
Dec 17, 2023 pm 12:09 PM
Introduction to how to use JavaScript and WebSocket to implement a real-time online ordering system: With the popularity of the Internet and the advancement of technology, more and more restaurants have begun to provide online ordering services. In order to implement a real-time online ordering system, we can use JavaScript and WebSocket technology. WebSocket is a full-duplex communication protocol based on the TCP protocol, which can realize real-time two-way communication between the client and the server. In the real-time online ordering system, when the user selects dishes and places an order
 How to implement an online reservation system using WebSocket and JavaScript
Dec 17, 2023 am 09:39 AM
How to use WebSocket and JavaScript to implement an online reservation system. In today's digital era, more and more businesses and services need to provide online reservation functions. It is crucial to implement an efficient and real-time online reservation system. This article will introduce how to use WebSocket and JavaScript to implement an online reservation system, and provide specific code examples. 1. What is WebSocket? WebSocket is a full-duplex method on a single TCP connection.
 JavaScript and WebSocket: Building an efficient real-time weather forecasting system
Dec 17, 2023 pm 05:13 PM
JavaScript and WebSocket: Building an efficient real-time weather forecast system Introduction: Today, the accuracy of weather forecasts is of great significance to daily life and decision-making. As technology develops, we can provide more accurate and reliable weather forecasts by obtaining weather data in real time. In this article, we will learn how to use JavaScript and WebSocket technology to build an efficient real-time weather forecast system. This article will demonstrate the implementation process through specific code examples. We
 Simple JavaScript Tutorial: How to Get HTTP Status Code
Jan 05, 2024 pm 06:08 PM
JavaScript tutorial: How to get HTTP status code, specific code examples are required. Preface: In web development, data interaction with the server is often involved. When communicating with the server, we often need to obtain the returned HTTP status code to determine whether the operation is successful, and perform corresponding processing based on different status codes. This article will teach you how to use JavaScript to obtain HTTP status codes and provide some practical code examples. Using XMLHttpRequest
 How to use insertBefore in javascript
Nov 24, 2023 am 11:56 AM
Usage: In JavaScript, the insertBefore() method is used to insert a new node in the DOM tree. This method requires two parameters: the new node to be inserted and the reference node (that is, the node where the new node will be inserted).
 JavaScript and WebSocket: Building an efficient real-time image processing system
Dec 17, 2023 am 08:41 AM
JavaScript is a programming language widely used in web development, while WebSocket is a network protocol used for real-time communication. Combining the powerful functions of the two, we can create an efficient real-time image processing system. This article will introduce how to implement this system using JavaScript and WebSocket, and provide specific code examples. First, we need to clarify the requirements and goals of the real-time image processing system. Suppose we have a camera device that can collect real-time image data


