 Backend Development
 PHP Tutorial
 Detailed explanation of PHP synergy implementation (with code)
Detailed explanation of PHP synergy implementation (with code)
This article brings you a detailed explanation of PHP synergy implementation (with code). It has certain reference value. Friends in need can refer to it. I hope it will be helpful to you.
Basic content you need to know to implement PHP coroutines.
Multiple processes/threads
The earliest server-side programs solved the problem of concurrent IO through multi-processes and multi-threads. The process model first appeared, starting from Unix The concept of process has been around since the birth of the system. The earliest server-side programs are generally Accept A client connection creates a process, and then the child process enters a loop to interact with the client connection in a synchronous and blocking manner, sending and receiving processing data.
Multi-threading mode appeared later. Threads are lighter than processes, and memory stacks are shared between threads, so interaction between different threads is very easy to implement. For example, if you implement a chat room, client connections can interact with each other, and players in the chat room can send messages to any other person. It is very simple to implement in multi-thread mode. Data can be sent directly to a client connection in the thread. The multi-process mode requires the use of pipelines, message queues, shared memory and other complex technologies collectively referred to as inter-process communication (IPC) to achieve it.
The simplest multi-process server model
$serv = stream_socket_server("tcp://0.0.0.0:8000", $errno, $errstr)
or die("Create server failed");
while(1) {
$conn = stream_socket_accept($serv);
if (pcntl_fork() == 0) {
	$request = fread($conn);
	// do something
	// $response = "hello world";
	fwrite($response);
	fclose($conn);
	exit(0);
	}
}The process of the multi-process/thread model is:
Create a Socket, binding server port (bind), listening port (listen), using stream_socket_server function in PHP can complete the above three steps. Of course, you can also use lower-level socket extensions to implement them separately.
Enter the while loop, block on the accept operation, and wait for the client connection to enter. At this time, the program will enter a sleep state until a new client initiates a connect to the server, and the operating system will wake up the process. The accept function returns the socket connected by the client. The main process creates a child process through fork (php: pcntl_fork) under the multi-process model, and uses pthread_create (php: new Thread) under the multi-thread model to create a child thread.
If there is no special statement below, process will be used to represent both process/thread.
After the child process is successfully created, it enters the while loop, blocking on the recv (php:fread) call, waiting for the client to send data to the server. After receiving the data, the server program processes it and then uses send (php: fwrite) to send a response to the client. A long-connection service will continue to interact with the client, while a short-connection service will generally close after receiving a response.
When the client connection is closed, the child process exits and destroys all resources, and the main process will recycle the child process.
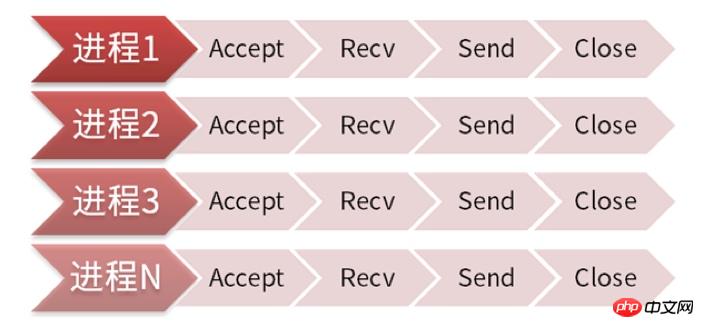
#The biggest problem with this model is that the cost of process creation and destruction is very high. So the above model cannot be applied to very busy server programs. The corresponding improved version solves this problem, which is the classic Leader-Follower model.
$serv = stream_socket_server("tcp://0.0.0.0:8000", $errno, $errstr)
or die("Create server failed");
for($i = 0; $i < 32; $i++) {
if (pcntl_fork() == 0)
 {
 while(1) {
 $conn = stream_socket_accept($serv);
 if ($conn == false) continue;
 // do something
 $request = fread($conn);
 // $response = "hello world";
 fwrite($response);
 fclose($conn);
 }
 exit(0);
 }
}Its characteristic is that N processes will be created after the program is started. Each child process enters Accept and waits for new connections to come in. When a client connects to the server, one of the child processes is awakened, starts processing client requests, and no longer accepts new TCP connections. When this connection is closed, the child process will be released, re-enter Accept, and participate in processing new connections.
The advantage of this model is that it can completely reuse the process, without additional consumption, and the performance is very good. Many common server programs are based on this model, such as Apache and PHP-FPM.
The multi-process model also has some disadvantages.
This model relies heavily on the number of processes to solve concurrency problems. One client connection requires one process. The number of worker processes depends on the concurrent processing capability. The operating system is limited in the number of processes it can create.
Starting a large number of processes will bring additional process scheduling consumption. When there are hundreds of processes, the cost of process context switching scheduling may be negligible, accounting for less than 1% of the CPU. If thousands or even tens of thousands of processes are started, the consumption will skyrocket. Scheduling consumption may account for dozens or even 100% of the CPU.
Parallel and Concurrency
When talking about multi-process and similar models that perform multiple tasks at the same time, we have to talk about parallelism and concurrency first.
Concurrency
refers to the ability to handle multiple simultaneous activities. Concurrent events do not necessarily have to occur at the same time.
Parallel (Parallesim)
refers to two concurrent events that occur at the same time, which has the meaning of concurrency, but concurrency is not necessarily parallel.
Difference
"Concurrency" refers to the structure of the program, "Parallel" refers to the state of the program when it is running
"Parallel" must be It is concurrent, and "parallel" is a type of "concurrent" design
A single thread can never reach the "parallel" state
The standard for correct concurrency design is:
Enable multiple operations to take place during overlapping time periods.
two tasks can start, run, and complete in overlapping time periods
Iterator & Generator
在了解 PHP 协程前,还有 迭代器 和 生成器 这两个概念需要先认识一下。
迭代器
PHP5 开始内置了 Iterator 即迭代器接口,所以如果你定义了一个类,并实现了Iterator 接口,那么你的这个类对象就是 ZEND_ITER_OBJECT 即可迭代的,否则就是 ZEND_ITER_PLAIN_OBJECT。
对于 ZEND_ITER_PLAIN_OBJECT 的类,foreach 会获取该对象的默认属性数组,然后对该数组进行迭代。
而对于 ZEND_ITER_OBJECT 的类对象,则会通过调用对象实现的 Iterator 接口相关函数来进行迭代。
任何实现了 Iterator 接口的类都是可迭代的,即都可以用 foreach 语句来遍历。
Iterator 接口
interface Iterator extends Traversable
{
// 获取当前内部标量指向的元素的数据
public mixed current()
// 获取当前标量
public scalar key()
// 移动到下一个标量
public void next()
// 重置标量
public void rewind()
// 检查当前标量是否有效
public boolean valid()
}常规实现 range 函数
PHP 自带的 range 函数原型:
range — 根据范围创建数组,包含指定的元素
array range (mixed $start , mixed $end [, number $step = 1 ])
建立一个包含指定范围单元的数组。
在不使用迭代器的情况要实现一个和 PHP 自带的 range 函数类似的功能,可能会这么写:
function range ($start, $end, $step = 1){
$ret = [];
for ($i = $start; $i <= $end; $i += $step) {
$ret[] = $i;
}
return $ret;
}需要将生成的所有元素放在内存数组中,如果需要生成一个非常大的集合,则会占用巨大的内存。
迭代器实现 xrange 函数
来看看迭代实现的 range,我们叫做 xrange,他实现了 Iterator 接口必须的 5 个方法:
class Xrange implements Iterator
{
protected $start;
protected $limit;
protected $step;
protected $current;
public function __construct($start, $limit, $step = 1){
$this->start = $start;
$this->limit = $limit;
$this->step  = $step;
}
public function rewind(){
$this->current = $this->start;
}
public function next(){
$this->current += $this->step;
}
public function current(){
return $this->current;
}
public function key(){
return $this->current + 1;
}
public function valid(){
return $this->current <= $this->limit;
}
}使用时代码如下:
foreach (new Xrange(0, 9) as $key => $val)
 {
   echo $key, ' ', $val, "\n";
 }
输出:
0 0
1 1
2 2
3 3
4 4
5 5
6 6
7 7
8 8
9 9
看上去功能和 range() 函数所做的一致,不同点在于迭代的是一个 对象(Object) 而不是数组:
var_dump(new Xrange(0, 9));
输出:
object(Xrange)#1 (4) {
["start":protected]=>
int(0)
["limit":protected]=>
int(9)
["step":protected]=>
int(1)
["current":protected]=>NULL
}另外,内存的占用情况也完全不同:
// range
$startMemory = memory_get_usage();
$arr = range(0, 500000);
echo 'range(): ', memory_get_usage() - $startMemory, " bytes\n";
unset($arr);
// xrange
$startMemory = memory_get_usage();
$arr = new Xrange(0, 500000);
echo 'xrange(): ', memory_get_usage() - $startMemory, " bytes\n";
输出:
xrange(): 624 bytes
range(): 72194784 bytes
range() 函数在执行后占用了 50W 个元素内存空间,而 xrange 对象在整个迭代过程中只占用一个对象的内存。
Yii2 Query
在喜闻乐见的各种 PHP 框架里有不少生成器的实例,比如 Yii2 中用来构建 SQL 语句的 \yii\db\Query 类:
$query = (new \yii\db\Query)->from('user');
// yii\db\BatchQueryResult
foreach ($query->batch() as $users) {
// 每次循环得到多条 user 记录
}来看一下 batch() 做了什么:
/**
* Starts a batch query.
*
* A batch query supports fetching data in batches, which can keep the memory usage under a limit.
* This method will return a [[BatchQueryResult]] object which implements the [[\Iterator]] interface
* and can be traversed to retrieve the data in batches.
*
* For example,
*
*
* $query = (new Query)->from('user');
* foreach ($query->batch() as $rows) {
*     // $rows is an array of 10 or fewer rows from user table
* }
*
*
* @param integer $batchSize the number of records to be fetched in each batch.
* @param Connection $db the database connection. If not set, the "db" application component will be used.
* @return BatchQueryResult the batch query result. It implements the [[\Iterator]] interface
* and can be traversed to retrieve the data in batches.
*/
public function batch($batchSize = 100, $db = null){
return Yii::createObject([
'class' => BatchQueryResult::className(),
'query' => $this,
'batchSize' => $batchSize,
'db' => $db,
'each' => false,
]);
}实际上返回了一个 BatchQueryResult 类,类的源码实现了 Iterator 接口 5 个关键方法:
class BatchQueryResult extends Object implements \Iterator
{
public $db;
public $query;
public $batchSize = 100;
public $each = false;
private $_dataReader;
private $_batch;
private $_value;
private $_key;
/**
* Destructor.
*/
public function __destruct()
{
// make sure cursor is closed
$this->reset();
}
/**
* Resets the batch query.
* This method will clean up the existing batch query so that a new batch query can be performed.
*/
public function reset(){
if ($this->_dataReader !== null)
{
$this->_dataReader->close();
}
$this->_dataReader = null;
$this->_batch = null;
$this->_value = null;
$this->_key = null;
}
/*
*
* Resets the iterator to the initial state.
* This method is required by the interface [[\Iterator]].
*/
public function rewind()
{
$this->reset();
$this->next();
}
/**
* Moves the internal pointer to the next dataset.
* This method is required by the interface [[\Iterator]].
*/
public function next()
{
if ($this->_batch === null || !$this->each || $this->each && next($this->_batch) === false)
{
$this->_batch = $this->fetchData();
reset($this->_batch);
}
if ($this->each)
{
$this->_value = current($this->_batch);
if ($this->query->indexBy !== null)
{
$this->_key = key($this->_batch);
}
elseif (key($this->_batch) !== null)
{
$this->_key++;
} else {
$this->_key = null;
}
} else {
$this->_value = $this->_batch;
$this->_key = $this->_key === null ? 0 : $this->_key + 1;
}
}
/**
* Fetches the next batch of data.
* @return array the data fetched
*/
protected function fetchData()
{
// ...
}
/**
* Returns the index of the current dataset.
* This method is required by the interface [[\Iterator]].
* @return integer the index of the current row.
*/
public function key()
{
return $this->_key;
}
/**
* Returns the current dataset.
* This method is required by the interface [[\Iterator]].
* @return mixed the current dataset.
*/
public function current()
{
return $this->_value;
}
/**
* Returns whether there is a valid dataset at the current position.
* This method is required by the interface [[\Iterator]].
* @return boolean whether there is a valid dataset at the current position.
*/
public function valid()
{
return !empty($this->_batch);
}
}以迭代器的方式实现了类似分页取的效果,同时避免了一次性取出所有数据占用太多的内存空间。
迭代器使用场景
使用返回迭代器的包或库时(如 PHP5 中的 SPL 迭代器)
无法在一次调用获取所需的所有元素时
要处理数量巨大的元素时(数据库中要处理的结果集内容超过内存)
…
生成器
需要 PHP 5 >= 5.5.0 或 PHP 7
虽然迭代器仅需继承接口即可实现,但毕竟需要定义一整个类然后实现接口的所有方法,实在是不怎么方便。
生成器则提供了一种更简单的方式来实现简单的对象迭代,相比定义类来实现 Iterator 接口的方式,性能开销和复杂度大大降低。
PHP Manual
生成器允许在 foreach 代码块中迭代一组数据而不需要创建任何数组。一个生成器函数,就像一个普通的有返回值的自定义函数类似,但普通函数只返回一次, 而生成器可以根据需要通过 yield 关键字返回多次,以便连续生成需要迭代返回的值。
一个最简单的例子就是使用生成器来重新实现 xrange() 函数。效果和上面我们用迭代器实现的差不多,但实现起来要简单的多。
生成器实现 xrange 函数
function xrange($start, $limit, $step = 1)
{
for ($i = 0; $i < $limit; $i += $step) {
yield $i + 1 => $i;
}
}
foreach (xrange(0, 9) as $key => $val) {
printf("%d %d \n", $key, $val);
}
// 输出
// 1 0
// 2 1
// 3 2
// 4 3
// 5 4
// 6 5
// 7 6
// 8 7
// 9 8实际上生成器生成的正是一个迭代器对象实例,该迭代器对象继承了 Iterator 接口,同时也包含了生成器对象自有的接口,具体可以参考 Generator 类的定义以及语法参考。
同时需要注意的是:
一个生成器不可以返回值,这样做会产生一个编译错误。然而 return 空是一个有效的语法并且它将会终止生成器继续执行。
yield 关键字
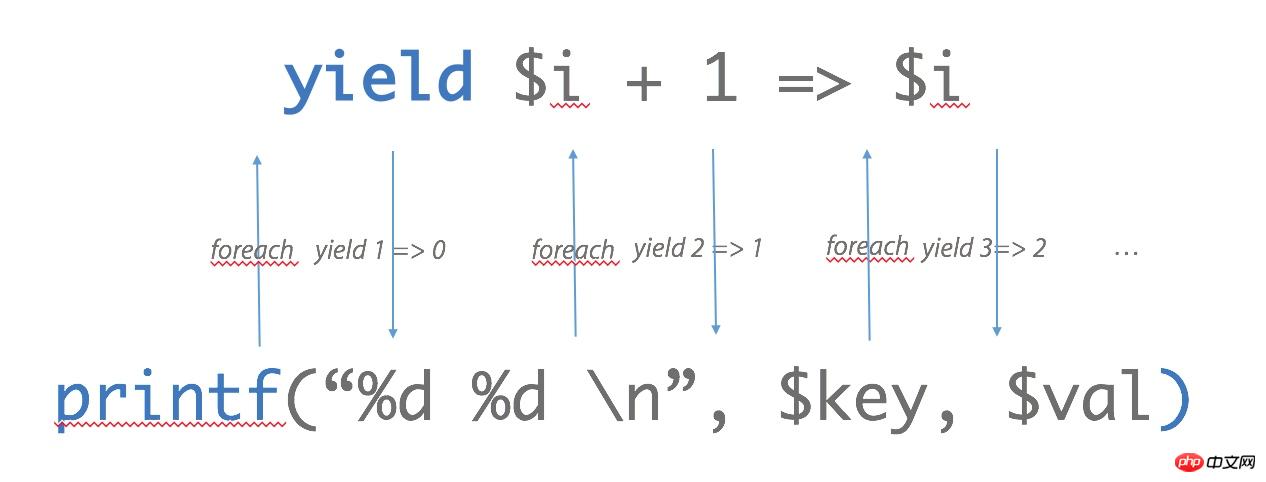
需要注意的是 yield 关键字,这是生成器的关键。通过上面的例子可以看出,yield 会将当前产生的值传递给 foreach,换句话说,foreach 每一次迭代过程都会从 yield 处取一个值,直到整个遍历过程不再能执行到 yield 时遍历结束,此时生成器函数简单的退出,而调用生成器的上层代码还可以继续执行,就像一个数组已经被遍历完了。
yield 最简单的调用形式看起来像一个 return 申明,不同的是 yield 暂停当前过程的执行并返回值,而 return 是中断当前过程并返回值。暂停当前过程,意味着将处理权转交由上一级继续进行,直到上一级再次调用被暂停的过程,该过程又会从上一次暂停的位置继续执行。这像是什么呢?如果之前已经在鸟哥的文章中粗略看过,应该知道这很像操作系统的进程调度,多个进程在一个 CPU 核心上执行,在系统调度下每一个进程执行一段指令就被暂停,切换到下一个进程,这样外部用户看起来就像是同时在执行多个任务。
但仅仅如此还不够,yield 除了可以返回值以外,还能接收值,也就是可以在两个层级间实现双向通信。
来看看如何传递一个值给 yield:
function printer()
{
while (true)
{
printf("receive: %s\n", yield);
}
}
$printer = printer();
$printer->send('hello');
$printer->send('world');
// 输出
receive: hello
receive: world根据 PHP 官方文档的描述可以知道 Generator 对象除了实现 Iterator 接口中的必要方法以外,还有一个 send 方法,这个方法就是向 yield 语句处传递一个值,同时从 yield 语句处继续执行,直至再次遇到 yield 后控制权回到外部。
既然 yield 可以在其位置中断并返回或者接收一个值,那能不能同时进行接收和返回呢?当然,这也是实现协程的根本。对上述代码做出修改:
function printer()
{
$i = 0;
while (true) {
printf("receive: %s\n", (yield ++$i));
}
}
$printer = printer();
printf("%d\n", $printer->current());
$printer->send('hello');
printf("%d\n", $printer->current());
$printer->send('world');
printf("%d\n", $printer->current());
// 输出
1
receive: hello
2
receive: world
3这是另一个例子:
function gen()
{
$ret = (yield 'yield1');
var_dump($ret);
$ret = (yield 'yield2');
var_dump($ret);
}
$gen = gen();
var_dump($gen->current());   // string(6) "yield1"
var_dump($gen->send('ret1')); // string(4) "ret1"   (第一个 var_dump)
                              // string(6) "yield2" (继续执行到第二个 yield,吐出了返回值)
var_dump($gen->send('ret2')); // string(4) "ret2"   (第二个 var_dump)
// NULL (var_dump 之后没有其他语句,所以这次 ->send() 的返回值为 null)current 方法是迭代器 Iterator 接口必要的方法,foreach 语句每一次迭代都会通过其获取当前值,而后调用迭代器的 next 方法。在上述例子里则是手动调用了 current 方法获取值。
上述例子已经足以表示 yield 能够作为实现双向通信的工具,也就是具备了后续实现协程的基本条件。
上面的例子如果第一次接触并稍加思考,不免会疑惑为什么一个 yield 既是语句又是表达式,而且这两种情况还同时存在:
对于所有在生成器函数中出现的 yield,首先它都是语句,而跟在 yield 后面的任何表达式的值将作为调用生成器函数的返回值,如果 yield 后面没有任何表达式(变量、常量都是表达式),那么它会返回 NULL,这一点和 return 语句一致。
yield 也是表达式,它的值就是 send 函数传过来的值(相当于一个特殊变量,只不过赋值是通过 send 函数进行的)。只要调用send方法,并且生成器对象的迭代并未终结,那么当前位置的 yield 就会得到 send 方法传递过来的值,这和生成器函数有没有把这个值赋值给某个变量没有任何关系。
这个地方可能需要仔细品味上面两个 send() 方法的例子才能理解。但可以简单的记住:
任何时候 yield 关键词即是语句:可以为生成器函数返回值;也是表达式:可以接收生成器对象发过来的值。
除了 send() 方法,还有一种控制生成器执行的方法是 next() 函数:
Next(),恢复生成器函数的执行直到下一个 yield
Send(),向生成器传入一个值,恢复执行直到下一个 yield
协程
对于单核处理器,多进程实现多任务的原理是让操作系统给一个任务每次分配一定的 CPU 时间片,然后中断、让下一个任务执行一定的时间片接着再中断并继续执行下一个,如此反复。由于切换执行任务的速度非常快,给外部用户的感受就是多个任务的执行是同时进行的。
多进程的调度是由操作系统来实现的,进程自身不能控制自己何时被调度,也就是说:
进程的调度是由外层调度器抢占式实现的
而协程要求当前正在运行的任务自动把控制权回传给调度器,这样就可以继续运行其他任务。这与『抢占式』的多任务正好相反, 抢占多任务的调度器可以强制中断正在运行的任务, 不管它自己有没有意愿。『协作式多任务』在 Windows 的早期版本 (windows95) 和 Mac OS 中有使用, 不过它们后来都切换到『抢占式多任务』了。理由相当明确:如果仅依靠程序自动交出控制的话,那么一些恶意程序将会很容易占用全部 CPU 时间而不与其他任务共享。
协程的调度是由协程自身主动让出控制权到外层调度器实现的
回到刚才生成器实现 xrange 函数的例子,整个执行过程的交替可以用下图来表示:
协程可以理解为纯用户态的线程,通过协作而不是抢占来进行任务切换。相对于进程或者线程,协程所有的操作都可以在用户态而非操作系统内核态完成,创建和切换的消耗非常低。
简单的说 Coroutine(协程) 就是提供一种方法来中断当前任务的执行,保存当前的局部变量,下次再过来又可以恢复当前局部变量继续执行。
我们可以把大任务拆分成多个小任务轮流执行,如果有某个小任务在等待系统 IO,就跳过它,执行下一个小任务,这样往复调度,实现了 IO 操作和 CPU 计算的并行执行,总体上就提升了任务的执行效率,这也便是协程的意义。
PHP 协程和 yield
PHP 从 5.5 开始支持生成器及 yield 关键字,而 PHP 协程则由 yield 来实现。
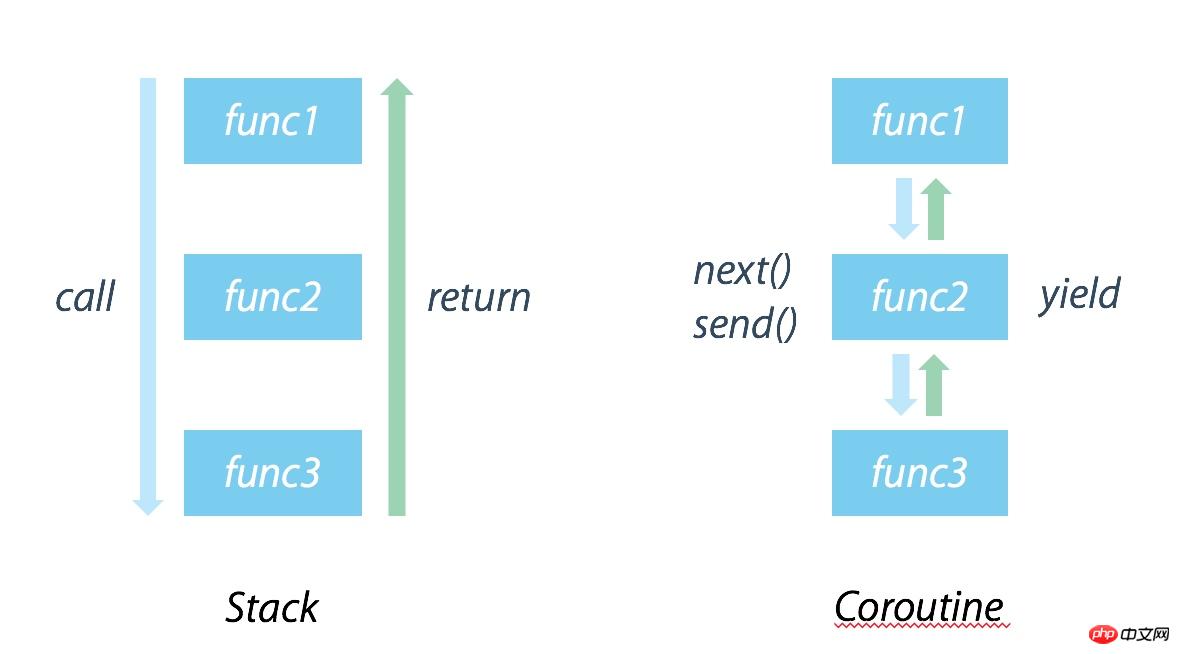
要理解协程,首先要理解:代码是代码,函数是函数。函数包裹的代码赋予了这段代码附加的意义:不管是否显式的指明返回值,当函数内的代码块执行完后都会返回到调用层。而当调用层调用某个函数的时候,必须等这个函数返回,当前函数才能继续执行,这就构成了后进先出,也就是 Stack。
而协程包裹的代码,不是函数,不完全遵守函数的附加意义,协程执行到某个点,协会协程会 yield 返回一个值然后挂起,而不是 return 一个值然后结束,当再次调用协程的时候,会在上次 yield 的点继续执行。
所以协程违背了通常操作系统和 x86 的 CPU 认定的代码执行方式,也就是 Stack 的这种执行方式,需要运行环境(比如 php,python 的 yield 和 golang 的 goroutine)自己调度,来实现任务的中断和恢复,具体到 PHP,就是靠 yield 来实现。
堆栈式调用 和 协程调用的对比:
结合之前的例子,可以总结一下 yield 能做的就是:
实现不同任务间的主动让位、让行,把控制权交回给任务调度器。
通过 send() 实现不同任务间的双向通信,也就可以实现任务和调度器之间的通信。
yield 就是 PHP 实现协程的方式。
协程多任务调度
下面是雄文 Cooperative multitasking using coroutines (in PHP!) 里一个简单但完整的例子,来展示如何具体的在 PHP 里实现协程任务的调度。
首先是一个任务类:
Task
class Task
{
// 任务 IDprotected
$taskId;
// 协程对象protected
$coroutine;
// send() 值protected
$sendVal = null;
// 是否首次 yieldprotected
$beforeFirstYield = true;
public function __construct($taskId, Generator $coroutine) {
$this->taskId = $taskId;
$this->coroutine = $coroutine;
}
public function getTaskId() {
return $this->taskId;
}
public function setSendValue($sendVal) {
$this->sendVal = $sendVal;
}
public function run() {
// 如之前提到的在send之前, 当迭代器被创建后第一次 yield 之前,一个 renwind() 方法会被隐式调用
// 所以实际上发生的应该类似:
// $this->coroutine->rewind();
// $this->coroutine->send();
// 这样 renwind 的执行将会导致第一个 yield 被执行, 并且忽略了他的返回值.
// 真正当我们调用 yield 的时候, 我们得到的是第二个yield的值,导致第一个yield的值被忽略。
// 所以这个加上一个是否第一次 yield 的判断来避免这个问题
if ($this->beforeFirstYield) {
$this->beforeFirstYield = false;
return $this->coroutine->current();
} else {
$retval = $this->coroutine->send($this->sendVal);
$this->sendVal = null;
return $retval;
}
}
public function isFinished() {
return !$this->coroutine->valid();
}
}接下来是调度器,比 foreach 是要复杂一点,但好歹也能算个正儿八经的 Scheduler :)
Scheduler
class Scheduler
{
protected $maxTaskId = 0;
protected $taskMap = []; // taskId => task
protected $taskQueue;
public function __construct() {
$this->taskQueue = new SplQueue();
}
// (使用下一个空闲的任务id)创建一个新任务,然后把这个任务放入任务map数组里. 接着它通过把任务放入任务队列里来实现对任务的调度. 接着run()方法扫描任务队列, 运行任务.如果一个任务结束了, 那么它将从队列里删除, 否则它将在队列的末尾再次被调度。
public function newTask(Generator $coroutine) {
$tid = ++$this->maxTaskId;
$task = new Task($tid, $coroutine);
$this->taskMap[$tid] = $task;
$this->schedule($task);
return $tid;
}
public function schedule(Task $task) {
// 任务入队
$this->queue->enqueue($task);
}
public function run() {
while (!$this->queue->isEmpty()) {
// 任务出队
$task = $this->queue->dequeue();
$task->run();
if ($task->isFinished()) {
unset($this->taskMap[$task->getTaskId()]);
} else {
$this->schedule($task);
}
}
}
}队列可以使每个任务获得同等的 CPU 使用时间,
Demo
function task1() {
for ($i = 1; $i <= 10; ++$i) {
echo "This is task 1 iteration $i.\n";
yield;
}
}
function task2() {
for ($i = 1; $i <= 5; ++$i){
echo "This is task 2 iteration $i.\n";
yield;
}
}
$scheduler = new Scheduler;
$scheduler->newTask(task1());
$scheduler->newTask(task2());
$scheduler->run();输出:
This is task 1 iteration 1.
This is task 2 iteration 1.
This is task 1 iteration 2.
This is task 2 iteration 2.
This is task 1 iteration 3.
This is task 2 iteration 3.
This is task 1 iteration 4.
This is task 2 iteration 4.
This is task 1 iteration 5.
This is task 2 iteration 5.
This is task 1 iteration 6.
This is task 1 iteration 7.
This is task 1 iteration 8.
This is task 1 iteration 9.
This is task 1 iteration 10.
结果正是我们期待的,最初的 5 次迭代,两个任务是交替进行的,而在第二个任务结束后,只有第一个任务继续执行到结束。
协程非阻塞 IO
若想真正的发挥出协程的作用,那一定是在一些涉及到阻塞 IO 的场景,我们都知道 Web 服务器最耗时的部分通常都是 socket 读取数据等操作上,如果进程对每个请求都挂起的等待 IO 操作,那处理效率就太低了,接下来我们看个支持非阻塞 IO 的 Scheduler:
<?php
class Scheduler
{
protected $maxTaskId = 0;
protected $tasks = []; // taskId => task
protected $queue;
// resourceID => [socket, tasks]
protected $waitingForRead = [];
protected $waitingForWrite = [];
public function __construct() {
// SPL 队列
$this->queue = new SplQueue();
}
public function newTask(Generator $coroutine) {
$tid = ++$this->maxTaskId;
$task = new Task($tid, $coroutine);
$this->tasks[$tid] = $task;
$this->schedule($task);
return $tid;
}
public function schedule(Task $task) {
// 任务入队
$this->queue->enqueue($task);
}
public function run() {
while (!$this->queue->isEmpty()) {
// 任务出队
$task = $this->queue->dequeue();
$task->run();
if ($task->isFinished()) {
unset($this->tasks[$task->getTaskId()]);
} else {
$this->schedule($task);
}
}
}
public function waitForRead($socket, Task $task)
{
if (isset($this->waitingForRead[(int)$socket])) {
$this->waitingForRead[(int)$socket][1][] = $task;
} else {
$this->waitingForRead[(int)$socket] = [$socket, [$task]];
}
}
public function waitForWrite($socket, Task $task)
{
if (isset($this->waitingForWrite[(int)$socket])) {
$this->waitingForWrite[(int)$socket][1][] = $task;
} else {
$this->waitingForWrite[(int)$socket] = [$socket, [$task]];
}
}
/**
* @param $timeout 0 represent
*/
protected function ioPoll($timeout)
{
$rSocks = [];
foreach ($this->waitingForRead as list($socket)) {
$rSocks[] = $socket;
}
$wSocks = [];
foreach ($this->waitingForWrite as list($socket)) {
$wSocks[] = $socket;
}
$eSocks = [];
// $timeout 为 0 时, stream_select 为立即返回,为 null 时则会阻塞的等,见 http://php.net/manual/zh/function.stream-select.php
if (!@stream_select($rSocks, $wSocks, $eSocks, $timeout)) {
return;
}
foreach ($rSocks as $socket) {
list(, $tasks) = $this->waitingForRead[(int)$socket];
unset($this->waitingForRead[(int)$socket]);
foreach ($tasks as $task) {
$this->schedule($task);
}
}
foreach ($wSocks as $socket) {
list(, $tasks) = $this->waitingForWrite[(int)$socket];
unset($this->waitingForWrite[(int)$socket]);
foreach ($tasks as $task) {
$this->schedule($task);
}
}
}
/**
* 检查队列是否为空,若为空则挂起的执行 stream_select,否则检查完 IO 状态立即返回,详见 ioPoll()
* 作为任务加入队列后,由于 while true,会被一直重复的加入任务队列,实现每次任务前检查 IO 状态
* @return Generator object for newTask
*
*/
protected function ioPollTask()
{
while (true) {
if ($this->taskQueue->isEmpty()) {
$this->ioPoll(null);
} else {
$this->ioPoll(0);
}
yield;
}
}
/**
* $scheduler = new Scheduler;
* $scheduler->newTask(Web Server Generator);
* $scheduler->withIoPoll()->run();
*
* 新建 Web Server 任务后先执行 withIoPoll() 将 ioPollTask() 作为任务入队
*
* @return $this
*/
public function withIoPoll()
{
$this->newTask($this->ioPollTask());
return $this;
}
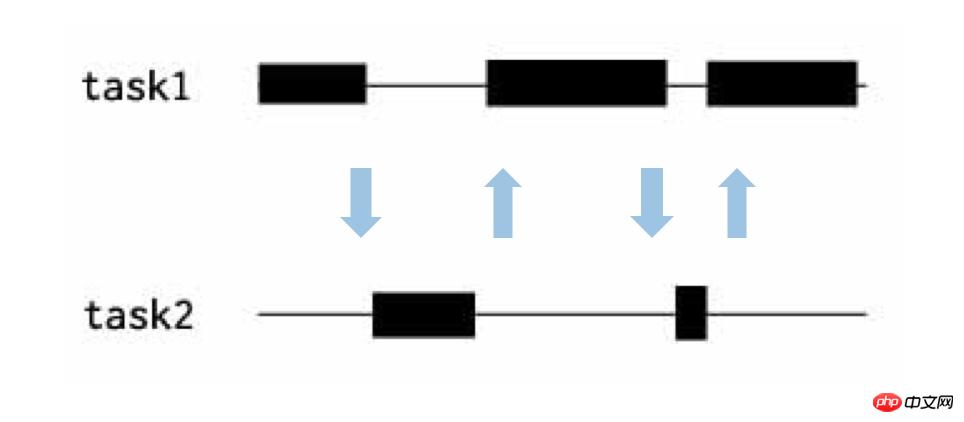
}这个版本的 Scheduler 里加入一个永不退出的任务,并且通过 stream_select 支持的特性来实现快速的来回检查各个任务的 IO 状态,只有 IO 完成的任务才会继续执行,而 IO 还未完成的任务则会跳过,完整的代码和例子可以戳这里。
也就是说任务交替执行的过程中,一旦遇到需要 IO 的部分,调度器就会把 CPU 时间分配给不需要 IO 的任务,等到当前任务遇到 IO 或者之前的任务 IO 结束才再次调度 CPU 时间,以此实现 CPU 和 IO 并行来提升执行效率,类似下图:
单任务改造
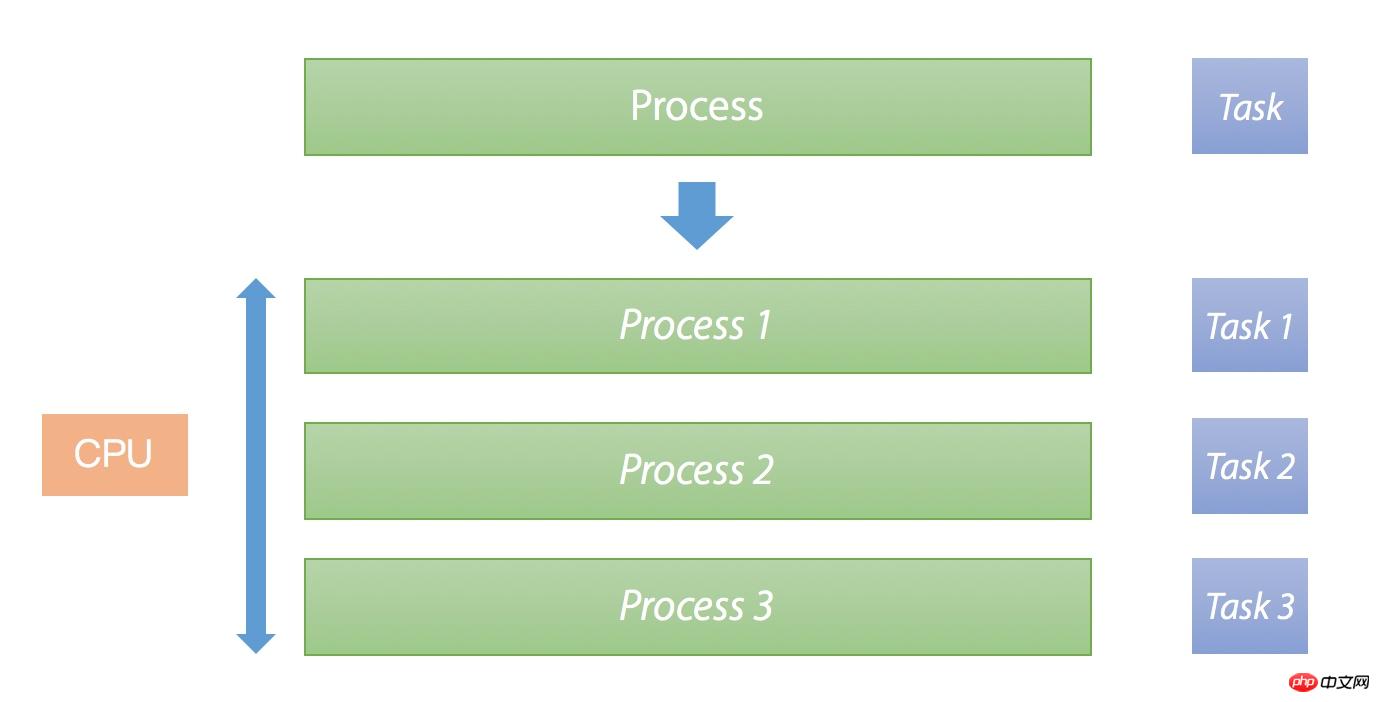
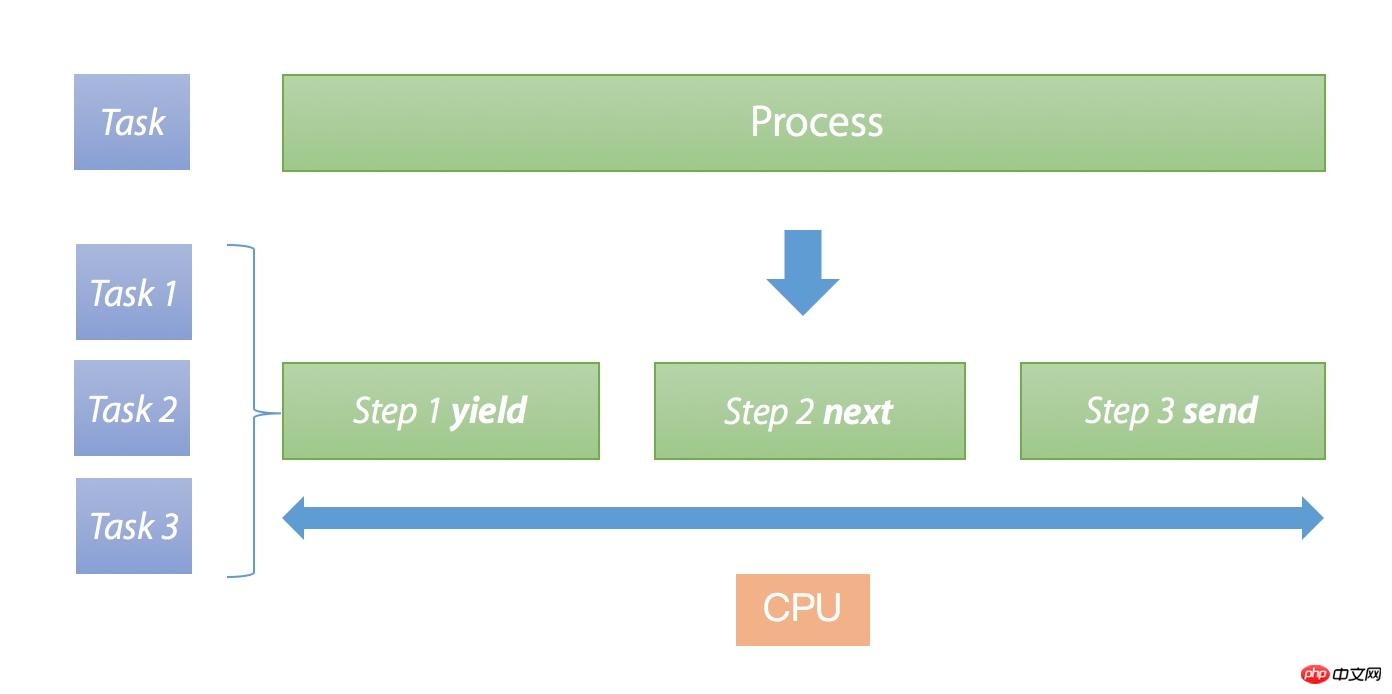
如果想将一个单进程任务改造成并发执行,我们可以选择改造成多进程或者协程:
多进程,不改变任务执行的整体过程,在一个时间段内同时执行多个相同的代码段,调度权在 CPU,如果一个任务能独占一个 CPU 则可以实现并行。
协程,把原有任务拆分成多个小任务,原有任务的执行流程被改变,调度权在进程自己,如果有 IO 并且可以实现异步,则可以实现并行。
多进程改造
协程改造
Coroutines and Go coroutines
Coroutines in PHP or other languages , such as Python, Lua, etc. all have the concept of coroutines, which is somewhat similar to Go coroutines, but there are two differences:
Go coroutines mean parallel (or can be deployed in parallel, you can use runtime .GOMAXPROCS() specifies the number of CPUs that can be used simultaneously), coroutines are generally only concurrent.
Go coroutines communicate through channels channel; coroutines communicate through yield yield and resume operations.
Go coroutine is more powerful than ordinary coroutine, and it is easy to reuse the logic of coroutine into Go coroutine. It is also extremely commonly used in Go development. If you are interested, you can learn about it as Compared.
End
Personally feel that PHP coroutines are inconvenient to implement and apply with bare hands in actual use and the scenarios are limited, but understanding its concepts and implementation principles is helpful A better understanding of concurrency is helpful.
If you want to know more about the actual application scenarios of coroutines, you might as well try the already famous Swoole. It encapsulates the underlying coroutines for clients of multiple protocols, and can almost write it in synchronous programming. Realize the effect of coroutine asynchronous IO.
The above is the detailed content of Detailed explanation of PHP synergy implementation (with code). For more information, please follow other related articles on the PHP Chinese website!

Hot AI Tools

Undresser.AI Undress
AI-powered app for creating realistic nude photos

AI Clothes Remover
Online AI tool for removing clothes from photos.

Undress AI Tool
Undress images for free

Clothoff.io
AI clothes remover

AI Hentai Generator
Generate AI Hentai for free.

Hot Article

Hot Tools

Notepad++7.3.1
Easy-to-use and free code editor

SublimeText3 Chinese version
Chinese version, very easy to use

Zend Studio 13.0.1
Powerful PHP integrated development environment

Dreamweaver CS6
Visual web development tools

SublimeText3 Mac version
God-level code editing software (SublimeText3)

Hot Topics
 Working with Flash Session Data in Laravel
Mar 12, 2025 pm 05:08 PM
Laravel simplifies handling temporary session data using its intuitive flash methods. This is perfect for displaying brief messages, alerts, or notifications within your application. Data persists only for the subsequent request by default: $request-
 cURL in PHP: How to Use the PHP cURL Extension in REST APIs
Mar 14, 2025 am 11:42 AM
The PHP Client URL (cURL) extension is a powerful tool for developers, enabling seamless interaction with remote servers and REST APIs. By leveraging libcurl, a well-respected multi-protocol file transfer library, PHP cURL facilitates efficient execution of various network protocols, including HTTP, HTTPS, and FTP. This extension offers granular control over HTTP requests, supports multiple concurrent operations, and provides built-in security features.
 Simplified HTTP Response Mocking in Laravel Tests
Mar 12, 2025 pm 05:09 PM
Laravel provides concise HTTP response simulation syntax, simplifying HTTP interaction testing. This approach significantly reduces code redundancy while making your test simulation more intuitive. The basic implementation provides a variety of response type shortcuts: use Illuminate\Support\Facades\Http; Http::fake([ 'google.com' => 'Hello World', 'github.com' => ['foo' => 'bar'], 'forge.laravel.com' =>
 12 Best PHP Chat Scripts on CodeCanyon
Mar 13, 2025 pm 12:08 PM
Do you want to provide real-time, instant solutions to your customers' most pressing problems? Live chat lets you have real-time conversations with customers and resolve their problems instantly. It allows you to provide faster service to your custom
 Explain the concept of late static binding in PHP.
Mar 21, 2025 pm 01:33 PM
Article discusses late static binding (LSB) in PHP, introduced in PHP 5.3, allowing runtime resolution of static method calls for more flexible inheritance.Main issue: LSB vs. traditional polymorphism; LSB's practical applications and potential perfo
 PHP Logging: Best Practices for PHP Log Analysis
Mar 10, 2025 pm 02:32 PM
PHP logging is essential for monitoring and debugging web applications, as well as capturing critical events, errors, and runtime behavior. It provides valuable insights into system performance, helps identify issues, and supports faster troubleshoot
 HTTP Method Verification in Laravel
Mar 05, 2025 pm 04:14 PM
Laravel simplifies HTTP verb handling in incoming requests, streamlining diverse operation management within your applications. The method() and isMethod() methods efficiently identify and validate request types. This feature is crucial for building
 Discover File Downloads in Laravel with Storage::download
Mar 06, 2025 am 02:22 AM
The Storage::download method of the Laravel framework provides a concise API for safely handling file downloads while managing abstractions of file storage. Here is an example of using Storage::download() in the example controller:


