Have you noticed when browsing websites that almost every website requires you to register or log in? As a front-end developer, do you know how to make an HTML login page? This article will share with you a cool login page code implemented by HTML and CSS. It has certain practical value. Interested friends can refer to it.
To make this cool login page, you need to use many attributes in CSS, such as box-shadow, display attribute, border-radius rounded corner, hover pseudo-class, etc. If you are unclear, you can read it Read my previous articles, or visit CSS video tutorial, I hope it can help you!
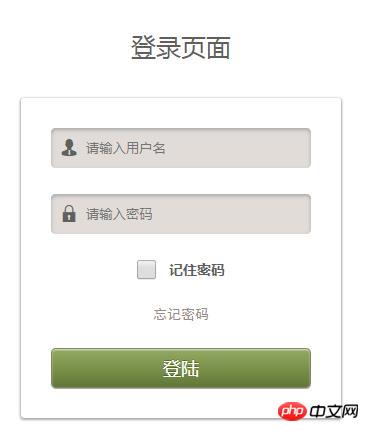
Instance description: Create a cool HTML and CSS login page. When information is entered in the input box, the color of the input box becomes lighter. It also has functions of remembering passwords, forgetting passwords, and logging in. The specific code is as follows:
HTML part:
<div class="wrapper">
<div class="header">登录页面</div>
<form action="" method="post">
<ul>
<li>
<div class="text">
<span class="yonghu"></span><input type="text" placeholder="请输入用户名">
</div>
</li>
<li>
<div class="password">
<span class="mima"></span><input type="password" placeholder="请输入密码">
</div>
</li>
<li class="remember">
<input type="checkbox">记住密码
</li>
<li>
<a href="">忘记密码</a>
</li>
<li>
<input type="button" value="登陆">
</li>
</ul>
</form>
</div>CSS part:
@font-face {
       font-family: 'iconfont';
       src: url('//at.alicdn.com/t/font_1463147324_946932.eot'); /* IE9*/
       src: url('//at.alicdn.com/t/font_1463147324_946932.eot?#iefix') format('embedded-opentype'), /* IE6-IE8 */
       url('http://at.alicdn.com/t/font_1463147324_946932.woff') format('woff'), /* chrome、firefox */
       url('http://at.alicdn.com/t/font_1463147324_946932.ttf') format('truetype'), /* chrome、firefox、opera、Safari, Android, iOS 4.2+*/
       url('//at.alicdn.com/t/font_1463147324_946932.svg#iconfont') format('svg'); /* iOS 4.1- */
   }
   *{margin: 0;padding: 0}
   li{list-style: none;}
   form a{text-decoration: none;}
   html,body {
       background: #fff;
       width: 100%;
       height: 100%;
       display: flex;
       flex-flow: column nowrap;
       justify-content: center;
   }
   .wrapper{text-align: center;}
   .header{
       font-size: 25px;
       font-family: 微软雅黑;
       color: rgb(98,94,91);
   }
   form{
       background: url(input-bg.png);
       width: 260px;
       height: 260px;
       margin: 35px auto;
       padding: 30px;
       box-shadow:0px 1px 2px 1px #aaaaaa,
       inset 0px 1px 1px rgba(255,255,255,0.7);
       border-radius: 3px;
   }
   form ul{
       width: 100%;
       height: 100%;
       text-align: left;
       display: flex;
       flex-flow: column nowrap;
       justify-content: space-between;
   }
   ul li div{
       width: 260px;
       height: 40px;
       background: #e1dcd8;
       color: rgb(98,94,91);
       box-shadow: inset 0px 2px 5px #aaaaaa;
       border-radius: 5px;
       position: relative;
   }
   ul li .yonghu{
       font-family: iconfont;
       position: absolute;
       top: 12px;
       left: 10px;
   }
   ul li .mima{
       font-family: iconfont;
       position: absolute;
       top: 12px;
       left: 10px;
   }
   ul li div input{
       height: 40px;
       width: 190px;
       padding: 0 35px;
       border: none;
       background: #e1dcd8;
       color: rgb(98,94,91);
       box-shadow:
               0px 1px 1px rgba(255,255,255,0.7),
               inset 0px 2px 5px #aaaaaa;
       border-radius: 5px;
   }
   ul li input:focus{
       outline: none;
       background: #f5f2ef;
   }
   ul .remember{
       font-size: 14px;
       font-family: 微软雅黑;
       font-weight: bold;
       color: rgb(98,94,91);
       position: relative;
       display: flex;
       justify-content: center;
   }
   ul .remember input[type*="checkbox"]{
       width: 20px;
       height: 20px;
       vertical-align: super;
       margin-right: 12px;
   }
   .remember label {
       cursor: pointer;
       position: absolute;
       width: 22px;
       height: 22px;
       top: 7px;
       left: 0;
       background: #eee;
       border:1px solid #cccccc;
       border-radius: 4px;

   }
   /*Display the tick inside the checkbox*/
   .remember label:after {
       opacity: 0.4;
       content: '';
       position: absolute;
       width: 12px;
       height: 5px;
       background: transparent;
       top: 6px;
       left: 4px;
       border: 3px solid #74884a;
       border-top: none;
       border-right: none;

       -webkit-transform: rotate(-45deg);
       -moz-transform: rotate(-45deg);
       -o-transform: rotate(-45deg);
       -ms-transform: rotate(-45deg);
       transform: rotate(-45deg);
   }
   /*Create the hover event of the tick*/
   .remember label:hover::after {
       opacity: 0.7;
   }
   /*Create the checkbox state for the tick*/
   .remember input[type=checkbox]:checked + label:after {
       opacity: 1;
       border-color: #74884a;
   }
   ul li a{
       font-size: 14px;
       font-family: 黑体;
       color: rgb(152,142,135);
       display: flex;
       justify-content: center;
   }
   ul li input[type*="button"]{
       width: 100%;
       height: 40px;
       font-family: Arial, Helvetica, sans-serif;
       font-size: 18px;
       color: #ffffff;
       background: -moz-linear-gradient(
               top,
               #94aa64 0%,
               #7a924a 50%,
               #607738);
       background: -webkit-gradient(
               linear, left top, left bottom,
               from(#94aa64),
               color-stop(0.50, #7a924a),
               to(#607738));
       -moz-border-radius: 5px;
       -webkit-border-radius: 5px;
       border-radius: 5px;
       border: 1px solid #7d8862;
       -moz-box-shadow:
               0px 1px 0px rgba(170,170,170,1),
               inset 0px 1px 1px rgba(255,255,255,0.7);
       -webkit-box-shadow:
               0px 1px 0px rgba(170,170,170,1),
               inset 0px 1px 1px rgba(255,255,255,0.7);
       box-shadow:
               0px 1px 0px rgba(170,170,170,1),
               inset 0px 1px 1px rgba(255,255,255,0.7);
       text-shadow:
               0px -1px 0px rgba(000,000,000,0.3),
               0px 0px 0px rgba(255,255,255,0);
   }
   ul li input[type*="button"]:hover{
       opacity: 0.8;
   }
   ul li input[type*="button"]:active{
       width: 100%;
       height: 40px;
       font-family: Arial, Helvetica, sans-serif;
       font-size: 18px;
       color: #ffffff;
       background: -moz-linear-gradient(
               top,
               #607738 0%,
               #7a924a 50%,
               #94aa64 );
       background: -webkit-gradient(
               linear, left top, left bottom,
               from(#607738),
               color-stop(0.50, #7a924a),
               to(#94aa64));
       -moz-border-radius: 5px;
       -webkit-border-radius: 5px;
       border-radius: 5px;
       border: 1px solid #7d8862;
       -moz-box-shadow:
               0px -1px 0px rgba(170,170,170,1),
               inset 0px -1px 1px rgba(255,255,255,0.7);
       -webkit-box-shadow:
               0px -1px 0px rgba(170,170,170,1),
               inset 0px -1px 1px rgba(255,255,255,0.7);
       box-shadow:
               0px -1px 0px rgba(170,170,170,1),
               inset 0px -1px 1px rgba(255,255,255,0.7);
       text-shadow:
               0px 1px 0px rgba(000,000,000,0.3),
               0px 0px 0px rgba(255,255,255,0);
}The effect is as shown in the picture:

The above has shared with you the cool login page code implemented by HTML and CSS. It may be difficult for beginners. This example is a comprehensive application of HTML and CSS knowledge, so you must lay a solid foundation. I hope This tutorial will help you!
【Recommended related tutorials】
1. HTML tutorial
2. CSS3 tutorial
3. bootstrap tutorial
The above is the detailed content of Share the cool login page code implemented in HTML and CSS. For more information, please follow other related articles on the PHP Chinese website!