 Java
Java
 javaTutorial
 Installation and configuration tutorial of hadoop cluster server (picture and text)
Installation and configuration tutorial of hadoop cluster server (picture and text)
The content of this article is about the installation and configuration tutorial (pictures and text) of the hadoop cluster server. It has certain reference value. Friends in need can refer to it. I hope it will be helpful to you.
The virtual machine and Linux system installation methods have been introduced in detail in the previous two sharings, and each step has been illustrated with pictures. If there are friends who still can’t understand, then there’s nothing I can do to help. This article mainly explains in detail the configuration of the Hadoop server operating system. Hadoop installation will be introduced in detail in the next article.
The hadoop installation package uses the DKHadoop distribution. Personally, I think the installation process of DKHadoop is relatively simple. I will introduce the installation of dkhadoop in detail in the next sharing. Let’s move on to the topic of this article - server operating system configuration tutorial
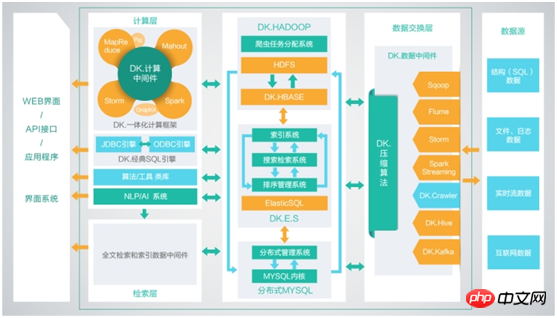
1. Installation package preparation
1. Virtual machine distributed installation (Three or more virtual machines)
If it is a personal computer Windows system or Linux system, and there are three virtual servers on the virtual machine, copy the installation package to the server and perform the installation operation.
2. Physical cluster (three or more physical servers)
1. External network download mode
2. Local file mode
Copy the installation package file directly to the root directory of the physical server for installation. Just do it.
3. Upload mode
This mode is applied when the server is in the computer room and there are no display and input devices.
Now install the file on the local computer (the default is a laptop, in the computer room), connect the computer to the server, and upload the installation package install and DKHInstall to the server root directory.
2. Server operating system configuration tutorial
After the preparation is completed, the server configuration operation must be performed. First, the three servers must ping each other. The so-called ping means that the network between the two devices is connected. If a data packet is sent from one end and received by the other end, it means that the two devices can ping.
1. Modify permissions
Purpose: Make the two installation packages install and DKHInstall have executable permissions. Insufficient permissions to perform some operations. Inside install is the script and all components, and inside DKHInstall is the installation interface.
Steps: After copying the installation package install and DKHInstall to the main node directory during preparation, modify the file permissions. First, enter the root directory, and change the permissions of the installation directories install and DKHInstall to: the file owner can read, write, and execute, other users who belong to the same user group as the file owner can read and execute, and other user groups can read and execute.
Command:
cd /root/
unzip DKHPlantform.zip
chmod -R 755 DKHPlantform
2. Build a Hadoop cluster and set up SSH password-free login
Purpose: Hadoop operation The remote Hadoop daemon process needs to be managed during the process. After Hadoop is started, the NameNode starts and stops various daemon processes on each DataNode through SSH (Secure Shell). This requires that you do not need to enter a password when executing instructions between nodes, so we need to configure SSH to use passwordless public key authentication, so that the NameNode uses SSH to log in without a password and start the DataName process. In the same principle, on the DataNode You can also use SSH to log in to the NameNode without a password.
Steps:
(1) Modify the local hosts file and write the corresponding relationship
In order to distinguish each host in the LAN, a host name will be assigned to the host, and each host will be connected through IP Communicate, but the IP address is not convenient to remember, so configuring the host name and IP mapping can achieve quick and convenient access between hosts.
Command:
vi /etc/hosts
Enter the editing mode by pressing the insert or I key on the keyboard. After editing, press the Esc key and then press the Shift: key, enter wq, and then return The car can be saved. Enter q! Press Enter to give up saving and exit.
After entering the edit mode, write the corresponding relationship between the host and the IP according to the rules (the host name dk41 is named by yourself, as shown below) Example:
192.168.1.41 dk41
192.168 .1.42 dk42
192.168.1.43 dk43
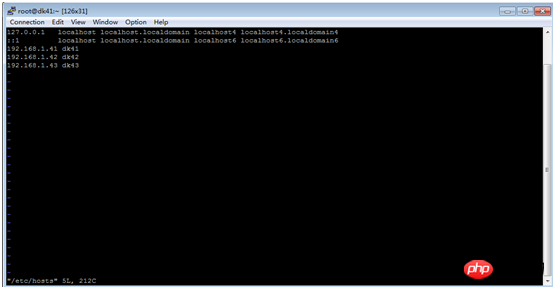
After editing, save and exit. Copy the corresponding relationship to two or more other machines.
Command:
scp -r /etc/hosts 192.168.1.42:/etc
scp -r /etc/hosts 192.168.1.43:/etc
(2) Before executing the password-free operation between clusters Preparation work
When executing the sshpass.sh script, it will read the two files sshhosts and sshslaves, replace
Modify the file sshhosts, enter the host names of all machines, one host name per line (as shown below)
Command:
vi /root/DKHPlantform/autossh/sshhosts
Enter the editing mode by pressing the insert or I key on the keyboard. After editing, press the Esc key and then press the Shift: key and enter wq , then press Enter to save. Enter q! Press Enter to give up saving and exit.
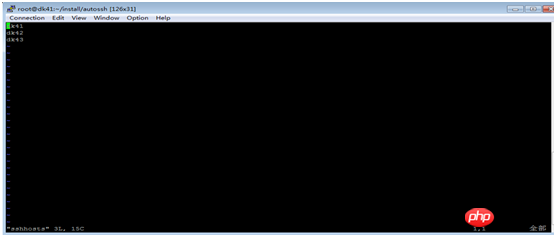
Modify the file sshslaves and write all machine names except the host name (as shown below)
Command:
vi /root/DKHPlantform /autossh/sshslaves
Enter the editing mode by pressing the insert or I key on the keyboard. After editing, press the Esc key and then press the Shift: key, enter wq, and press Enter to save. Enter q! Press Enter to give up saving and exit.
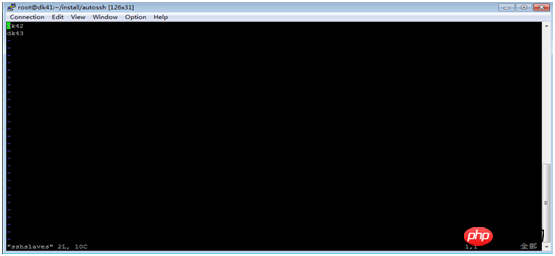
(3) Execute cluster password-free work
Command:
cd /root /DKHPlantform/autossh
./autossh Master node host name cluster password
Example: ./autossh dk41 123456
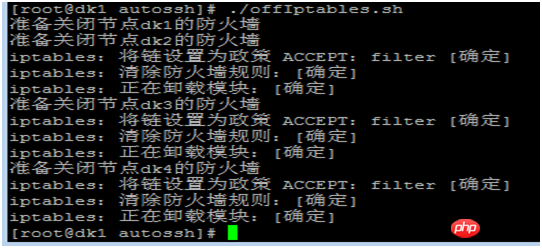
(4) Turn off the firewall
To prevent certain services from being intercepted when accessing the server, the firewall needs to be turned off .
Command:
cd /root/DKHPlantform/autossh
./offIptables.sh
Purpose: Store Hive metadata
Steps:
(1) Distribute the mySQL installation directory from the primary node to the second node
Command:
scp -r /root/DKHPlantform /mysqlInst/ 192.168.1.42:/root/
(2) Master node execution:
Command: Execution:
Command:
cd /root/mysqlInst/
./mysql.sh 2
(3) After successful execution, perform hot backup (must be executed on both machines, both IP exchange, write 42 above 41, write 41 above 42, the password is MySQL. The password is: 123456. It has been set in the platform, please do not modify it):
Command:
source /etc/profile
4. Create database
Purpose: MySQL is a relational database management system, and the relational database saves data in different tables , increased speed and improved flexibility.
Steps:
(1) Import the MySQL data table and execute it only on the main node:
Command:
mysql -uroot -p123456 For example: mysql -uroot -p123456 /DKHPlantform/dkh.sql
(2) After execution, check whether the data tables of the two mysqls exist, and check and execute from the master node:
Command:
mySQL -uroot -p123456
show databases;
use dkh;
show tables;
5. Start the installation 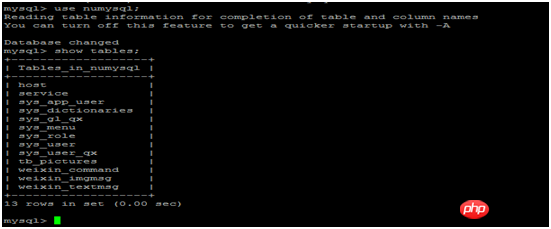 Purpose: After the server configuration operation is completed, start DKH. Steps: Execute the following commands.
cd /root/DKHPlantform/dkh-tomcat*/bin/
./startup.sh
6. Steps to build local time server
There is no Internet connection or the time is not available when installing the system Synchronization requires setting up a local time server.
(1) Build an intranet ntp server
Modify /etc/ntp.conf
Command:
Vim /etc/ntp.conf
By pressing the insert or I key on the keyboard Enter the editing mode. After editing, press the Esc key and then press the Shift: key. Enter wq and press Enter to save. Enter q! Press Enter to give up saving and exit.
Modify the following three lines:
server 0.centos.pool.ntp.org
server 1.centos.pool.ntp.org
server 2.centos.pool.ntp.org
Add the following two lines at the end of the file:
server 127.127.1.0fudge 127.127.1.0 stratum 10
( 2) Start the ntp serviceservice ntpd start
(3) Automatically start at boot
chkconfig ntpd on
(4) Client synchronization time
Command:
Vim /etc/ntp. conf
Enter the editing mode by pressing the insert or I key on the keyboard. After editing, press the Esc key and then press the Shift: key, enter wq, and press Enter to save. Enter q! Press Enter to give up saving and exit.
Add a line at the end of the file:
/15
* root ntpdate 192.168.27.35;hwclock -w
The above is the detailed content of Installation and configuration tutorial of hadoop cluster server (picture and text). For more information, please follow other related articles on the PHP Chinese website!

Hot AI Tools

Undresser.AI Undress
AI-powered app for creating realistic nude photos

AI Clothes Remover
Online AI tool for removing clothes from photos.

Undress AI Tool
Undress images for free

Clothoff.io
AI clothes remover

AI Hentai Generator
Generate AI Hentai for free.

Hot Article

Hot Tools

Notepad++7.3.1
Easy-to-use and free code editor

SublimeText3 Chinese version
Chinese version, very easy to use

Zend Studio 13.0.1
Powerful PHP integrated development environment

Dreamweaver CS6
Visual web development tools

SublimeText3 Mac version
God-level code editing software (SublimeText3)

Hot Topics
 Square Root in Java
Aug 30, 2024 pm 04:26 PM
Guide to Square Root in Java. Here we discuss how Square Root works in Java with example and its code implementation respectively.
 Perfect Number in Java
Aug 30, 2024 pm 04:28 PM
Guide to Perfect Number in Java. Here we discuss the Definition, How to check Perfect number in Java?, examples with code implementation.
 Random Number Generator in Java
Aug 30, 2024 pm 04:27 PM
Guide to Random Number Generator in Java. Here we discuss Functions in Java with examples and two different Generators with ther examples.
 Weka in Java
Aug 30, 2024 pm 04:28 PM
Guide to Weka in Java. Here we discuss the Introduction, how to use weka java, the type of platform, and advantages with examples.
 Armstrong Number in Java
Aug 30, 2024 pm 04:26 PM
Guide to the Armstrong Number in Java. Here we discuss an introduction to Armstrong's number in java along with some of the code.
 Smith Number in Java
Aug 30, 2024 pm 04:28 PM
Guide to Smith Number in Java. Here we discuss the Definition, How to check smith number in Java? example with code implementation.
 Java Spring Interview Questions
Aug 30, 2024 pm 04:29 PM
In this article, we have kept the most asked Java Spring Interview Questions with their detailed answers. So that you can crack the interview.
 Break or return from Java 8 stream forEach?
Feb 07, 2025 pm 12:09 PM
Java 8 introduces the Stream API, providing a powerful and expressive way to process data collections. However, a common question when using Stream is: How to break or return from a forEach operation? Traditional loops allow for early interruption or return, but Stream's forEach method does not directly support this method. This article will explain the reasons and explore alternative methods for implementing premature termination in Stream processing systems. Further reading: Java Stream API improvements Understand Stream forEach The forEach method is a terminal operation that performs one operation on each element in the Stream. Its design intention is


