 Web Front-end
 CSS Tutorial
 Explanation of common problems with display attribute and border attribute in css
Explanation of common problems with display attribute and border attribute in css
This article brings you an explanation of common problems with the display attribute and border attribute in CSS. It has certain reference value. Friends in need can refer to it. I hope it will be helpful to you.
Because HTML rarely has too complex problems, I will just write an article about common questions and answers about CSS~The difference between display: none; and visibility:hidden;
Simply put:
display: none; will no longer occupy space, just like it does not exist.
visibility:hidden; just changes the transparency to 0 and still occupies its space.
The difference between inline, inline-block and block
First of all, it must be clear that each label has its default display attribute value. For example:
The tag defaults to display: inline;
However, the default value can be overridden . That is, you can set display: inline; for the
Let’s talk about the difference next:

For display: block;
It occupies one line, that is, no other elements are allowed around it.
The width and height can be set.
When the width is not set, its width will be full.
The top, bottom, left, and right padding and margin will all work (the role here means that it can increase the distance from other elements).
For display: inline;
It will not occupy a line alone and can allow other elements to be around it.
The width and height are supported by the content, and setting width and height is invalid.
The left and right margins and padding can create distance, but the upper and lower margins and padding cannot.
For more information, please click here.
For display: inline-block;
It is like a combination of inline and block.
Allows other elements to be placed around it.
The width and height can be set.
Focus on explaining the padding-top or padding-bottom of inline. When setting these two values for the inline element, padding is actually added. When setting the background color, you can clearly see that the background color acts on the padding, but it does not increase the distance from the element below. .
The code is as follows:
<span>block1</span>
<span>block2</span>
<div>block3</div>

.block1 {
  background-color: lightblue;
  width: 100px; // 无效
  height: 500px; //无效
  margin-right: 20px;
  margin-bottom: 20px; // 无法拉开距离
  padding-left: 10px;
  padding-bottom: 10px; // 无法拉开距离
}

.block2 {
  display: inline-block;
  width: 300px; // 可以起作用
  background-color: lightgray;
}
.block3 {
  background-color: red;
}The picture is as follows:

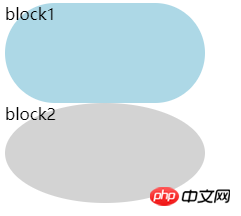
##border-radius: 999px; and border-radius : 50%; correct understanding.
Look at the code first:<div>block1</div>
<div>block2</div>
.block1 {
width: 200px;
height: 100px;
background-color: lightblue;
border-radius: 999px;
}
.block2 {
width: 200px;
height: 100px;
background-color: lightgray;
border-radius: 50%;
}

L is the side length, S is the sum of the values in the two directions set by border-radius, if f = min (L / s) is less than 1, the border-radius must be multiplied by f to reduce it. Take the above code as an example, because the minimum side is 100px and s is 999px 999px, so f = 100 / (999 999) is less than 1, so border-radius must be multiplied by f, and we get border-radius: 999px ; Equivalent to border-radius: 50px; therefore becomes the runway shape in block1.


Summary:
- border-radius: 50px; equivalent to border-radius: 50px/50px;
has two directions.
通常,50%的radius用的比较多,常用来设置圆形的头像,对一个正方形元素设置border-radius: 50%;即可实现。
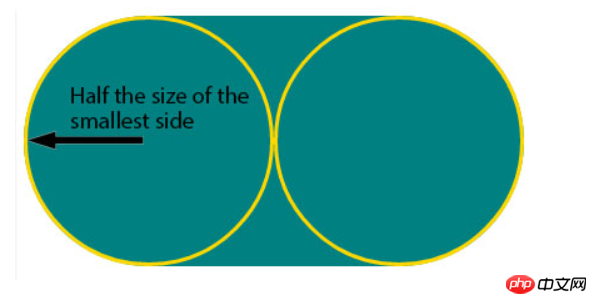
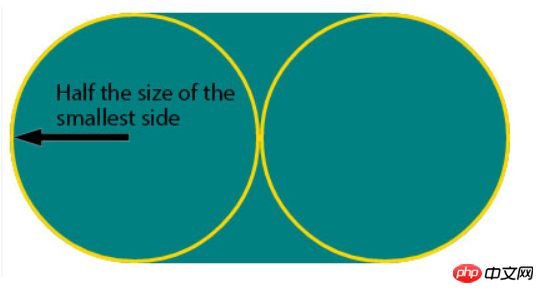
当border-radius非常大时,会产生交叠,导致要一起缩小,缩小至
最短边的一半。
margin和padding的区别,何时用哪个?
区别:
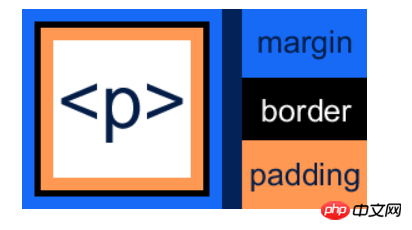
首先,以border为界,margin在border之外,padding在border里。

其次,背景色会作用在padding上,不会作用到margin上。
margin在垂直方向上可能会出现合并的问题(具体可搜索margin坍塌或者外边距合并)
我的用法:
通常情况下,我会这样用:
在需要拉开内部元素与父元素的距离时,在父元素上加padding
在需要拉开元素和元素之间的距离时,用margin
<div>
  <div>son1</div>
  <div>son2</div>
</div>

.container {
  background-color: lightblue;
  padding: 10px;
}
.son1 {
  margin-bottom: 10px;
  background-color: orange;
}
.son2 {
  background-color: lightgray;
}
The above is the detailed content of Explanation of common problems with display attribute and border attribute in css. For more information, please follow other related articles on the PHP Chinese website!

Hot AI Tools

Undresser.AI Undress
AI-powered app for creating realistic nude photos

AI Clothes Remover
Online AI tool for removing clothes from photos.

Undress AI Tool
Undress images for free

Clothoff.io
AI clothes remover

AI Hentai Generator
Generate AI Hentai for free.

Hot Article

Hot Tools

Notepad++7.3.1
Easy-to-use and free code editor

SublimeText3 Chinese version
Chinese version, very easy to use

Zend Studio 13.0.1
Powerful PHP integrated development environment

Dreamweaver CS6
Visual web development tools

SublimeText3 Mac version
God-level code editing software (SublimeText3)

Hot Topics
 1378
1378
 52
52
 How to write split lines on bootstrap
Apr 07, 2025 pm 03:12 PM
There are two ways to create a Bootstrap split line: using the tag, which creates a horizontal split line. Use the CSS border property to create custom style split lines.
 How to insert pictures on bootstrap
Apr 07, 2025 pm 03:30 PM
There are several ways to insert images in Bootstrap: insert images directly, using the HTML img tag. With the Bootstrap image component, you can provide responsive images and more styles. Set the image size, use the img-fluid class to make the image adaptable. Set the border, using the img-bordered class. Set the rounded corners and use the img-rounded class. Set the shadow, use the shadow class. Resize and position the image, using CSS style. Using the background image, use the background-image CSS property.
 How to resize bootstrap
Apr 07, 2025 pm 03:18 PM
To adjust the size of elements in Bootstrap, you can use the dimension class, which includes: adjusting width: .col-, .w-, .mw-adjust height: .h-, .min-h-, .max-h-
 The Roles of HTML, CSS, and JavaScript: Core Responsibilities
Apr 08, 2025 pm 07:05 PM
HTML defines the web structure, CSS is responsible for style and layout, and JavaScript gives dynamic interaction. The three perform their duties in web development and jointly build a colorful website.
 How to use bootstrap in vue
Apr 07, 2025 pm 11:33 PM
Using Bootstrap in Vue.js is divided into five steps: Install Bootstrap. Import Bootstrap in main.js. Use the Bootstrap component directly in the template. Optional: Custom style. Optional: Use plug-ins.
 How to set up the framework for bootstrap
Apr 07, 2025 pm 03:27 PM
To set up the Bootstrap framework, you need to follow these steps: 1. Reference the Bootstrap file via CDN; 2. Download and host the file on your own server; 3. Include the Bootstrap file in HTML; 4. Compile Sass/Less as needed; 5. Import a custom file (optional). Once setup is complete, you can use Bootstrap's grid systems, components, and styles to create responsive websites and applications.
 How to use bootstrap button
Apr 07, 2025 pm 03:09 PM
How to use the Bootstrap button? Introduce Bootstrap CSS to create button elements and add Bootstrap button class to add button text
 How to view the date of bootstrap
Apr 07, 2025 pm 03:03 PM
Answer: You can use the date picker component of Bootstrap to view dates in the page. Steps: Introduce the Bootstrap framework. Create a date selector input box in HTML. Bootstrap will automatically add styles to the selector. Use JavaScript to get the selected date.


